
Table of Contents >> Show >> Hide
- What Are Blini, Exactly?
- How to Make Blini Gluten-Free (Without Losing the Magic)
- Gluten-Free Blini Ingredients
- Ingredient Swaps and Dietary Options
- Step-by-Step: Gluten-Free Blini Recipe
- Quick “Authentic-Style” Option: Yeasted Buckwheat Blini
- Topping Ideas (Savory and Sweet)
- Pro Tips for Light, Tender Gluten-Free Blini
- Troubleshooting
- Make-Ahead, Storage, and Reheating
- FAQ
- Kitchen Reality: What Making Gluten-Free Blini Feels Like ( of Experience)
Blini are the tiny, fancy cousins of pancakesthe kind that show up at parties wearing a little dill hat and acting like they own the charcuterie board.
Traditionally, blini are associated with Russian and Eastern European cooking and are often served with savory toppings like smoked salmon, sour cream, and caviar.
The classic versions are commonly made with wheat flour (sometimes alongside buckwheat) and can be yeast-raised, which is great… unless you’re avoiding gluten.
The good news: you can make gluten-free blini that are tender, lightly springy, and sturdy enough to hold toppings without collapsing into a sad little pancake puddle.
This recipe leans on buckwheat flour (which is naturally gluten-free), a touch of starch for bounce, and a quick lift from baking powder for reliable fluff.
You’ll get the “blini vibe” without needing a culinary time machineor a second mortgage for specialty ingredients.
What Are Blini, Exactly?
Think of blini as small, appetizer-sized pancakes. In many U.S. kitchens, “blini” usually means mini rounds served as party bites.
In traditional contexts, blini can be larger and sometimes made with a yeast-raised batter, often featuring buckwheat for an earthy, nutty flavor.
In other words: blini can be thin or fluffy, big or smallbut they’re nearly always designed for toppings.
How to Make Blini Gluten-Free (Without Losing the Magic)
Gluten-free baking is basically teamwork. Since you’re not relying on gluten to provide structure and chew, you need a combination of ingredients that each do a job:
- Buckwheat flour: Provides flavor, color, and a hearty “real blini” vibe (and yes, it’s gluten-free despite the word “wheat” in the name).
- Starch (tapioca or cornstarch): Adds lightness and a gentle elasticity so your blini don’t crumble when topped.
- Egg: Helps bind and gives the batter strength (no egg? We’ll cover swaps).
- Buttermilk or yogurt/sour cream: Adds tang and tenderness, plus helps the texture feel richerlike a special occasion pancake, not a compromise pancake.
- Baking powder: The quick, dependable lift that keeps blini party-ready even when your schedule is not.
A quick safety note for gluten-free kitchens
If you’re cooking for someone with celiac disease or high sensitivity, “gluten-free ingredients” aren’t the whole storycross-contact matters.
Use clean bowls and utensils, avoid shared condiment jars that may have breadcrumbs, and be cautious with flour dust in shared kitchens.
Also, buy gluten-free flours and grains that are labeled gluten-free (and skip bulk bins for gluten-free staples if cross-contact is a concern).
Gluten-Free Blini Ingredients
Dry ingredients
- 3/4 cup buckwheat flour
- 1/4 cup tapioca starch (or cornstarch)
- 1 1/2 teaspoons baking powder
- 1/2 teaspoon fine salt
- 1 teaspoon sugar (optional, but helps browning)
Wet ingredients
- 1 large egg
- 3/4 cup buttermilk (or plain kefir)
- 2 tablespoons sour cream or plain Greek yogurt
- 1 tablespoon melted butter (or neutral oil)
- 1/2 teaspoon vanilla (optionalgreat if you’ll do sweet toppings)
For cooking
- Neutral oil or butter for the pan
Optional add-ins (choose your adventure)
- 1 tablespoon finely chopped fresh dill or chives (savory route)
- 1/4 teaspoon garlic powder (savory route)
- 1/2 teaspoon cinnamon (sweet route)
- Freshly ground black pepper (savory route)
Ingredient Swaps and Dietary Options
Dairy-free
Swap buttermilk for an unsweetened plant milk (almond, soy, oat, or rice) mixed with 2 teaspoons lemon juice or apple cider vinegar.
Use a dairy-free yogurt instead of sour cream, and use oil instead of butter.
Your blini will be slightly less tangy, but still tender and snackable.
Egg-free
For an egg-free version, try a “flax egg” (1 tablespoon ground flaxseed + 3 tablespoons warm water, rested 5 minutes).
Texture will be a bit more delicate, so cook gently and keep the blini slightly thicker.
Oat flour option (only if certified gluten-free)
Want a softer, more “pancake-y” blini? You can replace 2 tablespoons of buckwheat flour with oat flour
but only use certified gluten-free oats/oat flour if gluten cross-contact is a concern.
Important note about buckwheat allergies
Buckwheat is gluten-free, but it can be an allergen for some people. If anyone you’re serving has known seed or grain allergies,
it’s worth double-checking before you go all-in on buckwheat blini.
Step-by-Step: Gluten-Free Blini Recipe
1) Mix the dry ingredients
In a medium bowl, whisk together the buckwheat flour, tapioca starch, baking powder, salt, and sugar.
Whisking well helps distribute the baking powder evenly, which means more consistent puff and fewer “why is this one flat?” moments.
2) Mix the wet ingredients
In a separate bowl (or a large measuring cup), whisk the egg, buttermilk, sour cream, and melted butter until smooth.
3) Combinegently
Pour the wet mixture into the dry mixture. Stir with a spoon or spatula until just combined.
The batter should be thick but spoonablelike a soft scoop of yogurt, not like water and not like cement.
A few small lumps are fine (and often better than overmixing).
4) Rest the batter (don’t skip this)
Let the batter rest for 15 minutes at room temperature. This gives gluten-free flours time to hydrate,
thickens the batter slightly, and improves tenderness.
If your kitchen is busy and chaotic, think of this as the batter taking a deep breath before the party starts.
5) Cook the blini
Heat a nonstick skillet or well-seasoned cast iron pan over medium heat.
Add a small amount of oil or butter and swirl to coat lightly.
Use a tablespoon measure (or a small cookie scoop) to portion batter onto the skillet.
Aim for 1 tablespoon per blini for classic party size.
Cook 1 to 2 minutes, until small bubbles form and the edges look set.
Flip and cook another 45 to 75 seconds, until the underside is golden and the blini spring back lightly when touched.
Transfer to a plate and repeat, adding a tiny bit more oil as needed.
6) Keep warm (optional but helpful)
If you’re making a big batch, keep finished blini warm in a 200°F oven on a baking sheet while you cook the rest.
Quick “Authentic-Style” Option: Yeasted Buckwheat Blini
Want a more traditional, slightly tangy flavor and a delicate, airy crumb? Try a yeasted version:
- Replace baking powder with 1 teaspoon active dry yeast.
- Warm the buttermilk/kefir slightly (lukewarm, not hot), then whisk in yeast and let sit 5 minutes.
- Mix batter as above, then let it rise 45–60 minutes until slightly puffy.
- Cook on medium-low so the blini set without overbrowning.
Yeasted blini are excellent for savory toppings and feel extra speciallike your snack suddenly got a fancy accent.
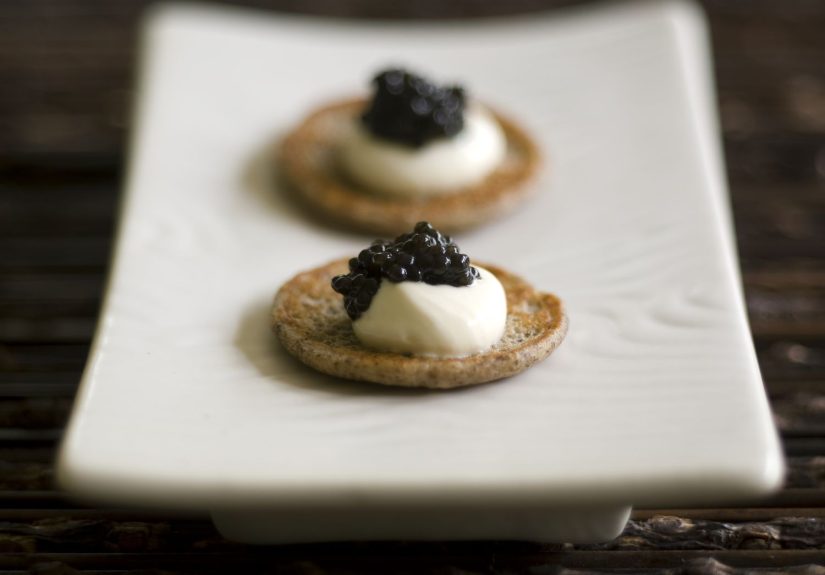
Topping Ideas (Savory and Sweet)
Classic savory blini board
- Smoked salmon + sour cream + dill
- Salmon or trout roe + crème fraîche + chives
- Cucumber ribbons + herbed cream cheese + lemon zest
- Roast beef + horseradish cream + pickled onions
- Sautéed mushrooms + thyme + a tiny smear of goat cheese
Sweet blini (brunch dessert energy)
- Berry jam + whipped cream
- Honey + Greek yogurt + toasted nuts
- Nut butter + banana slices + cinnamon
- Chocolate-hazelnut spread + strawberries
Tip: Keep toppings dry-ish. If you put a watery topping directly on the blini and let it sit, you’ll eventually create
a tiny pancake sponge. Delicious, but structurally questionable.
Pro Tips for Light, Tender Gluten-Free Blini
- Rest matters: That 15-minute batter rest improves hydration and texture.
- Keep the batter thick: Thin batter spreads and makes blini fragile. If needed, add 1–2 tablespoons extra buckwheat flour.
- Don’t crank the heat: Medium heat gives the center time to cook without scorching the outside.
- Wipe the pan occasionally: If butter solids brown too much, wipe the skillet and add fresh fat.
- Make them uniform: A tablespoon scoop helps you get consistent, party-ready circles.
Troubleshooting
My blini are gummy in the middle
The pan may be too hot (browning outside before the center sets) or the blini may be too thick.
Lower the heat slightly and cook a little longer per side.
My blini fall apart when topped
Batter may be too thin or undercooked. Thicken the batter with a tablespoon of buckwheat flour and ensure the first side is fully set before flipping.
My blini taste bitter
Too much baking powder or an old tin can cause bitterness. Measure carefully and replace baking powder if it’s been living in the pantry since the last presidential administration.
My blini are pale
Add the optional teaspoon of sugar, ensure the pan is properly preheated, and use a little butter for better browning.
Make-Ahead, Storage, and Reheating
Blini are surprisingly make-ahead friendlywhich is great because nobody wants to be flipping pancakes while guests are already dipping into the good olives.
- Refrigerate: Cool completely, then store in an airtight container up to 3 days.
- Freeze: Freeze in a single layer on a baking sheet, then transfer to a freezer bag. Store up to 2 months.
- Reheat: Warm in a 300°F oven for 6–10 minutes, or briefly in a skillet over low heat. Microwave works, but can soften edges.
FAQ
Is buckwheat actually gluten-free?
Yespure buckwheat is naturally gluten-free and isn’t related to wheat. The main concern is cross-contact during processing,
so look for buckwheat flour that’s labeled gluten-free if you need strict gluten-free.
Are blini the same as crepes?
Not exactly. Crepes are usually thin and un-leavened. Blini are often leavened (with yeast or baking powder) and can be slightly thicker,
especially when made as mini rounds.
Can I make the batter the night before?
For the quick baking-powder version, it’s best the same day for maximum lift.
If you want an overnight option, use the yeasted variation and refrigerate the batter after it starts to rise.
How many blini does this recipe make?
Using 1 tablespoon batter per blini, you’ll get about 24–30 mini blini, depending on how generous your “tablespoon” is.
Kitchen Reality: What Making Gluten-Free Blini Feels Like ( of Experience)
The first time you make gluten-free blini, it’s normal to hover over the pan like a scientist watching a tiny edible experiment.
You’ll drop that first spoonful of batter, stare at it, and wonder: “Is it spreading too much? Is it too thick? Is it doing… anything?”
That’s the blini rite of passage. The good news is that blini give quick feedbacklike a friendly teacher, not the kind who assigns surprise quizzes.
Here’s what you’ll likely notice in a real home kitchen: the batter looks thicker after the 15-minute rest. That’s not a problem; that’s the plan.
Gluten-free flours are thirsty, and that rest is them finally getting a proper drink of liquid instead of trying to hydrate mid-flip.
When the batter thickens slightly, it holds its shape better in the skillet, which makes blini sturdier and more “topping-worthy.”
If you skip the rest, the batter can cook up a bit unevenlystill tasty, but more fragile, like it’s not emotionally ready for smoked salmon.
The second thing you’ll notice is that heat control matters more than you expect. Medium heat is the sweet spot.
If you go too hot, the blini will brown fast on the outside while the center stays a little underdone.
You’ll flip them, feel proud, top them, and then discover the middle is doing a gummy impression. If that happens, dial the heat down and extend the cooking time slightly.
You’re not failing; you’re just discovering that your stove has opinions.
If you’re cooking for guests, the most satisfying moment is when you realize blini are basically a hosting cheat code.
You can stack them like edible coasters and build a topping station that makes everyone feel like they’re at a brunch bar
even if you’re wearing sweatpants and the “brunch bar” is your cutting board.
People love customizing: a swirl of sour cream here, a sprinkle of chives there, a little salmon rose that someone will absolutely photograph.
Meanwhile, you’re quietly thrilled because you didn’t have to cook eggs to order.
In gluten-free kitchens, there’s also a specific kind of peace that comes from good prep.
Using clean utensils, setting out separate condiments, and avoiding shared jars can feel fussyuntil you realize it makes everything smoother.
No one has to guess which butter is safe. No one has to do the “wait, did that knife touch bread?” panic dance.
It’s just good food with clear rules, and that’s a gift when you’re feeding people who truly need gluten-free meals.
Finally, expect your own preferences to evolve. Some people fall in love with the buckwheat flavor right awayearthy, nutty, and a little toasty.
Others like it best with tangy dairy and savory toppings, where buckwheat tastes “grown up” and balanced.
If you’re in the second group, try the yeasted version at least once; it has that gentle fermented aroma that makes the blini feel a little more traditional.
Either way, once you nail your preferred thickness and stove temperature, blini become one of those recipes you can make on autopilot
the kind that turns random Tuesdays into “we’re doing a board” nights.


