
Table of Contents >> Show >> Hide
- What Is an ESP32 Pomodoro Timer?
- Why Use an ESP32 Instead of a Phone App?
- Core Features Worth Building
- Recommended Parts List
- Basic Wiring Plan
- How the Software Should Work
- Example Program Structure
- Designing the User Interface
- Adding Wi-Fi Without Adding Distraction
- Power and Battery Considerations
- Useful Upgrades After Version One
- Common Problems and Fixes
- Practical Example: A Study Desk Build
- SEO-Friendly Build Tips for Makers Publishing the Project
- Experience Notes: What Building an ESP32 Pomodoro Timer Teaches You
- Conclusion
A good Pomodoro timer should do one simple job beautifully: protect your focus from the tiny gremlins that live inside every phone notification. That is exactly why an ESP32 Pomodoro timer is such a satisfying project. It blends a proven productivity method with a compact, low-cost microcontroller, a small display, a few buttons, and just enough beeping to remind you that your brain deserves a break.
The idea is simple: build a physical timer that runs focused work sessions, short breaks, and long breaks without requiring an app, a browser tab, or another glowing rectangle begging for attention. The ESP32 is especially useful because it offers plenty of GPIO pins, built-in Wi-Fi and Bluetooth on many boards, hardware timers, PWM output for buzzers and LEDs, I2C support for OLED displays, and non-volatile storage for saving preferences. In other words, it is overqualified for counting down from 25 minutesbut in the best maker-project way.
This guide explores how to design an ESP32-based Pomodoro timer, what parts you need, how the hardware fits together, how the software should behave, and how to improve the build after the first version works. Think of it as a desk gadget, productivity coach, and tiny electronic tomato all rolled into one.
What Is an ESP32 Pomodoro Timer?
An ESP32 Pomodoro timer is a standalone electronic device that uses the Pomodoro Technique: typically 25 minutes of focused work, followed by a 5-minute break. After four work sessions, the timer gives you a longer break, often 15 to 30 minutes. Instead of relying on a phone app, the ESP32 handles the countdown, displays the remaining time, tracks sessions, and triggers alerts with a buzzer, LED, vibration motor, or all three if you enjoy dramatic productivity theater.
The beauty of building your own timer is control. You can choose a minimalist OLED screen, a big seven-segment display, a rotary encoder, a battery-powered enclosure, a web dashboard, or a completely offline version that never asks for your Wi-Fi password. You can also customize the durations. Some people love the classic 25/5 rhythm. Others prefer 50/10, 30/5, or “I have exactly 17 minutes before dinner burns.”
Why Use an ESP32 Instead of a Phone App?
Phone apps are convenient, but they are also dangerous little rabbit holes. You open a timer app, glance at a message, check one notification, and suddenly you are watching a video about raccoons stealing cat food. A physical ESP32 Pomodoro timer removes that temptation. It sits on your desk, does not show social feeds, and has no opinion about trending topics.
The ESP32 also gives makers room to experiment. Unlike a basic kitchen timer, it can store user settings, connect to a local network, sync with task systems, host a small web page, or log completed focus sessions. You can make it as simple or as delightfully nerdy as you want. A beginner can build a basic version with an OLED display and three buttons. An advanced builder can add capacitive touch controls, RGB status lights, deep sleep, battery charging, 3D-printed housing, and maybe a tiny tomato logo with suspiciously serious eyebrows.
Core Features Worth Building
1. Focus, Short Break, and Long Break Modes
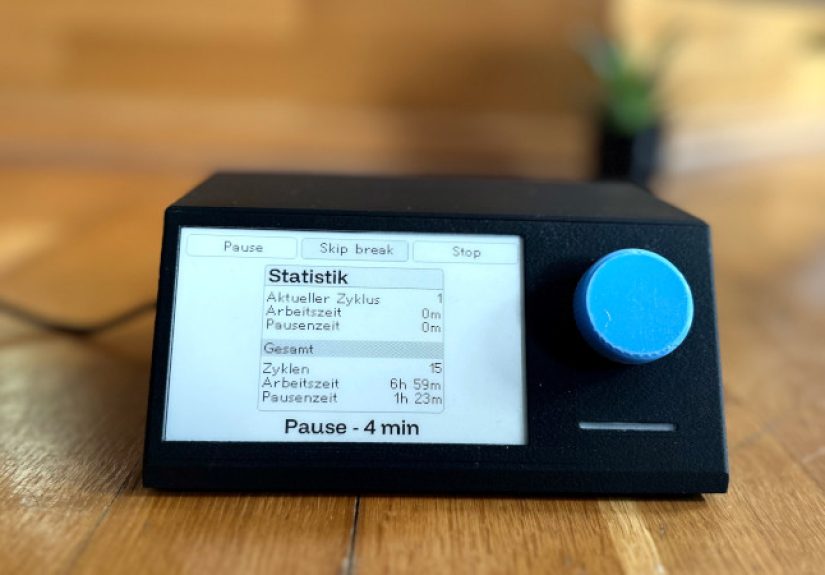
The timer should cycle through three states: focus time, short break, and long break. A practical default is 25 minutes for work, 5 minutes for a short break, and 15 minutes for a long break after four completed focus sessions. The display should clearly show the current mode, remaining time, and session count.
2. Start, Pause, Reset, and Skip Buttons
Three buttons are enough for most builds. One button starts and pauses the timer. A second resets the current session. A third skips to the next mode. If you want a cleaner interface, use a rotary encoder with a push button. Rotating can adjust minutes, while pressing can start or pause. This makes the device feel less like a science project and more like something you might actually keep on your desk.
3. OLED or TFT Display
A 0.96-inch SSD1306 OLED display is a popular choice because it is small, readable, inexpensive, and uses I2C communication. With I2C, the display usually needs only power, ground, SDA, and SCL connections. For an ESP32 development board, GPIO 21 is commonly used for SDA and GPIO 22 for SCL, though many boards allow reassignment in software.
4. Audible and Visual Alerts
A buzzer makes the timer useful even when you are not staring at the screen. An active buzzer is simple: set a GPIO high and it sounds. A passive buzzer gives you more control over tones using PWM. LEDs are also helpful. A green LED can mean focus mode, blue can mean break mode, and red can mean “the timer is yelling at you politely.”
5. Saved Settings
A polished Pomodoro timer should remember custom durations after power loss. On the ESP32, the Preferences library can store small values in non-volatile storage. That means your preferred 40-minute focus session will survive a reset, unplugging, or the classic “I accidentally yanked the USB cable with my elbow” incident.
Recommended Parts List
You do not need exotic components to build this project. A basic version can be assembled on a breadboard in an afternoon.
- 1 ESP32 development board, such as ESP32 DevKit V1 or an ESP32-S3 board
- 1 SSD1306 I2C OLED display, usually 128×64 pixels
- 3 momentary push buttons
- 1 active or passive buzzer
- 3 resistors for buttons if not using internal pull-ups
- Optional RGB LED or individual status LEDs
- Jumper wires and breadboard
- Optional LiPo battery module for portable use
- Optional 3D-printed or laser-cut enclosure
For the simplest wiring, use the ESP32 internal pull-up resistors for the buttons. Connect one side of each button to a GPIO pin and the other side to ground. In code, configure the button pins as INPUT_PULLUP. When a button is pressed, the pin reads LOW. It feels backward at first, but after a while it becomes one of those electronics habits that makes you nod wisely at breadboards.
Basic Wiring Plan
A clean wiring plan makes debugging much easier. Here is a practical layout for a typical ESP32 board:
- OLED VCC to 3.3V
- OLED GND to GND
- OLED SDA to GPIO 21
- OLED SCL to GPIO 22
- Start/Pause button to GPIO 32 and GND
- Reset button to GPIO 33 and GND
- Skip button to GPIO 25 and GND
- Buzzer signal to GPIO 26
- Status LED to GPIO 27 through a current-limiting resistor
Always check your specific board pinout. ESP32 boards are wonderfully capable, but not every GPIO behaves the same. Some pins are strapping pins, some are input-only, and some may be connected to onboard flash or special boot functions. When in doubt, choose common safe GPIO pins such as 25, 26, 27, 32, and 33 for buttons and simple outputs.
How the Software Should Work
The software can be built as a small state machine. A state machine is just a fancy way of saying, “The device knows what mode it is in, and it behaves differently depending on that mode.” For this timer, the main states are idle, running focus session, paused focus session, running break, paused break, and session complete.
Use millis() or ESP32 timer functions to track elapsed time without blocking the rest of the program. Avoid long delay() calls for the main countdown. A blocking delay makes button handling feel sluggish because the microcontroller is basically standing in the corner counting Mississippi-style instead of listening for input.
The main loop should repeatedly do five things: read buttons, update the timer, refresh the display, manage alerts, and save settings only when needed. Do not write preferences to flash every second. Flash memory has a limited write life, so save only when the user changes a setting or completes a meaningful configuration step.
Example Program Structure
The following simplified structure shows the logic. It is not meant to be a full production sketch, but it gives the project a reliable backbone.
In a real build, add button debouncing. Mechanical buttons can produce rapid on/off changes when pressed, which the ESP32 may read as several presses. You can debounce in software by ignoring repeated changes for 30 to 50 milliseconds, or you can use a dedicated button library. Either way, the timer should not skip three sessions because your button had a tiny electrical tantrum.
Designing the User Interface
A great Pomodoro timer is readable at a glance. Do not crowd the display with too much information. The most important element is the remaining time. The second most important is the current mode. Session count, battery level, Wi-Fi status, or custom labels can be smaller.
For a 128×64 OLED, use a large font for the countdown and a small font for mode labels. A helpful screen layout might look like this:
- Top row: “FOCUS” or “BREAK”
- Center: large countdown, such as 24:18
- Bottom row: “Session 2/4” or “Paused”
If you add an RGB LED, color becomes part of the interface. Green can mean work, blue can mean break, yellow can mean paused, and red can mean finished. This is especially useful when the timer is across the desk and the tiny OLED text looks like ant handwriting.
Adding Wi-Fi Without Adding Distraction
Because the ESP32 supports wireless features, it is tempting to connect everything. A web dashboard! Statistics! MQTT! Calendar sync! A tiny API that tells your smart lamp to turn red when you are focusing! These features can be genuinely useful, but the best Pomodoro timer should remain calm and low-friction.
If you add Wi-Fi, consider a local-only configuration page. The ESP32 can host a small web interface where you adjust focus duration, break length, buzzer volume, and screen timeout. Once settings are saved, the device can return to offline mode. This preserves the biggest benefit of a physical Pomodoro timer: fewer distractions.
Power and Battery Considerations
A USB-powered timer is easiest. Plug it into your computer, monitor, or wall adapter and forget about charging. A battery-powered version is more elegant, especially if you want a portable study timer, but it requires more planning.
The ESP32 can use light sleep and deep sleep modes to reduce power consumption, but a countdown timer must still keep track of time and respond to buttons. For a desk timer, light sleep between display refreshes may be enough. For a battery version, consider turning the OLED off during long idle periods, dimming LEDs, and using a low-power ESP32 board designed for battery operation. Not all development boards are equally efficient because USB-to-serial chips and power regulators can consume current even when the ESP32 itself is sleeping.
Useful Upgrades After Version One
Rotary Encoder Controls
A rotary encoder makes setting time easier. Turn to adjust minutes, press to confirm, press and hold to reset. It also gives the timer a satisfying physical feel, like a tiny productivity safe.
Session Logging
The timer can store completed Pomodoro counts by day. Keep it simple: save the date and number of completed sessions. If you add Wi-Fi later, you can sync these stats to a local dashboard.
Custom Sounds
A passive buzzer can play different tones for focus and break transitions. Use gentle sounds. A Pomodoro timer should not make you feel like a microwave is angry about philosophy.
Touch-Sensitive Case
Some ESP32 boards support capacitive touch pins. With careful design, you can create touch buttons under a 3D-printed or acrylic surface. This gives the timer a clean, modern look.
Task Label Display
Add a simple web page or serial input to set the current task label: “Math homework,” “Write blog draft,” “Email cleanup,” or “Finally organize downloads folder.” Seeing the task on the timer reduces the chance of wandering into unrelated work.
Common Problems and Fixes
The OLED Screen Is Blank
Check power, ground, SDA, and SCL. Confirm the display address, commonly 0x3C or 0x3D. Run an I2C scanner sketch to verify that the ESP32 can detect the display. Also make sure the display is powered at the correct voltage.
The Buttons Trigger Randomly
Use INPUT_PULLUP, wire the button to ground, and add software debouncing. Keep wires short during testing. Long jumper wires can pick up noise, especially on a crowded breadboard.
The Timer Drifts Over Time
For a basic Pomodoro timer, small drift is usually not a problem. If accuracy matters, calculate elapsed time from timestamps rather than subtracting one second in a loop that may run late. Store a target end time and compute remaining seconds from millis().
The Buzzer Is Too Loud
Add a resistor, reduce duty cycle if using PWM, use a smaller buzzer, or switch to visual alerts. Your productivity tool should not become the reason everyone in the room starts a group complaint.
Practical Example: A Study Desk Build
Imagine a student building a timer for evening study sessions. The ESP32 sits in a small 3D-printed enclosure with an OLED screen angled upward. The left button starts and pauses, the middle button resets, and the right button skips to break. A blue LED glows during breaks, while a green LED glows during focus time. The buzzer chirps twice when work ends and once when break ends.
The software uses 25-minute focus sessions and 5-minute breaks by default. After four focus sessions, it switches to a 20-minute long break. The student can hold the reset button for three seconds to enter settings mode, then use the skip button to adjust duration. When saved, the ESP32 writes the new values to Preferences storage.
This is not just a gadget. It changes behavior. Instead of checking a phone timer, the student glances at the desk device. Instead of negotiating with distractions every five minutes, the timer creates a visible boundary. Work now. Break soon. Repeat. It is simple enough to trust, and that is the whole point.
SEO-Friendly Build Tips for Makers Publishing the Project
If you plan to publish your ESP32 Pomodoro timer online, document the build clearly. Include a parts table, wiring diagram, photos, code explanation, troubleshooting section, and upgrade ideas. Readers love practical details: exact GPIO pins, library names, display address, button behavior, enclosure measurements, and mistakes you fixed along the way.
Use descriptive headings such as “ESP32 Pomodoro Timer Wiring,” “OLED Display Setup,” and “Arduino Code for ESP32 Timer.” These help readers scan the guide and help search engines understand the content. Avoid vague headings like “Step 2” unless they are paired with meaningful text. Also include alt text for images, especially wiring diagrams and finished build photos.
Experience Notes: What Building an ESP32 Pomodoro Timer Teaches You
Building an ESP32 Pomodoro timer is one of those projects that looks small at first but quietly teaches a full workshop of practical skills. The first lesson is that time-based code is different from ordinary blinking LED code. When you start, it is tempting to use delay(1000) and call it a day. That works until you press a button and nothing happens because the microcontroller is stuck waiting. The moment you switch to non-blocking timing with millis(), the project becomes smoother, more responsive, and much closer to a real product.
The second lesson is that user experience matters, even on a tiny device. A timer with confusing buttons is technically functional but emotionally annoying. You quickly learn to ask practical questions: Can I pause without looking? Is reset too easy to press by accident? Does the alert sound friendly or does it make the room feel like a fire drill at a toy factory? These questions are not just decoration. They decide whether the device becomes part of your routine or ends up in the drawer of abandoned prototypes next to the mystery cables.
The third lesson is hardware humility. On paper, wiring an OLED display is easy: four wires, done. In real life, the screen might stay blank because the I2C address is different, SDA and SCL are swapped, the breadboard rail is not connected, or one jumper wire has chosen a career in performance art. Troubleshooting teaches patience. You learn to test one part at a time, run scanner sketches, print debug messages, and stop assuming the problem is “probably the code.” Sometimes the problem is a loose ground wire smirking at you.
The fourth lesson is restraint. The ESP32 can do many things, so feature creep arrives wearing a tiny cape. You may start with a timer and suddenly want Wi-Fi sync, a web dashboard, daily analytics, RGB animations, sound themes, calendar integration, and a motivational quote generator. Some upgrades are worth it, but the best version often stays focused. A Pomodoro timer should reduce friction, not become another project management platform with a buzzer attached.
The final lesson is personal. A handmade timer feels different from an app. Because you built it, you notice it. Because it is physical, it creates a stronger ritual. Pressing the start button feels like making a small promise: for the next session, this task gets your attention. The device does not magically create discipline, but it makes discipline easier to begin. That is the quiet charm of the ESP32 Pomodoro timer. It is a microcontroller project, a productivity experiment, and a tiny reminder that focus can be designed into your environment.
Conclusion
An ESP32 Pomodoro timer is a practical, beginner-friendly, and surprisingly expandable maker project. It combines electronics, embedded programming, user-interface design, and productivity psychology in one compact desk tool. The basic version needs only an ESP32, OLED display, buttons, and buzzer. From there, you can add saved settings, custom alerts, battery power, Wi-Fi configuration, session tracking, and a polished enclosure.
Most importantly, the project solves a real problem. It helps you focus without pulling you back into your phone. It turns time management into something visible, physical, and personal. Whether you are studying, coding, writing, designing, or trying to survive an inbox with too many unread messages, a custom ESP32 Pomodoro timer can make focused work feel a little more intentionaland a lot more fun.
Note: This article is written for educational and web publishing purposes. Hardware pin choices, libraries, and board behavior can vary by ESP32 model, so always verify your board pinout and component voltage requirements before building.


