
Table of Contents >> Show >> Hide
- Outdoor Outlet Installation Basics (In Plain American English)
- Where Outdoor Outlets Are Typically Required (And Where They Make Life Easier)
- Permits, Inspections, and “Why Can’t I Just…?”
- Choosing the Right Type of Outdoor Outlet
- What a Licensed Electrician Typically Does (High-Level Installation Walkthrough)
- 1) Confirm the plan: location, circuit capacity, and intended use
- 2) Select listed outdoor-rated components
- 3) Route wiring using an approved method
- 4) Install the box and seal it correctly
- 5) Provide GFCI protection and verify it
- 6) Install a weatherproof while-in-use cover
- 7) Final checks: labeling, reset access, and cleanup
- Common Mistakes (And How Pros Avoid Them)
- Testing and Maintaining Your Outdoor GFCI Outlet
- Cost: What You’ll Likely Pay (And Why Prices Vary So Much)
- FAQ: Outdoor Electrical Outlet Installation Questions Homeowners Actually Ask
- Conclusion: The Smart Way to Get Outdoor Power
- Real-World Experiences: What People Learn After Installing an Outdoor Outlet (The Hard Way)
An outdoor outlet is one of those “why didn’t this house come with more of these?” upgrades. Holiday lights. String lights.
Power tools. A leaf blower that sounds like it’s auditioning for a monster movie. All of it gets easier when you have a
weatherproof outdoor receptacle exactly where you need itwithout running an extension cord through a cracked-open window
like a raccoon with a home renovation budget.
That said: mixing electricity, weather, and DIY confidence is how small projects become big problems. This guide is written
for homeowners who want to understand the process and code expectations, plan the right location, and either (a) work with a
licensed electrician or (b) make an informed decision about whether this is truly within their skill level. If you’re not
trained for electrical work, treat this like a “what to expect” roadmapnot a permission slip.
Outdoor Outlet Installation Basics (In Plain American English)
“Outdoor outlet installation” sounds simple until you remember that outdoors includes rain, sprinklers, condensation, bugs,
and wind that can drive water sideways like it’s mad at your siding. A proper installation is designed to keep water out,
shut power off fast if something goes wrong, and meet electrical code requirements that exist because history has been… spicy.
The three big safety requirements you’ll hear again and again
- GFCI protection: Outdoor receptacles are typically required to be GFCI-protected to reduce shock risk.
- Weather-resistant (WR) devices: Outdoor receptacles must be listed for outdoor exposure and corrosion resistance.
- Weatherproof “in-use” cover: The cover must protect the outlet even when something is plugged in.
When you shop for parts, you’ll often see a WR marking on the receptacle face and see packaging call out
“extra-duty” or “while-in-use” covers. Those terms are not marketing poetry. They’re tied to code and product listing standards.
Where Outdoor Outlets Are Typically Required (And Where They Make Life Easier)
Many homes are expected to have at least one outdoor receptacle at the front and back of the dwelling, and at least one
on certain decks, balconies, and porchesusually with placement limits so the outlet is actually reachable and useful.
Even if your local rules are different, these concepts are a solid planning baseline.
Practical placement tips that homeowners appreciate later
- Put outlets where cords naturally want to go: near a patio seating area, grill zone (but not right next to heat), or garden tool storage.
- Avoid obvious water paths: downspout splash zones, sprinkler heads, and the spot your roof always drips during storms.
- Think “year-round,” not just one season: holiday lights today, snow-melt mat tomorrow, phone charger during the summer party forever.
- Plan for the load: a string of café lights is one thing; a pressure washer or shop vac is another.
A good electrician will also think about what else is on the circuit (so you don’t trip breakers every time you run the hedge
trimmer) and whether a dedicated circuit is a better long-term move.
Permits, Inspections, and “Why Can’t I Just…?”
Electrical permits can feel like bureaucracy wearing steel-toe boots, but the logic is straightforward: outdoor wiring mistakes
can become shock hazards, fire hazards, or both. Many municipalities require permits and inspections for new wiring or new
circuits. If you hire a licensed electrician, they’ll usually guide you through what’s required locally (or handle it).
The short version: if you’re adding a new outdoor outlet by tapping an existing circuit, you may still need approval depending
on your area. If you’re running new cable, adding a breaker, or installing a new circuit, permits are even more likely.
Skipping this step can cause issues at resale time, and it’s not exactly a fun surprise during a home inspection.
Choosing the Right Type of Outdoor Outlet
Option 1: A standard outdoor receptacle protected by an upstream GFCI
In some setups, an electrician can place the GFCI protection upstream (for example, at another device protecting “downstream”
outlets) while installing a weather-resistant receptacle outdoors. This can be tidybut it must be designed correctly so the
outdoor outlet is actually protected.
Option 2: A GFCI receptacle installed outdoors
This is common when the outdoor outlet is the main point of access and you want the test/reset buttons right there.
It can also be useful when an outdoor outlet feeds additional outdoor receptacles.
Option 3: An outdoor outlet on a dedicated circuit
If you’re powering larger tools, a pool pump, a hot tub system, or frequent high-load gear, a dedicated circuit may be the
cleanest and least-annoying solution. “Least annoying” is a technical term meaning “you can run the pressure washer without
turning your living room into a darkness exhibit.”
What a Licensed Electrician Typically Does (High-Level Installation Walkthrough)
If you’ve ever wondered what you’re paying for beyond “two screws and a plastic cover,” here’s the professional workflowkept
intentionally high-level for safety. Electrical work should be performed by a qualified person who can verify de-energized
circuits, use correct wiring methods, and confirm code compliance.
1) Confirm the plan: location, circuit capacity, and intended use
The electrician will ask what you plan to plug in, how often, and where. This isn’t small talk. It helps determine whether a
general-use circuit is acceptable, whether a dedicated circuit is wiser, and how to route wiring without creating moisture
problems or structural headaches.
2) Select listed outdoor-rated components
Outdoor electrical outlet installation depends on using the right parts: a weatherproof box rated for the location, a
weather-resistant receptacle (often marked WR), proper gaskets, and a while-in-use weatherproof cover (often “extra-duty” in wet
locations). This is also where they consider corrosion resistance for coastal areas or harsh winters.
3) Route wiring using an approved method
Getting power to the new outdoor outlet can happen a few ways: from an interior box on the other side of the wall, from an
accessible junction point, or from the panel using a new run. The “right” method depends on wall construction, distance,
exposure, and what your local rules allow. A professional will also protect wiring from physical damage and water intrusion.
4) Install the box and seal it correctly
A common failure point is not the outletit’s the box and sealing. A pro will mount the box solidly, use the appropriate
fittings, and seal penetrations so water doesn’t get invited into your wall cavity like it pays rent.
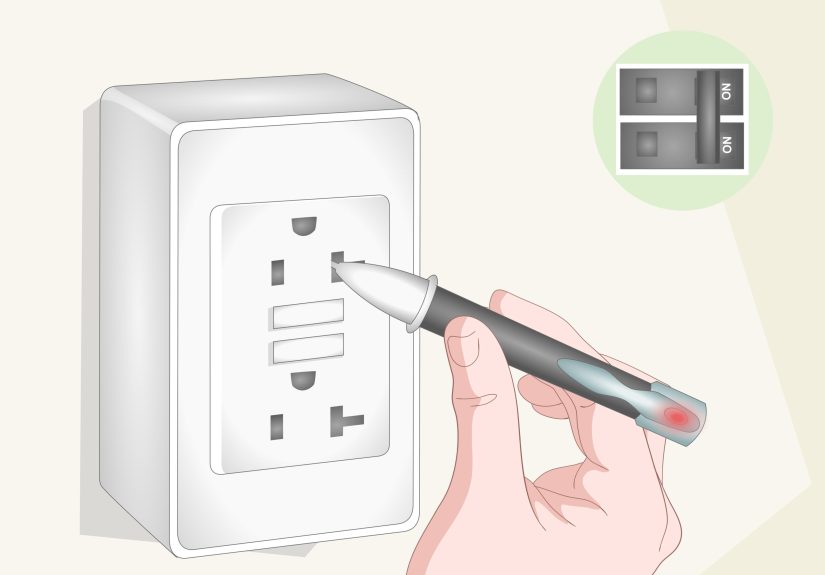
5) Provide GFCI protection and verify it
Whether the GFCI is at the receptacle, at a breaker, or upstream, the electrician will confirm the outlet is protected and
functioning. They’ll test and document performance, and they’ll typically ensure the device remains readily accessible for
future testing.
6) Install a weatherproof while-in-use cover
Outdoors, you want a cover that remains weatherproof even when a cord is plugged in. This is the “bubble cover” you’ve seen.
In many wet locations, an “extra-duty” rated cover is commonly required. The cover choice also affects usabilitysome are
easier for bulky transformer plugs and smart lighting adapters.
7) Final checks: labeling, reset access, and cleanup
The last step is confirming everything is secure, the cover closes properly, and the GFCI can be tested and reset without
wrestling the cover. A conscientious electrician will also walk you through how to test the outlet periodically.
Common Mistakes (And How Pros Avoid Them)
Mistake: Using indoor parts outdoors
Indoor receptacles and covers aren’t designed for UV exposure, moisture, or corrosion. Outdoors, you want listed outdoor-rated
devices and covers. The wrong parts can degrade faster and become a safety risk.
Mistake: Choosing the wrong “location rating”
Damp location vs. wet location matters. Under a roofed porch that doesn’t get blown rain is different from an outlet fully
exposed to weather. The enclosure and cover requirements change accordingly.
Mistake: Poor sealing that lets water into the wall
Even a perfect receptacle can’t outsmart water that gets behind siding or into the box. Pros focus heavily on gaskets, proper
mounting, and the integrity of the exterior penetration.
Mistake: Ignoring real-world use
If your outlet is going to run lights for six hours during a party, the cover needs to accommodate a plug while staying
weatherproof. If you’ll use large transformer plugs, you need space. If the outlet is behind a grill, you’ll hate it forever.
Planning is the cheapest part of the jobuse it.
Testing and Maintaining Your Outdoor GFCI Outlet
Outdoor outlets live a hard life. Sunlight bakes plastic. Rain finds angles. Dirt and insects attempt a hostile takeover.
The most homeowner-friendly maintenance step is regular GFCI testing.
A simple maintenance routine
- Test the GFCI after installation and then monthly: Use the TEST and RESET buttons as directed.
- Test after major storms or power outages: Power events can affect protective devices.
- Inspect the cover and gasket: Replace cracked covers, missing gaskets, or covers that no longer close firmly.
- Keep the area clear: Mulch piled against the box and constant sprinkler spray are not “helpful.”
If a GFCI won’t reset, trips repeatedly, or feels warm, stop using it and contact a qualified electrician. This is not the
moment for “maybe it’ll sort itself out.” Electricity does not do self-improvement.
Cost: What You’ll Likely Pay (And Why Prices Vary So Much)
Outdoor outlet installation costs can range widely based on distance to the panel, wall access, whether trenching is required,
and whether your electrical panel has capacity. If the outlet can be added on the other side of an interior wall with easy
access, it may be relatively straightforward. If you need a new circuit, long run, or panel work, the price climbs fast.
Cost factors that move the needle
- Distance and access: Longer runs and difficult walls take more labor.
- New circuit vs. existing circuit: A dedicated circuit costs more but may be worth it.
- Exterior surface: Brick, stucco, and stone can increase labor complexity.
- Permits and inspection: Often modest, but varies by location.
- Upgrades: If your panel is maxed out, you may need additional electrical work.
FAQ: Outdoor Electrical Outlet Installation Questions Homeowners Actually Ask
Do I need a weatherproof cover if the outlet is under a porch roof?
Usually, yesbecause “under a roof” doesn’t always mean “protected from wind-driven rain or runoff.” The correct cover depends
on whether the location is considered damp or wet. When in doubt, electricians typically choose a cover that protects the
receptacle even when in use.
Is a “bubble cover” the same as a while-in-use cover?
In everyday language, yes. People call it a bubble cover because it bulges out to fit a plug. In product terms, you’ll see
“while-in-use,” “in-use,” “raintight,” and sometimes “extra-duty.”
Can I just use an extension cord instead of installing an outlet?
For temporary needs, an outdoor-rated extension cord plugged into a GFCI-protected outlet can be acceptable, but extension
cords are not meant to replace permanent wiring. They can be damaged, overloaded, or used in unsafe ways. If you frequently
need outdoor power, installing a proper outdoor receptacle is usually safer and more convenient.
What’s the “best” location for an outdoor outlet?
The best location is where you’ll use it often, where water doesn’t routinely hit it, and where it’s easy to access and test.
For many homes, that’s a patio wall, near a deck entry point, or on the side of the house near the driveway for tools and car
vacuuming.
Conclusion: The Smart Way to Get Outdoor Power
Learning how to install an outdoor outlet starts with understanding what “done right” looks like: GFCI protection, a
weather-resistant device, and a weatherproof while-in-use cover, all installed using approved wiring methods and local code
requirements. The goal isn’t just convenienceit’s safe, reliable power that holds up through seasons of weather and the
occasional enthusiastic holiday decorating spree.
If you’re not trained in electrical work, the most homeowner-friendly plan is to use this guide to pick a location, understand
the features you’re paying for, and hire a licensed electrician to complete the installation and any required permitting. You
get an outlet you can trustand you keep your weekend free for the fun stuff, like actually being outside.
Real-World Experiences: What People Learn After Installing an Outdoor Outlet (The Hard Way)
Homeowners tend to picture an outdoor outlet as a simple add-on: “We’ll put one right there, plug in string lights, and live
our best backyard life.” And honestly, that is the happy endingonce you’ve bumped into the little details no one thinks about
until they’re holding a tangled cord at dusk.
The first lesson is almost always location humility. People install the outlet where it’s easiest to reach
from inside, then realize their patio furniture, grill, and “party zone” live ten feet away. Suddenly the new outlet is
technically outdoors but functionally emotional supportit’s there, but it’s not helping. The best installs follow the
routine: stand where you’ll actually use power, imagine where cords will run, and choose a spot that won’t force cords across
walkways (aka the world’s least exciting trip hazard).
Next comes the cover reality check. A cover that looks fine in the store can become annoying in real life if
you use bulky plugs, smart lighting adapters, or transformer blocks. People love the idea of a neat, flush lookuntil they
discover their plug won’t fit with the cover closed. That’s when the phrase “while-in-use cover” stops sounding like jargon
and starts sounding like a feature you should have cared about. The best experiences happen when the cover is roomy enough to
close properly with the most awkward plug you own.
Then there’s weather behavior. Many homeowners don’t realize how much “rain” is actually “wind-driven rain,”
or how sprinklers can hit a wall for 20 minutes every morning like it’s their full-time job. People who place outlets near
downspouts or irrigation zones often end up adjusting sprinkler heads or adding simple splash management later. A good outdoor
outlet isn’t just weather-resistantit’s placed like you respect that water has hobbies.
Another common story is the breaker surprise. Someone plugs in a shop vac or pressure washer and the outlet
tripsbecause the circuit is already supporting other loads. This doesn’t mean the outlet is “bad.” It means planning matters.
Homeowners who share their best outcomes usually did one of two things: they (1) kept their outdoor use to light-duty loads
like lighting and chargers, or (2) chose a setup (often with professional guidance) that better matched what they actually run
outdoors. In other words, “I might someday use a pressure washer” is a planning statement. “I use a pressure washer every
weekend” is a circuit design statement.
Finally, there’s the maintenance habit people pick up. Outdoor outlets are exposed, so they need occasional
attention. The homeowners who stay happiest long-term are the ones who test the GFCI monthly, keep the cover intact, and
replace cracked plastic before it becomes a problem. It’s not dramatic maintenanceit’s more like brushing your teeth. Small,
consistent, and very effective at avoiding expensive regrets.
The biggest takeaway from real homeowner experiences? The outdoor outlet itself is the easy part. The win comes from picking a
smart location, choosing outdoor-rated components that fit real plugs, and treating safety features as non-negotiable. Do that,
and the outlet becomes what it should be: invisible infrastructure that makes your outdoor space feel effortlessly usable.


