
Table of Contents >> Show >> Hide
- Why Paste Application Is the Bottleneck in Reflow Prep
- Stencil vs. Dispenser: Pick the Tool That Matches the Job
- What Makes an “Electric” Solder Paste Dispenser Different?
- The Features That Actually Speed You Up
- Paste Handling: Speed Starts Before You Touch the Pedal
- Choosing the Right Paste for Dispensing (Not Just for Printing)
- Dialing In an Electric Dispenser: A Practical Setup Flow
- How an Electric Dispenser Speeds Up Reflow Prep in Real Builds
- Common Defects (and How Better Dispensing Prevents Them)
- Maintenance: The Fastest Dispenser Is the One That Doesn’t Clog
- Safety Notes (Quick, Because You’re Here to Build Cool Stuff)
- Conclusion
- Experiences from the Bench: What People Notice After Switching to an Electric Dispenser
If surface-mount reflow feels like making tiny sandwiches for ants, you’re not alone. The “fun” part is placing parts. The
“why is my life like this” part is getting solder paste onto padsquickly, cleanly, and consistentlywithout turning your
PCB into a modern art piece called Bridge, Tombstone, and the Mystery Solder Ball.
That’s where an electric solder paste dispenser earns its bench space. Whether it’s an all-electric syringe system
(motor-driven plunger) or an electronically controlled dispenser that regulates time/pressure/vacuum, the goal is the same:
faster reflow prep with less rework. You spend less time wrestling with a syringe and more time building boards that
actually work on the first try (or at least fail in exciting, educational ways).
Why Paste Application Is the Bottleneck in Reflow Prep
Reflow prep is basically three steps: apply paste, place components, heat the assembly. If paste volume or placement is off,
everything downstream gets messy. Too much paste and you invite bridging; too little and joints go starved or open. A smear
under a part can shift placement; a paste dot that’s too tall can tip a 0402 resistor like a domino auditioning for Broadway.
In production, stencils dominate because they deposit paste uniformly and fast across an entire board. But prototyping, rework,
and low-volume builds often don’t justify a custom stencilor you need paste only on a few pads (QFN rework, connector
touch-ups, shield frames, odd footprints). That’s the niche where dispensers shine.
Stencil vs. Dispenser: Pick the Tool That Matches the Job
When a stencil wins
- You’re building multiple identical boards.
- You need consistent deposits on fine-pitch footprints across the whole PCB.
- You want the fastest “paste down” time per board once setup is done.
When an electric dispenser wins
- You’re doing one-offs, prototypes, or frequent design revisions.
- You’re reworking a single part (QFN/QFP, small passives, connectors) and don’t want to re-stencil everything.
- You need selective paste placement (a few pads here, a shield perimeter there).
- You want cleaner starts/stops and less dripping than hand-squeezing a syringe.
The smartest shops don’t argue stencil versus dispenser. They use both. A stencil for the main assembly, then an electric
dispenser for fixes and add-onsbecause nothing says “deadline week” like discovering you forgot two pull-up resistors after
your stencil arrives.
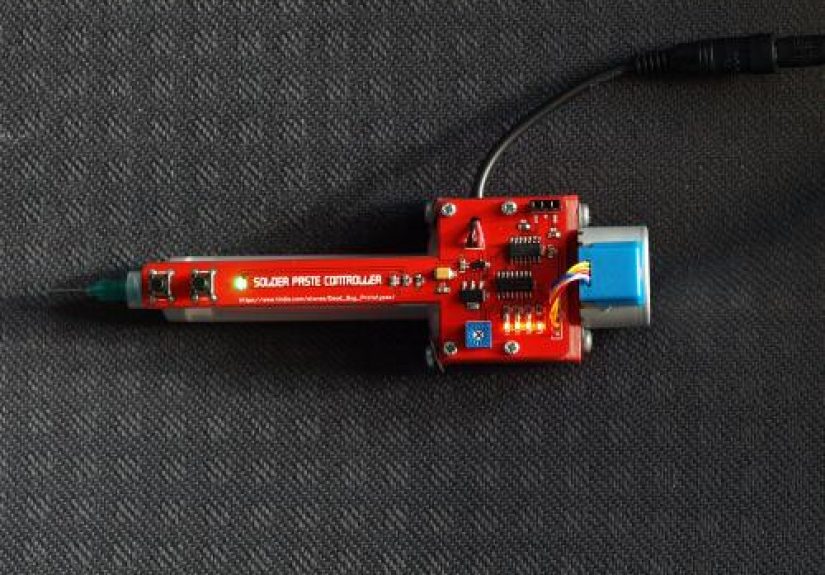
What Makes an “Electric” Solder Paste Dispenser Different?
People use “electric dispenser” in a couple ways:
-
All-electric, non-pneumatic syringe dispensers: A motor drives the plunger. No shop air needed. Many have
programmable “pullback” to prevent drooling and memory presets for repeat jobs. -
Electronic time/pressure dispensers: These still use air pressure, but the controller is electronic: it precisely
controls dispense time, pressure, and vacuum “suck-back,” improving repeatability.
In both cases, the “speed” benefit isn’t just raw flow rate. It’s repeatability. When each press of a foot pedal gives a
predictable dot, you stop re-aiming, re-squeezing, and re-cleaning. Paste goes down faster because you’re not constantly
correcting paste that went sideways.
The Features That Actually Speed You Up
1) Foot pedal control (hands stay where they belong)
Foot control sounds basic, but it’s a productivity cheat code. One hand stabilizes the syringe/needle; the other steadies the
board or holds tweezers. Your foot triggers a repeatable shot. The workflow becomes smooth instead of awkward.
2) Adjustable shot time (and sometimes shot “modes”)
For prototyping, you usually want “timed shot” dispensing: press → dot → stop. Some dispensers also offer steady-flow modes
(for beads along a shield frame) and teach/memory features so you can store settings for common footprints.
3) Pullback / vacuum suck-back (goodbye, surprise blobs)
Solder paste is sticky, but it can still oozeespecially if it warms up, you use a larger tip, or you pause mid-board. Pullback
retracts pressure (or slightly reverses/plucks back material) so the tip stops cleanly. This is how you avoid the classic move:
you lift the needle, it drools, and now Pad B has a bonus dot it didn’t earn.
4) Tip selection (because dot size isn’t a vibe)
The needle/tip is your “nozzle.” Gauge choice changes dot size, backpressure, and how likely you are to clog. Having an
assortment lets you match the tool to the footprint: a bigger tip for a connector ground pad, a finer tip for small passives.
If your dispenser is doing its job but dots look inconsistent, the tip size and paste type are often the real story.
5) No-shop-air operation (for smaller benches and quieter brains)
All-electric systems are popular in labs and maker spaces because they don’t require a compressor. That removes one more
setup step and makes the whole station more “plug in and go.”
Paste Handling: Speed Starts Before You Touch the Pedal
A dispenser can’t save paste that’s handled badly. Temperature, humidity, and how you open or mix paste affect how it
dispenses and how it reflows. The short version: treat paste like a fussy ingredient, because it is.
Let paste reach room temperature (sealed) before opening
Opening cold paste can cause condensation, and moisture in paste is not a fun surprise. Many manufacturers recommend
equilibrating paste to room temperature before use (often a couple hours; longer for larger or frozen containers). Don’t “help”
by heating it above room tempwarm paste can separate faster and behave unpredictably.
Store cartridges tip-down when appropriate
For dispensing paste in syringes/cartridges, storage orientation matters. Tip-down storage helps keep material ready to flow
and reduces air gaps that lead to spitting and inconsistent dots.
Mix gently (don’t whip it like frosting)
Many solder pastes are designed to be thixotropicthey respond to shear. A brief, gentle hand mix can improve roll/flow and
reduce “first dot weirdness.” Aggressive mixing, on the other hand, can trap air and create inconsistencies.
Choosing the Right Paste for Dispensing (Not Just for Printing)
“Solder paste” is not one universal goop. Alloy, flux type, metal load, and powder size all change how it prints, dispenses,
and reflows.
Powder size: Type 3 vs Type 4 vs Type 5 (and why it matters)
Powder size affects how well paste can pass through small openings and how it behaves on fine features. Smaller powder can
help with miniature deposits, but it can also change shelf life and defect tendencies (like solder balling) if process control
isn’t tight. For many small SMT prototypes, Type 4 is a common “sweet spot,” while Type 3 is still widely used for larger
footprints and general work.
No-clean vs water-soluble flux
No-clean is popular for prototyping because it reduces the need for post-reflow cleaninghelpful when you’re trying to move
fast. Water-soluble can be great for certain assemblies, but it typically expects cleaning, and storage/handling rules can differ.
Always follow the paste’s datasheet for intended use and process windows.
Dialing In an Electric Dispenser: A Practical Setup Flow
Here’s a workflow that’s fast because it’s controlled. (Chaos feels fast until you count the rework.)
Step 1: Start with a “calibration card” board
Keep a scrap PCB (or a cheap breakout board) for test dots. This is where you tune shot time/speed and tip choice before you
touch your real board.
Step 2: Pick tip size based on the smallest footprint you care about
If you need dots for 0402/0201 parts, start with a finer tip and adjust shot time. For big pads (USB-C shield, connectors),
switch to a larger tip so you’re not doing 30 micro-dots like you’re stippling a pointillism painting.
Step 3: Set shot time, then adjust volume
Begin with short shots. Increase gradually until the dot covers a reasonable portion of the pad without bulging beyond it.
Your goal is consistent, repeatable depositsnot maximum paste output.
Step 4: Use pullback/suck-back to eliminate tails
If you see stringing, tails, or drool between dots, add pullback/vacuum. Increase only enough to stop drippingtoo much can
introduce bubbles or cause inconsistent starts.
Step 5: Work in small sections
Paste has a working life once exposed. For best placement control, dispense paste on a section of the board, place those
components, then move on. This keeps paste tacky enough to hold parts and reduces smearing accidents.
How an Electric Dispenser Speeds Up Reflow Prep in Real Builds
Example 1: The “prototype microcontroller board” sprint
Imagine a small board with a QFN microcontroller, a handful of 0402 passives, and a couple connectors. A stencil is greatif
you have one. But if you’re on Revision C before lunch, an electric dispenser lets you:
- Drop controlled dots on the QFN perimeter pads and a modest amount on the center pad (if used).
- Hit 0402 pads quickly with short, repeatable shots.
- Skip pads that don’t need paste yet (because that connector footprint might change… again).
The speed boost comes from not constantly fighting paste variability. With repeatable shots, your rhythm becomes:
dot-dot-dot → place → dot-dot → place → reflow. That’s the workflow you want when you’re iterating fast.
Example 2: Rework without re-stenciling
You reflow a board and realize one resistor value is wrong (classic). Instead of scraping, re-printing, and reflowing the whole
board, you can remove the part, clean the pads, dispense two controlled dots, place the new resistor, and reflow locally. A
dispenser turns “ugh” into “done.”
Common Defects (and How Better Dispensing Prevents Them)
Bridging
Usually caused by too much paste, especially on fine-pitch parts. Solution: reduce shot volume, use a finer tip, and verify you
aren’t leaving extra paste tails between pins.
Tombstoning
Often tied to uneven paste volume or uneven heating. If one pad gets a bigger paste deposit, the surface tension during
reflow can lift the part. Solution: match dot size on both pads and keep deposits consistent.
Solder balls
Can be influenced by paste formulation, powder size, and process conditions. Solution: follow paste handling rules (avoid
moisture), don’t overwork the paste, and use the recommended process window.
Opens / insufficient solder
Too little paste, paste dried out, or poor wetting conditions can lead to weak joints. Solution: increase dot volume slightly,
confirm paste is within working life, and ensure pads are clean.
Maintenance: The Fastest Dispenser Is the One That Doesn’t Clog
- Cap tips immediately when you pause. Paste exposed at the tip dries faster than you’d think.
- Wipe and replace tips instead of forcing a clog (forcing usually creates a paste “sneeze”).
- Store paste properly and track “out time” so you don’t dispense material that’s past its happy place.
- Keep the station clean so stray paste doesn’t end up on your board edge… or your sleeve… or your keyboard.
Safety Notes (Quick, Because You’re Here to Build Cool Stuff)
- If you use a toaster oven or similar for reflow, don’t use it for food afterward. Dedicated tools only.
- Follow the solder paste SDS for handling and ventilation. Even “no-clean” flux is still chemistry doing chemistry things.
- Wash hands after handling solder materials, and keep paste away from food/drinks (your coffee doesn’t need extra metal load).
Conclusion
An electric solder paste dispenser doesn’t replace good processit makes good process faster. By giving you repeatable dots,
clean cutoffs, and quick setup for prototypes and rework, it turns paste application from the slow, messy step into a controlled,
confidence-building routine. Combine smart paste handling (proper storage, warm-up, gentle mixing) with the right tip and
pullback settings, and your reflow prep becomes smoother, quicker, and far less “why is this bridged again.”
If you’re building one board today and a different revision tomorrow, an electric dispenser is the kind of upgrade that feels like
hiring a tiny, extremely focused assistantone who only speaks in perfectly sized solder dots.
Experiences from the Bench: What People Notice After Switching to an Electric Dispenser
In small labs, maker spaces, and prototype benches, the first “experience” people report is surprisingly emotional: relief. Not
the dramatic kindmore like the quiet relief of realizing you can stop squeezing a syringe like it owes you money. With a
foot pedal and a consistent shot, paste application becomes boring in the best way. You stop hovering over every pad wondering
whether the next squeeze will produce a perfect dot or a blob with delusions of grandeur.
Another common experience is discovering how much time was being lost to micro-corrections. Before an electric dispenser,
many builders do this loop: squeeze → inspect → wipe a smear → re-apply → inspect again. After switching, the loop changes to:
dispense → place → move on. The dot is consistent enough that you trust it, and trust is a productivity multiplier. It’s not that
the dispenser is “faster” by raw speed; it’s faster because it prevents the little detours that add up to half your evening.
People also notice that rework feels less intimidating. Replacing one QFN or fixing a connector pad becomes a contained
operation instead of a whole-board drama. You clean the site, put down controlled deposits, place the part, and reflowdone.
That confidence tends to change behavior: builders take on denser footprints, attempt finer-pitch parts, and iterate more
aggressively because the “paste step” is no longer the scary part. Even when a board fails, you’re more willing to revise and try
again because the setup cost is lower.
There’s also a learning curve experience that shows up almost everywhere: the realization that tip choice matters as much as
settings. Many first-time users try to solve everything with shot time. Then they swap to a better-matched tip and suddenly
their dots become crisp, their starts/stops cleaner, and clogs less frequent. It’s a classic hardware lesson: you can’t software
your way out of a nozzle that’s the wrong size. Once people build a small “tip and preset library” (this tip for 0402, that tip for
connector shells, that preset for QFN touch-up), speed jumps again because decisions disappear.
Finally, there’s the “I didn’t know paste handling was half the battle” moment. Users start paying attention to warm-up time,
keeping the paste sealed until it’s at room temperature, and capping tips whenever they pause. Those habits often come from
a few early mistakes: stringing because the paste warmed up, a sudden spit because an air pocket formed, or sluggish flow
because the paste was still cold. The dispenser makes these variables visible, which is actually helpfulonce you see how
temperature and exposure affect dot quality, you naturally tighten your routine. And when your routine tightens, your reflow
results improve. Not magicallyjust predictably.
Put all that together and the “experience” becomes simple: an electric solder paste dispenser reduces friction. Less squeezing,
less guessing, less cleanup, fewer accidental blobs. More building, more experimenting, and more boards that look like you
meant them to.


