
Table of Contents >> Show >> Hide
- Before You Start: The 3 “Big Savings” Rules
- 1) Deep Clean Like You’re Staging a Listing
- 2) Re-Caulk the Tub, Shower, and Sink Edges
- 3) Refresh Grout (Clean, Whiten, or Re-Color)
- 4) Paint the Walls a Light-Boosting Color
- 5) Paint (or Refinish) the Vanity Instead of Replacing It
- 6) Swap Vanity Hardware for Instant “New Bathroom” Energy
- 7) Update the Faucet (Without Re-Plumbing the Whole World)
- 8) Replace the Showerhead for a Better Daily Experience
- 9) Add a Curved Shower Curtain Rod (Yes, It Matters)
- 10) Upgrade the Mirror (Or Just Frame the One You Have)
- 11) Change the Vanity Light Fixture (Big Impact, Moderate Effort)
- 12) Switch to LED Lighting for Efficiency and Longevity
- 13) Install a Dimmer (Spa Vibes on a Budget)
- 14) Add Peel-and-Stick Wallpaper (Use It Strategically)
- 15) Try Peel-and-Stick Floor Tile for a Quick Refresh
- 16) Add Beadboard or Wainscoting for Instant Character
- 17) Paint the Ceiling (Yes, the Ceiling)
- 18) Replace the Toilet Seat (Small Change, Big Comfort)
- 19) Go Water-Smart With WaterSense-Labeled Fixtures
- 20) Add Storage Without Adding Square Footage
- 21) Upgrade Accessories as a “Mini Remodel”
- 22) Add a New Shower Curtain and Better Linens
- 23) Style Like a Designer: Trays, Jars, Greenery, and Art
- Budget-Friendly Game Plan: What to Do First
- Conclusion
- Experience Section: Real-World Lessons DIY Bathroom Remodelers Learn (the Fun Way)
Bathroom remodels have a reputation for being expensive, time-consuming, and full of surprises (the “surprise” is usually behind the toilet).
But here’s the good news: you don’t need a full gut renovation to make your bathroom look cleaner, brighter, and more expensive.
In fact, the most satisfying DIY bathroom upgrades are often the simplestpaint, lighting, hardware, and a few strategic swaps that make your
space feel brand new without sending your bank account into witness protection.
This guide focuses on budget-friendly bathroom remodel ideas you can DIY, especially over a weekend. We’ll prioritize high-impact changes,
keep the “oops” factor low, and sprinkle in practical examples so you can choose what fits your space, skill level, and budget.
(And yes, you can absolutely give your vanity a glow-up without a PhD in carpentry.)
Before You Start: The 3 “Big Savings” Rules
- Keep the layout: Moving plumbing or electrical is where budgets go to cry. Work with what you’ve got whenever possible.
- Refresh surfaces first: Paint, caulk, grout, and lighting can make a “meh” bathroom look custom for a fraction of the cost.
- Choose upgrades that fix daily annoyances: Wobbly towel bars, dim lights, and zero storage are quality-of-life issuessolve those first.
1) Deep Clean Like You’re Staging a Listing
Not glamorous, but wildly effective. Use a degreaser on soap-scum zones, polish fixtures, and scrub grout lines. A truly clean bathroom
makes every upgrade look more intentionalespecially if you’re adding new paint, decor, or lighting.
2) Re-Caulk the Tub, Shower, and Sink Edges
Old caulk can turn a bathroom from “fresh” to “haunted” fast. Remove the cracked or moldy caulk and reapply a smooth bead for a crisp finish.
Pro tip: painter’s tape is your best friend if your hands aren’t naturally “steady surgeon” level.
3) Refresh Grout (Clean, Whiten, or Re-Color)
Grout is the silent mood-setter of tile. Clean it thoroughly, then consider a grout pen or grout colorant to make floors and shower walls
look newer. Choosing a slightly deeper grout tone can also disguise future stains and reduce the “I swear I cleaned yesterday” feeling.
4) Paint the Walls a Light-Boosting Color
Paint is the cheapest dramatic transformation available. Bathrooms often look better with light neutrals, soft warm whites, pale grays,
or muted greens/blues. Keep sheen in mind: satin or semi-gloss tends to handle moisture better than flat paint.
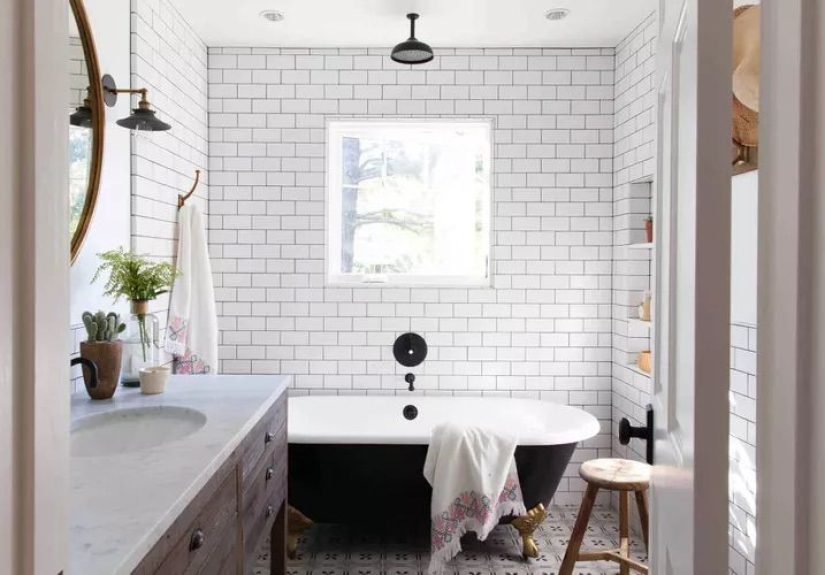
5) Paint (or Refinish) the Vanity Instead of Replacing It
Replacing a vanity can get pricey fast, especially once you add a top and faucet. Painting what you have is a classic DIY bathroom makeover move.
Example: a builder-grade oak vanity + cabinet paint + modern pulls = “custom look” on a sensible budget.
Prep matters: clean, scuff-sand, prime, then paint in thin coats.
6) Swap Vanity Hardware for Instant “New Bathroom” Energy
Cabinet pulls and knobs are basically bathroom jewelry. Match finishes for a cohesive lookmatte black, brushed nickel, or champagne bronze are
popular for a reason. This is one of the fastest upgrades with a surprisingly high return in “wow.”
7) Update the Faucet (Without Re-Plumbing the Whole World)
A modern faucet can make even an older sink look updated. Bonus: choosing a water-efficient faucet (or adding aerators) helps reduce water use
without changing your routine. If your faucet is dripping or crusty, this upgrade pulls double dutystyle plus function.
8) Replace the Showerhead for a Better Daily Experience
If your shower feels like a sad garden hose, swap the showerhead. Many DIY-friendly models install in minutes with basic tools.
Consider water-efficient options that still feel strongyour water bill may thank you, and your morning will definitely thank you.
9) Add a Curved Shower Curtain Rod (Yes, It Matters)
Curved rods make a shower feel roomier and keep the curtain from clinging to you like it’s emotionally attached. It’s also a low-cost way to
make a standard tub/shower combo feel more comfortable and a little more “hotel.”
10) Upgrade the Mirror (Or Just Frame the One You Have)
A mirror takes up visual real estateso it should earn its keep. Replace a dated frameless mirror with a framed one, or DIY a frame kit to
make the existing mirror look intentional. This is a favorite trick for making a bathroom feel styled, not slapped together.
11) Change the Vanity Light Fixture (Big Impact, Moderate Effort)
Lighting is a mood changer. Swap dated fixtures for a clean, modern bar light or sconces. Use bulbs with flattering brightness (think “I can see”
but not “interrogation room”). If wiring makes you nervous, get help from a qualified adult or licensed electricianbathrooms are not the place
for experimental electricity.
12) Switch to LED Lighting for Efficiency and Longevity
LEDs use less energy and last much longer than old-school bulbs, making them a smart budget upgrade over time.
Consider moisture-appropriate bulbs/fixtures for bathrooms (especially near showers), and keep the color temperature consistent so your bathroom
doesn’t look like it’s lit by three different suns.
13) Install a Dimmer (Spa Vibes on a Budget)
A dimmer lets your bathroom do double duty: bright for cleaning and calm for baths. If you’re not comfortable working with switches, this is a
great “hire a pro for one hour” taskstill budget-friendly compared to major renovations.
14) Add Peel-and-Stick Wallpaper (Use It Strategically)
Wallpaper can add personality fastpowder rooms especially love drama. Use it on a single wall, above wainscoting, or behind the vanity.
Pick patterns that won’t overwhelm the space. In smaller bathrooms, one strong statement beats five competing “statements.”
15) Try Peel-and-Stick Floor Tile for a Quick Refresh
If your floor is dated but intact, peel-and-stick tile can be a budget-friendly facelift. The key is surface prep: clean thoroughly and make sure
the floor is smooth and stable. It’s not magic, but it can be a weekend-worthy “before and after” that feels like a real remodel.
16) Add Beadboard or Wainscoting for Instant Character
Beadboard and wainscoting add architecture where there wasn’t any. Keep it simple: a chair-rail height panel in a crisp white or a soft tone
can make your bathroom feel more classic and finished. Bonus: it hides minor wall imperfections.
17) Paint the Ceiling (Yes, the Ceiling)
A freshly painted ceiling can brighten the entire room, especially if it’s yellowed or patchy. Most people forget it existsso when it looks good,
the whole bathroom feels cleaner. If you want a designer trick, try a very pale tint of the wall color overhead for a soft, wrapped look.
18) Replace the Toilet Seat (Small Change, Big Comfort)
If your toilet seat is old, loose, or stained, replace it. It’s inexpensive, easy, and surprisingly satisfying.
Consider soft-close hinges so nobody has to hear a toilet seat slam like a courtroom gavel at 2 a.m.
19) Go Water-Smart With WaterSense-Labeled Fixtures
If you’re replacing a faucet, showerhead, or toilet anyway, look for WaterSense-labeled options.
Water-efficient upgrades can reduce water use without sacrificing performanceand that’s a rare “feel good” upgrade that also saves money long-term.
20) Add Storage Without Adding Square Footage
The best budget bathroom remodel idea might be solving clutter. Add floating shelves above the toilet, baskets under the sink,
or a slim rolling cart. Example: two shelves + labeled bins = “I’m organized” even if your life is not.
21) Upgrade Accessories as a “Mini Remodel”
Coordinated towel bars, a matching toilet paper holder, and a simple robe hook can make a bathroom feel cohesive.
If your fixtures are mismatched (chrome here, brass there, mystery metal everywhere), updating accessories creates instant visual calm.
22) Add a New Shower Curtain and Better Linens
A fresh shower curtain is basically a new wall. Pair it with fluffy towels and a washable bath mat for an inexpensive “spa” upgrade.
Stick to a simple palette (two neutrals + one accent) to avoid turning your bathroom into a fabric sample sale.
23) Style Like a Designer: Trays, Jars, Greenery, and Art
Styling is the finishing move. Use a small tray for daily items, add apothecary-style jars for cotton rounds or Q-tips,
hang moisture-friendly art, and bring in a plant that can handle humidity. These details make your bathroom feel intentionalnot accidental.
Budget-Friendly Game Plan: What to Do First
If you only have $100–$300
- Paint + new hardware
- New showerhead + fresh caulk/grout refresh
- Better lighting bulbs + new accessories
If you have $300–$800
- Paint vanity + swap faucet + upgrade mirror
- New vanity light fixture + LED bulbs
- Peel-and-stick flooring or wallpaper accent wall
If you have $800–$1,500 (still DIY-friendly)
- Replace the vanity (keep plumbing locations) + update lighting
- Water-smart toilet replacement + storage upgrades
- Feature wall with beadboard/wainscoting + styling refresh
Conclusion
A budget-friendly bathroom remodel isn’t about cutting cornersit’s about choosing the right corners to improve.
When you focus on surfaces (paint, grout, caulk), fixtures (lighting, faucet, showerhead), and function (storage, comfort),
your bathroom can feel dramatically more modern without the cost of a full renovation.
Start with the upgrade that fixes your biggest daily annoyance, then stack a few small wins.
By the time you’re done, you’ll have a bathroom that looks cleaner, feels brighter, and functions betterwithout requiring a second job.
Experience Section: Real-World Lessons DIY Bathroom Remodelers Learn (the Fun Way)
DIY bathroom upgrades tend to come with a shared set of “ohhh, that’s why professionals do it that way” momentsand learning those lessons
can save you time, money, and at least one dramatic sigh. One of the most common experiences is realizing that prep work is the project.
Painting a vanity sounds like a simple weekend win until you meet the reality of cleaning off hair spray residue, sanding glossy finishes,
labeling hinges, and waiting for primer to dry. The funny thing is: the people who love their results are usually the ones who didn’t rush.
Thin coats, proper cure time, and patient reassembly beat “I want it done by dinner” every single time.
Another classic experience: the “one more trip to the store” phenomenon. Even small bathroom refreshes often require an extra run
for painter’s tape, a better caulk tool, a missing supply line, or the correct bulb base you didn’t know existed. The best DIYers plan for this
by buying the boring essentials early (drop cloth, gloves, sandpaper, painter’s tape, caulk remover) and keeping receipts organized.
If you’re doing multiple upgradessay, mirror + lighting + hardwaretry to pick finishes in advance so you don’t end up with a bathroom that
looks like three different design shows filmed there at once.
DIY remodelers also learn quickly that lighting is emotional. A bathroom can be freshly painted and still feel “off” if the bulbs are
too cool, too dim, or mismatched. Many people go through a mini bulb audition: one day the bathroom looks clean and crisp, the next day it looks
like a sci-fi spaceship, and by day three they’ve found the sweet spot. A simple tip: keep all bulbs the same color temperature in the space,
and prioritize flattering vanity lighting. Better lighting makes paint colors look better, mirrors look cleaner, and the entire room feel more open.
Storage upgrades often come with a surprise lesson too: clutter is a design problem. You can install a beautiful mirror and modern
hardware, but if toothbrushes, half-used products, and random bottles live on every surface, the bathroom will still look busy.
DIY remodelers who feel “wow” after their refresh usually create a tiny system: a tray for daily items, a bin for backups under the sink,
and a rule that the counter only holds what gets used every day. It’s not about being perfectit’s about making the room easier to maintain.
Finally, there’s the big budget lesson: in-stock choices keep projects affordable. When you fall in love with a faucet that’s backordered
for six weeks, your whole timeline can stalland delays can lead to extra shipping fees, extra returns, or “temporary solutions” that become permanent.
Many successful DIY bathroom remodelers pick readily available items first (especially fixtures), then add personality with paint, decor,
and styling. That combosmart basics plus flexible finishing touchescreates a bathroom that looks custom, feels functional, and stays within budget.
The best part? Once you’ve done a few DIY upgrades, your confidence grows. You stop seeing a bathroom as a money pit and start seeing it as a series
of solvable problemswith a paint roller and a playlist.


