
Table of Contents >> Show >> Hide
- What Is the Homebrew Browser, Exactly?
- What You Need Before You Install the Homebrew Browser
- How to Install the Homebrew Browser Step by Step
- Step 1: Confirm that the Homebrew Channel is already working
- Step 2: Prepare your SD card
- Step 3: Download the current Homebrew Browser package
- Step 4: Extract the files to the root of the SD card
- Step 5: Put the SD card back into the Wii
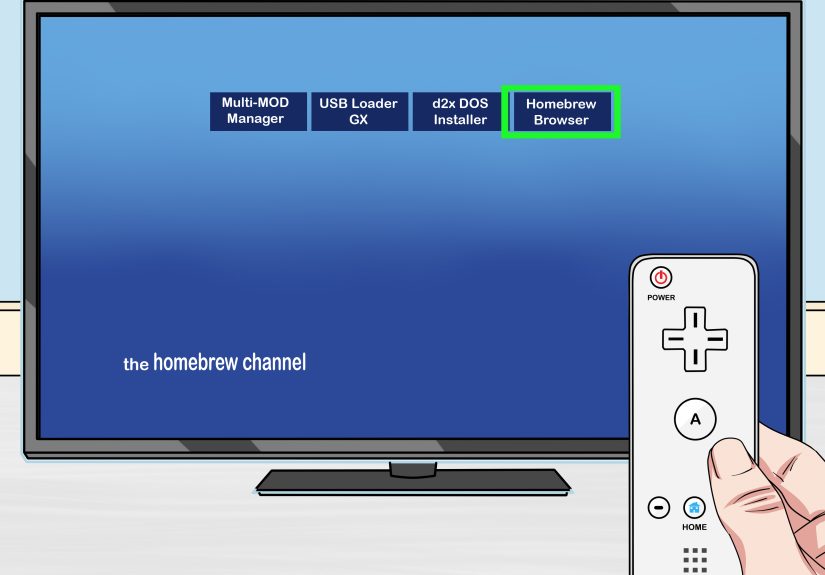
- Step 6: Launch the Homebrew Browser
- Step 7: Download your first app and test it
- Common Problems and How to Fix Them
- Is the Homebrew Browser Still Worth Installing?
- What the Experience Is Really Like
- Conclusion
If you own an old Wii, there comes a magical moment when you realize the little white box under your TV still has some life left in it. Not “kind of alive,” either. More like “why is this 2006 console suddenly acting like a tiny indie app machine?” alive. That is where the Homebrew Browser comes in. It gives your Wii a much easier way to find and install homebrew apps directly from the console, without the constant ritual of popping your SD card in and out like you are performing ancient storage-card yoga.
There is one important modern twist, though: when people talk about installing the Homebrew Browser today, they usually mean the version supported by the Open Shop Channel. In other words, this is not just dusty retro software floating around the internet with 2009 energy and zero supervision. It is an actively kept-alive path for browsing Wii homebrew from the Wii itself. That makes the process far more practical than many older guides suggest.
In this guide, you will learn what the Homebrew Browser is, what you need before you install it, how to set it up step by step, how to fix the most common problems, and what the real experience is like once you start using it. We will keep things clear, beginner-friendly, and a little fun, because console modding is stressful enough without sounding like a motherboard manual written by a grumpy toaster.
Note: Use Homebrew Browser for legal homebrew software and content you have the right to use on hardware you own.
What Is the Homebrew Browser, Exactly?
The Homebrew Browser is a Wii application that lets you browse, download, and manage homebrew apps directly on the console. Instead of hunting down files on your computer, unzipping them manually, and hoping the folder structure is correct, you can launch the browser through the Homebrew Channel and install many apps from there.
That convenience is the whole appeal. Older tutorials often describe a clunky setup process where every new app requires a trip back to your computer. The Homebrew Browser cuts down that friction. It is the difference between shopping in a store and digging through three mystery boxes in your attic labeled “Wii stuff maybe.”
One more thing worth knowing: many current Wii homebrew guides prefer LibreShop as the more modern option, while the Homebrew Browser remains a popular graphical alternative. If you specifically want the classic visual experience with point-and-click browsing on the console itself, the Homebrew Browser is still a solid choice.
What You Need Before You Install the Homebrew Browser
Before you install anything, make sure you have the basics covered. Skipping this part is how people end up blaming the Wii, the SD card, the router, the moon phase, and eventually themselves.
1. A homebrewed Wii
The Homebrew Browser does not replace the Homebrew Channel. It depends on it. So your Wii must already be homebrewed and able to launch apps through the Homebrew Channel. If your console is not there yet, that is your first stop.
2. An SD card or compatible USB device
Most people still use an SD card, and it is usually the simplest choice. The key is having a working device that your Wii can read properly. Your storage should contain an apps folder at the root, because that is where the Homebrew Browser files need to live.
3. A computer for the initial file setup
Ironically, the tool that helps you stop using your computer still requires your computer once. You will use it to download the Homebrew Browser package and extract the files onto the SD card or USB device.
4. A working internet connection on the Wii
The Homebrew Browser needs the Wii to go online so it can fetch app listings and downloads. If your Wii refuses to connect, remember that the console is picky: it works with 2.4GHz wireless and supports older 802.11b/g-style compatibility. If your router is set to modern-only modes, the Wii may stare blankly into the network void.
5. A writable SD card
This tiny detail causes a ridiculous number of problems. If the physical write-lock switch on the SD card is enabled, the Homebrew Browser may fail to launch or download anything properly. Tiny switch, enormous drama.
How to Install the Homebrew Browser Step by Step
Now for the part you actually came for. Here is the practical installation process.
Step 1: Confirm that the Homebrew Channel is already working
Turn on your Wii and launch the Homebrew Channel. If it opens normally and you can already see at least one app, great. You are ready to install the Homebrew Browser. If the Homebrew Channel is not installed yet, stop here and finish that setup first. The browser is an app inside the channel, not a replacement for it.
Step 2: Prepare your SD card
Insert the SD card into your computer and open it. At the root of the card, you should either already have an apps folder or create one now. The root means the main top-level location on the card, not buried inside another folder like Downloads, Wii Files, or Things I Meant to Organize in 2018.
If your card is write-protected, unlock it before continuing. Also, if your card has become a junk drawer of random files, this is a good time to tidy up a bit so you can actually tell what belongs there.
Step 3: Download the current Homebrew Browser package
Get the currently recommended Homebrew Browser package from the Open Shop Channel source. Modern guides point there because it provides the supported version that works with the current server setup. This matters because very old copies of the browser can behave badly, fail to load app lists, or act like the internet ended somewhere around 2011.
Step 4: Extract the files to the root of the SD card
Open the ZIP file you downloaded and extract its contents to the root of the SD card. If the archive already contains an apps folder, merge it into the root. When you are done, the file structure should look something like this:
Some packages may include extra documentation, but the important thing is that the Homebrew Browser app folder ends up inside /apps/. If you place the folder one level too deep, the Homebrew Channel will not detect it. That is one of the most common mistakes, and yes, it happens to almost everyone at least once.
Step 5: Put the SD card back into the Wii
Safely eject the SD card from your computer, insert it into the Wii, and launch the Homebrew Channel. If everything is in the correct place, you should see the Homebrew Browser appear as an available app.
If it does not show up, do not panic and do not accuse the Wii of betrayal just yet. In most cases, the folder structure is wrong, the ZIP was extracted into the wrong location, or the card is still write-locked.
Step 6: Launch the Homebrew Browser
Select the app from the Homebrew Channel and launch it. On first run, the browser may need a moment to initialize, build caches, or load its interface. Once it is up, you can use the Wii Remote to browse available homebrew apps and games.
This is where the installation starts paying off. Instead of returning to your computer for every single new app, you can browse categories right on the console. That old Wii suddenly feels a lot more alive.
Step 7: Download your first app and test it
Pick something simple and well-known, download it, and verify that it installs and appears correctly. A successful first download tells you three important things: your Wii is online, the browser is reading and writing to the storage correctly, and your folder setup is behaving itself. That is the homebrew equivalent of hearing a car engine turn over on the first try.
Common Problems and How to Fix Them
The Homebrew Browser does not appear in the Homebrew Channel
This is usually a folder issue. Check that the path is /apps/homebrew_browser/ and that the folder contains the core files such as boot.dol, plus the usual icon and metadata files when included. If the app folder is nested incorrectly, the channel will ignore it like it was never invited.
The app starts, but it cannot download anything
Check your internet connection on the Wii first. If the console cannot connect to your network, the browser cannot reach the app repository. On many modern routers, the problem is compatibility: the Wii needs 2.4GHz and older wireless modes. If your router is running in 5GHz-only or newer standards without backward-friendly settings, the Wii may simply refuse to cooperate.
The SD card seems fine, but the browser still acts weird
Make sure the write-protect switch is off. Also confirm that the card is healthy and readable. Some mysterious “nothing works and I am losing patience” situations come down to a flaky card, a poor adapter, or a file system that has seen better days.
You installed an ancient version from an old tutorial
This happens a lot because retro tutorials never die; they just keep floating around search results like digital ghosts. If you used a very old package, remove it and grab the current Homebrew Browser package recommended by the Open Shop Channel ecosystem. That is usually faster than trying to rescue an outdated copy.
Is the Homebrew Browser Still Worth Installing?
Yes, if you like convenience and you want a graphical, on-console way to browse homebrew. It is especially useful for casual tinkerers who do not want to manually manage every app from a desktop computer. It also feels appropriately “Wii-like,” which sounds silly until you use it and realize the whole point of the console was always ease and charm.
That said, it is not the only option anymore. Some modern guides prefer LibreShop because it is more current and often more reliable. Still, the Homebrew Browser remains a familiar and friendly tool for many users, especially those who want the classic experience and do not mind that the interface shows its age in places.
So, if you want a clean answer: the Homebrew Browser is not the newest kid in class, but it is still absolutely worth installing if you enjoy the idea of downloading Wii homebrew from the Wii itself.
What the Experience Is Really Like
Installing the Homebrew Browser is one of those projects that sounds more intimidating than it feels once you are actually doing it. The hardest part is usually not the browser itself; it is the emotional roller coaster of dealing with old hardware. You start the process feeling confident, then spend ten minutes wondering why the Wii cannot see your SD card, then realize the lock switch is on, then feel like a genius again. Retro tinkering is humbling that way.
For many people, the experience is surprisingly charming. The Wii was designed around simple menus, a pointer-based remote, and a living-room-friendly style, so using a browser-like tool on it feels more natural than you might expect. Once the Homebrew Browser appears inside the Homebrew Channel, there is a little moment of victory. It is not flashy. No fireworks. No orchestral soundtrack. Just a quiet little “oh, nice, it works.” Somehow that feels even better.
The first launch can also be a lesson in patience. Older consoles do not move at modern smartphone speed, and the Wii definitely has opinions about how fast it would like to do things. Menus can feel a little slow. Downloads may not be lightning-fast. The interface can look dated in a way that is both endearing and slightly hilarious. But that is part of the fun. You are not turning the Wii into a futuristic supercomputer; you are giving it a very clever second act.
Another common experience is rediscovering how many small details matter in old-school setup work. Modern apps hide everything from you. The Wii does not. Folder placement matters. Wireless compatibility matters. Whether the SD card is write-protected matters. Even the difference between extracting a ZIP to the root of the card and extracting it into the wrong folder matters. It can feel picky, but it also makes the success more satisfying because you know you actually set it up correctly.
There is also a very real nostalgia factor. Using the Homebrew Browser on a Wii in the present day feels like opening a side door into gaming history. You are working with a console that was never meant to function as a tiny homebrew storefront, yet here it is, happily browsing and downloading software years after its mainstream peak. That gives the whole experience a scrappy, community-driven vibe that many people love. It is less like buying into a polished ecosystem and more like joining a clever long-running DIY club.
For beginners, the biggest emotional shift usually comes after the installation is finished. Beforehand, the process can seem technical and fragile. Afterward, it feels approachable. Once the browser is installed, the Wii becomes much easier to experiment with. You are no longer thinking, “Can I do this?” You are thinking, “What else can this thing run?” That is the exact moment an old console turns from a dusty memory into an active hobby.
And yes, there will probably be at least one mildly ridiculous obstacle. A missing app icon. A folder in the wrong place. A router setting that makes no sense. A moment where the Wii seems to be offended by modern networking as a concept. But that is honestly part of the experience too. Getting the Homebrew Browser installed is not just a setup task; it is a tiny adventure in keeping old hardware useful, weird, and delightfully alive.
Conclusion
If you want the easiest way to browse Wii homebrew directly from your console, the Homebrew Browser is still a smart install. The modern approach is simple: make sure your Wii already has the Homebrew Channel, use a writable SD card or compatible USB device, download the current package supported through the Open Shop Channel ecosystem, extract it to the root so the app lands inside /apps, and then launch it from the Homebrew Channel.
From there, the fun starts. You spend less time shuffling files on a computer and more time actually exploring what the Wii homebrew scene has to offer. For a console that many people wrote off years ago, that is a pretty great comeback story.


