
Table of Contents >> Show >> Hide
- Before You Start: Set Yourself Up for Craft Success
- Idea #1: The Classic Egg Carton Flower Bouquet (The “I Can’t Believe That’s Trash” Starter)
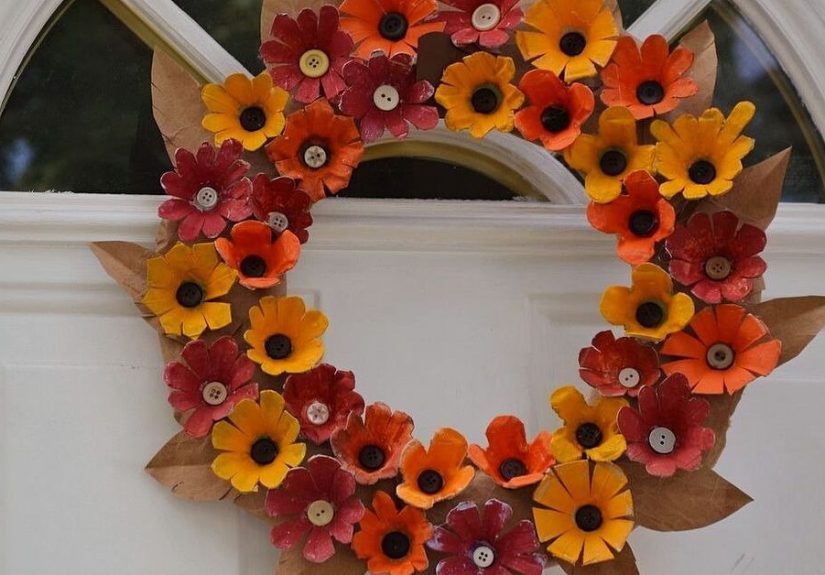
- Idea #2: A Spring Wreath Covered in Egg Carton Blooms
- Idea #3: Egg Carton Flower Garland for Walls, Mantels, and Parties
- Idea #4: Light-Up Flower String Lights (Yes, You’re Allowed to Be This Delightful)
- Idea #5: A Hanging Egg Carton Flower Mobile (Whimsical, Not Noisy)
- Idea #6: 3D Egg Carton Flower Canvas Art (Textured Wall Decor That’s Actually Fun to Make)
- Idea #7: Egg Carton Flower Prints (Stamp Your Own Wrapping Paper, Cards, or Wall Art)
- Idea #8: Egg Carton Flower Magnets (Tiny Cheer for Your Fridge or Locker)
- FAQ: Little Problems You’ll Run Into (And Easy Fixes)
- Real-Life Crafting Experiences: What You’ll Notice When You Actually Make These
- Conclusion: Your Egg Cartons Have a Second Life Now
Somewhere between “I should recycle this” and “why do I suddenly own twelve glue sticks?” lives the humble egg carton.
Cardboard egg cartons are basically pre-cut sculpting material: lightweight, paint-friendly, and already shaped like little flower cups.
With a few snips and a little color, you can turn breakfast leftovers into bright blooms that never wilt, never need watering,
and will not judge you for forgetting them on a windowsill.
Below are eight egg carton flower craft ideassome quick enough for a rainy afternoon, others worthy of “wait… you made that?!”
status. I’ll walk you through what to use, how to shape petals, how to keep the carton from getting soggy, and how to make the
final result look less “kindergarten mystery blob” and more “cheerful handmade décor.”
Before You Start: Set Yourself Up for Craft Success
1) Pick the right egg carton (your future self will thank you)
Choose paper pulp/cardboard egg cartons whenever possible. They cut cleanly, hold paint well, and can be shaped
into crisp petals. Foam cartons are frustrating to paint, harder to glue neatly, and generally feel like they were invented to
test your patience.
2) A simple supply list that covers (almost) everything
- Cardboard egg cartons (12-count or 18-count are both great)
- Scissors (and a craft knife for adults-only detail work)
- Paint (acrylic for bold color; tempera for kid-friendly projects)
- Paintbrushes + a cheap sponge brush for quick coverage
- Glue (tacky glue for kids; hot glue for fast, strong holds)
- Optional “wow” extras: buttons, beads, pom-poms, glitter, tissue paper, metallic paint, Mod Podge/sealer
- For stems: pipe cleaners, floral wire, paper straws, skewers, or craft sticks
3) The petal-shaping cheat codes
- Rough edge = realistic: Slightly jagged petals can look more like real blooms than perfectly round ones.
- Layering is instant “fancy”: Stack two or three cups (small on top of large) to create depth.
- Cut “V” notches: A tiny V cut between petals helps them flare outward instead of sticking together.
- Paint smarter: Use thicker paint or two light coatstoo much water can soften the carton and blur details.
- Seal for durability: A thin coat of Mod Podge or clear craft sealer helps your flowers survive real life.
4) Quick safety note
If you’re using a craft knife, wire cutters, or a hot glue gun: adult supervision is a must. Hot glue is basically lava with a
marketing teamrespect it accordingly.
Idea #1: The Classic Egg Carton Flower Bouquet (The “I Can’t Believe That’s Trash” Starter)
This is the gateway craft: simple steps, big payoff. You’ll make individual blooms, add stems, and gather them into a bouquet
that looks cheerful on a desk, kitchen counter, or anywhere you need a little color therapy.
Materials
- Cardboard egg carton cups (6–12 cups for a small bouquet)
- Acrylic or tempera paint
- Pipe cleaners, floral wire, or paper straws (stems)
- Glue
- Optional centers: pom-poms, buttons, beads, crumpled tissue paper
Steps
- Cut the cups: Separate egg cups and trim away extra cardboard.
- Shape petals: Cut 4–6 petal points around the rim, then round them slightly.
- Paint: Apply one coat, let dry, then add a second coat for brighter color. Add quick highlights with a lighter shade along the petal edges.
- Add a center: Glue a pom-pom/button inside the cup.
- Attach a stem: Poke a small hole in the center (adult help), then push a pipe cleaner or floral wire through and bend the end inside to lock it in place.
- Finish: Twist leaves from green pipe cleaners or glue on paper leaves.
Make it look extra good with minimal effort
- Color combo hack: Paint the inside darker and the outer petals lighter for instant dimension.
- Shape variety: Mix rounded petals, pointed petals, and fringed petals in one bouquet.
- Display trick: Put the bouquet in a jar with rice or pebbles so stems stand upright.
Idea #2: A Spring Wreath Covered in Egg Carton Blooms
If you want “front door energy” without buying a new wreath every season, egg carton flowers are your budget-friendly best friend.
Make a wreath once, then swap colors through the year: pastels for spring, brights for summer, rust-and-gold for fall, icy tones
for winter.
Materials
- Lots of egg carton flowers (plan on 25–50 depending on wreath size)
- Wreath base: cardboard ring, embroidery hoop, foam form, or a wire hanger shaped into a circle
- Paint (acrylic tends to look boldest)
- Hot glue (strongly recommended for speed)
- Optional: ribbon bow, faux greenery, small berries, letter monogram
Steps
- Build the base: Cut a sturdy cardboard ring (outer circle and inner circle).
- Make flowers in batches: Cut, shape, and paint all blooms before you start gluing.
- Plan your color layout: Dry-fit flowers around the ringlike a puzzlebefore committing with glue.
- Glue from the outside in: Start with larger flowers around the outer edge, then fill gaps with smaller blooms.
- Add accents: Tuck greenery or ribbon where the wreath needs balance.
- Seal (optional): A light craft sealer helps prevent scuffs if the wreath gets bumped.
Design ideas
- Monochrome modern: All white flowers with a single gold center on each bloom.
- Ombre ring: Deep color at the bottom fading lighter as you go up.
- Daisy-dense: Lots of small flowers packed tightly for a lush look.
Idea #3: Egg Carton Flower Garland for Walls, Mantels, and Parties
Garlands are the decorating equivalent of playing a cheerful song at low volume: they instantly change the mood.
This one is lightweight, easy to customize, and perfect for birthdays, baby showers, spring holidays, or “I refuse to let winter win.”
Materials
- Egg carton flowers (10–30 depending on garland length)
- Twine, yarn, or sturdy string
- Paint
- Needle or skewer for holes (adult help)
- Optional: beads between flowers, ribbon tails, paper leaves
Steps
- Paint first: Painted flowers look cleaner than trying to paint once they’re on the string.
- Poke center holes: Make a small hole in the middle of each flower.
- String them up: Thread twine through each bloom.
-
Keep spacing consistent: Tie a small knot under each flower to stop it from sliding.
(Or add a bead as a spacerbonus sparkle.) - Hang: Tape, tack, or tie to a dowel for a neat “wall banner” look.
Quick variations
- Kids’ version: Bigger flowers, fewer pieces, bright primary colors.
- Minimalist version: Unpainted carton flowers + natural twine for a neutral, textured look.
- Seasonal swap: Add paper snowflakes in winter or tiny paper butterflies in spring.
Idea #4: Light-Up Flower String Lights (Yes, You’re Allowed to Be This Delightful)
Take your garland from “cute” to “magical” by pairing egg carton flowers with string lights.
The cardboard acts like a tiny lampshade, softening the glowcozy enough for a bedroom, whimsical enough for a party.
Materials
- LED string lights (cool-to-the-touch LEDs only)
- Egg carton flowers (roughly one per bulb you want covered)
- Paint + brush
- Scissors and a pencil/skewer
- Optional: glitter paint or pearlescent topcoat
Steps
- Paint and dry: Make sure flowers are fully dry so paint doesn’t transfer to the bulbs.
- Cut a small X in the center: Start tiny. You can always widen it, but you can’t un-cut cardboard (sadly).
- Push bulb through: Gently insert each light into a flower so the bulb sits inside like a glowing center.
- Test your spacing: Adjust the flower orientation so the petals face outward nicely.
- Hang and enjoy: Mantel, headboard, bookshelfinstant mood upgrade.
Tips so it looks polished
- Use a limited palette: Two to three colors can look more “designer” than eight.
- Dry brush highlights: Lightly brush white or metallic paint on petal edges for glow-friendly dimension.
- Seal lightly: A thin clear coat helps reduce paint rub-off during assembly.
Idea #5: A Hanging Egg Carton Flower Mobile (Whimsical, Not Noisy)
Mobiles aren’t just for nurseries. A flower mobile in a corner of a room adds movement and softnesslike having spring gently
hovering near your ceiling. The key is balancing the strands so it hangs evenly (and doesn’t bonk anyone in the head).
Materials
- Egg carton flowers (15–30)
- Branch, embroidery hoop, or two crossed craft sticks (mobile frame)
- String, fishing line, or thin cord
- Needle/skewer for holes
- Optional: small beads, bells, or paper leaves (keep it light)
Steps
- Make the flowers: Cut, shape, and paint. Let dry completely.
- Create hanging holes: Poke a hole through each flower center.
- Prep strands: Cut multiple strings at different lengths for visual variety.
- Thread flowers: Tie a knot below each bloom (or use a bead + knot combo) so they stay in place.
- Attach to frame: Tie strands around the branch/hoop/sticks, spacing evenly.
- Balance: Hang temporarily and adjust knots until it’s level.
Extra-credit ideas
- Gradient mobile: Darker colors at the top fading lighter toward the bottom.
- Petal mix: Add a few fringed flowers so the whole thing doesn’t look too uniform.
- Quiet sparkle: A tiny touch of glitter on the centers catches light without becoming a craft explosion.
Idea #6: 3D Egg Carton Flower Canvas Art (Textured Wall Decor That’s Actually Fun to Make)
If you like crafts that look “gallery-ish” without the gallery price tag, 3D egg carton canvas art is your move.
You’ll paint flowers, glue them onto a painted background, and add stems/leaves for a raised, tactile finish.
Materials
- Canvas or sturdy cardboard panel
- Egg carton flower pieces
- Paint (acrylic works beautifully for bold color)
- Glue (craft glue or hot glue)
- Optional: sparkle topcoat, buttons, pipe cleaners for stems
Steps
- Paint the background: Solid color, simple stripes, or a soft gradient skykeep it easy.
- Make and paint flowers: Let them dry fully before attaching.
- Arrange first: Place flowers on the canvas without glue until the layout feels balanced.
- Glue down: Start with larger blooms, then fill gaps with smaller ones.
- Add stems/leaves: Paint stems, glue paper leaves, or twist pipe cleaners into simple shapes.
- Finish coat (optional): A clear sealer or Mod Podge can protect the surface and add shine.
Composition tips
- Odd numbers: 3, 5, or 7 main blooms often look more natural than 4 or 6.
- Vary the heights: Stagger flower placement so your bouquet looks like it has depth.
- Leave breathing room: Empty space helps the texture pop instead of feeling cluttered.
Idea #7: Egg Carton Flower Prints (Stamp Your Own Wrapping Paper, Cards, or Wall Art)
Want the flower vibe without cutting 30 petals? Use egg carton cups as stamps.
This one is especially great for kids because the process is fast, repeatable, and forgivingevery “mistake” just becomes part of
the pattern (which is a nice life lesson disguised as a craft).
Materials
- Egg carton cups (different sizes give you different flower shapes)
- Washable craft paint
- Paper: cardstock, kraft paper, butcher paper, or a blank canvas
- Paper plates or paint tray
- Optional: markers for stems, dots, and details
Steps
- Set up paint: Put small puddles of paint on a plate.
- Dip the cup edge: Lightly coat the rim (not dripping wet).
- Stamp: Press onto paper firmly, then lift straight up.
- Repeat: Rotate the cup slightly each time for a varied look.
- Add details: Use a marker for stems and leaves, or a cotton swab for dotted flower centers.
Where to use your prints
- DIY wrapping paper: Stamp on kraft paper and tie with twine.
- Homemade cards: Add a simple messageyour future self will appreciate having cards ready.
- Wall art: Stamp a repeating pattern, frame it, and pretend you planned it all along.
Idea #8: Egg Carton Flower Magnets (Tiny Cheer for Your Fridge or Locker)
Flower magnets are the perfect “small win” craft: quick to make, easy to gift, and surprisingly joyful. They also help turn your
refrigerator into less of a “paper pile panic zone” and more of a “look, I’m thriving” zone.
Materials
- Egg carton flower pieces
- Paint
- Small magnets (craft magnets or cut magnetic sheet)
- Strong glue (E6000-style craft glue or hot glue, depending on magnet type)
- Optional: faux mini flowers, paper blooms, rhinestones, or button centers
Steps
- Cut and shape: Make a small flower (4–6 petals) from one egg cup. For a fuller look, stack two flowers.
- Paint and dry: Let everything dry completely so the magnet glue sticks well.
- Add a center: Glue on a button, bead, or tiny paper bloom.
- Attach magnet: Glue the magnet to the back. Press firmly and let cure per glue instructions.
- Optional seal: A light coat of sealer helps the paint resist scuffs.
Ideas for gifting
- Mini sets: Make 3–5 magnets in matching colors and tie them together with ribbon.
- Teacher gifts: Add a small note: “Thanks for helping me grow.” (Yes, it’s cheesy. Yes, it works.)
- Seasonal themes: Pastels for spring, red/white for holidays, orange/yellow for fall.
FAQ: Little Problems You’ll Run Into (And Easy Fixes)
What paint works best on egg carton flowers?
Acrylic paint gives the brightest color and crispest coverage. Tempera is great for kids and classroom crafting, but you may need
an extra coat. Avoid overly watery paint mixestoo much moisture can soften the carton.
How do I keep the carton from getting soggy?
Use thin coats of paint, let layers dry fully, and don’t soak pieces in water. If you want a watercolor look, try dry brushing
acrylics or using a sponge brush with minimal water.
How do I make petals curl like real flowers?
After painting and drying, gently curl petals around a pencil. If you want more shape, lightly bend outward at the base of each
petal, then add a second flower layer inside.
Can I make these crafts last longer?
Yesseal finished flowers with a thin coat of Mod Podge or clear craft sealer. For wreaths and mobiles, sealing also helps reduce
wear from handling.
Real-Life Crafting Experiences: What You’ll Notice When You Actually Make These
The first “experience surprise” with egg carton flowers is how quickly your brain changes its mind about trash. You start with a
carton that looks like it wants to retire in the recycling bin, and within five minutes you’re holding something that genuinely
resembles a bloom. That transformation hits a sweet spot: it’s satisfying in the practical, “I made a thing” way, but also a
little magicallike you hacked the universe with scissors and paint.
The second surprise is texture. Egg cartons aren’t flat paper; they’re slightly rough, slightly bumpy, and weirdly perfect for
petals. When you paint them, the fibers catch color in a way that makes highlights look accidental (in the best possible way).
Add a tiny bit of lighter paint to the edges and suddenly you have depthno advanced art degree required. People often expect
craft flowers to look overly smooth or plastic-y. Egg carton flowers tend to land in a cozy middle ground: handmade, but not
“messy,” especially once you layer cups or add a defined center.
If you’re crafting with kids, the experience shifts from precision to personality. The “perfect” petal shapes matter less than
the energy of the color choices. Kids will paint a flower neon green and confidently announce it’s a “dragon daisy,” and honestly,
that kind of joy is the point. It’s also one of those projects where kids can do meaningful parts independently: painting, adding
centers, stamping prints, or choosing layouts for canvas art. Adults can handle the trickier steps (craft knife holes, hot glue,
wire cutting) without taking over the whole activity.
Another real-world moment: the “layout spiral.” When you make a wreath or 3D canvas, you may spend a ridiculous amount of time
moving flowers around like you’re solving a floral Rubik’s Cube. That’s normal. The fix is to use a simple rule: start big, then
fill small. Place your largest blooms first, then tuck smaller flowers into gaps. If your piece looks chaotic, reduce the color
palette (two to three main colors plus one accent). That one decision can make a craft look intentionally designed instead of
accidentally loud.
Finally, there’s the quiet satisfaction of having decor that’s both cute and a conversation starter. People love hearing, “It’s
made from an egg carton,” because it’s unexpectedand because it reminds them that creativity doesn’t require a fancy supply list.
Whether you hang a garland for a party, make magnets for your fridge, or build a mobile that gently spins in the corner, the
experience is the same: you’ve added color, texture, and a little optimism to your space using something you almost threw away.
That’s a small win with big “brighten your day” energy.


