
Table of Contents >> Show >> Hide
- Why Faux Embroidery on a Lampshade Works So Well
- Materials and Tools You’ll Need
- Pick the Right Lampshade (It Matters More Than You Think)
- DIY Faux Embroidered Lampshade Tutorial
- Step 1: Measure the shade and cut your fabric
- Step 2: Plan your faux embroidery design (without overthinking yourself into paralysis)
- Step 3: Glue the cording to create the raised “stitched” effect
- Step 4: Attach the fabric to the shade
- Option A: Spray adhesive (fast and forgiving)
- Option B: Fabric glue (more controlled, less airborne)
- Step 5: Create a neat seam
- Step 6: Finish the top and bottom edges
- Design Ideas That Look Custom (Not Crafty)
- Troubleshooting: Fixes for the Most Common “Oops” Moments
- Safety Notes (Because This Is a Lamp, Not a Decorative Bonfire)
- Time and Cost Breakdown
- Conclusion: A High-End Look Without the High-End Panic
- Experience Notes: What It’s Actually Like to Make a DIY Faux Embroidered Lampshade
Want the cozy, heirloom vibe of embroidery… without committing to a lifelong relationship with a needle and a hoop?
Same. The good news: you can fake that stitched, raised texture on a lampshade in a way that looks surprisingly
high-end (and costs less than a single “artisan” throw pillow that somehow doesn’t include the artisan).
This “faux embroidered” lampshade is a perfect Hometalk-style makeover: practical, beginner-friendly, and wildly
satisfying. You’re basically giving a plain shade the kind of dimensional detail you see in boutique lightingby
combining a simple fabric wrap with a raised pattern made from cording and glue. The result? A soft, textured design
that looks like it took hours of hand stitching, but really took more “snack breaks” than “skill.”
Why Faux Embroidery on a Lampshade Works So Well
Embroidery is all about texture. On a lampshade, texture becomes dramabecause light exaggerates dimension. When the
lamp is off, the design reads as crisp, tailored detail. When the lamp is on, shadows form around the raised lines,
giving you that “wait… is that actually stitched?” effect.
The other reason this project shines (pun fully intended): lampshades are small enough to finish in a day, but big
enough to make a room feel refreshed. You don’t need to repaint a wall or reupholster anything. Just swap “boring
shade” for “custom shade,” and suddenly the whole corner looks curated.
Materials and Tools You’ll Need
Keep it simple. You’re aiming for clean lines, smooth fabric, and a raised pattern that looks intentional.
Core supplies
- A lampshade (a straight drum shade is easiest; tapered shades take extra measuring)
- Lightweight fabric (linen, cotton-linen blend, cotton canvasnothing too thick)
- White or tone-on-tone decorative cording (the “faux stitch” material)
- Adhesive (spray adhesive or a fabric-safe glue)
- Hot glue gun (preferably low-temp for fabric work)
- Scissors or rotary cutter
- Measuring tape
- Pencil or fabric marker
Optional “make it look expensive” extras
- Ribbon or trim to finish the top/bottom edge
- Pressing cloth + iron (for smoothing fabric before wrapping)
- Painter’s tape (for alignment marks)
- Craft paper/cardboard (to protect your work surface from glue adventures)
Pick the Right Lampshade (It Matters More Than You Think)
A straight drum lampshade is the easiest shape for beginners because the top and bottom rings are the same size.
That means your fabric piece can be a simple rectangle. Tapered shades can still work, but you’ll need to create a
pattern (or use a paper wrap template) so the fabric doesn’t pull and wrinkle.
Also: check the shade material. A sturdier shade with a firm inner lining is more forgiving than a floppy, thin one.
And if your shade is old, wipe it down and remove dustadhesives don’t bond well to “mystery powder.”
DIY Faux Embroidered Lampshade Tutorial
This method creates a raised “embroidered” pattern using cording on top of fabric, then wraps the fabric onto the
shade. It’s beginner-friendly and doesn’t require sewingjust patience and the willingness to glue tiny sections at
a time like a responsible adult.
Step 1: Measure the shade and cut your fabric
Measure the height of the shade and the circumference around the widest part.
Cut a fabric rectangle that’s:
- Height: shade height + about 1–2 inches (for wrapping over top and bottom)
- Width: circumference + about 1–2 inches (for the seam overlap)
Pro tip: if the fabric has a visible weave or pattern, decide which direction you want it to run before you cut.
A crooked weave line can make a perfectly glued shade look “off,” and then you’ll stare at it forever.
Step 2: Plan your faux embroidery design (without overthinking yourself into paralysis)
Choose a design that looks intentional but isn’t overly complex. Curvy lines, simple geometric loops, and repeating
motifs look great. Sketch the design lightly on the fabric with pencil or fabric marker.
Want a foolproof strategy? Pick one “hero” line that snakes across the panel, then add a second line that weaves
around it like it’s doing a gentle dance. That layered look reads as “embroidered,” even though it’s just cording
doing its best impression of thread.
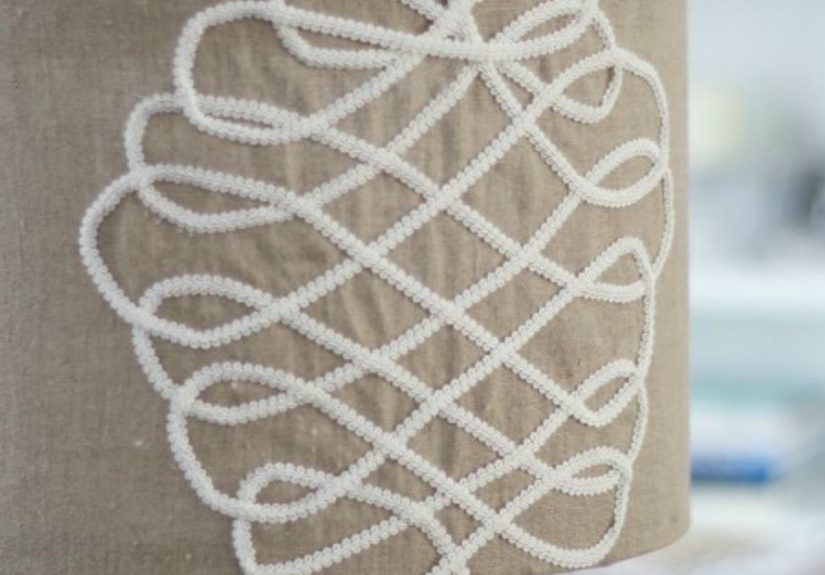
Step 3: Glue the cording to create the raised “stitched” effect
Work in small sections. Lay the cording on your drawn line, then lift a few inches at a time and
tack it down with hot glue. Don’t try to glue the entire line in one go unless you enjoy racing against cooling
glue while whispering threats at inanimate objects.
- Use light pressure so glue doesn’t squish up through the cording texture.
- Keep a scrap piece of fabric nearby to test glue temperature and avoid shine marks.
- If you get glue strings, let them cool, then pull them away gently (don’t smear warm glue).
Repeat for any additional lines until the pattern looks balanced. Step back occasionally. Your eyes need distance to
judge whether it looks “designer” or “spaghetti map.”
Step 4: Attach the fabric to the shade
You have two main routes here. Both workpick the one that fits your comfort level and workspace.
Option A: Spray adhesive (fast and forgiving)
In a well-ventilated area, apply spray adhesive in sections. Let it get tacky, then smooth the fabric onto the shade,
working from one seam area outward. Press and smooth as you go to avoid bubbles.
Option B: Fabric glue (more controlled, less airborne)
Apply a thin, even layer of fabric glue along the shade (or along the seam line first), then wrap the fabric panel
around, smoothing with your hands. Work gradually and keep the fabric tauttight enough to look crisp, not so tight
it distorts the weave.
Step 5: Create a neat seam
Where the fabric overlaps, fold the raw edge under for a cleaner finish, then glue it down. Try to align the seam
with the shade’s original seam (if it has one) so everything looks intentional.
Step 6: Finish the top and bottom edges
Cut small vertical snips into the overhang (like fringe) so the fabric can fold smoothly over the rings without
bunching. Glue down the tabs along the inside edge.
For a polished look, cover the inside edge with ribbon or trim. This is the step that makes people say,
“Where did you buy that?” instead of “Wow, you own glue.”
Design Ideas That Look Custom (Not Crafty)
Here are a few patterns that reliably look elevated:
- French-inspired looping vines: soft curves that repeat around the shade
- Modern scallops: a simple row of arches around the bottom third
- Interlocking loops: a braided look that screams “textile detail”
- Minimal monogram band: one clean stripe with a letter or small motif
- Art-deco geometry: angled lines and repeating diamonds
Troubleshooting: Fixes for the Most Common “Oops” Moments
My fabric wrinkled as I wrapped it
Lightly reposition if your adhesive allows it. Wrinkles often happen when the fabric isn’t smoothed evenly as you go.
For stubborn areas, lift gently and re-smooth, or use a bit of extra glue to secure the fabric from the inside.
The cording looks uneven
If the line wobbles, you can gently peel back a short section and reset it while the glue is still warm. If the glue
is set, don’t yanktrim and camouflage. Add a small extra loop or flourish nearby so it looks like the design was
always meant to be organic.
Glue seeped through and left shiny spots
Use less glue and lower temperature when possible. If you already have a shine spot, try dabbing it lightly with a
clean, dry cloth (do not rub aggressively). For future-proofing, test on a scrap first.
The shade looks dimmer than before
That’s normal if you used thicker fabric. Choose a lighter-weight linen/cotton next time, and consider a brighter
LED bulb (within your lamp’s rating). The goal is “cozy,” not “mysterious cave corner.”
Safety Notes (Because This Is a Lamp, Not a Decorative Bonfire)
- Use LED bulbs to minimize heat inside the shade.
- Keep ventilation in mind when using spray adhesive and allow full curing time.
- Don’t let fabric or trim sit too close to the bulb or hardware.
- Never leave a newly DIY’d lamp unattended the first few times you use itjust to be safe.
Time and Cost Breakdown
- Time: about 2–4 hours active work (plus drying/curing time)
- Cost: often $15–$45 depending on whether you already own a shade and glue
- Skill level: beginner to confident beginner
Conclusion: A High-End Look Without the High-End Panic
A faux embroidered lampshade is one of those rare DIY wins where the “after” looks legitimately boutique. You’re not
just decorating a lampyou’re changing the mood of the room with texture, softness, and a custom detail that’s hard
to find in stores (and even harder to justify at full retail).
If you love Hometalk-style projectsquick upgrades, big visual payoff, and the thrill of turning “plain” into “pretty”
with household toolsthis is your kind of craft. Start simple, keep your lines clean, and let the lamp do what it does
best: make everything look more charming when the light turns on.
Experience Notes: What It’s Actually Like to Make a DIY Faux Embroidered Lampshade
Here’s the honest, real-world part that tutorials don’t always say out loud: this project feels easy… right up until
you start gluing the cording. Then it becomes a tiny test of patience, like trying to lay a perfect strand of hair on
a windy day. The good news is that the “experience” of making a faux embroidered lampshade is mostly about learning a
rhythmand once you find it, the whole thing becomes weirdly relaxing.
The first few inches of cording usually look a little clumsy. That’s normal. You’re figuring out how much glue is
enough, how quickly it cools, and how to keep your line from drifting. The trick is to stop expecting perfection and
start aiming for consistency. “Handmade” should look intentional, not machine-printed. If your curves are smooth and
your spacing is even, your brain will read it as “designed,” not “accidental.”
Another thing you’ll notice in practice: fabric choice changes everything. A crisp linen (or linen-blend) tends to
behave nicelyit smooths well, holds shape, and gives the cording a clean surface to sit on. Softer fabrics can still
work, but they’re more likely to ripple when you wrap them. If you’re using something drapey, you’ll want to keep the
fabric taut while attaching it and smooth it in smaller increments. And if the fabric has a bold slub texture (those
thicker linen threads), the cording can disappear visually. Sometimes that’s gorgeous and subtle. Sometimes it’s “I
swear I did a design; please clap.”
The wrapping step is where you’ll feel like a pro. Smoothing fabric around a shade is instantly gratifyinglike gift
wrapping, but the present is your own good taste. This is also where alignment matters most. Many DIYers find it helps
to mark a straight guideline on the shade (even just a small piece of tape) so the fabric edge doesn’t creep upward as
you wrap. When you get to the seam, you’ll probably re-stick it once or twice to keep it straight. That’s not failure;
that’s the process working.
Edge finishing is the “why it looks store-bought” moment. Even if your pattern is simple, a neat trim on the inside
top and bottom makes the whole project look intentional. It also hides tiny snips and glue tabs, which is great because
lampshades are basically spotlights for your craftsmanship. Add ribbon, a clean cotton tape, or a narrow decorative
trim and suddenly the shade looks like it came from a boutique lighting shopminus the boutique pricing and the sales
associate who says “interesting choice” in a way that feels like a personal attack.
Finally, the best part of the experience is flipping the lamp on for the first time. The raised lines cast subtle
shadows, and the design gains depth. It’s the moment you realize why faux embroidery is such a smart hack: you’re
getting the visual richness of stitched decor, but with tools that most DIYers already own. If you’re chasing that
cozy, layered, high-end look in a room, this project deliversone glued curve at a time.


