
Table of Contents >> Show >> Hide
- Why a DIY Scarecrow Wreath Is Perfect for Fall
- Supplies You’ll Need
- Step-by-Step: How to Make a Cute & Simple DIY Scarecrow Wreath
- Simple Design Tips to Make Your Scarecrow Wreath Look Better
- Common Mistakes to Avoid
- How to Customize Your DIY Scarecrow Wreath
- How to Display and Store Your Wreath
- Final Thoughts
- Personal Experiences: What Making a DIY Scarecrow Wreath for Fall Really Feels Like
- SEO Tags
There are two kinds of fall decorators in this world: the ones who gently place one tasteful pumpkin by the door, and the ones who look at September and think, “Yes, but what if my porch had more personality?” If you fall into the second camp, a cute DIY scarecrow wreath is right up your alley. It’s cheerful, easy to customize, and charming enough to carry your front door from early fall through Thanksgiving without looking like Halloween exploded on your siding.
This project works because it combines everything people love about fall wreath ideas: warm colors, rustic texture, playful character, and a handmade look that feels welcoming instead of overly polished. Even better, you do not need advanced crafting skills. If you can use a glue gun without gluing your soul to the kitchen table, you are qualified.
In this guide, you’ll learn exactly how to make a scarecrow wreath, what supplies to buy, how to style it so it looks cute instead of chaotic, and how to make it sturdy enough for real front-door use. Whether you want farmhouse charm, a kid-friendly autumn craft, or a front porch piece that says “I enjoy fall but also believe in whimsy,” this wreath checks every box.
Why a DIY Scarecrow Wreath Is Perfect for Fall
A DIY scarecrow wreath for fall hits a sweet spot that many seasonal projects miss. It feels festive, but it is not too spooky. It is playful, but it can still look polished. It also gives you room to work with classic fall materials like burlap, faux leaves, raffia, plaid ribbon, sunflowers, and grapevine wreath bases without ending up with something that looks like a craft store coupon came to life.
Scarecrows are classic symbols of autumn because they tie together harvest season, porch decorating, and rustic farmhouse style. On a wreath, that theme becomes even more practical. Instead of building a full porch scarecrow that needs boots, hay stuffing, and probably an emotional support ladder, you get the same cozy vibe in a compact project you can finish in an afternoon.
Another reason this project works so well is flexibility. You can make your scarecrow wreath:
- Bright and playful with orange ribbon and oversized sunflower accents
- Neutral and farmhouse-inspired with beige burlap, cream florals, and muted leaves
- Kid-friendly with a smiling face and floppy hat
- Slightly rustic with raffia hair, plaid fabric, and natural textures
Translation: you can make it cute, simple, and actually suited to your front door instead of copying a wreath that only looks good in the lighting department of a fancy home décor catalog.
Supplies You’ll Need
One of the best parts of this easy autumn craft is that the supply list is manageable. You can find everything at a craft store, big-box store, or online.
Basic Wreath Materials
- 1 grapevine wreath or wire wreath form, 12 to 18 inches
- 1 small straw hat or mini scarecrow hat
- Faux fall leaves in orange, gold, red, and brown
- 1 to 3 faux sunflowers
- Burlap ribbon, plaid ribbon, or fall-pattern ribbon
- Raffia or straw for hair accents
- Hot glue gun and glue sticks
- Floral wire or paddle wire
- Scissors and wire cutters
- Black and pink or red craft markers/paint for the face
- Optional: felt, fabric scraps, mini pumpkins, berries, bow, wooden sign
For the Scarecrow Face
You have two easy options:
- Hat-forward design: Let the straw hat act as the main scarecrow feature and create a simple face on a fabric or felt circle beneath it.
- Full face design: Use a stuffed fabric face, foam circle, or layered felt base with painted eyes, cheeks, and a stitched smile.
If you want the easiest route, go with a grapevine base, a mini straw hat, raffia hair, sunflower accents, and a simple painted face. That combo gives you the classic cute scarecrow decor look without requiring a full engineering degree in decorative fluff.
Step-by-Step: How to Make a Cute & Simple DIY Scarecrow Wreath
Step 1: Choose Your Wreath Base
A grapevine wreath is the easiest and most forgiving option because it already has rustic texture built in. You can tuck in leaves and stems, wrap ribbon through the twigs, and wire on embellishments without fighting the frame. A wire wreath form also works well if you want a lighter, cleaner look, especially if you plan to wrap it with burlap or ribbon first.
For beginners, a 14-inch grapevine wreath is the sweet spot. It is large enough to be seen from the curb but small enough that it won’t dominate your entire front door like a seasonal moon.
Step 2: Create the Scarecrow Hat Area
Place the straw hat slightly above center on the wreath. Before gluing anything, test the placement by setting the wreath flat and stepping back. The best position usually sits near the top third of the wreath so the hat becomes the focal point and leaves room for the face and floral accents below.
Attach the hat with floral wire if possible, then reinforce with hot glue. Wire gives it strength; glue gives it staying power. Using both is the crafting equivalent of wearing a belt and suspenders, but for a front-door wreath in wind, that is not overkill. That is wisdom.
Step 3: Add the Face
Cut a round or oval face shape from beige felt, burlap-backed fabric, or muslin. Keep the face simple and sweet. Draw or paint:
- Two small black eyes
- A triangle nose in orange
- Pink or red cheeks
- A curved smile or stitched-mouth look
If you prefer a softer style, lightly blush the cheeks and keep the smile minimal. If you want a more playful front porch look, exaggerate the rosy cheeks and add tiny lashes. Glue the face under the hat so it peeks out naturally, almost like the scarecrow is hiding under an oversized fall fashion choice.
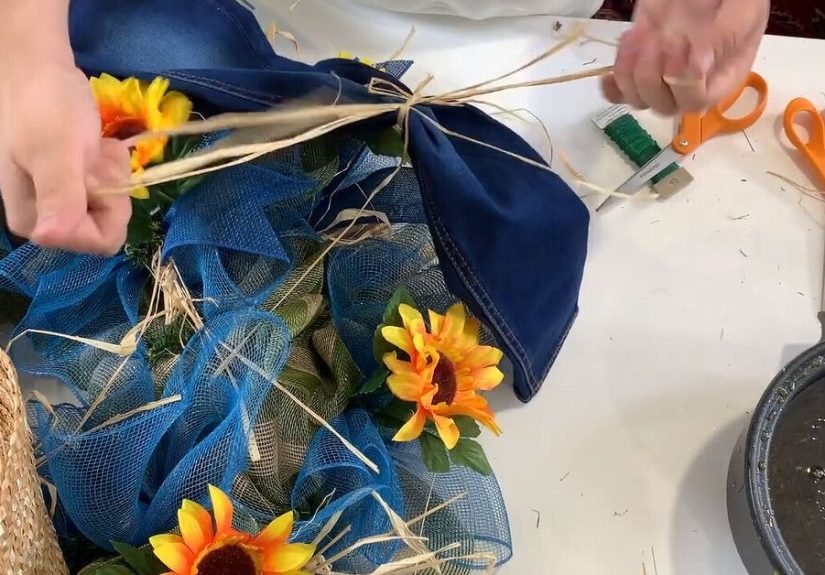
Step 4: Tuck in Raffia or Straw Hair
Cut small bunches of raffia and glue or wire them under both sides of the hat brim. This instantly makes the wreath look more like a scarecrow and less like a random hat having a very emotional day. Keep the raffia uneven for a casual, handmade style. Too perfect, and it starts looking suspiciously salon-finished.
Step 5: Build Out the Fall Foliage
Now add your faux leaves, florals, and filler. Start with the largest pieces first, usually leaves or sunflower stems. Work in a loose crescent shape around one side and the bottom of the wreath. This asymmetrical layout keeps the design modern and visually balanced without looking stiff.
Good combinations include:
- Sunflowers + orange leaves + berries
- Muted leaves + burlap bow + cream florals
- Plaid ribbon + mini pumpkins + wheat stems
- Rustic leaves + pinecones + raffia bow
Tuck stems into the grapevine first, then secure with hot glue or wire once you like the arrangement. That “dry fit first, commit later” approach saves you from ripping out glued stems while whispering regrets into the void.
Step 6: Add Ribbon and a Bow
Ribbon is where the wreath gets personality. Burlap ribbon gives you a traditional farmhouse feel. Plaid adds playful charm. A mix of both can look especially cute on a front door fall decor piece.
Make one medium or oversized bow and place it off-center near the leaves, or use ribbon tails under the hat to frame the face. If your wreath already has a lot going on, keep the bow simple. If your wreath feels flat, ribbon can rescue it in five seconds flat.
Step 7: Fill Empty Spaces
Stand back and check for bare spots. Fill gaps with smaller leaves, raffia tufts, berries, or a little extra ribbon. This is the difference between “cute handmade wreath” and “I got distracted halfway through and then snacks happened.”
The key is not to overcrowd the design. You want texture and fullness, but you still need to see the wreath base, hat, and face clearly. Let each element breathe.
Step 8: Create a Hanging Loop
Attach sturdy ribbon or wire to the back for hanging. If the wreath is going on an exterior door, make sure the hanger is secure and the heavier decorative side is balanced. A lopsided scarecrow wreath can still be charming, but only if it is intentional and not because gravity won the argument.
Simple Design Tips to Make Your Scarecrow Wreath Look Better
Stick to 2 or 3 Main Colors
Too many colors can make the wreath look busy fast. A simple palette like orange, tan, and deep burgundy feels cohesive and classic. If you want a lighter look, try cream, sage, and soft gold.
Mix Textures, Not Chaos
The prettiest fall wreath ideas usually mix rough and soft textures: grapevine with ribbon, raffia with faux florals, burlap with smooth pumpkins. Texture makes the wreath interesting without forcing you to add ten thousand extra pieces.
Go Cute, Not Cluttered
The scarecrow face should stay the star. If the hat, leaves, bow, pumpkins, sunflower, berries, sign, and random decorative crow are all demanding attention at once, your wreath is no longer simple. It is a committee meeting.
Common Mistakes to Avoid
- Using too much hot glue: It can create strings and visible blobs. Glamorous? No.
- Skipping wire support: Heavy items like hats and pumpkins need more than glue.
- Making the face too small: If no one can see it from five feet away, it loses impact.
- Overstuffing the wreath: More leaves do not always equal more beauty.
- Ignoring weather: If your door is exposed, choose sturdy faux materials and secure everything well.
How to Customize Your DIY Scarecrow Wreath
Once you know the basic formula, you can create a wreath that matches your style.
Farmhouse Style
Use a grapevine base, tan burlap, cream flowers, muted leaves, and a weathered wooden tag that says “Hello Fall.”
Bright & Cheerful Style
Use orange ribbon, bold sunflower heads, red berries, rosy cheeks, and a plaid bow for that happy harvest vibe.
Neutral Fall Style
Choose beige, rust, dusty green, ivory, and wheat stems instead of loud orange. This works beautifully on black, white, or navy doors.
Kid-Friendly Style
Make the face extra sweet with oversized cheeks, a button nose, and floppy raffia pigtails. Let kids help choose the ribbon or place lightweight leaves.
How to Display and Store Your Wreath
Your DIY scarecrow wreath will look best on a covered front door, interior entryway, mudroom wall, or porch area protected from heavy rain. If you use natural materials, keep in mind they may fade or become brittle faster outdoors. Faux materials usually last longer and are easier to store.
When the season ends, place the wreath in a large plastic storage bin or wreath box. Lightly wrap the face and florals with tissue paper so they do not get crushed. Store it flat if possible. Future-you will be deeply grateful when next fall rolls around and the wreath still looks cute instead of emotionally exhausted.
Final Thoughts
If you want a fun seasonal project that is easy, affordable, and genuinely adorable, this cute & simple DIY scarecrow wreath for fall is hard to beat. It brings together the warmth of autumn colors, the rustic charm of classic harvest décor, and the satisfaction of making something with your own hands. Better yet, it is endlessly customizable, so your wreath can feel uniquely yours instead of looking like every other front door on the block.
Start with a solid base, keep your colors coordinated, add one sweet scarecrow face, and let texture do the heavy lifting. That is the secret. No fancy tricks. No impossible crafting gymnastics. Just a cheerful wreath, a little creativity, and maybe one dramatic glue-gun moment for authenticity.
Personal Experiences: What Making a DIY Scarecrow Wreath for Fall Really Feels Like
The first time I made a scarecrow wreath, I had a very confident vision and absolutely no graceful plan. I walked into the craft store thinking I would buy “just a few things,” which is adorable in hindsight. Twenty minutes later, I was holding a grapevine wreath, three ribbon rolls, faux leaves, sunflowers, raffia, a mini straw hat, and at least one item I still cannot explain. That is the magic of fall crafting. It starts as a simple idea and quickly turns into a seasonal scavenger hunt.
What surprised me most was how quickly the wreath began to look like something real. At first it was just a vine circle and a tiny hat sitting there like it had lost its way. Then I added the raffia hair. Suddenly, personality. Then I drew the little face with rosy cheeks and a crooked smile. Suddenly, charm. By the time the sunflower went on, the whole thing had crossed the line from “craft supplies” to “tiny porch celebrity.”
There is also something weirdly relaxing about making a wreath in the fall. The process encourages you to slow down. You arrange a few leaves. You step back. You tilt the bow. You stare at it like a judge on a reality competition show. Then you move one stem half an inch and somehow that fixes everything. It is low-stakes creativity, which is sometimes the best kind. No one is expecting museum-level art here. You are making a smiling scarecrow for your front door, and honestly, that is a pretty delightful use of an afternoon.
I also learned that simple really is better. On my first attempt, I kept trying to add more: more ribbon, more leaves, more filler, more tiny pumpkins. At one point the wreath looked less like a scarecrow and more like a hay fever episode with accessories. Once I pulled a few things off and let the hat, face, and sunflower stand out, the design instantly looked better. That experience changed how I think about seasonal decorating in general. Fall already gives you so much texture and color to work with that you do not need to force it. A few well-placed elements do more than a mountain of stuff ever could.
Another thing I love about this project is that it feels nostalgic without feeling old-fashioned. A scarecrow reminds people of hayrides, pumpkin patches, school harvest festivals, and chilly weekends when the porch starts looking extra inviting. But on a wreath, especially with a clean layout and a modern color palette, it still feels fresh. It is the kind of decoration that makes people smile when they walk up to the door, which is really the whole point.
And yes, there is usually one mildly chaotic moment in the process. Maybe the hat slips. Maybe the bow looks ridiculous. Maybe hot glue strings appear like tiny haunted cobwebs. That is part of it. Every handmade wreath has a few imperfect details, and that is exactly why it feels warm and human. The finished piece is not just décor. It carries the memory of making it, tweaking it, laughing at it, and finally hanging it up with that deeply satisfying feeling of, “Wait… I actually made that.”
By the time the wreath is on the door, it changes the whole mood of the entryway. Even a plain porch looks friendlier. Add a pumpkin or two, maybe a mat, maybe a lantern, and suddenly your home looks like it has fall plans and good snacks. That is the power of a cute scarecrow wreath. It is not just a craft. It is a tiny welcome sign with a personality.


