
Table of Contents >> Show >> Hide
- What Is an Egress Window?
- Know the Code Before You Cut Anything
- Choose the Right Egress Window Style
- Decide Whether This Is DIY or Pro Territory
- Tools, Materials, and Planning Checklist
- Step-by-Step: How to Install an Egress Window
- 1. Pull permits and verify the approved location
- 2. Mark utilities and prep the work area
- 3. Excavate for the window well
- 4. Lay out and cut the foundation opening
- 5. Frame the rough opening
- 6. Flash and waterproof the opening
- 7. Set and fasten the window
- 8. Install the window well and drainage components
- 9. Insulate, air-seal, and finish the interior
- 10. Test operation and pass inspection
- Common Mistakes to Avoid
- How Long Does It Take?
- Final Thoughts
- Real-World Experience and Lessons From Egress Window Projects
- SEO Tags
If your basement feels like a cave with a couch, an egress window can fix more than the mood lighting. It can bring in daylight, improve ventilation, make a basement bedroom legal in many jurisdictions, and most importantly, provide a life-saving emergency exit. That last part matters most. An egress window is not just a “nice upgrade.” It is a safety feature with code requirements, drainage demands, and zero tolerance for sloppy work.
Installing one is not the same as swapping out an old window on a sunny Saturday with a coffee in one hand and misplaced confidence in the other. In many homes, the job involves excavation, concrete cutting, framing, waterproofing, window-well drainage, and inspections. Done correctly, it can transform a dark basement into usable living space. Done poorly, it can create leaks, structural headaches, and a very expensive lesson in why shortcuts are rarely cheap.
This guide walks through how to install an egress window the smart way: code first, shovel second, panic never.
What Is an Egress Window?
An egress window is a window large enough and accessible enough to serve as an emergency escape and rescue opening. In plain English, it must allow someone to get out fast and allow first responders to get in. That is why code focuses on the net clear opening, not just the size printed on the product label. The actual open space matters. A window can look big and still fail egress requirements once the sash, tracks, or hardware eat into the opening.
Why homeowners install them
Most people install an egress window for one or more of these reasons:
- To make a basement bedroom or finished basement meet code
- To add daylight and ventilation
- To improve resale appeal and functional square footage
- To make a basement feel less like a bunker and more like part of the house
Know the Code Before You Cut Anything
Before you choose a window, rent tools, or start imagining a Pinterest-perfect basement office, verify local code and permit requirements. In much of the United States, the usual benchmark is the residential code standard many municipalities adopt or modify. Local rules can be stricter, and that matters because inspectors are not famous for grading on effort.
Typical egress window requirements
- Minimum net clear opening area: 5.7 square feet
- Exception for grade-floor or below-grade openings in many jurisdictions: 5.0 square feet
- Minimum net clear opening height: 24 inches
- Minimum net clear opening width: 20 inches
- Maximum sill height from the finished floor: 44 inches
- Window must open from the inside without keys, tools, or special knowledge
Typical window well requirements
- Minimum horizontal area: 9 square feet
- Minimum projection and width: 36 inches
- The well must allow the window to fully open
- If the well depth is more than 44 inches, a permanently affixed ladder or steps is typically required
- The well must be designed to drain properly
One more detail that catches people off guard: if the egress window sits under a deck or porch, you usually still need a clear path out. So yes, even your charming backyard deck can become a code complication if it turns your emergency exit into a crawl-space obstacle course.
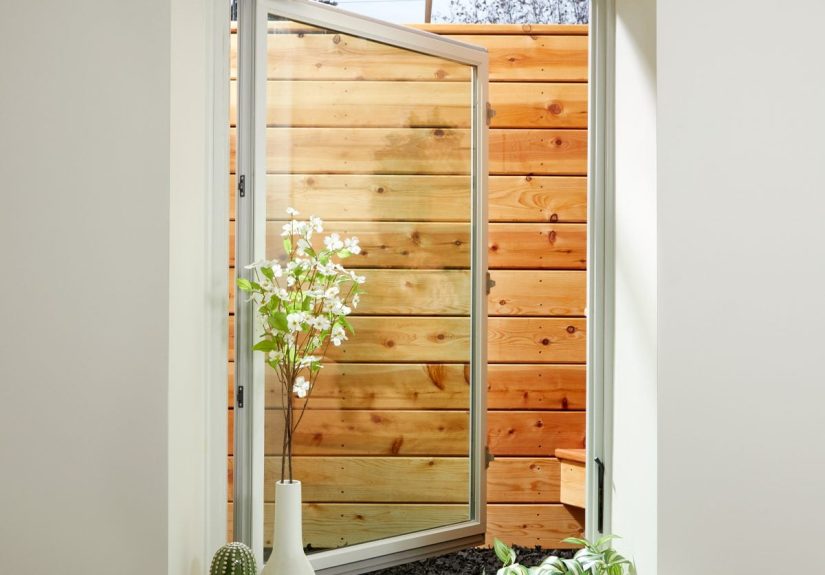
Choose the Right Egress Window Style
Not every window style works equally well for egress. In many basement projects, casement windows are the favorite because the sash swings open and gives you a large clear opening relative to the overall unit size. Double-hung and sliding windows can work too, but they often need to be much larger to achieve the same net clear opening.
Best options for most basements
- Casement windows: Often the easiest way to meet egress rules in a smaller opening
- Sliding windows: Useful in wider layouts, but require more overall size
- Double-hung windows: Can work, but the sash opening reduces usable clear area
Pick the window after you confirm the actual rated opening. This is not the moment for guesswork or “it looks big enough.” Inspectors enjoy tape measures far more than homeowners do.
Decide Whether This Is DIY or Pro Territory
There are two versions of this project. Version one is a controlled, code-aware installation done by a qualified contractor or a very experienced remodeler. Version two is the one where someone underestimates concrete cutting, forgets drainage, and later Googles “why is my basement wall leaking?” at 2:13 a.m.
DIY may be realistic when
- You are replacing an existing above-grade opening
- You have solid experience with framing, flashing, and window installation
- The wall is wood-framed and structural changes are minimal
Hire a professional when
- You need to cut poured concrete, masonry block, or stone foundation walls
- A lintel or structural support may be required
- The window well needs drainage tied to the footing drain or another approved system
- You are unsure about permits, engineering, or waterproofing details
For most basement egress projects, the safest advice is simple: let a qualified pro handle the cutting and structural work, even if you plan to do some finishing work yourself.
Tools, Materials, and Planning Checklist
Every installation varies, but most projects require some version of the following:
- Egress-rated window unit
- Window well sized for the unit and code clearance
- Excavation tools or equipment
- Concrete saw or masonry cutting tools
- Pressure-treated framing lumber for the rough opening
- Anchors, fasteners, shims, and sealants
- Self-adhered flashing or manufacturer-approved flashing materials
- Gravel or free-draining rock for the bottom of the well
- Ladder or steps if required by well depth
- Window well cover if desired
- Interior insulation, trim, and drywall repair materials
Before excavation, contact 811 and have buried utility lines marked. This is not optional common sense; it is actual safety. Gas, power, water, and communications lines do not care how enthusiastic your basement remodel is.
Step-by-Step: How to Install an Egress Window
1. Pull permits and verify the approved location
Confirm the window location with your local building department. Check setback issues, drainage requirements, and inspection sequence. If your home is in a historic district or has unusual zoning conditions, get that sorted before work begins. Paperwork is boring, but leaking basements are even less fun.
2. Mark utilities and prep the work area
Call 811 several business days before digging. Inside the basement, move furniture and protect floors. Outside, mark the footprint of the future well and plan access for excavation. Make sure soil and debris can be removed safely without damaging landscaping, HVAC lines, or your neighbor’s patience.
3. Excavate for the window well
Dig the area outside the foundation to create enough room for the well, the workers, and drainage materials. In many projects, the well should extend beyond the opening on each side and provide at least the minimum required clear floor area. Remove loose soil and create a stable base.
At the bottom of the well, plan for drainage. Depending on the site and local code, that may mean tying into the foundation drainage system or using another approved method. Many well manufacturers and code guides also call for clean gravel or free-draining rock in the bottom area to reduce standing water.
4. Lay out and cut the foundation opening
This is the big one. From inside and outside, carefully measure and mark the new opening based on the window manufacturer’s rough opening requirements. If the wall is masonry or concrete, the cut must be precise, level, and structurally appropriate. In some cases, a header or lintel is needed to support loads above the new opening.
Cutting foundation walls is where many “I’ll just do it myself” plans meet their dramatic conclusion. Concrete dust, saw kickback, structural risk, and water intrusion are real concerns. This is pro-level work.
5. Frame the rough opening
After the opening is cut, install the rough framing. Typically, this includes pressure-treated lumber and anchoring the frame securely to the masonry or concrete. The opening must be plumb, level, and square. If it is not, the window will remind you forever by sticking, leaking, or refusing to lock properly.
6. Flash and waterproof the opening
Proper flashing is what keeps this project from becoming a future mold story. Install flashing and water-management materials exactly as the window manufacturer specifies, integrating them with the wall’s drainage plane so water is directed out, not into the wall cavity. That “shingle-lapped” concept matters: upper layers should overlap lower layers so gravity can do its job instead of becoming your enemy.
Sealants help, but sealant alone is not a drainage strategy. Caulk is not magic in a tube.
7. Set and fasten the window
Place the egress window into the prepared opening, shim it as needed, and fasten it according to manufacturer instructions. Check for level, plumb, smooth operation, and full opening clearance. Test it now, not after the trim is installed and your confidence has returned.
8. Install the window well and drainage components
Mount the window well to the foundation wall or buck, depending on the system. Backfill as directed by the well manufacturer. Use the required gravel or drainage stone at the bottom, and do not block any drain connection. If the well is deep enough to trigger ladder requirements, install the ladder or steps now.
If you want a well cover, choose one that helps keep out debris and rain while still working with safety and access needs. A good cover is useful. A cover that turns the well into a bathtub is not.
9. Insulate, air-seal, and finish the interior
Inside the basement, insulate around the opening as appropriate for your climate and wall assembly. Air-seal carefully to reduce drafts and condensation risk. Then patch drywall, install trim, and finish the reveal so the new window looks intentional rather than like your house lost a fight with a saw.
10. Test operation and pass inspection
Open and close the window several times. Confirm the sill height, the clear opening, the well dimensions, the ladder, and the drainage setup. Then schedule inspection. A legal, safe installation is the finish line. A window that merely looks nice is only halftime.
Common Mistakes to Avoid
- Buying by rough size only: Net clear opening is what counts
- Ignoring drainage: Water in the well becomes water in the basement
- Skipping flashing details: Leaks often start at window openings
- Forgetting permits: This can derail resale and inspections later
- Setting the sill too high: The window may fail egress even if it is large enough
- Underbuilding the well: If the window cannot fully open, the exit fails in practice
- Not calling 811: Hidden utilities are not a treasure hunt prize
How Long Does It Take?
A straightforward replacement or simple framed-wall installation can move quickly. A full basement egress installation involving excavation, concrete cutting, drainage, inspections, and finish work usually takes longer and may stretch across several days depending on weather, access, and foundation type. Rain can slow excavation. Permit timing can slow everything. And discovering an unexpected structural condition can slow your heartbeat first, then the project.
Final Thoughts
An egress window is one of those projects where safety, code, and craftsmanship all have to agree. The payoff is significant: more light, better function, a safer basement, and more confidence that the lower level of your home is actually living space, not just a dim storage annex for old holiday decorations and mysterious bins labeled “misc.”
The key is respecting the whole system, not just the window itself. The opening must be sized correctly. The structure must be protected. The flashing must shed water. The well must drain. The exit path must work when someone is scared, disoriented, or carrying rescue gear. When you treat the installation that seriously, the finished result is more than attractive. It is durable, legal, and genuinely useful.
Real-World Experience and Lessons From Egress Window Projects
Across real basement remodels, the same lessons show up again and again. The first is that homeowners almost always underestimate how much of the project is about water, not glass. People start out focused on window style, trim color, or how much light the basement will get. Then the job begins, and suddenly drainage stone, footing drains, grading, flashing tape, and waterproofing details become the main characters. That is not bad news. It is just reality. A beautiful egress window that lets in water is basically a very expensive apology.
Another common experience is surprise at how much better a basement feels once the window is installed. Even a single egress unit can change the character of the room. What looked low, dark, and a little gloomy can start to feel open and intentional. Homeowners who planned to use the space as an office, guest room, gym, or playroom often say the room finally feels like part of the house instead of a place where treadmills and forgotten furniture go to reflect on their life choices.
Contractors also learn quickly that site conditions decide everything. Soil type matters. Foundation type matters. Existing drainage matters. A home with good access, predictable soil, and a modern foundation is a very different job from an older house with tight side-yard clearance, block walls, and years of water pressure against the foundation. On older homes, the “simple window project” often turns into a bigger conversation about waterproofing, grading, or structural support. That is why the best installers do not rush the planning stage. They know the easy-looking jobs are sometimes the sneaky ones.
There is also a practical lesson about window operation. Many homeowners assume any large basement window can serve as egress. Then they learn that a big-looking double-hung unit may not provide enough usable opening, while a casement can meet code more efficiently. This is one of those details that seems boring until it saves you from ordering the wrong product. And once the wrong product is installed, “boring detail” becomes “very memorable invoice.”
Finally, experienced remodelers nearly always say the same thing about inspections: involve the code officials early, not late. Asking questions before the cut is made is far cheaper than defending a bad decision after the concrete is already on the lawn. The smoothest projects usually come from a simple formula: verify code, call 811, use manufacturer instructions, respect drainage, and do not improvise structural work. That formula is not flashy, but it works. And in home improvement, “works every time” is a lot more beautiful than “looked faster on Saturday morning.”


