
Table of Contents >> Show >> Hide
- What Is Biga Pizza Dough?
- Why Use Biga for Pizza Dough?
- Biga Pizza Dough Recipe
- Bonus 45-Minute Pizza Dough Recipe
- Biga Dough vs. 45-Minute Dough: Which Should You Use?
- Best Flour for Biga Pizza Dough
- Home Oven Tips for Better Pizza
- Common Pizza Dough Problems and Fixes
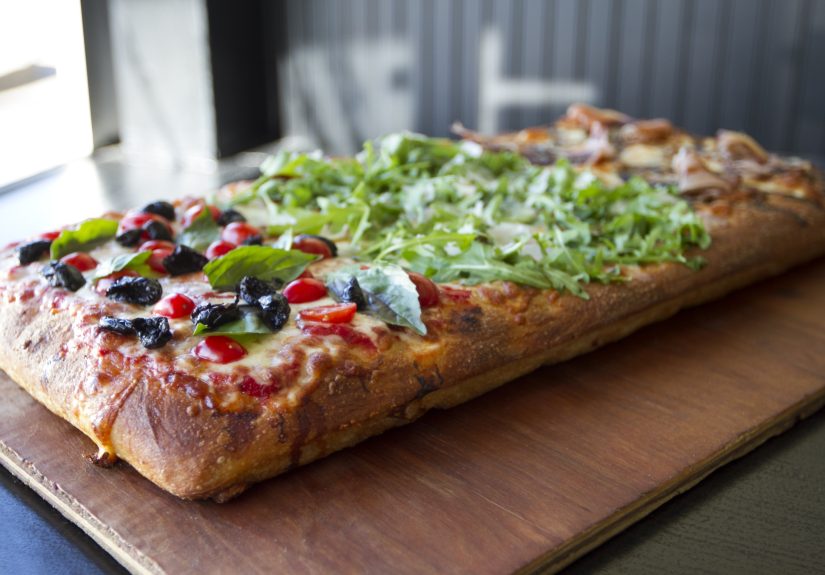
- Topping Ideas That Work Beautifully
- Storage and Make-Ahead Tips
- Experience Notes: What Making Biga Pizza Dough Teaches You
- Conclusion
- SEO Tags
If pizza dough had a personality contest, biga pizza dough would be the quiet genius in the corner: not flashy, not rushed, and somehow responsible for making everyone else look better. It is the kind of dough that asks for patience, rewards planning, and gives your crust that bakery-level combination of chew, aroma, blistered edges, and a flavor that tastes like you did something very professionaleven if you made it in sweatpants.
This guide gives you two reliable paths to homemade pizza happiness. First, we’ll make a deeply flavorful biga pizza dough, using a stiff Italian preferment that rests overnight and develops complexity before becoming the final dough. Then, because life does not always send a calendar invitation before pizza cravings arrive, you’ll also get a bonus 45-minute pizza dough recipe for emergency pizza nights. Think of it as the difference between slow jazz and a drum solo: both can be excellent, but they work best in different moods.
The goal is not just to hand you a recipe. The goal is to help you understand why the dough behaves the way it does, how to fix common problems, and how to make better pizza in a regular American home kitchen without installing a wood-fired oven in your living room. Your landlord can relax.
What Is Biga Pizza Dough?
Biga is an Italian-style preferment made with flour, water, and a small amount of yeast. Unlike a wet preferment such as poolish, biga is usually firmer and lower in hydration. It looks shaggy, rough, and a little unimpressive at firstbasically the “before” photo in a dough makeover show. But after resting for 12 to 18 hours, it becomes fragrant, bubbly, and full of fermentation magic.
When biga is added to pizza dough, it brings several benefits. It improves flavor, strengthens dough structure, encourages a lighter crumb, and helps create the kind of crust that is crisp on the outside but tender and chewy inside. The long fermentation gives yeast and enzymes time to break down starches and proteins, creating more depth than a same-day dough can usually achieve.
In plain English: biga makes pizza crust taste less like plain bread and more like something you would happily eat even if the cheese slid off. And that is the real test of great pizza dough.
Why Use Biga for Pizza Dough?
There are many ways to make pizza dough: direct dough, no-knead dough, overnight refrigerator dough, sourdough pizza dough, pan pizza dough, and the “I bought it at the grocery store and will deny everything” method. Biga stands out because it gives you a professional-style flavor boost without needing a sourdough starter or years of fermentation therapy.
1. Better Flavor
A long fermentation creates nutty, slightly sweet, lightly tangy notes. The dough does not taste sour like strong sourdough, but it has a layered flavor that makes each bite more interesting. With biga, the crust becomes part of the pizza experience instead of just a delivery platform for pepperoni.
2. Stronger Dough Structure
Biga helps build gluten strength, which gives the final dough better stretch and elasticity. This is especially useful if you want a puffy rim, also called the cornicione, or if you enjoy tossing dough in the air and pretending you are in an Italian cooking montage.
3. Airier Crust
Because biga develops slowly, the finished dough can trap gas more effectively. That means a lighter, more open crumb and a crust that feels satisfying rather than dense. When baked hot, the rim can blister beautifully and develop those tiny charred spots that make homemade pizza look suspiciously restaurant-worthy.
4. Easier Digestion for Some People
Many bakers find that long-fermented dough feels lighter than fast dough. While this does not make pizza a health foodnice tryit can make the crust taste cleaner and feel less heavy than dough rushed from flour to oven.
Biga Pizza Dough Recipe
This recipe makes enough dough for four 10- to 12-inch pizzas. For best results, use a kitchen scale. Measuring flour by cups can vary wildly depending on how it is scooped. Pizza dough is a tiny science project wearing mozzarella.
Ingredients for the Biga
- 300 grams bread flour or “00” pizza flour
- 165 grams cool water
- 1 gram instant yeast, about 1/4 teaspoon
Ingredients for the Final Dough
- All of the prepared biga
- 200 grams bread flour or “00” pizza flour
- 135 grams water, room temperature
- 12 grams fine sea salt
- 8 grams olive oil, optional but helpful for home ovens
- 1 gram instant yeast, optional if your kitchen is cool or you want a slightly quicker final rise
Step 1: Mix the Biga
In a bowl, combine the flour and yeast. Add the cool water and mix by hand until you have a rough, shaggy mass. Do not knead it smooth. Biga is supposed to look rustic, not camera-ready. Cover the bowl tightly and let it ferment at room temperature for 12 to 16 hours.
The finished biga should smell pleasantly yeasty and slightly sweet. It should show bubbles, feel airy in spots, and pull apart in strands. If it smells harshly alcoholic or has collapsed into soup, it may have over-fermented. If it looks exactly the same as when you mixed it, your yeast may be old, your room may be cold, or your dough may be silently judging your thermostat.
Step 2: Mix the Final Dough
Tear the biga into small pieces and place it in a mixing bowl. Add the water and gently squeeze or stir to loosen the preferment. Add the remaining flour and yeast if using. Mix until the dough comes together, then let it rest for 15 minutes. This short rest helps the flour hydrate and makes kneading easier.
Add the salt and olive oil. Knead by hand for 8 to 10 minutes, or mix with a dough hook on low speed for 5 to 7 minutes. The dough should become smoother and more elastic, though it may still feel slightly tacky. Avoid adding too much extra flour. A sticky dough can become great pizza; a dry dough becomes a cracker with commitment issues.
Step 3: Bulk Ferment
Place the dough in a lightly oiled bowl or container. Cover and let it rest at room temperature for 1 to 2 hours, or until slightly puffy. It does not need to double dramatically. With biga dough, flavor and structure matter more than balloon-level expansion.
Step 4: Divide and Ball the Dough
Turn the dough onto a lightly floured surface. Divide it into four equal pieces, roughly 200 grams each. Shape each piece into a tight dough ball by folding the edges underneath and rotating the dough against the counter to build surface tension.
Place the dough balls in lightly oiled containers. Cover and refrigerate for 12 to 24 hours for the best flavor and handling. If you are short on time, let them proof at room temperature for 2 to 3 hours instead, but the overnight cold rest gives better results.
Step 5: Bring Dough to Room Temperature
Remove the dough from the refrigerator 1 to 2 hours before baking. Cold dough resists stretching and snaps back like a rubber band with trust issues. Room-temperature dough is relaxed, cooperative, and much less dramatic.
Step 6: Shape the Pizza
Dust your work surface with flour or semolina. Press the dough gently from the center outward, leaving the edge slightly thicker. Pick it up and stretch it over your knuckles, rotating as you go. Avoid smashing the rim if you want a puffy crust.
If the dough keeps shrinking, cover it and let it rest for 10 to 15 minutes. Gluten tightens when handled. A short break lets it relax, and frankly, we could all learn from that.
Step 7: Top Lightly
Use a modest amount of sauce, cheese, and toppings. Great pizza is about balance. Too many toppings can weigh down the dough, cause sogginess, and turn your pizza into a delicious but structurally questionable casserole.
For a classic Margherita-style pizza, use crushed tomatoes or simple tomato sauce, fresh mozzarella or low-moisture mozzarella, a drizzle of olive oil, and basil after baking. For pepperoni pizza, use low-moisture mozzarella and a thin layer of sauce so the crust can crisp properly.
Step 8: Bake Hot
Preheat your oven as high as it will go, usually 500°F to 550°F. Place a pizza stone or baking steel on the upper-middle rack and preheat it for at least 45 minutes. A hot surface gives the dough quick oven spring and a crisp bottom.
Launch the pizza onto the hot stone or steel and bake for 5 to 8 minutes, depending on your oven. Rotate once if needed. The pizza is done when the crust is puffed and browned, the cheese is bubbling, and your kitchen smells like you made excellent life choices.
Bonus 45-Minute Pizza Dough Recipe
Now for the emergency dough. This recipe is not trying to beat biga at its own game. It is here for Tuesday nights, hungry kids, surprise guests, or the sudden realization that delivery pizza costs as much as a small appliance.
This 45-minute pizza dough uses more yeast, warm water, a touch of sugar, and olive oil to move things along quickly. It will not have the same depth as long-fermented biga dough, but it can still make a crisp, tender, very enjoyable homemade pizza.
Ingredients
- 360 grams all-purpose flour or bread flour, about 3 cups
- 240 grams warm water, about 1 cup, around 105°F to 110°F
- 7 grams instant yeast or active dry yeast, about 2 1/4 teaspoons
- 6 grams sugar, about 1 1/2 teaspoons
- 8 grams fine sea salt, about 1 1/4 teaspoons
- 15 grams olive oil, about 1 tablespoon
Step 1: Wake Up the Yeast
In a large bowl, combine warm water, yeast, and sugar. Let it sit for 5 minutes. If using active dry yeast, it should look foamy. Instant yeast does not always foam dramatically, but it should smell alive and yeasty.
Step 2: Mix the Dough
Add flour, salt, and olive oil. Stir until a shaggy dough forms. Knead by hand for 5 to 7 minutes, or mix with a dough hook for about 4 minutes. The dough should be soft, smooth, and slightly tacky.
Step 3: Quick Rise
Place the dough in a lightly oiled bowl, cover it, and let it rise in a warm spot for 25 to 30 minutes. It should become noticeably puffy. If your kitchen is chilly, place the bowl nearbut not ona warm oven.
Step 4: Shape and Bake
Divide the dough into two balls for medium pizzas or keep it whole for one large sheet-pan pizza. Stretch it gently, top it lightly, and bake at 500°F to 550°F on a hot stone, steel, or preheated sheet pan. Thin round pizzas usually bake in 7 to 10 minutes; sheet-pan pizza may take 12 to 16 minutes.
Biga Dough vs. 45-Minute Dough: Which Should You Use?
Use biga pizza dough when flavor is the main event. It is ideal for weekend pizza nights, dinner parties, or whenever you want crust with character. The long fermentation creates complexity, chew, and aroma that fast dough cannot fully imitate.
Use 45-minute pizza dough when speed matters. It is practical, beginner-friendly, and satisfying. It is especially good for thicker crusts, sheet-pan pizzas, garlic knots, calzones, and family pizza nights where the audience is more focused on melted cheese than fermentation nuance.
Here is the honest truth: both recipes deserve a place in your kitchen. Biga is the artisan route. Quick dough is the weeknight hero. One wears a linen apron; the other shows up with snacks and saves dinner.
Best Flour for Biga Pizza Dough
Bread flour is a great choice because it has enough protein to build strong gluten. This helps the dough stretch without tearing and gives the crust a satisfying chew. “00” flour can also work beautifully, especially for Neapolitan-style pizza, because it creates a soft, delicate texture. However, in a regular home oven, bread flour often browns better and handles high heat well.
All-purpose flour can work too, especially in the 45-minute dough. The crust may be a little softer and less chewy, but it will still be delicious. The best flour is the one that helps you actually make pizza instead of just reading about pizza while eating crackers over the sink.
Home Oven Tips for Better Pizza
Preheat Longer Than You Think
A pizza stone or steel needs time to absorb heat. Even if your oven beeps after 12 minutes, the baking surface is probably not ready. Give it at least 45 minutes. This is one of the simplest ways to improve homemade pizza crust.
Use Less Sauce
Too much sauce creates soggy pizza. Spread a thin layer and leave some dough visible through the sauce. Pizza is not soup with architecture.
Do Not Overload the Cheese
More cheese sounds like a good idea until it releases moisture and turns your crust limp. Use enough to cover the pizza lightly, then add more after baking if you must live boldly.
Bake on a Hot Surface
A baking steel usually transfers heat faster than a stone, but either one helps. If you do not own either, preheat a heavy sheet pan upside down and slide the pizza onto it.
Finish Under the Broiler
If the bottom is crisp but the top needs more color, turn on the broiler for the final 30 to 90 seconds. Watch carefully. The line between “beautifully blistered” and “fire drill” is thinner than you think.
Common Pizza Dough Problems and Fixes
The Dough Is Too Sticky
Lightly oil your hands or dust the surface with flour. Do not panic and add handfuls of flour. Sticky dough often becomes an excellent crust after resting.
The Dough Tears When Stretching
It may need more gluten development or more resting time. Cover it for 10 minutes, then try again. If it still tears, shape a smaller pizza.
The Dough Shrinks Back
The gluten is too tight or the dough is too cold. Let it rest at room temperature before stretching.
The Crust Is Pale
Your oven or baking surface may not be hot enough. Preheat longer, bake higher in the oven, or add a tiny amount of olive oil or sugar to encourage browning in home ovens.
The Bottom Is Soggy
Use less sauce, fewer wet toppings, and a hotter baking surface. Fresh mozzarella should be drained and patted dry before using.
Topping Ideas That Work Beautifully
For biga dough, keep toppings simple so the crust can shine. Try tomato sauce, mozzarella, basil, and olive oil. Or use mushrooms, garlic, thyme, and fontina. Spicy salami with honey is another excellent option, especially if you enjoy pizza that flirts with chaos.
For 45-minute dough, go comforting and bold. Pepperoni, sausage, roasted peppers, caramelized onions, barbecue chicken, or a white pizza with ricotta and mozzarella all work well. Quick dough is flexible and forgiving, which is exactly what you want when dinner is moving faster than your planning skills.
Storage and Make-Ahead Tips
Biga can be made the night before and used the next day. Once the final dough is mixed and shaped into balls, it can rest in the refrigerator for 24 to 48 hours. For longer storage, freeze dough balls after the first rise. Wrap them tightly and place them in freezer bags.
To use frozen dough, thaw it overnight in the refrigerator, then bring it to room temperature before shaping. Never try to stretch cold dough unless you enjoy wrestling with carbohydrates.
Experience Notes: What Making Biga Pizza Dough Teaches You
Making biga pizza dough is one of those kitchen projects that quietly changes how you think about baking. At first, it feels almost suspiciously simple. You mix flour, water, and yeast, cover the bowl, and walk away. That is it. No dramatic kneading. No heroic flour clouds. No need to stare at the bowl like it owes you rent. But the next day, the dough has changed. It smells alive. It has texture, stretch, and personality. You realize that time has been doing the work while you were sleeping, answering emails, or pretending to clean the kitchen.
The first time you bake with biga, the biggest surprise is usually the crust. It is not just “better” in a vague food-blog way. It has a different bite. The edge puffs with more confidence, the bottom crisps more deeply, and the inside has a soft chew that makes plain crust worth eating. That is when you understand why pizza makers care so much about fermentation. It is not snobbery. Well, not only snobbery. It is flavor.
Another lesson is restraint. Biga dough rewards a lighter hand. If you crush the rim while shaping, you lose the air pockets you spent hours developing. If you pile on wet toppings, you bury the work under a swamp of cheese and sauce. The dough teaches you to slow down, use your fingertips instead of brute force, and let the pizza be balanced. This is difficult if your natural cooking style is “add more cheese until emotionally secure,” but it is worth practicing.
The 45-minute dough teaches a different lesson: homemade pizza does not have to be precious. Some nights, the best pizza is the one you actually make. Fast dough may not have the same complex flavor as biga, but it brings joy quickly. It is perfect for kids who want to help, friends who show up hungry, or weeknights when the refrigerator contains cheese, sauce, and optimism. The dough rises fast, stretches easily, and delivers a soft, golden crust that beats most last-minute alternatives.
After making both recipes several times, you start using them for different occasions. Biga becomes the weekend doughthe one you make when you want to enjoy the process and maybe brag a little. The 45-minute dough becomes the rescue recipethe one you keep in your back pocket when everyone wants pizza now, not tomorrow. Together, they cover nearly every pizza mood.
The most practical experience tip is to trust the dough more than the clock. Room temperature, flour type, yeast freshness, and humidity all affect fermentation. If the biga looks bubbly and smells pleasantly fermented, it is ready. If the quick dough looks puffy after 25 minutes, move forward. Recipes are maps, not handcuffs.
Finally, pizza dough teaches humility. Some pizzas will be oval. Some will stick to the peel. Some will have one heroic bubble that lifts half the cheese like a tiny dairy volcano. That is fine. Homemade pizza is not about perfection. It is about learning heat, dough, timing, and appetite. And even the imperfect ones usually disappear from the table quickly, which is the most honest review a recipe can get.
Conclusion
Biga pizza dough is the recipe to choose when you want deep flavor, a chewy crust, and that slow-fermented character usually associated with serious pizzerias. It asks for planning, but not complicated technique. Mix the biga, let time do its quiet work, build the final dough, and bake it hot.
The bonus 45-minute pizza dough recipe is your fast, dependable backup. It proves that homemade pizza can still happen when you did not plan ahead, which is important because hunger rarely respects fermentation schedules.
Use biga when you want the best crust. Use quick dough when you want pizza tonight. Keep both recipes close, and your kitchen will always be dangerously near a great pizza.


