
Table of Contents >> Show >> Hide
- Why Beginning DIYers Should Start With a Plan
- Step 1: Decide How Detailed Your Landscape Plan Needs to Be
- Step 2: Gather the Right Tools
- Step 3: Draw a Base Map First
- Step 4: Do a Site Analysis Before You Design Anything
- Step 5: Make a Wish List, Then Create Bubble Diagrams
- Step 6: Turn Your Bubbles Into a Real Layout
- Step 7: Add Labels, Notes, and Phases
- Common Mistakes First-Time DIYers Make
- A Simple Example for Beginners
- Final Thoughts
- Extra Experience: What Beginning DIYers Usually Learn the Hard Way
If you have ever stood in your yard holding a shovel, a nursery receipt, and a wildly unrealistic amount of confidence, welcome. You are exactly the kind of person who needs a landscape plan. The good news is that drawing one does not require a beret, a drafting degree, or a mysterious ability to sketch perfect shrubs from memory. It requires observation, a measuring tape, some graph paper, and the willingness to slow down before planting the hydrangeas in a spot that turns into a kiddie pool every time it rains.
For beginning DIYers, a landscape plan is less about making something fancy and more about making something useful. A good plan helps you understand your yard from above, organize what you want it to do, and avoid expensive mistakes. It can help you decide where a patio should go, where a privacy screen makes sense, how wide a path should be, and why that one tree should not be planted six feet from your foundation just because it looked “small enough” at the garden center.
In short, drawing landscape plans is part art, part common sense, and part saving your future self from muttering, “Well, that was a terrible idea.” Here is how to do it step by step.
Why Beginning DIYers Should Start With a Plan
A landscape plan gives your ideas structure. Instead of randomly adding beds, shrubs, edging, and decorative objects until the yard looks like a home improvement aisle exploded, you create a layout with intention. That matters because outdoor spaces need to work both functionally and visually. A beautiful yard that floods, blocks access, or demands endless trimming is not a triumph. It is an outdoor chore chart.
A plan also helps you think in stages. Most homeowners do not redesign an entire yard in one weekend unless they have a TV crew, a crane, and a suspiciously energetic host. Real-life DIY landscaping usually happens in phases. When you draw a master plan first, you can complete one area at a time without creating a patchwork yard that feels disconnected.
Step 1: Decide How Detailed Your Landscape Plan Needs to Be
Before you start measuring every blade of grass, figure out the scope of your project. If you are only adding a small planting bed along the fence, a simple hand-drawn sketch may be enough. If you are reworking the front yard, adding a walkway, or planning multiple beds, a scaled drawing is the smarter move.
Ask yourself a few practical questions:
- What do I want this space to do?
- Who will use it?
- How much maintenance am I honestly willing to do?
- What is my budget?
- Will this project happen all at once or in phases?
Those questions sound simple, but they shape everything. A yard for toddlers, dogs, grilling, and quick cleanup will look different from a yard designed for cutting flowers, entertaining, and pretending you enjoy hand-weeding every Saturday morning.
Step 2: Gather the Right Tools
You do not need professional drafting gear to draw a beginner-friendly landscape plan. Keep it simple. A clipboard, pencils, eraser, graph paper, measuring tape, and tracing paper will get you surprisingly far. A phone camera also helps, because photos capture details you will absolutely forget five minutes after going back inside for water.
Helpful tools include:
- Property survey or plat map, if you have one
- Graph paper
- Pencil and eraser
- Long measuring tape or measuring wheel
- Tracing paper
- Ruler or scale ruler
- Clipboard
- Phone or camera for reference photos
If your lot is large or awkwardly shaped, a measuring wheel can save time. If you have an old survey, use it as a starting point, but verify it. Yards love changing after surveys are done. Sheds appear. Beds expand. Someone adds a patio and suddenly your “official” drawing is missing half the story.
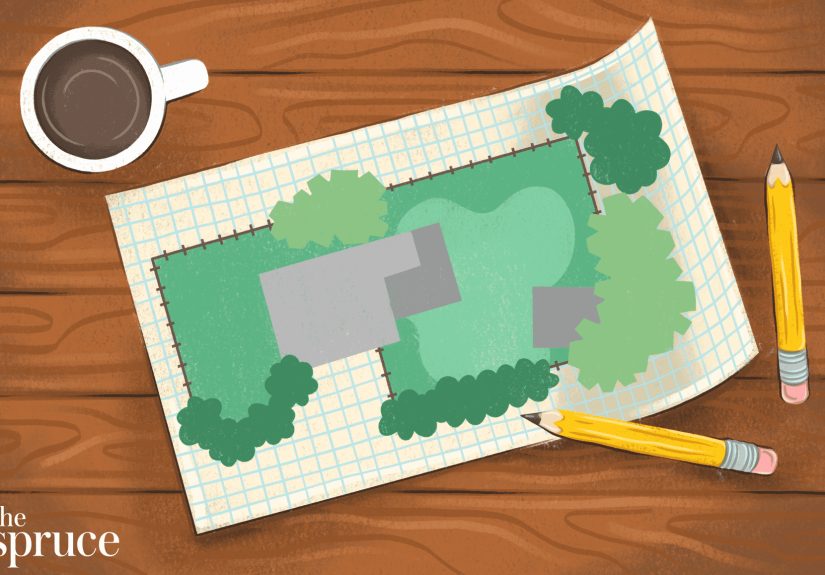
Step 3: Draw a Base Map First
The base map is the foundation of your landscape plan. Think of it as a bird’s-eye view of the existing yard. This is where you draw the property lines, house footprint, driveway, walks, fences, utilities, patios, decks, trees, and any other permanent or semi-permanent features. If you skip this step, your later design ideas will float around like decorative suggestions with no actual relationship to reality.
Choose a Scale That Fits the Page
Pick a scale that lets the whole yard fit comfortably on paper. A common residential scale is something like 1 inch equals 8 feet, but graph paper can make things even easier. The key is consistency. If one square equals 1 foot, keep it that way throughout the plan. Randomly changing scale halfway through is a fast route to confusion and crooked patios.
Measure From Fixed Points
Measure from fixed points such as house corners, property lines, sidewalks, or driveways. This gives you more accurate placement for features like trees, existing beds, air-conditioning units, gates, or utility boxes. Measure twice. Then measure again when something seems weird. Landscape plans are much like baking: a little error early can become a spectacular mess later.
Include the Unsexy Stuff
Yes, draw the downspouts. Yes, mark the utility meter. Yes, note the septic area if you have one. These items are not glamorous, but they affect what you can plant and where you can dig. Add a north arrow, too. Knowing orientation helps you understand how sunlight moves across the site and keeps your plan grounded in something more scientific than “the sunny side, I think.”
Step 4: Do a Site Analysis Before You Design Anything
This is the part beginners are most tempted to skip because it is less fun than browsing plant catalogs. Resist that urge. A site analysis is where smart landscape design begins. You study what the yard is already doing before deciding what it should become.
Watch Sun and Shade
Notice where the sun falls in the morning, afternoon, and evening. A patio that sounds dreamy on paper may turn into a skillet at 5 p.m. in July. Likewise, a bed you picture full of sun-loving flowers may actually spend half the day in tree shade. Observe first, then plan.
Check Wind and Views
Pay attention to strong winds, especially in exposed corners or side yards. Wind affects comfort and plant performance. Also note good and bad views. Maybe you want to frame a view of a tree, borrow a scenic backdrop, or block the neighbor’s trampoline collection. A landscape plan should solve visual problems, not accidentally spotlight them.
Study Drainage and Slope
After rain, where does water collect? Which areas stay soggy? Which areas dry out fast? Low spots, runoff paths, and slopes matter. They influence everything from patio location to plant choice. If you ignore drainage, the yard will eventually introduce itself to you in the least polite way possible.
Learn Your Soil
Soil affects plant success more than wishful thinking ever will. Clay, sand, compaction, poor drainage, and low fertility can all change your plan. If you can, get a soil test through your local extension service. It is one of the least flashy but most useful things a DIYer can do.
Think About Rules and Safety
Check setbacks, easements, HOA rules, and buried utilities. Before any serious digging, call 811 so underground lines can be marked. Nothing ruins a landscape project faster than hitting a utility line and becoming the most talked-about person on the block for all the wrong reasons.
Step 5: Make a Wish List, Then Create Bubble Diagrams
Once your base map and site analysis are done, write down everything you want in the yard. Be honest and practical. Maybe you want a dining patio, grill zone, herb bed, privacy planting, lawn for the dog, storage corner, and a place to sit with coffee and pretend the weeds are “naturalistic.” Put it all on the list.
Next comes the fun, low-pressure stage: bubble diagrams. On tracing paper laid over your base map, draw loose circles or shapes showing where different functions could go. Label them: patio, lawn, shade bed, play area, cutting garden, compost, path. This is not the final plan. It is brainstorming with structure.
Bubble diagrams help you organize use areas before you obsess over exact plant choices. They also make it easier to test multiple ideas. Maybe the patio works better off the kitchen than in the back corner. Maybe the vegetable garden belongs closer to the hose. This is where you find those answers without moving a single wheelbarrow of mulch.
Step 6: Turn Your Bubbles Into a Real Layout
Now begin refining the design. This is where your landscape plan starts to look like an actual yard instead of a strategic map for very calm gardeners.
Start With Movement and Structure
Lay out paths, seating areas, lawn shapes, fences, walls, and major beds first. Think about how people move through the space. Are the routes logical? Is there enough room to walk comfortably? Does the path lead somewhere useful, or does it trail off like the plot of a bad reality show?
Strong structure gives the rest of the plan clarity. Hardscape elements, bed lines, and open lawn areas should feel intentional. Clean shapes are usually easier for beginners to manage than overly wiggly, decorative lines that look charming on paper and exhausting in the real world.
Use Design Principles Without Getting Precious About It
You do not need to become a design philosopher, but basic principles help. Use repetition to make the yard feel connected. Use a focal point to draw the eye. Balance masses so one side of the yard does not feel visually heavier than the other. Consider scale so plantings suit the house instead of swallowing it or looking too tiny to matter.
Texture, form, line, and color also matter. A good beginner strategy is to keep the main structure simple and let plants provide seasonal interest. That gives you a cleaner plan and fewer opportunities to create chaos with enthusiasm.
Draw Plants at Mature Size
This is a big one. Do not draw a shrub based on how it looks in a nursery pot. Draw it based on how large it will become. Mature size affects spacing, maintenance, airflow, sight lines, and whether your front walk remains a front walk or turns into a botanical obstacle course.
Grouping plants in masses usually looks better than scattering one of everything. Resist the urge to create a collector’s album in the front yard. Repetition is your friend. So is breathing room.
Step 7: Add Labels, Notes, and Phases
Your final landscape plan should be easy to understand later, especially when you are tired, dirty, and trying to remember why you thought Bed C needed six ornamental grasses. Label major features. Add dimensions where needed. Mark materials, plant groups, and notes about sunlight or drainage. Make it readable.
Then break the project into phases. For example:
- Phase 1: grading, drainage fixes, and path layout
- Phase 2: patio and main foundation beds
- Phase 3: privacy planting and side yard cleanup
- Phase 4: decorative details, containers, and lighting
Phasing keeps your budget sane and your plan realistic. It also helps you prioritize infrastructure before aesthetics, which is much smarter than installing beautiful plantings only to tear them up later for drainage work.
Common Mistakes First-Time DIYers Make
Most beginner landscape plan mistakes are not dramatic. They are ordinary little oversights that become expensive, annoying, or deeply inconvenient over time.
- Skipping measurements and drawing from memory
- Ignoring sun, shade, and drainage patterns
- Planting too close to the house or walkway
- Choosing plants before defining the layout
- Overdesigning the yard all at once
- Forgetting maintenance realities
- Ignoring utilities, setbacks, or easements
If you avoid those mistakes alone, your DIY landscape plan will already be ahead of many real yards currently surviving on optimism and pruning shears.
A Simple Example for Beginners
Imagine a small backyard with a back door, a patchy lawn, one large tree, and a fence. Instead of rushing to buy plants, you draw a base map. You note that the left side gets afternoon sun, the area near the downspout stays wet, and the best shade is under the tree. Your wish list includes a dining spot, easier maintenance, a privacy screen, and some color.
Your bubble diagram shows a small patio near the door, a curved bed along the fence, a mulched shade bed under the tree, and a simple path connecting spaces. In the final plan, you keep the lawn open in the center, place taller screening plants along the back fence, use lower plantings near the patio, and choose species that fit the actual light conditions. Suddenly the yard has shape, purpose, and a much lower chance of becoming a random collection of “sale plants.”
Final Thoughts
Learning how to draw landscape plans is one of the best skills a beginning DIYer can develop. It teaches you to look carefully, think in layers, and make decisions based on how a yard really works. It also gives you confidence. Once you can map your space, study it, and translate ideas into a simple design, the whole project feels less overwhelming.
So start small. Measure carefully. Use tracing paper. Think about function before flowers. Draw plants at mature size. And remember: the goal is not to create a museum-quality rendering. The goal is to create a yard that looks good, works well, and does not make future you whisper, “Why did I do this to myself?” every time you step outside.
Extra Experience: What Beginning DIYers Usually Learn the Hard Way
There is a special kind of education that comes from drawing your first landscape plan. It usually begins with confidence, moves quickly into confusion, and ends in a much better yard. Many beginners start with the idea that landscape planning is mostly about choosing pretty plants. Then they go outside with paper, start measuring, and discover that the yard has opinions. The fence is not perfectly square. The patio door is off-center. The giant maple throws more shade than expected. The side yard that seemed “fine” is really a narrow wind tunnel with the personality of a hallway.
That experience is useful. It teaches you that landscape plans are not just drawings. They are decision-making tools. The first time you sketch a bed too wide and realize it blocks the hose bib, you start respecting the process. The first time you notice water always pools near the steps, you understand why drainage belongs on the plan before plants do. The first time you compare two layouts and see that one gives you better circulation, better sight lines, and less maintenance, you stop thinking of planning as a delay and start seeing it as progress.
Another common beginner experience is learning the difference between “looks nice” and “works well.” On paper, a winding path can seem charming. In real life, if it is too narrow, too awkward, or leading nowhere useful, it becomes decorative confusion. The same goes for foundation shrubs, privacy hedges, and accent trees. New DIYers often discover that mature size matters far more than nursery size. A little shrub can become a window-eating monster. A cute tree can eventually scrape the roof, crowd the walk, and start every conversation with, “We really should have placed that farther away.”
Beginners also learn that the best landscape plans come from living with a yard for a while. The place where you thought you wanted a bench may turn out to be the hottest spot in the yard. The corner you barely noticed may become your favorite evening hangout because it catches a breeze and feels private. The plan improves when you observe real habits: where people cut across the lawn, where the dog runs, where the grill actually makes sense, where you tend to stand with coffee in the morning. Your yard quietly tells you what it wants to be if you pay attention long enough.
And perhaps the most encouraging lesson is this: your first landscape plan does not need to be perfect. It just needs to be useful. Most DIYers revise their ideas several times. They erase. They overlay tracing paper. They move the patio. They shrink the bed. They decide the fountain can wait and the drainage fix cannot. That is not failure. That is design doing its job. The experience of drawing a landscape plan trains you to think clearly, spend more wisely, and create an outdoor space that feels intentional instead of accidental. For beginners, that is a huge win, and it often marks the moment landscaping stops feeling intimidating and starts feeling genuinely fun.


