
Table of Contents >> Show >> Hide
- What You Need Before You Start
- Why Learning to Clean a Whole Fish Is Worth It
- How to Gut and Scale a Whole Fish in 9 Steps
- Step 1: Keep the Fish Cold and Set Up a Clean Work Area
- Step 2: Give the Outside a Quick Check and Trim Sharp Fins If Needed
- Step 3: Scale the Fish from Tail to Head
- Step 4: Rinse Off Loose Scales and Pat the Fish Steady
- Step 5: Insert the Knife at the Vent and Make a Shallow Belly Cut
- Step 6: Open the Cavity and Pull Out the Guts
- Step 7: Scrape Out the Bloodline and Remove the Membranes
- Step 8: Remove the Gills
- Step 9: Give the Fish a Final Quick Rinse, Dry It Well, and Cook or Chill Immediately
- Common Mistakes to Avoid
- What to Do After the Fish Is Cleaned
- Best Fish to Practice On
- What the Experience Is Really Like the First Few Times
- Conclusion
- SEO Tags
Learning how to gut and scale a whole fish sounds like one of those kitchen skills reserved for old-school anglers, restaurant pros, and one mysterious uncle who owns three coolers and a sharpening stone. In reality, it is a straightforward skill that any home cook can learn with a little patience, a sharp knife, and the willingness to accept that fish scales have a shocking amount of ambition when it comes to flying across your kitchen.
If you have ever brought home a whole trout, snapper, branzino, or bluegill and wondered what to do next, this guide walks you through the process from start to finish. You will learn how to set up your workspace, remove scales without turning the room into a glitter factory, open the fish cleanly, remove the guts, clean the cavity, and get the fish ready for cooking. The goal is simple: less mess, better flavor, and a lot more confidence the next time a whole fish lands on your cutting board.
Before diving in, one quick note: not every fish needs scaling. Some fish have very small scales, and some, like catfish, are scaleless. But for most common whole fish sold for roasting, grilling, or pan-frying, proper fish cleaning matters. It improves texture, removes bitter parts, and makes the finished dish much more pleasant to eat.
What You Need Before You Start
You do not need a professional fish station or a dockside sink with seagulls judging your technique. A few basic tools will do the job:
- A sharp fillet knife or paring knife
- Kitchen shears
- A fish scaler, butter knife, or the dull side of a chef’s knife
- A cutting board that will not slide
- Paper towels
- A trash bowl or bag nearby
- Disposable gloves, if you prefer
- Cold water and a clean sink
If you are buying fish instead of catching it yourself, look for a fresh whole fish with clear eyes, firm flesh, intact scales, red gills, and a mild ocean-like smell. If it smells aggressively fishy, sour, or like ammonia, let that fish live its afterlife somewhere else.
Why Learning to Clean a Whole Fish Is Worth It
There are a few good reasons to master this. First, whole fish can be more affordable than prepped fillets. Second, fish cooked on the bone often stays juicier and tastes better. Third, being able to clean your own fish gives you more control over freshness and prep. And finally, it is a strangely satisfying kitchen skill. It feels practical, a little rugged, and just fancy enough to impress dinner guests who thought you only knew how to order takeout.
How to Gut and Scale a Whole Fish in 9 Steps
Step 1: Keep the Fish Cold and Set Up a Clean Work Area
Start with a very cold fish. If you caught it yourself, clean it as soon as possible and keep it on ice until you are ready. If you bought it from a market, move it from the fridge to your prep area only when everything else is ready to go.
Lay down a stable cutting board and keep a trash container close by. Put paper towels within reach because fish are slippery little escape artists. The cleaner and more organized your station is, the easier the process will be. This is not the moment to discover your scissors are in the dishwasher and your trash bag is still in the closet.
Step 2: Give the Outside a Quick Check and Trim Sharp Fins If Needed
Before scaling, look over the fish. If it has especially sharp dorsal or pectoral fins, snip them off with kitchen shears. This is optional for some fish, but it can make handling safer and more comfortable. If the fish is very slimy, blot it with paper towels so it grips the board a bit better.
Do not overcomplicate this step. You are not sculpting marble. You are just making the fish easier to hold and less likely to poke you while you work.
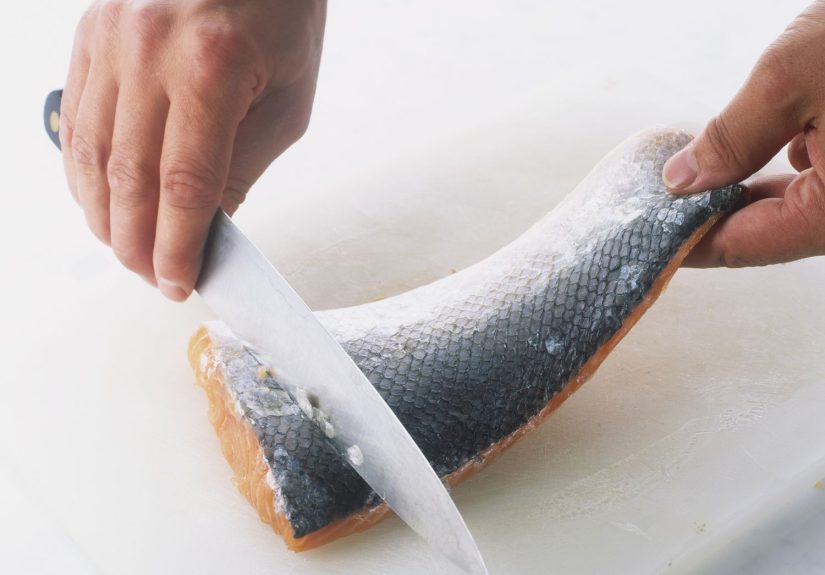
Step 3: Scale the Fish from Tail to Head
This is the part where your kitchen tries to become a snow globe. Hold the fish firmly by the tail and scrape against the direction of the scales, moving from tail to head. Use a fish scaler if you have one, but a butter knife or the dull side of a knife works too.
Use gentle, firm strokes. You want to lift the scales without gouging the skin. Pay close attention to the collar, the area near the head, around the belly, and close to the fins. Those spots are easy to miss and annoyingly obvious later.
If possible, do this under a light stream of cold water or inside a sink to keep scales from launching themselves into neighboring zip codes. Run your hand over the fish when you think you are done. If it still feels rough or scratchy, keep scraping.
Step 4: Rinse Off Loose Scales and Pat the Fish Steady
Once the scales are off, give the fish a quick rinse or wipe-down to remove loose bits. Then pat it dry enough that it will not slide all over the board. A drier fish is much easier to cut cleanly than a wet, slippery one.
This is also the right moment to flip the fish and make sure you did not miss the other side. Many first-timers do a heroic job on one side and then discover the opposite side is still dressed for battle.
Step 5: Insert the Knife at the Vent and Make a Shallow Belly Cut
Place the fish on its side. Find the vent, which is the small opening on the belly near the tail. Insert the tip of your knife there and cut toward the head in one shallow line. Keep the blade angled up slightly so you do not puncture the guts more than necessary.
The key word here is shallow. You are opening the belly, not trying to split the fish in half like firewood. A controlled cut makes the next steps cleaner and keeps unpleasant surprises to a minimum.
Step 6: Open the Cavity and Pull Out the Guts
Once the belly is open, spread the cavity with your fingers and pull out the innards. On a small fish, they may come out in one fairly satisfying pull. On a larger fish, you may need to loosen a few attachments with the tip of your knife or your fingers.
Discard everything you remove unless you specifically know you want to save a part, such as roe in season. For most home cooks, this is the “out you go” stage. Keep a trash bowl close so you are not dripping your way across the room like a seafood-themed crime scene.
Step 7: Scrape Out the Bloodline and Remove the Membranes
Inside the cavity, especially along the backbone, you may see a dark bloodline or residual organs clinging to the interior. Scrape these out with a spoon, your thumb, or the back of the knife. This step matters more than many beginners realize. Leaving blood and membranes behind can make the fish taste stronger, muddier, or bitter.
Take an extra minute here. A well-cleaned cavity is one of the biggest differences between fish that tastes fresh and sweet and fish that tastes like it has been holding a grudge.
Step 8: Remove the Gills
The gills are usually tucked beneath the gill covers behind the head. Lift the cover, cut or pull the gills where they attach, and remove them. Kitchen shears are handy here, though a knife can do the job too.
Skipping the gills is one of the most common mistakes in whole fish preparation. They can add bitterness and shorten shelf life, so take them out unless your recipe or stock preparation specifically calls for otherwise.
Step 9: Give the Fish a Final Quick Rinse, Dry It Well, and Cook or Chill Immediately
Once the fish is scaled, gutted, and fully cleaned inside, give it a final quick rinse if needed to remove blood, stray scales, and loose bits. Then pat it dry thoroughly inside and out with paper towels. Dry skin helps the fish roast, grill, or sear better, and it also keeps seasonings from sliding off like they have somewhere else to be.
From here, either cook the fish right away or store it properly on ice or in the refrigerator. Do not leave it sitting out at room temperature while you answer texts, make a salad, and wonder whether you should light a candle. Seafood is not patient.
Common Mistakes to Avoid
Even a simple fish cleaning process can go sideways if you rush. Here are the big mistakes people make:
- Not keeping the fish cold: Warm fish gets soft, smelly, and harder to handle.
- Forgetting the collar and belly scales: Those hidden scales always seem to survive when you miss them.
- Cutting too deep into the belly: A gentle cut is cleaner and easier to manage.
- Leaving the bloodline behind: This can affect taste more than people expect.
- Skipping the gills: They are not decorative. Remove them.
- Leaving the fish out too long: Clean it, chill it, or cook it. No leisurely countertop lounging.
What to Do After the Fish Is Cleaned
Once your whole fish is ready, you have options. You can roast it with lemon and herbs, grill it whole, pan-fry it until crisp, or stuff the cavity with aromatics like garlic, thyme, dill, parsley, ginger, or sliced citrus. Whole fish is especially good for high-heat cooking because the skin and bones help protect the flesh from drying out.
If you are not cooking it immediately, pack it on ice or refrigerate it right away. For food safety, fish should not sit out for more than two hours at normal room temperature, and even less if the room is very warm. When you do cook it, aim for opaque flesh that flakes easily, or use a thermometer and cook the fish to 145 degrees Fahrenheit in the thickest part.
Best Fish to Practice On
If this is your first time learning how to clean whole fish, start with fish that are manageable in size and fairly forgiving. Trout, snapper, sea bass, porgy, and branzino are all good beginner-friendly choices. They are not too large, the anatomy is easy to follow, and they cook beautifully whole.
Bluegill and other panfish are also classic practice fish, especially if you like the old-school scaled-and-gutted fish fry approach. On the other hand, a giant fish with armor-like scales is maybe not the best way to begin your new life as a backyard fish butcher.
What the Experience Is Really Like the First Few Times
The first time you gut and scale a whole fish, it feels like a combination of cooking, shop class, and a very mild courage test. You may start with a certain amount of false confidence, the kind that says, “How hard can it be?” and then immediately discover that fish scales are clingier than glitter and just as committed to staying in your house forever. That is normal. Every beginner has a moment where they pause, stare at the fish, and think, “We are both learning today.”
What surprises most people is how quickly the process becomes logical. At first, the fish seems like one mysterious, slippery object. Then, within minutes, you start recognizing the pattern. Tail, scrape, belly, cut, pull, rinse, dry. The anatomy becomes less intimidating. The tools make sense in your hands. The mess becomes manageable. And the moment you clean one fish successfully, the second one feels about 40 percent easier.
There is also a big sensory component to the experience. A truly fresh fish does not smell wildly fishy. It smells clean, briny, and mild. The flesh feels firm. The scales come off with a satisfying rasp. The cavity looks cleaner and brighter once the bloodline and membranes are removed. You begin to understand, in a practical way, what freshness actually means beyond a label at the seafood counter.
Another common experience is learning that neatness matters. People often assume fish cleaning is automatically chaotic, but it gets much easier when the station is organized. A trash bowl near your elbow, paper towels within reach, and a board that does not slide all make a huge difference. So does staying calm. Rushing is usually what causes a deep cut, a torn belly, or the kind of scale explosion that makes you find one on your forearm an hour later.
Emotionally, there is a strange little confidence boost that comes from preparing a whole fish yourself. It feels useful in a deeply old-fashioned way. You are taking an ingredient from its most natural cooking form and getting it ready with your own hands. That makes the final meal more satisfying. A roasted or grilled whole fish tastes good on its own, but it tastes even better when you know exactly how clean it is, how fresh it was, and how much care went into the prep.
By the third or fourth time, many people start developing their own rhythm. Some trim fins first. Some scale under running water. Some prefer shears for the belly cut, while others swear by a short knife. That is part of the learning process too. The goal is not to look dramatic or professional. The goal is to get a clean, well-prepped fish that cooks beautifully and tastes fresh. Once you do that, the process stops feeling intimidating and starts feeling like one more genuinely useful kitchen skill you now own.
Conclusion
Knowing how to gut and scale a whole fish in 9 steps can save money, improve flavor, and make whole-fish cooking far less intimidating. Once you understand the sequence, the job becomes simple: keep the fish cold, remove the scales, make a shallow belly cut, clear out the guts, scrape the cavity clean, remove the gills, dry it well, and cook it promptly.
It is not glamorous work, but it is satisfying work. And the payoff is excellent. A properly cleaned whole fish cooks beautifully, tastes fresher, and gives you one more kitchen skill that feels equal parts practical and impressive. Also, after you do it a few times, you get to casually say things like, “I’ll just clean this fish myself,” which is extremely powerful energy.


