
Table of Contents >> Show >> Hide
- Why Pruning Thyme Matters
- Best Time to Prune Thyme
- Tools You Need Before Pruning Thyme
- How to Prune Thyme: 9 Steps
- Step 1: Check Whether the Thyme Plant Is Established
- Step 2: Identify Green Growth, Woody Stems, and Dead Material
- Step 3: Choose the Right Pruning Point
- Step 4: Start With Light Harvesting Cuts
- Step 5: Remove Flowers If You Want More Leaf Growth
- Step 6: Shape the Plant Without Cutting Too Deep
- Step 7: Thin Out Dead, Weak, or Crowded Stems
- Step 8: Water Lightly After Pruning If the Soil Is Dry
- Step 9: Use or Preserve the Thyme Sprigs
- Common Thyme Pruning Mistakes
- How to Prune Different Types of Thyme
- Pruning Thyme in Containers
- How Often Should You Prune Thyme?
- of Real-Garden Experience: What Pruning Thyme Teaches You
- Conclusion
Thyme is the tiny-leaved overachiever of the herb garden. It asks for sunshine, good drainage, and the occasional haircut, then rewards you with fragrant sprigs for roasted vegetables, chicken, soups, stews, marinades, breads, and the kind of weeknight dinner that makes you look suspiciously organized. But here is the trick: thyme may look delicate, yet it is a woody perennial herb. Treat it like basil and chop it down dramatically, and your plant may sulk. Ignore it completely, and it may turn into a twiggy little shrub that looks like it has been through a very stressful tax season.
Learning how to prune thyme is really about balance. You want enough cutting to keep the plant compact, leafy, and productive, but not so much that you remove all the green growth it needs to recover. Regular pruning also doubles as harvesting, which is excellent news for anyone who likes garden chores that end with dinner. This guide walks through nine practical steps for pruning thyme the right way, whether your plant is in a raised bed, container, windowsill pot, herb spiral, or that mysterious sunny corner where Mediterranean herbs magically behave better than everything else.
Why Pruning Thyme Matters
Thyme naturally develops woody stems as it matures. A little woodiness is normal; it is part of the plant’s structure. The problem starts when the center becomes bare, the green tips move farther outward, and the plant stops producing the tender sprigs you actually want to cook with. Pruning encourages fresh side shoots, improves airflow, helps maintain shape, and reduces the chance of the plant becoming lanky or sparse.
Another reason to prune thyme is flavor. Thyme leaves are usually most aromatic before the plant is in full bloom, which is why many gardeners schedule a larger harvest just before flowers open. That does not mean flowering thyme is “ruined.” The bees would like to file a formal complaint against that idea. But if your goal is maximum leaf production for the kitchen, timely trimming helps the plant focus on foliage instead of seed production.
Best Time to Prune Thyme
The best time to prune thyme depends on what kind of pruning you are doing. Light snipping for cooking can happen throughout the active growing season once the plant is established and has enough leafy growth to spare. For a larger shaping prune, late spring to early summer is usually ideal, especially when the plant has pushed out new green growth and is not under stress from frost, drought, or heat.
Avoid heavy pruning late in the fall. Cutting too much at that time may stimulate tender new growth that does not have enough time to toughen before cold weather. In mild climates, thyme may remain evergreen or semi-evergreen, but it still slows down. Think of late-season thyme as a plant wearing pajamas: light tidying is fine, but do not ask it to run a marathon.
Tools You Need Before Pruning Thyme
You do not need a full garden shed to prune thyme. A clean pair of scissors, herb snips, or small pruning shears will do the job. For older plants with tougher stems, use sharp hand pruners to avoid crushing the branches. Clean blades matter because ragged cuts heal poorly and dirty tools can spread plant problems from one herb to another.
Before you start, gather a small bowl or basket for usable sprigs, a second pile for dead or woody debris, and a cup of confidence. The cup of confidence is optional but recommended.
How to Prune Thyme: 9 Steps
Step 1: Check Whether the Thyme Plant Is Established
Do not rush heavy pruning on a new thyme plant. Young thyme needs time to build roots and develop enough foliage to recover after cutting. If you recently planted a small nursery start, give it several weeks of active growth before harvesting more than a few sprigs. If you grew thyme from seed, expect it to be slow at first. Thyme is not lazy; it is just building its empire underground.
A plant is usually ready for regular light pruning when it has multiple stems, a full shape, and enough green growth that removing a few tips will not leave it looking bald. If the plant is tiny, stressed, yellowing, or newly transplanted, wait. Good pruning starts with a plant that has something to give.
Step 2: Identify Green Growth, Woody Stems, and Dead Material
Before making cuts, look closely. Green, flexible stems are the safest places to prune because they can branch and regrow. Older woody stems are firmer, browner, and less likely to produce new shoots if cut too hard. Dead stems are brittle, dry, gray or brown all the way through, and often snap easily.
Your mission is to remove dead material, lightly shorten green stems, and avoid cutting deep into bare old wood. Thyme can recover from thoughtful trimming, but it may not reshoot reliably from old woody sections with no leaves. When in doubt, leave some green growth behind. Plants enjoy photosynthesis. It is kind of their main hobby.
Step 3: Choose the Right Pruning Point
The best place to cut thyme is just above a leaf node or a pair of leaves. A node is the point where leaves attach to the stem and where new side growth can develop. Cutting above this point encourages a bushier plant instead of leaving long, awkward stubs.
For everyday kitchen harvesting, snip the top few inches of a stem. Choose stems with healthy leaves and avoid taking all the growth from one side of the plant. Move around the plant evenly so it keeps a rounded, natural shape. A thyme plant should look groomed, not like it lost a bet with the scissors.
Step 4: Start With Light Harvesting Cuts
If you are new to pruning thyme, begin with light cuts. Remove small sprigs from several areas rather than taking one huge section. This gives you a usable harvest while encouraging the plant to branch. It also helps you learn how quickly your particular thyme plant regrows in your climate, soil, and container size.
Light harvesting is especially useful for potted thyme, which can dry out faster and may have less root space than thyme grown in the ground. A container plant can be productive for a long time, but it appreciates moderation. Snip what you need, keep the plant evenly shaped, and avoid stripping stems completely bare.
Step 5: Remove Flowers If You Want More Leaf Growth
Thyme flowers are pretty, edible, and beloved by pollinators. If you are growing thyme partly as a bee-friendly plant, let some flowers bloom. If you are growing thyme mainly for leaves, pinch or cut flower buds as they appear. This helps direct the plant’s energy back into leafy growth.
There is no need to panic if your thyme flowers. The leaves are still usable, though the flavor may be a bit less intense after flowering. For the strongest kitchen harvest, make a larger cutting just before the plant opens its flowers. That is the sweet spot where the plant is leafy, fragrant, and ready to make your roasted potatoes taste like you hired a tiny herb consultant.
Step 6: Shape the Plant Without Cutting Too Deep
Once the plant is actively growing, you can shape it by trimming the longest stems back by about one-third. The goal is to create a compact mound with good airflow and plenty of leafy tips. Do not shear thyme into a tight ball like a formal hedge unless you are using it ornamentally and still leaving enough green growth. A gentle, natural shape is better for long-term health.
Always avoid cutting into bare, old wood unless you are removing dead stems. If a branch has green growth near the end but a woody base, shorten it only to a point where leaves remain. This is one of the most important rules of thyme pruning: never assume a leafless woody stump will politely grow back just because you asked nicely.
Step 7: Thin Out Dead, Weak, or Crowded Stems
After shaping the plant, remove dead stems at the base or back to a healthy side shoot. If the plant is dense in the center, thin a few weak or crossing stems to improve airflow. Better airflow can help keep the plant drier, which thyme prefers. This is especially important in humid climates or heavy soils where Mediterranean herbs can struggle.
Do not over-thin. Thyme is naturally small and low-growing, so you are not trying to open it like a fruit tree. You are simply removing the stems that are clearly dead, unproductive, tangled, or shading the plant’s healthier growth. Think of it as editing a sentence: remove the clutter, keep the meaning.
Step 8: Water Lightly After Pruning If the Soil Is Dry
After pruning, check the soil. Thyme likes well-drained conditions and does not want soggy roots, but a dry plant recovering from pruning may appreciate a modest drink. Water at the soil level rather than soaking the foliage. Wet leaves plus poor airflow can invite problems, and thyme did not leave the Mediterranean lifestyle behind just to sit around damp.
If your thyme is in a pot, make sure the container has drainage holes. If water sits in the saucer, empty it. Many thyme problems come from too much moisture rather than too little. A sunny location, lean soil, and careful watering usually produce stronger growth and better flavor than rich, wet conditions.
Step 9: Use or Preserve the Thyme Sprigs
Fresh thyme can be used immediately. Rinse only if necessary, then pat dry. Add whole sprigs to soups, stews, sauces, and roasted dishes, removing the stems before serving if they are tough. For softer green stems, you can chop the leaves and tender tips together.
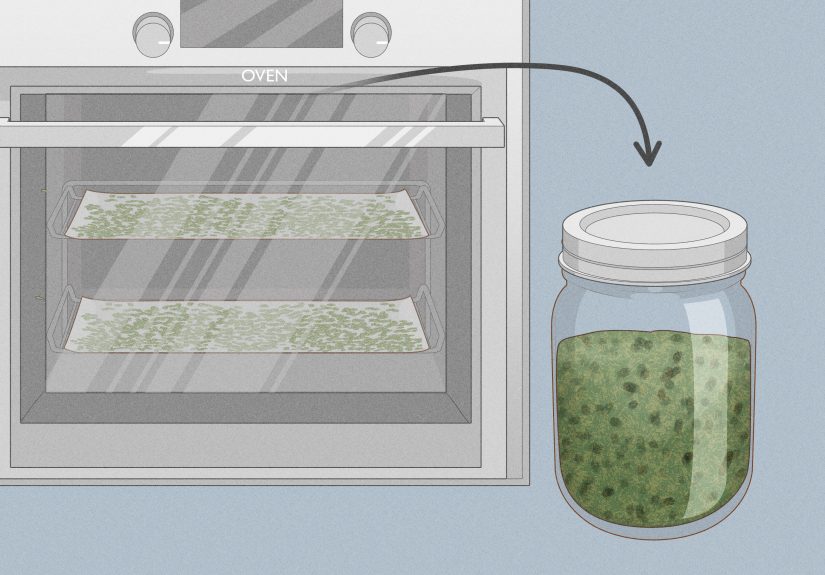
If you harvested more than you need, dry the sprigs in small bundles or spread them in a single layer in a dry, airy place away from direct sun. Once fully dry, strip the leaves from the stems and store them in an airtight container. Label the jar with the date, because “mystery herb dust” is not the culinary flex anyone thinks it is.
Common Thyme Pruning Mistakes
Cutting Into Bare Old Wood
The biggest mistake is cutting thyme back to old, leafless wood. Unlike some vigorous herbs, thyme may not push fresh growth from those old sections. Keep cuts in leafy growth whenever possible.
Taking Too Much at Once
For routine pruning, avoid removing more than about one-third of the plant at a time. A very healthy plant in peak growth may tolerate more, but conservative pruning is safer, especially for container thyme or older plants.
Pruning Hard in Late Fall
Heavy fall pruning can encourage new growth that is vulnerable to cold damage. Save major shaping for spring or early summer, and limit fall work to light harvesting or removing dead stems.
Ignoring the Plant for Years
Unpruned thyme often becomes woody, sparse, and less productive. Regular light harvesting is easier than rescuing an old plant that has turned into a bundle of sticks with opinions.
How to Prune Different Types of Thyme
Common thyme, lemon thyme, and English thyme are usually pruned in similar ways: cut above leafy nodes, shape lightly, and avoid old bare wood. Creeping thyme, often used as a ground cover between stepping stones or along garden edges, needs a lighter touch. Trim it after flowering to keep it neat, remove dead patches, and prevent it from spreading into places where it was not invited, such as the driveway, the lawn, or your emotional support oregano.
Variegated thyme grows a bit more slowly than plain green types in many gardens, so prune it gently. If you see plain green shoots on a variegated plant, remove those stems to preserve the variegated look. Otherwise, the stronger green growth may take over.
Pruning Thyme in Containers
Container-grown thyme is convenient because it can sit near the kitchen, where you are more likely to use it. The tradeoff is that pots dry out quickly, heat up fast, and restrict root growth. Prune potted thyme lightly but regularly, taking small sprigs from around the plant to keep it compact.
If the plant becomes woody, root-bound, or thin in the center, consider refreshing it. You can repot into fresh, well-draining mix, take cuttings from healthy green stems, or replace the plant after a few years. There is no shame in replacing an exhausted thyme plant. Even herbs deserve retirement.
How Often Should You Prune Thyme?
During active growth, light pruning can happen every couple of weeks if the plant is healthy and growing well. Larger harvests are best limited to a few times per season. Let the plant regrow between bigger cuts. In cooler months, slow down and harvest sparingly.
The best schedule is based on the plant’s growth, not the calendar alone. If thyme is producing new leafy tips, you can prune lightly. If it is stressed, dry, newly planted, or dormant, wait. Good gardeners watch the plant first and the schedule second.
of Real-Garden Experience: What Pruning Thyme Teaches You
Pruning thyme teaches patience in a way few garden chores do. With some herbs, the instructions are dramatic: cut basil hard, chop mint back, harvest cilantro before it bolts into outer space. Thyme is quieter. It asks you to notice the difference between green and woody growth, between a helpful trim and a haircut that has gone too far. The first time you prune thyme, you may feel like you are barely removing anything. Then, a couple of weeks later, you see tiny side shoots forming below the cuts, and suddenly the whole method makes sense.
One useful experience is to prune thyme while cooking. Instead of treating pruning as a separate chore, take a small bowl outside when you are making soup, roasted chicken, mushrooms, beans, or potatoes. Snip from the longest stems, always moving around the plant. You come back with enough thyme for dinner, and the plant gets a light shaping without you overthinking it. This “cook and clip” method is one of the easiest ways to keep thyme from getting woody because you are constantly encouraging fresh tips.
Another lesson is that thyme grown in lean soil often behaves better than thyme in rich, wet soil. Many gardeners accidentally love their thyme too much. They water it like lettuce, feed it like tomatoes, and then wonder why it looks unhappy. Thyme prefers restraint. After pruning, give water only if the soil is actually dry. If the plant is in a container, lift the pot. A lightweight pot usually means dry soil; a heavy pot means wait. This simple habit prevents the soggy-root situation that thyme deeply dislikes.
Older thyme plants also teach when to let go. If the center is mostly woody and bare, and green growth only appears at the far edges, pruning may improve the shape but may not fully restore the plant. In that case, take cuttings from healthy stems before doing anything drastic. Rooting thyme cuttings is a practical backup plan, and it feels wonderfully thrifty. You are not losing a plant; you are starting the next generation.
Finally, pruning thyme helps you understand that not every garden task needs to be aggressive to be effective. Small, regular cuts often work better than one heroic chop. A well-pruned thyme plant looks natural, smells amazing when brushed, and produces enough sprigs to make ordinary food taste intentional. That is the charm of thyme: it does not shout for attention, but it quietly improves everything around it. A little pruning keeps that charm going season after season.
Conclusion
Pruning thyme is simple once you understand the plant’s personality. It is a woody perennial herb that wants sunshine, drainage, and thoughtful trimming rather than a brutal buzz cut. Cut above leaf pairs, harvest lightly and regularly, shape the plant during active growth, remove dead stems, and avoid deep cuts into old bare wood. Do that, and your thyme will stay compact, fragrant, and productive for far longer.
Whether you grow thyme in a raised bed, patio pot, windowsill planter, or ground-cover border, the same principle applies: prune for healthy new growth, not just for appearance. The reward is a stronger plant, a better harvest, and a kitchen that smells like you know exactly what you are doing.


