
Table of Contents >> Show >> Hide
- Before You Start: Know Which LifeProof You’re Dealing With
- What You’ll Need
- How to Remove a LifeProof Case (7 Steps)
- Step 1: Power Down and Unplug Everything
- Step 2: Find the Seam and the “Starting Spot”
- Step 3: Open All Port Covers First
- Step 4: Use the Coin (or Case Key) to Create the First Gap
- Step 5: Work Around the EdgesSlowly and Evenly
- Step 6: Separate the Halves and Remove the Phone Safely
- Step 7: Inspect, Clean, and Protect the Seals (So Reinstalling Is Easy)
- Troubleshooting: When the Case Still Won’t Come Off
- Common Mistakes That Scratch Phones (and Pride)
- Real-World Experiences: What People Learn the Hard Way (and Then Laugh About Later)
- Conclusion
LifeProof cases are the phone-case equivalent of a bouncer at a nightclub: their whole job is to not let anything in or out.
That’s great for water, dust, and “oops, I dropped it again” moments. Not so great when you just want your phone backlike, today.
The good news: you don’t need superhuman grip strength or a degree in mechanical engineering to remove a LifeProof case safely.
You just need the right starting point, a little patience, and (in many models) a humble coin that finally gets promoted from “cup-holder clutter” to “useful tool.”
Before You Start: Know Which LifeProof You’re Dealing With
“LifeProof” isn’t one single case styleit’s a family. Removal depends on the series:
- FRĒ: Sealed, two-piece design (front + back). Often has port covers and a clear front.
- NÜÜD: Similar toughness, but typically leaves the screen uncovered (touching the real glass).
- NËXT: Designed for drop/dirt/snow protection and often opens with a case key (or coin).
- SLAM: More of a snap-on shell style (usually simpler to remove than the fully sealed options).
If you don’t know the series, look for the branding inside the case or search the model name printed near the inner frame. When in doubt, follow the safe method below.
What You’ll Need
- A clean coin (quarter works well) or a LifeProof case key (if your model came with one)
- A soft towel or microfiber cloth (to protect your phone when it pops free)
- An optional plastic card (old gift card) or a plastic pick (for stubborn seams)
Avoid: knives, metal screwdrivers, or anything sharp that can slip and scratch your phone or gouge the case’s sealing surfaces.
How to Remove a LifeProof Case (7 Steps)
-
Step 1: Power Down and Unplug Everything
Turn your phone off and disconnect charging cables or headphones. This prevents accidental taps, surprise calls,
and “why did I just take 37 screenshots” moments while you wrestle the case.Place a towel on a table so the phone has a soft landing zone if it slips.
-
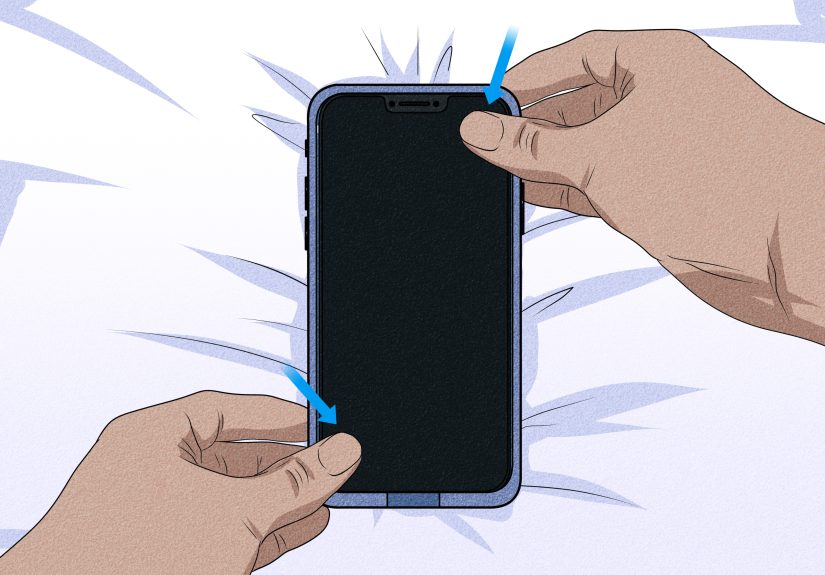
Step 2: Find the Seam and the “Starting Spot”
LifeProof cases usually separate along a perimeter seam where the front and back shells meet.
Look closely around the edgesmany models have a small notch or separation point
near the bottom, often close to the charging port area.If you have a NËXT model and a case key, the key typically fits into a dedicated slot designed to start the separation.
-
Step 3: Open All Port Covers First
This is the step people skipand then wonder why the case won’t budge.
Flip open the charge port door. If your case has a headphone-jack cover or plug, open or loosen it too.Port covers can add tension. Opening them gives the case room to flex instead of fighting you like it’s defending a title belt.
-
Step 4: Use the Coin (or Case Key) to Create the First Gap
Insert a coin into the notch/separation point and twist gentlythink “turn a key,” not “open a paint can.”
Your goal is to create a small gap between the front and back shells.If you have the case key (common with NËXT), insert it where indicated and use it to separate the case at the designed point.
Tip: Keep the phone face-down on the towel while you start the split. Gravity is your friend here.
-
Step 5: Work Around the EdgesSlowly and Evenly
Once you’ve opened a small section, use your fingers to “walk” around the perimeter seam.
Gently pull the two halves apart a little at a time. If clips resist, don’t brute-force one cornerspread the effort around.If the seam keeps snapping back, slide a plastic card into the gap and move it along the edge to help release clips without scratching.
-
Step 6: Separate the Halves and Remove the Phone Safely
When enough clips release, the case will open like a clam (a very protective, slightly stubborn clam).
Lift the front shell away, then remove the phone from the back shell.If it feels stuck, check for snag points around the camera lip or button areas, and free those spots gently rather than yanking.
-
Step 7: Inspect, Clean, and Protect the Seals (So Reinstalling Is Easy)
If you’re using a sealed-style LifeProof (like FRĒ), take 30 seconds to inspect the gaskets and sealing surfaces.
Tiny debrislint, hair, dustcan compromise the seal and make the case harder to close cleanly next time.Wipe the inside with a microfiber cloth. If the seals are dirty, clean them gently (and make sure they’re fully dry) before reinstalling.
Store the case key somewhere you’ll rememberlike taped inside your “phone stuff” drawer, not “somewhere safe” you’ll never find again.
Troubleshooting: When the Case Still Won’t Come Off
The seam won’t open at all
- Double-check the port door. If it’s closed, you’re fighting extra tension.
- Try a different corner. Start on the side with fewer buttons for an easier flex point.
- Use a plastic helper. A plastic card is safer than metal tools.
It opens a little… then snaps shut again
- Keep light pressure on the first gap while you work the seam.
- Insert the plastic card briefly to hold the separation while you release the next clips.
It feels “glued”
-
Some tight-fitting cases benefit from gentle warmth (think low heat for short intervals) to make materials slightly more flexible.
Don’t cook your phonejust make the case less stiff.
Common Mistakes That Scratch Phones (and Pride)
- Using sharp metal tools: One slip and you’ve got a souvenir scratch.
- Forcing one corner: This can warp the case or stress the phone frame.
- Ignoring seals and debris: Reinstalling gets harder, and protection can drop.
- Doing it over hard floors: The moment it pops free is the moment gravity starts auditioning.
Real-World Experiences: What People Learn the Hard Way (and Then Laugh About Later)
If you’ve ever tried to remove a LifeProof case for the first time, you already know the emotional arc:
confidence → confusion → bargaining → victory dance. The case looks simple, but it’s engineered to lock down tight
which means the first removal can feel like you’re attempting to open a vault with only your fingertips and optimism.
One of the most common experiences is that moment when you find the notch, try to pry it with a fingernail, and immediately realize
your nail is not a precision toolit’s just a tiny piece of keratin with big dreams. That’s where the “coin method” becomes legendary.
The funny part is how low-tech it feels: you’re removing advanced protective gear with pocket change. But it works because the case is
designed to separate at a specific point, and the coin gives controlled twisting force without needing a sharp edge.
Another classic: forgetting to open the charge port door first. People will twist and pull, swear the case is fused to the phone, and
thenonce the port door flips openeverything suddenly loosens. It’s like trying to remove a tight shoe while you’re still stepping on
the laces. The case isn’t “stuck,” it’s just doing exactly what it was built to do: stay sealed and rigid until you release the tension points.
Then there’s the “pop” moment. When the first clips release, the case often makes a sound that’s halfway between “snap” and “freedom.”
That’s when a lot of people accidentally shift from careful to overconfidentpulling too hard and launching the phone onto the nearest
hard surface. That’s why doing this over a towel is such a small step with huge payoff. A soft landing spot turns “oops” into “no damage,
we’re good.”
Long-term LifeProof users also learn a maintenance truth: lint is the unofficial villain. Dust and pocket fuzz love to gather around
seals and port covers. If you remove your case regularly (say, for cleaning), you’ll start noticing how tiny debris can collect in corners you
never see. People who take 30 seconds to wipe the sealing areas usually report smoother reinstallations and fewer “why won’t this close?”
frustrations. It’s not glamorous, but it’s the difference between a case that snaps shut cleanly and one that feels like it’s arguing with you.
Finally, many folks have a story about losing the case key (for NËXT-style cases). It’s always “I put it somewhere safe,” which is a polite
way of saying “I will never see it again.” The lesson: store it where you store your SIM tool, spare charger, or other phone essentials.
Because the day you need to remove the case quickly is the day you’ll wish you didn’t treat the key like a magical object that can teleport.
The upside? Once you’ve removed a LifeProof case a couple times, it stops feeling intimidating. You learn where the case flexes, where the
seam starts, and how much pressure is “enough.” The case doesn’t get weakeryou just get smarter. And honestly, that’s the best outcome:
your phone stays protected, and you stay in control (with a coin that finally earned your respect).
Conclusion
Taking off a LifeProof case is all about the right sequence: open the port covers, start at the designed notch,
use a coin or case key for the first separation, then work the seam patiently around the edges.
Do it on a soft surface, avoid sharp tools, and give the seals a quick inspection so your case keeps protecting like it’s supposed to.
SEO tags (JSON):


