
Table of Contents >> Show >> Hide
- Why Paint Oak Cabinets White and Gray?
- Planning Your White-and-Gray Oak Cabinet Makeover
- Tools, Materials, and Products You’ll Need
- Step-by-Step: How to Paint Oak Cabinets White and Gray
- Common Mistakes to Avoid When Painting Oak Cabinets
- Style Ideas Inspired by Remodelaholic’s White and Gray Cabinets
- Real-Life Experiences: What DIYers Learn Painting Oak Cabinets White and Gray
- 1. The Prep Feels Endless, But It’s Worth Every Minute
- 2. The Right Primer Can Save Your Sanity
- 3. Two-Tone Colors Are Surprisingly Forgiving
- 4. The Project Takes Longer Than You ThinkPlan for It
- 5. The Transformation Is HugeEven Without a Full Remodel
- 6. Small Imperfections Are Normaland Invisible to Everyone Else
- Conclusion: A Remodel-Worthy Look Without a Full Gut
If your honey-oak kitchen is giving “1995 starter home” instead of “fresh Pinterest board,” painting your oak cabinets white and gray might be the glow-up your space has been begging for. The good news: you don’t have to rip out perfectly solid cabinets to get a custom-looking kitchen. With the right prep, products, and a bit of patience, oak can go from orange and busy to calm, bright, and modern.
This guide walks you through everything you need to know to paint oak cabinets white and gray, from handling the oak grain to choosing colors and getting a pro-level finish that can stand up to daily cooking chaos. We’ll also pull in real-world tips and experiences so you know what actually works in a lived-in kitchensticky fingers, spaghetti splatters, and all.
Why Paint Oak Cabinets White and Gray?
Oak cabinets were the darlings of builders for decades because they’re durable and relatively affordable. The downside? That heavy grain and warm orange or yellow tone can make a kitchen feel dated and dark. Enter the white-and-gray combo: bright, neutral, and endlessly flexible.
- Light and airy: White uppers bounce light around the room, making even small kitchens feel more open.
- Grounded and modern: Gray lowers add contrast so the room doesn’t feel washed out. It’s a classic “two-tone kitchen” look that feels custom, not builder basic.
- Compliments oak’s strengths: Oak is sturdy and worth saving. Paint lets you keep the solid wood and ditch the orange tone.
- Plays nicely with everything: White and gray cabinets work with stainless, black, or white appliances, almost any countertop, and a wide range of backsplash styles.
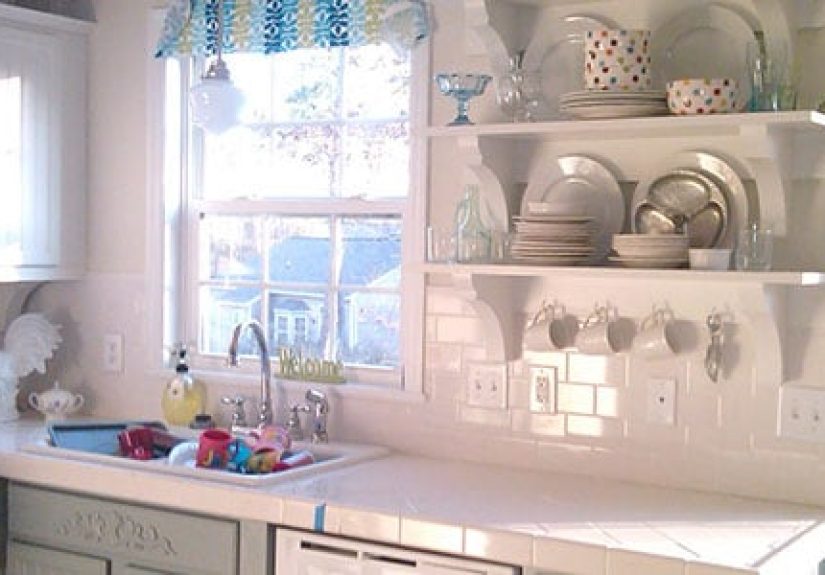
The original Remodelaholic project that inspired this look paired white upper cabinets with gray lowers, new countertops, and open shelves. The result: a brighter, more functional kitchen without a full gut renovation.
Planning Your White-and-Gray Oak Cabinet Makeover
1. Evaluate Your Existing Oak Cabinets
Before you buy a single paint can, inspect what you’re working with:
- Check the structure: Are the boxes solid? Doors aligned? If everything is sturdy but just dated, paint is a smart investment.
- Look at the grain: Oak has strong, open grain. Decide whether you’re okay seeing some grain through the paint or if you want a super-smooth, furniture-like finish.
- Note previous finishes: High-gloss varnish or heavy lacquer will need more aggressive prep and a strong bonding primer.
2. Choose Your White and Gray Paint Colors
Color choice is where your future self will either thank you… or politely side-eye you every morning.
A few tips for picking cabinet colors:
- Stick to soft, neutral whites: Look for whites labeled “warm,” “soft,” or “off-white.” Stark, cold whites can look harsh against wood floors and create a sterile vibe.
- Pick grays with a touch of warmth: Warm gray or “greige” tones play nicely with existing flooring and counters. Very cool grays can look blue or flat in some lighting.
- Test in your kitchen: Paint large sample boards (or sample doors) and move them around the room at different times of day. A color that looks perfect in a showroom can read completely differently under your ceiling lights.
Many designers love using off-whites and soft greige tones for cabinetsshades that read nearly white on uppers and a bit deeper on lowers. This keeps things bright but still cozy and forgiving of daily smudges.
3. Decide on Your Layout: White on Top, Gray on Bottom
The classic Remodelaholic-inspired layout is:
- Upper cabinets: White
- Lower cabinets + island: Gray
This combo visually lightens the top half of the room while anchoring the bottom. It also pairs beautifully with wood or laminate floors, butcher block, white quartz, or stone-look counters.
For extra style points:
- Use the same white on upper cabinets and walls for a seamless, airy look.
- Choose hardware in black, brushed nickel, or brass to contrast with both colors.
- Add a simple backsplash (subway tile, zellige, or patterned tile) to bridge the white and gray tones.
Tools, Materials, and Products You’ll Need
Great prep and the right products are what separate “Pinterest-worthy” from “why is this peeling already?” Here’s a solid starting list:
Prep and Cleaning
- Degreaser or TSP substitute (kitchen cabinets are always greasier than they look).
- Scuff-sanding pads or 120–220 grit sandpaper.
- Tack cloths or a vacuum with a brush attachment.
- Wood filler or grain filler (if you want a smoother finish).
Primers
Oak has natural tannins that love to bleed through paint, especially when you go light with whites and grays. A strong, stain-blocking primer is non-negotiable.
- Bonding primer: For varnished or slick oak, a bonding primer helps paint stick (for example, specialized “extreme bond” formulas marketed for cabinets and glossy surfaces).
- Tannin-blocking primer: Oil-based or shellac-based primers are classic choices for oak because they seal in stains and tannins. Modern water-based stain-blocking primers can also work if they’re specifically labeled to block tannin bleed.
Paints and Tools
- High-quality trim or cabinet paint with a durable finish (satin, semi-gloss, or “enamel” formulas designed for trim and doors).
- Good nylon/polyester brushes for cutting in and detail work.
- Foam or microfiber rollers for a smooth finish on flat surfaces.
- Optional: a paint sprayer if you want a factory-like finish and have space to spray doors safely.
Step-by-Step: How to Paint Oak Cabinets White and Gray
Step 1: Label, Remove, and Set Up Your Workspace
Before you touch a screwdriver, grab painter’s tape and a marker. Number or label each door and drawer front, plus the inside of each cabinet box, so you know exactly where everything goes later.
- Remove doors, drawer fronts, and hardware.
- Set up a painting area for doorsgarage, basement, or a spare room with plastic on the floor.
- Lay doors on painter’s pyramids, scrap blocks, or cups so edges are raised off the surface.
Step 2: Deep-Clean and Degrease
Grease and cooking residue are the sworn enemies of adhesion. Even cabinets that “look” clean tend to hide a decade of fingerprints and cooking oil.
- Scrub all surfaces with a degreaser or TSP substitute.
- Rinse with clean water and let everything dry completely.
Step 3: Sand and (Optional) Fill the Oak Grain
Light sanding gives your primer something to grip and knocks down any rough spots. Use 120–150 grit for your first pass, then 220 for a smoother finish.
If you want to minimize or hide the oak grain:
- Apply a dedicated grain filler or a thin layer of spackle/wood filler over heavily grained areas.
- Let it dry, then sand smooth.
- Wipe all surfaces with a tack cloth to remove dust.
Note: You can absolutely paint oak and still see the grainit’s a style choice. Many Remodelaholic-style projects embrace a bit of texture for character.
Step 4: Prime Like You Mean It
Prime every surface you plan to paint, including door edges and the visible parts of cabinet frames.
- Use a bonding primer on varnished or slick surfaces to ensure your paint sticks.
- On oak, consider at least one coat of a strong stain-blocking primer (oil-based or shellac-based), especially under white and light gray. This helps prevent tannin bleed and yellowish stains.
- Allow the primer to dry fully, then lightly sand with a fine-grit sandpaper for an extra-smooth base.
If you see yellow or brown spots bleeding through after your first coat of primer, spot-prime those areas again. It’s easier to fix now than after two coats of paint.
Step 5: Apply Your White and Gray Paint
Now for the fun partcolor!
Work in this order for cabinets:
- Paint the cabinet frames in place: do the white uppers first, then the gray lowers.
- Paint the doors and drawer fronts laid flat.
For the smoothest finish:
- Use a brush for detailed areas and inside profiles, and a foam or microfiber roller on flat sections.
- Apply two to three thin coats rather than one heavy coat; thin coats cure harder and chip less.
- Lightly sand between coats to knock down nibs and dust.
Plan on at least two coats of your white and gray paints, sometimes three over oakespecially for bright whites.
Step 6: Let Everything Cure Before Reinstalling
Paint can feel dry to the touch long before it’s fully cured. If you re-hang doors too soon, soft paint may stick to frames or pull off with hardware.
- Give cabinets at least a few days before heavy use; a week is even better if your schedule allows.
- When reattaching hardware, don’t over-tighten screws into freshly painted holes.
Step 7: Add Hardware and Styling Details
Fresh hardware is the jewelry of your kitchen. For white and gray cabinets:
- Black hardware adds a modern, graphic edge.
- Brushed nickel or stainless coordinates easily with existing appliances.
- Brass or gold warms up cool grays and gives a more custom, elevated look.
Finish the look with a few styled open shelves, a pretty rug runner, and some greenery. Suddenly those “builder basic” oak cabinets feel like a custom kitchen.
Common Mistakes to Avoid When Painting Oak Cabinets
- Skipping degreasing: Sanding over grease just grinds it into the finish, and paint won’t stick well.
- Not using a stain-blocking primer: On oak, this is how you end up with yellowish spots bleeding through your white paint.
- Rushing dry and cure times: Always follow the label’s dry and recoat times. Humidity and temperature matter.
- Using the wrong sheen: Flat paint shows smudges; high-gloss can highlight imperfections. Satin or semi-gloss is usually the sweet spot for cabinets.
- Skipping sanding between coats: It’s a small step that makes a huge difference in how smooth and “factory” your finish looks.
Style Ideas Inspired by Remodelaholic’s White and Gray Cabinets
Once your cabinets are white and gray, the fun really starts. Here are a few design directions that work beautifully with this palette:
Bright Farmhouse
- White uppers, soft warm gray lowers.
- Butcher block or light stone-look counters.
- Simple white subway tile backsplash with a slightly darker grout.
- Black pulls and knobs for contrast.
Modern Classic
- Crisp, clean white on uppers; deeper charcoal gray on lowers or the island.
- Quartz counters with subtle veining.
- Minimalist bar pulls in brushed nickel or brass.
- Under-cabinet lighting to show off that new paint job.
Cozy Transitional
- Creamy, soft white uppers and a greige lower cabinet color.
- Warm wood floors and woven shades.
- Mix of open shelving and closed cabinets, like the original Remodelaholic inspiration.
Real-Life Experiences: What DIYers Learn Painting Oak Cabinets White and Gray
Reading a step-by-step is one thing. Living through a cabinet-painting projectwith kids, pets, and work in the mixis another story. Here are experience-based lessons that people almost always mention after completing oak-to-white-and-gray makeovers.
1. The Prep Feels Endless, But It’s Worth Every Minute
Many DIYers start excited to dive into painting and quickly discover that 70–80% of the project is prep. There’s a moment, usually around cabinet box #6, where you may question your life choices while degreasing or sanding. But the people who get the best results almost always say the same thing afterward: “I’m so glad I didn’t rush the prep.”
If you’re tempted to skip grain filling or extra sanding passes, remember that every little ridge or ding will be more noticeable once the cabinets are bright white and light gray. Oak doesn’t hide sins well under light paint, so smoothing now saves a lot of side-eye later.
2. The Right Primer Can Save Your Sanity
A common “oops” story goes like this: someone uses regular wall primer, paints everything white, and wakes up the next day to mysterious yellow spots and streaks. That’s tannin bleed from the oak. Fixing it means sanding, spot-priming with a stronger primer, and repaintingbasically doing the job twice.
DIYers who had smooth sailing usually:
- Chose a primer specifically labeled for stain-blocking or tannin-blocking.
- Did a test door first to see how the oak behaved.
- Did not move on to paint until the primer looked consistent and stain-free.
It may feel extra cautious, but cabinet paint is not cheap, and your time is valuable. Getting the primer right is the best insurance policy.
3. Two-Tone Colors Are Surprisingly Forgiving
One of the best parts of painting oak cabinets white and gray is how forgiving the two-tone layout is in daily life. White uppers aren’t touched as often, so they stay bright longer, while gray lowers do a much better job hiding scuffs from shoes, kids’ backpacks, and vacuum cleaners.
Many homeowners report that the kitchen instantly feels bigger once the uppers go white. Even if your layout hasn’t changed, the lighter top half of the room visually “lifts” the ceiling. When you walk in, your eye catches the airy uppers and clean lines instead of the former patchwork of oak grain and heavy color.
4. The Project Takes Longer Than You ThinkPlan for It
A full cabinet painting project often stretches over a few weekends, especially if you’re working around family life and a functioning kitchen. People who stay the least stressed usually:
- Divide the project into phases (lowers first, then uppers, or vice versa).
- Set up a temporary “kitchen” in another room with a coffee maker, microwave, and essentials.
- Accept that the house will look messy for a bit and focus on the finish line.
Framing it as a short-term inconvenience for a long-term upgrade helps you keep your sense of humor when you’re fishing the silverware out of a moving box… again.
5. The Transformation Is HugeEven Without a Full Remodel
Almost everyone who paints their oak cabinets white and gray comments on how dramatic the change feels compared to the cost. You’re keeping the same cabinet boxes, most of the layout, and often the appliances, but visually the room jumps a couple of decades forward.
The white-and-gray combo especially feels “designer” because it mimics what you see in custom kitchens and inspiration photos. Add in updated hardware and a few styling touches, and suddenly your old oak kitchen becomes one of your favorite places in the house.
6. Small Imperfections Are Normaland Invisible to Everyone Else
Up close, you will notice tiny brush marks, a bit of grain peeking through, or a corner where the paint isn’t absolutely perfect. The funny thing? Guests almost never notice. They see the big picture: a brighter, updated kitchen with clean white uppers and chic gray lowers.
So aim for “high quality, durable, and beautiful,” not “flawless under a magnifying glass.” Take pride in the fact that you saved solid oak from the landfill and turned it into a custom-looking kitchen with your own hands.
Conclusion: A Remodel-Worthy Look Without a Full Gut
Painting oak cabinets white and gray is one of the most impactful upgrades you can make without tearing your kitchen down to the studs. With thoughtful prep, a good primer, quality cabinet paint, and a smart two-tone color scheme, you can transform heavy, dated oak into a bright, modern, Remodelaholic-inspired showpiece.
Yes, it’s a project. Yes, there will be sanding dust and paint-splattered yoga pants. But when you walk into your kitchen and see crisp white uppers, grounded gray lowers, and a space that finally matches your style, you’ll know it was worth every brush stroke.


