
Table of Contents >> Show >> Hide
- Why Accent Walls Work (Even When the Rest of the Room Is Still a Work in Progress)
- Step Zero: Choose the Right Wall (So the “Accent” Doesn’t Turn Into “Accident”)
- Prep Like a Pro (Because the Wall Will Absolutely Tell on You)
- 8 Easy, Affordable Accent Wall Ideas That Look High-End
- 1) Paint-Only Accent Wall (Fastest, Cheapest, Still Dramatic)
- 2) Peel-and-Stick Wallpaper (Pattern Without the Commitment)
- 3) Picture-Frame Molding (Classic “Fancy Wall” on a Budget)
- 4) Board-and-Batten (The Crowd-Pleaser That Looks Custom)
- 5) Shiplap or Plank Walls (Big Texture, Surprisingly DIY-Friendly)
- 6) Wood Slat Accent Wall (Modern, Warm, and Very “Architect’s Instagram”)
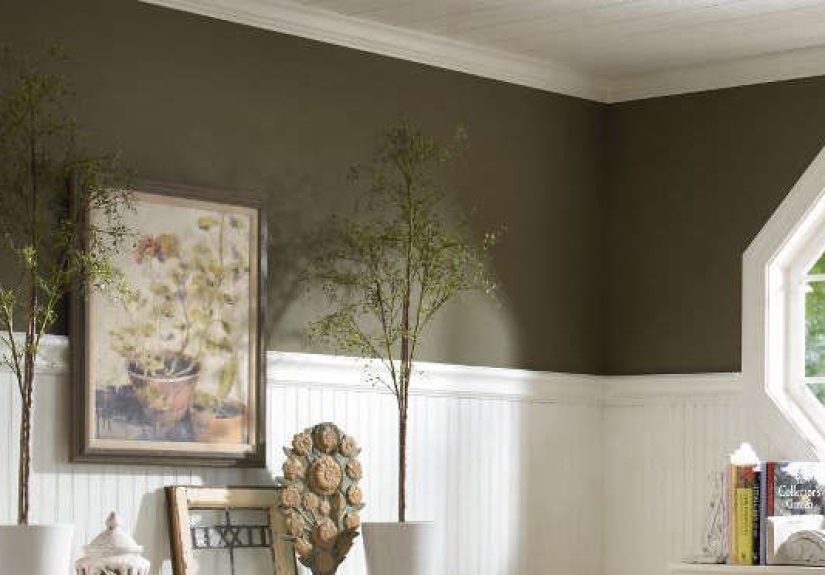
- 7) Beadboard or Wainscoting Panels (Instant Charm, Less Effort Than You Think)
- 8) Faux Brick, Stone, or 3D Wall Panels (Texture Without Masonry Drama)
- Budget Reality Check: What These Accent Walls Typically Cost
- Common Mistakes That Make Accent Walls Look Cheaper Than They Were
- Mini Playbooks: Pick Your Weekend
- Real-World Experiences: What People Learn After Their First Accent Wall (Plus How to Make Yours Easier)
- Conclusion: The Best Accent Wall Is the One You’ll Finish
If your room feels a little “meh,” an accent wall is the remodeling equivalent of changing into clean shoes:
suddenly, the whole outfit makes sense. You get a big visual upgrade without tearing down half your house,
refinancing your sanity, or learning twelve new power-tool noises.
The best part? Most accent walls are weekend-friendly and budget-flexible. You can go as simple as paint and a
level, or as “I watched three tutorials and now I have opinions” as trim and planks. Let’s walk through
the easiest, most affordable ways to add drama (the good kind) to any room.
Why Accent Walls Work (Even When the Rest of the Room Is Still a Work in Progress)
Accent walls do three jobs at once: they create a focal point, add depth, and help “zone” a spaceespecially in
open layouts where your dining area is also your office and occasionally your laundry-folding arena.
A single wall can visually anchor the sofa, frame a bed, or make a bland hallway feel intentional.
And because you’re treating one wall instead of four, you can afford nicer finishes or bolder choices without
committing your entire home to a color that felt “cozy and moody” at 9 p.m. but looks like a thunderstorm at noon.
Step Zero: Choose the Right Wall (So the “Accent” Doesn’t Turn Into “Accident”)
Pick the wall your room already looks at
The easiest accent wall is the one your eyes naturally land on: behind the headboard, the wall your sofa faces,
a fireplace wall, or the first wall you see when you walk in. If you have built-ins, niches, or a TV wall, those
are natural candidates too.
Avoid the “Swiss cheese” wall
Walls packed with doors, windows, vents, and odd angles are harder for wallpaper patterns, trim grids, or slats.
You can still accent thembut it’s more measuring, more cutting, and more chances to invent new vocabulary.
Do a 5-minute lighting reality check
Paint and wallpaper change dramatically in different light. Tape up a few samples (or print a pattern) and look at
them morning, afternoon, and night. If it looks great in every lighting mood, you’ve found a winner.
Prep Like a Pro (Because the Wall Will Absolutely Tell on You)
Prep is the difference between “custom feature wall” and “I tried my best.” Good news: it’s not complicated.
It’s just unglamorouslike flossing, but for drywall.
- Clean: Dust and oils reduce adhesion for removable wallpaper and panel glue. Use a gentle cleaner and let the wall dry fully.
- Patch and smooth: Fill holes, sand bumps, and remove loose paint. Wallpaper and slat panels love smooth walls.
- Mark studs (if you’re adding anything solid): Planks, slats, and heavy trim often need fastening into studs for a long-lasting hold.
- Use a level or plumb line: Very few walls are perfectly square. A straight starting line prevents “it looked fine until the last strip.”
- Safety note: If a project involves cutting, nailing, or power tools, use proper safety gear and work with an experienced adult or a qualified pro.
8 Easy, Affordable Accent Wall Ideas That Look High-End
1) Paint-Only Accent Wall (Fastest, Cheapest, Still Dramatic)
A painted accent wall is the gateway project: low cost, low mess, high impact. Go bold with a deep navy, forest
green, or warm terracottaor keep it subtle with a shade 1–2 steps darker than your main wall color.
Want extra style without extra spend? Try:
- Color-blocking: Paint a wide rectangle behind the bed or sofa to “frame” furniture.
- Painted arch: Softens a room and looks custom, especially behind a nightstand or desk.
- Stripes or geometric shapes: Painter’s tape plus patience = big design energy.
- Monochrome moment: Paint the accent wall and trim the same color for a designer look.
Finish matters. A washable sheen (often eggshell or satin) is practical for living spaces, and a slightly higher
sheen can make trim details pop. In bathrooms or busy hallways, durability becomes your best friend.
2) Peel-and-Stick Wallpaper (Pattern Without the Commitment)
Peel-and-stick wallpaper is a favorite because it delivers instant pattern and texture with minimal tools.
It’s also great for renterswhen the wall is smooth and properly prepped.
- Start with a straight guide: Draw a vertical line using a level; your first panel sets the tone for everything after it.
- Smooth as you go: Work from the center outward to push air out before it becomes a bubble museum.
- Plan your seams: Place seams where they’ll be less noticeable (behind curtains or near corners).
- Give fresh paint time: If you just painted, wait for full cure before applying removable wallpaper.
- Order extra: Patterns require matching and trimmingextra material saves the day.
Pro tip: choose patterns with a background color close to your wall color. If a seam shifts by a hair (because
walls are rarely perfect), it’s less noticeable.
3) Picture-Frame Molding (Classic “Fancy Wall” on a Budget)
Picture-frame molding (also called box trim) makes a wall look tailored and expensiveeven if it’s just lightweight
molding and caulk doing the heavy lifting. You create rectangular “frames” on the wall, then paint everything the
same color for a seamless, architectural look.
This style shines in dining rooms, stairways, entryways, and behind beds. Keep the grid simple (2–4 large boxes)
for modern spaces, or go with more boxes for a traditional vibe. The secret sauce is clean spacing, crisp corners,
and tidy caulk lines.
4) Board-and-Batten (The Crowd-Pleaser That Looks Custom)
Board-and-batten is basically the accent wall equivalent of a perfectly tailored blazer: it makes everything look
more put-together. In many DIY versions, you’re adding battens (vertical strips) and sometimes a top rail over an
existing wall. Painted in one color, it reads as built-in paneling.
The key is spacing. Measure the wall width, subtract the total width of all battens, then divide the remaining
space evenly. That simple math step is what keeps it from looking “random fence pickets indoors.”
Cost-saving moves: use primed MDF trim, keep the layout straightforward, and stick to one accent wall instead of an
entire room. Most of the “luxury” comes from the finish workfilling nail holes, sanding, and caulking gaps so the
wall reads as one clean surface.
5) Shiplap or Plank Walls (Big Texture, Surprisingly DIY-Friendly)
Shiplap and wall planks add texture instantlymodern farmhouse, coastal, Scandinavian, you name it.
Many products are designed to interlock or align easily, which reduces the “why is this board doing that?” factor.
Budget tip: material choices swing cost dramatically. Plywood-style panels can be cheaper than solid boards, and
you can finish with paint for a clean, consistent look. For best results, let wood acclimate in the room before
installation so it’s less likely to shift later.
Design tip: vertical planks can make ceilings feel taller; horizontal planks can make a narrow room feel wider.
If you want subtle, paint it the same color as the wall. If you want contrast, stain or use a natural wood tone.
6) Wood Slat Accent Wall (Modern, Warm, and Very “Architect’s Instagram”)
A wood slat wall gives you rhythm and warmthwithout needing a full remodel. You can build it from individual
slats, or use pre-made slat panels (some include felt backing for a softer, more acoustic-friendly feel).
To keep it affordable, do a partial-height slat feature (like behind a TV or desk), or use slats on a smaller wall
such as an entry nook. The biggest visual upgrade comes from consistent spacing and clean edgesso measure carefully
and finish the perimeter neatly.
7) Beadboard or Wainscoting Panels (Instant Charm, Less Effort Than You Think)
Beadboard and wainscoting add structure and protect high-traffic walls (hello, muddy paws and chair scuffs).
Panels can be installed on the lower portion of a wall with a cap rail, or used on a full wall for a cottage or
classic look.
For a modern twist, paint beadboard a deep color and keep the upper wall lightor flip it and paint the top bold
while keeping the wainscoting bright. Either way, it’s a strong “finished room” signal.
8) Faux Brick, Stone, or 3D Wall Panels (Texture Without Masonry Drama)
If you want texture that reads from across the room, lightweight faux panels can mimic brick, stone, or geometric
relief. They’re popular for basements, offices, and TV walls because you get a lot of character fast.
Keep it believable by focusing on clean seams, realistic paint choices (a soft wash often looks more natural than
a stark, single-color coat), and good lighting. And if you’re doing a fireplace-adjacent wall, follow product
guidance for heat clearance and safety.
Budget Reality Check: What These Accent Walls Typically Cost
Prices vary by region and material quality, but here’s a practical snapshot. Consider this a “planning range,” not
a pinky-swear invoice.
| Accent Wall Type | Typical DIY Cost Range | Time | Difficulty | Good for Renters? |
|---|---|---|---|---|
| Paint-only | $30–$150 (depending on paint quality and wall size) | 4–8 hours + dry time | Easy | Yes |
| Peel-and-stick wallpaper | $1–$5+ per sq. ft. (pattern dependent) | 4–10 hours | Easy–Medium | Often (test first) |
| Picture-frame molding | $80–$300 | 1–2 days | Medium | Not ideal |
| Board-and-batten | $150–$400 | 1–2 days | Medium | Not ideal |
| Shiplap / planks | $2–$7 per sq. ft. (materials vary widely) | 1–2 days | Medium | Usually no |
| Wood slat wall | $200–$800 (DIY slats vs. panels) | 1–2 days | Medium | Sometimes (panels vary) |
| Beadboard / wainscoting panels | $150–$500 | 1–2 days | Medium | Not ideal |
| Faux brick/3D panels | $150–$600 | 1 day | Easy–Medium | Sometimes |
Common Mistakes That Make Accent Walls Look Cheaper Than They Were
- Skipping prep: bumps, dust, and unfilled holes will show through wallpaper and panels.
- Eyeballing straight lines: use a levelyour ceiling is not a reliable narrator.
- Forgetting finish work: caulk + sand + touch-up paint is what makes trim look built-in.
- Ignoring outlets and switches: plan cuts and seams so plates sit flat and look intentional.
- Choosing a “random” wall: the best accent wall supports the room’s layout and focal points.
Mini Playbooks: Pick Your Weekend
The “Saturday Afternoon” Plan (Paint)
Clean, patch small holes, tape edges, paint two coats, remove tape before fully cured for crisp lines. If you’re
doing shapes, measure twice and tape patiently. You’ll be shocked how much the room changes by dinner.
The “One-Day Glow-Up” Plan (Peel-and-Stick Wallpaper)
Clean wall, mark a plumb line, dry-fit panels, then install slowly. Use a smoothing tool and trim carefully around
outlets. Take breaksrushing is how patterns become modern art.
The “Weekend Warrior” Plan (Trim or Planks)
Day 1 is layout and install. Day 2 is the glow-up: fill, sand, caulk, prime where needed, then paint. If you do
only one thing like a pro, do the finish work like you mean it.
Real-World Experiences: What People Learn After Their First Accent Wall (Plus How to Make Yours Easier)
Most people go into an accent wall project thinking the hard part is the “big thing” (painting the wall, sticking
the wallpaper, installing the trim). Then they discover the real story: the big thing is mostly straightforward,
and the small things are where the wall either looks custom… or looks like a weekend experiment.
One of the most common experiences is the “why does this look crooked?” moment. It happens with wallpaper seams,
slat spacing, board-and-batten gridsalmost anything with repeating lines. The surprise is that your eyes aren’t
lying; your room just isn’t perfectly square. Floors tilt slightly, ceilings drift, corners flare. That’s why
people who love their finished accent wall almost always mention the same trick: they used a level or plumb line
and treated that first line as sacred. Once the first strip or first batten is straight, everything else can be
adjusted off it, and the room reads as intentional even if the architecture is doing its best impression of a funhouse.
Another frequent lesson: patterns are picky, and they’re not sorry about it. People often buy exactly the square
footage they need for peel-and-stick wallpaper and then realize that matching repeats, trimming around outlets,
and fixing small mistakes eats material fast. The experienced DIY crowd tends to buy extra on purpose. It feels
annoying at checkout, but it feels brilliant when you don’t have to hunt for a discontinued roll later.
Trim-based accent walls come with their own “aha”: cutting and installing can be satisfying, but filling, sanding,
and caulking is what makes it look like it was always part of the house. Many first-timers stop right after the
boards go up because they’re tired, and then they wonder why the wall looks a little rough. People who love their
final result usually describe a second wind on day two: wood filler in nail holes, a light sand, caulk in gaps,
then paint. Suddenly the seams disappear, the shadows look clean, and the wall goes from “DIY project” to “custom detail.”
And here’s a very honest shared experience: most accent walls look worse before they look better. Paint can look
streaky until the second coat dries. Wallpaper looks chaotic while it’s half-installed. Board-and-batten looks
like a lumber receipt nailed to a wall until it’s caulked and painted. Knowing that ahead of time keeps you from
panic-scrolling inspiration photos mid-project and deciding to “just repaint everything white” at 10 p.m.
Finally, people often learn what their household actually needs. A glossy, dramatic wall in a hallway might be
gorgeousuntil fingerprints and backpack scuffs show up daily. A textured panel wall might be perfectuntil a
tight corner makes one seam impossible to hide. The best “experienced” advice is practical: match the accent wall
style to the room’s real life. Busy hallway? Durable paint sheen and simple design. Bedroom? Softer finishes and
cozy colors. Home office? Slats or paneling that adds warmth on camera. When the wall works with your habits, not
against them, you’ll like it longer than a design trend cycle.
Conclusion: The Best Accent Wall Is the One You’ll Finish
Accent walls don’t have to be expensive or complicated to look intentional. Paint delivers the fastest payoff,
peel-and-stick wallpaper adds instant pattern, and trim or planks bring real architectural character when you want
that “custom home” vibe. Choose the right wall, prep it properly, and pick a method that fits your tools, time,
and patience level. Then enjoy the magic trick: one wall changes how the whole room feels.


