
Table of Contents >> Show >> Hide
- Before You Touch a Paintbrush: A Quick Reality Check
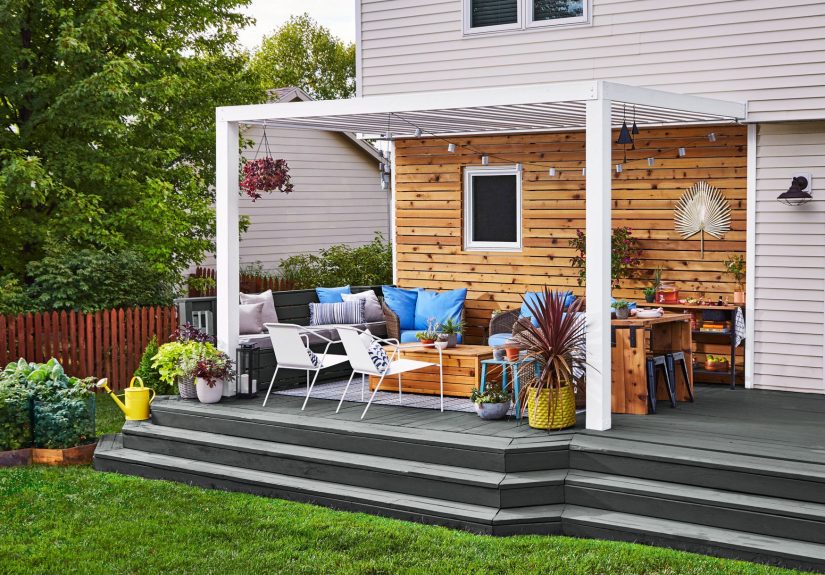
- 1) The “Colorful Outdoor Oasis” Glow-Up
- 2) The Pergola That Turned a Hot Deck into a Hangout
- 3) The Built-In Bench That Finally Made Sense
- 4) The Privacy Screen That Saved the Vibe
- 5) The “Lighting Layers” Nighttime Transformation
- 6) The Fresh-Stain Miracle on a Tired Wood Deck
- 7) The Painted Deck Rescue (When Stain Isn’t the Answer)
- 8) The Composite Cap That Ended the Maintenance Drama
- 9) The Railing Upgrade That Made the Whole Deck Look New
- 10) The Staircase Makeover That Stopped the Trip Hazards
- 11) The “Outdoor Dining Room” Layout Flip
- 12) The Planter-Edge Deck That Blended Into the Yard
- 13) The Under-Deck “Bonus Space” Reveal
- 14) The “Architectural” Upgrade: Curves, Contrast, and Character
- How to Get a “Before-and-After” Result Without Rebuilding Everything
- of Real-World Deck Makeover Experience (The Stuff People Learn the Hard Way)
- Conclusion: Your Dreamy Deck Makeover, in One Sentence
A deck makeover is basically a personality makeover for your backyard. One minute it’s a sun-baked plank platform where you store a lonely grill and a folding chair you “temporarily” left out in 2019. The next, it’s an outdoor living room where people mysteriously volunteer to do the dishesbecause they don’t want to go inside and miss the vibe.
The good news: “dreamy” doesn’t have to mean “demolish and rebuild.” Most jaw-dropping before-and-after deck makeovers rely on a few repeatable movesclean and prep the surface correctly, refresh the finish, add shade and privacy where it counts, and layer in lighting and furnishings that make the space feel intentional. The smartest transformations also include a quiet hero move: safety upgrades (rails, stairs, connections) that you don’t notice until you realize you’re not holding your breath every time someone leans on the railing.
Below are 14 makeover stories you can borrow fromeach one written like a “before and after” photo in words, with specific upgrade ideas and practical tips you can actually use.
Before You Touch a Paintbrush: A Quick Reality Check
If your deck has soft spots, wobbling rails, severe rot, or fasteners pulling out, treat that like a “check engine” light, not “rustic charm.” Cosmetic updates should come after structural fixes. Also: many cities require permits for changes that affect structure, stairs, guards/rails, or ledger connections. When in doubt, ask your local building departmentit’s cheaper than learning deck code through regret.
1) The “Colorful Outdoor Oasis” Glow-Up
Before
A large deck with furniture that looked like it came from three separate yard sales and a sad umbrella that never got invited to the party.
After
The same footprintnow zoned for lounging and dining with a weather-friendly rug, coordinated cushions, and planters that make the space feel finished.
What changed
- Defined “rooms” with an outdoor rug and furniture groupings.
- Added color through textiles (easy to swap seasonally).
- Used planters as soft dividers and visual anchors.
Pro tip: If you’re unsure about color, pick one bold accent (pillows) and let the deck finish stay neutral.
2) The Pergola That Turned a Hot Deck into a Hangout
Before
An elevated deck that was technically “outdoor living,” but functionally a solar panel. No shade, no reason to linger.
After
A pergola or louvered shade structure creates an outdoor ceilinginstantly making the deck feel like a room instead of a stage.
What changed
- Added overhead shade (pergola, louvers, or retractable canopy).
- Hung outdoor-rated pendants or string lights for nighttime use.
- Placed seating beneath the shaded zone to “train” people where to sit.
Pro tip: Shade first, furniture secondotherwise you’ll buy cushions that fade faster than your summer playlist.
3) The Built-In Bench That Finally Made Sense
Before
A built-in bench existed… but it was too shallow, awkwardly placed, and about as comfortable as sitting on a cardboard box.
After
The bench was extended and deepened (or replaced), with a layout that supports both dining and lounging. Add cushions and suddenly it’s everyone’s favorite seat.
What changed
- Corrected bench proportions and added a backrest for comfort.
- Created storage under seating for cushions and outdoor games.
- Added side tables so people can set down drinks without living dangerously.
Pro tip: Make built-ins earn their square footagestorage is the secret superpower.
4) The Privacy Screen That Saved the Vibe
Before
The deck was exposed to neighbors, street views, and the awkward feeling of making eye contact while you’re trying to eat chips in peace.
After
A privacy wall (wood slats, lattice, or a mixed screen with plants) creates a cozy perimeter without turning the deck into a fortress.
What changed
- Installed a partial-height privacy screen on the most exposed side.
- Layered planters with tall grasses or climbing vines for softness.
- Used a consistent stain or paint color to tie screen and deck together.
Pro tip: Screen the sightlines, not the whole worldstart where you actually feel watched.
5) The “Lighting Layers” Nighttime Transformation
Before
The deck was usable only during daylight, and “ambiance” meant your phone flashlight.
After
A layered lighting plan makes the deck feel like an outdoor loungestring lights for glow, step lights for safety, and a warm task light near dining.
What changed
- Added string lights overhead for sparkle and softness.
- Installed low-voltage step or post-cap lights to reduce trip hazards.
- Used lanterns or battery sconces for flexible, renter-friendly light.
Pro tip: Put lights on a timer or smart plug so your deck “turns on” before you remember it exists.
6) The Fresh-Stain Miracle on a Tired Wood Deck
Before
Sun-bleached boards, patchy discoloration, and splintersaka the deck equivalent of “I need a nap.”
After
A proper clean, repair, and stain brings wood back to life. The grain looks richer, the surface feels smoother, and the whole backyard looks more expensive.
What changed
- Deep-cleaned (not just a quick rinse), then allowed full drying time.
- Sanded rough spots and replaced damaged boards.
- Applied stain in small sections for even coverage and fewer lap marks.
Pro tip: Test stain color on a hidden board. Wet wood lies. Dry wood tells the truth.
7) The Painted Deck Rescue (When Stain Isn’t the Answer)
Before
An older deck with heavy blemishes, mismatched boards, or a previous paint job that’s peeling like a bad sunburn.
After
A quality deck paint or solid-color stain delivers a clean, uniform look and can hide imperfections better than transparent products.
What changed
- Scraped and sanded failing paint; spot-primed where needed.
- Used a coating designed for horizontal deck surfaces.
- Added a contrasting color on rails or trim to sharpen the design.
Pro tip: If it’s been painted before, repainting often performs better than trying to “go back to stain.”
8) The Composite Cap That Ended the Maintenance Drama
Before
The deck looked fine… until you remembered it needed sanding and sealing again. And again. And again.
After
Composite decking (or resurfacing systems, where appropriate) creates a consistent, low-fuss surface that cleans up with gentle washingno annual “deck weekend” required.
What changed
- Evaluated the substructure first (composite needs a sound frame).
- Installed composite boards with manufacturer-recommended spacing.
- Upgraded to matching composite railing for a cohesive look.
Pro tip: The boards are only as good as the frame. Fix bounce, rot, and poor drainage before upgrading the surface.
9) The Railing Upgrade That Made the Whole Deck Look New
Before
Rails that were outdated, wobbly, or spaced in a way that made you suddenly remember gravity exists.
After
Updated railswood, metal, cable (where permitted), or compositeinstantly modernize the deck and improve safety.
What changed
- Reinforced posts and hardware for stability.
- Chose a rail style that matches the home’s architecture (modern black metal is a cheat code).
- Ensured guard height and infill spacing meet local requirements.
Pro tip: If your view is the point, pick thin-profile balusters or darker rails to “disappear” visually.
10) The Staircase Makeover That Stopped the Trip Hazards
Before
Uneven steps, loose treads, or slick surfaces that turned rain into an extreme sport.
After
Rebuilt or reinforced stairs, added a handrail, and improved traction. Suddenly the deck feels accessible instead of intimidating.
What changed
- Replaced cracked treads and tightened or upgraded fasteners.
- Added grip strips or textured treads for rainy climates.
- Installed step lighting for safer evenings.
Pro tip: Stairs are where most deck accidents happendesign for real shoes, not ideal shoes.
11) The “Outdoor Dining Room” Layout Flip
Before
A deck with plenty of square footage but no planso it felt empty and awkward.
After
A simple layout strategy: put dining closest to the door, lounging farthest out, and keep a clear traffic lane between.
What changed
- Created zones (dining / lounging / serving) instead of random furniture scatter.
- Used a console table or slim cart as a “bar” or serving station.
- Added a shade element to the dining area for comfort.
Pro tip: Measure the “chair pull-out zone” (about 2 feet behind chairs). If you don’t plan for it, you’ll feel it.
12) The Planter-Edge Deck That Blended Into the Yard
Before
A deck that ended abruptlyhard edge, hard vibe, and landscaping that looked like an afterthought.
After
Built-in planters (or large containers) soften the border, add privacy, and make the deck feel integrated with the backyard.
What changed
- Added planters as a perimeter buffer and privacy boost.
- Chose plants with height and movement (grasses, small trees, climbing vines).
- Matched planter material or color to the deck finish for cohesion.
Pro tip: Group plants in odd numbers for a more natural look. Your deck is not a spreadsheet.
13) The Under-Deck “Bonus Space” Reveal
Before
A raised deck with the world’s least charming area underneath: muddy, drippy, and mostly used by spiders who pay zero rent.
After
Under-deck storage (and, where feasible, drainage solutions) turns wasted space into a clean zone for bikes, bins, or even a sheltered sitting area.
What changed
- Added lattice or slat skirting for a polished perimeter.
- Improved airflow and drainage to discourage moisture buildup.
- Created a storage wall with hooks and weather-resistant cabinets.
Pro tip: If the underside stays wet, address drainage first. Pretty skirting over damp wood is just a cover story.
14) The “Architectural” Upgrade: Curves, Contrast, and Character
Before
A builder-basic rectanglefunctional, sure, but about as memorable as unbuttered toast.
After
Small architectural movescurved edges, a new pergola, metal accents, or a contrasting inlayturn the deck into a feature instead of an accessory.
What changed
- Added a focal point (pergola, statement rail, or built-in seating).
- Introduced contrast (dark railing with warm wood, or vice versa).
- Used lighting and greenery to highlight the new shape and zones.
Pro tip: One bold structural change beats ten tiny decor changes. Give your deck a “main character” moment.
How to Get a “Before-and-After” Result Without Rebuilding Everything
Step 1: Inspect like a grown-up (even if you refuse to feel like one)
- Check boards for rot, deep cracks, excessive splintering, and sagging.
- Test rails and posts for wobble. If they move, fix them before hosting guests who lean.
- Look at stairs: loose treads and missing handrails are makeover dealbreakers.
- Pay attention to the deck-to-house connection and flashingwater damage here can get expensive fast.
Step 2: Clean properly (because dirt is not a design style)
- Sweep and clear debris between boards so water can drain and the deck can dry.
- Use a deck-appropriate cleaner; avoid harsh shortcuts that can harm wood or nearby plants.
- If pressure washing, start low and use the right tip and distancewood fibers are easier to damage than you think.
- Let the deck dry thoroughly before staining, sealing, or painting.
Step 3: Pick the right finish for the “before” you actually have
- Transparent / semi-transparent stain: best when you want to see grain and the boards are in good shape.
- Semi-solid / solid stain: better coverage for older, blotchy, or repaired decks.
- Paint: great for uniform color, but prep matters moreespecially if paint has failed before.
Step 4: Add the big three: comfort, privacy, and night lighting
- Comfort: shade + seating + a place to set a drink.
- Privacy: a partial screen or tall planters where sightlines hit hardest.
- Lighting: overhead glow + step/edge lighting for safety + a task light for dining.
of Real-World Deck Makeover Experience (The Stuff People Learn the Hard Way)
If you scroll deck makeovers online, it’s easy to assume the “after” happens because someone bought matching chairs and a cute citronella candle. In real life, the biggest transformation usually comes from the unglamorous part: preparation, patience, and a plan that respects weather and wood.
First lesson: your deck tells you what it needsif you listen. Blotchy areas that never dry? That’s not “character,” that’s moisture retention, which can be a drainage issue, trapped debris, or boards that have started to break down. Rail posts that wiggle? Don’t decorate around that. Fix it. You’ll enjoy your deck more when you’re not subtly monitoring every guest like a nervous lifeguard.
Second lesson: timing is everything. People often underestimate drying time after cleaning. Wood that feels dry on top can still hold moisture deeper down. That’s how you end up with finish that peels early or looks uneven. A smart habit is to schedule the “pretty part” (stain/paint) only after you’ve built in a buffer for drying and surprise rain. Your future self will thank youand will also stop using the phrase “why is it sticky?”
Third lesson: sample like you mean it. Stain looks different on new boards vs. old boards, on shaded areas vs. sunny areas, and on pine vs. cedar. Testing one small area is the difference between “rich warm tone” and “oops, it’s orange.” For paint, the real test is adhesion: if the old coating is failing, the new coat will follow it right off the cliff unless you scrape, sand, and prime appropriately.
Fourth lesson: the best decks feel like they belong to the house. That often means repeating a color that’s already on your exterior (trim, shutters, door) or choosing a complementary neutral for the floor and bringing personality through textiles and plants. When people say a deck looks “designer,” it’s usually because the colors feel connected and the layout feels intentional.
Fifth lesson: comfort is built from small, specific upgrades. Shade changes how long you’ll stay outside. Step lighting changes how safe the space feels. A bench with proper depth changes how many people actually sit down. And privacyespecially on one exposed edgecan change the entire mood. If you’re on a budget, prioritize the upgrades that change behavior (you use the deck more) rather than the ones that only change appearance (it photographs well but sits empty).
Finally, take “before” photos even if you’re mildly embarrassed. When the “after” is finished, you’ll appreciate the proof. Also, you’ll get to casually show people your deck makeover like it’s a home improvement mic drop. (You earned that.)
Conclusion: Your Dreamy Deck Makeover, in One Sentence
The most dramatic before-and-after deck makeovers don’t rely on magicjust smart prep, the right finish, and a few high-impact upgrades (shade, privacy, lighting, and layout) that make your deck feel like a true outdoor room.


