
Table of Contents >> Show >> Hide
- Before You Make It Pretty: A Quick Reality Check (So Your Dream Deck Stays Upright)
- What Makes a Deck Makeover “Dreamy”?
- 14 Dreamy Before-and-After Deck Makeovers
- 1) The “From Splinter City to Barefoot Friendly” Sand-and-Stain Refresh
- 2) The “Painted Porch Energy” Floor Makeover for Old Wood Decks
- 3) The Railing Glow-Up: From Chunky Wood to Modern Lines
- 4) The “I Can Finally See the Lake” Cable-Rail Transformation
- 5) The Resurface Miracle: Keep the Frame, Replace the “Tired Top”
- 6) The “Outdoor Living Room” Builder-Grade Deck Upgrade
- 7) The Shade Upgrade: Pergola = Instant Dream Factor
- 8) The Lighting Makeover: From “One Harsh Floodlight” to Ambience
- 9) The Built-In Seating Upgrade: Clean Lines, Extra Storage
- 10) The Privacy Screen Glow-Up: Cozy Without Feeling Boxed In
- 11) The Staircase Makeover: Wide Steps That Feel Like an Invitation
- 12) The Skirting Upgrade: Hide the Under-Deck Chaos
- 13) The “Small Deck, Big Personality” Makeover with Color + Decor
- 14) The “Entertainer’s Deck” Upgrade: Zones for Cooking, Dining, Lounging
- Deck Makeover Game Plan: How to Get a Great Before-and-After
- Conclusion
- Experience-Based Deck Makeover Lessons (Extra )
There are few joys as satisfying as stepping onto your “new” deck for the first timecoffee in hand, sun on your face, and absolutely zero splinters in your socks. The best deck transformations aren’t always the biggest or most expensive. Sometimes the glow-up is as simple as swapping tired railings, adding lighting that doesn’t look like an airport runway, or finally choosing a stain color that isn’t “Sad Beige Boardwalk.”
In this guide, we’re diving into 14 dreamy before-and-after deck makeoverseach one packed with practical ideas you can steal, mix, match, and brag about to your neighbors. Expect real-world upgrades like resurfacing worn boards, tightening up safety, modernizing railings, adding shade, creating zones for lounging and dining, and turning a plain platform into an outdoor room with actual personality.
Before You Make It Pretty: A Quick Reality Check (So Your Dream Deck Stays Upright)
A deck makeover should start with a quick safety and structure checkbecause nothing ruins a backyard vibe faster than a wobbly railing or stairs that feel like they’re negotiating with gravity. Walk your deck slowly and look for soft spots, popped fasteners, rot around posts, shaky stair stringers, and loose rails. If the deck is older or you spot major issues, consider having a pro inspect it. (You can still pick out cute pillows while someone else checks the ledger board. Balance in all things.)
What Makes a Deck Makeover “Dreamy”?
- Comfort: Shade, seating, and layout that actually fits your life (and your grill).
- Flow: Clear zones for eating, lounging, and moving around without the “excuse me” shuffle.
- Low maintenance: Smarter finishes and materials so you spend more time relaxing than repainting.
- Lighting: A mix of safety and ambianceso the party doesn’t end at sunset.
- Style: Railings, color, and decor that make your deck feel intentional, not accidental.
14 Dreamy Before-and-After Deck Makeovers
1) The “From Splinter City to Barefoot Friendly” Sand-and-Stain Refresh
Before: Gray, weathered boards. Peeling finish. Handrails that snag sweaters like it’s their hobby.
After: Cleaned, sanded, and stained boards with a fresh, even finishand railings that look smooth enough to lean on confidently.
Steal this idea: Prep is the makeover. Thorough cleaning, dry time, and sanding make the difference between “dream deck” and “why is it sticky?” Choose a stain or sealer that fits your wood type and sun exposure, and test the color in a small area first. (Deck stain dries darker than your optimism suggests.)
2) The “Painted Porch Energy” Floor Makeover for Old Wood Decks
Before: Patchy boards that look tired even after sweeping.
After: A painted deck floor (often a soft gray, classic black, or beachy white) that feels crisp and intentional.
Steal this idea: Paint can be stunning on older decks when the surface is properly prepped. Consider a porch-and-floor coating designed for foot traffic. Add an outdoor rug for contrast, and suddenly your deck reads “boutique hotel patio” instead of “forgotten platform.”
3) The Railing Glow-Up: From Chunky Wood to Modern Lines
Before: Thick, dated railings that block the view and swallow the vibe.
After: Sleeker railingsthink black aluminum, simple vertical balusters, or a minimalist profile that lets the scenery shine.
Steal this idea: Railing changes have huge visual impact without requiring a full rebuild. Keep it simple and consistent: one color, clean lines, and hardware that won’t turn orange after one dramatic winter.
4) The “I Can Finally See the Lake” Cable-Rail Transformation
Before: A deck with a million balusters and a view of… more balusters.
After: Cable rail that opens sightlines and feels modern, airy, and just a little fancy.
Steal this idea: Cable rail can be a game-changer for view decks. It often works best with sturdy posts and precise installation. Pair it with warm wood or composite decking for that “modern lodge” look. Add two lounge chairs and pretend you’re at a vacation rental you can’t afford.
5) The Resurface Miracle: Keep the Frame, Replace the “Tired Top”
Before: Solid structure underneath, but the surface boards are cracked, warped, and full of nail pops.
After: New deck boards and updated railingsusing the existing framing (when it’s sound) for a major facelift with less demo.
Steal this idea: Resurfacing is one of the most cost-effective deck renovation strategies when the substructure is in good shape. Many homeowners upgrade to low-maintenance boards at this stage and add matching fascia for a polished edge.
6) The “Outdoor Living Room” Builder-Grade Deck Upgrade
Before: A plain rectangle deck with one lonely chair and a grill that’s seen things.
After: A real outdoor room: sectional seating, rug, side tables, and decor that makes it feel like an extension of the house.
Steal this idea: Use indoor design rules outside: a cohesive color scheme, layered textiles, and furniture scaled to your deck size. Add planters to soften edges and make the space feel “styled,” not staged.
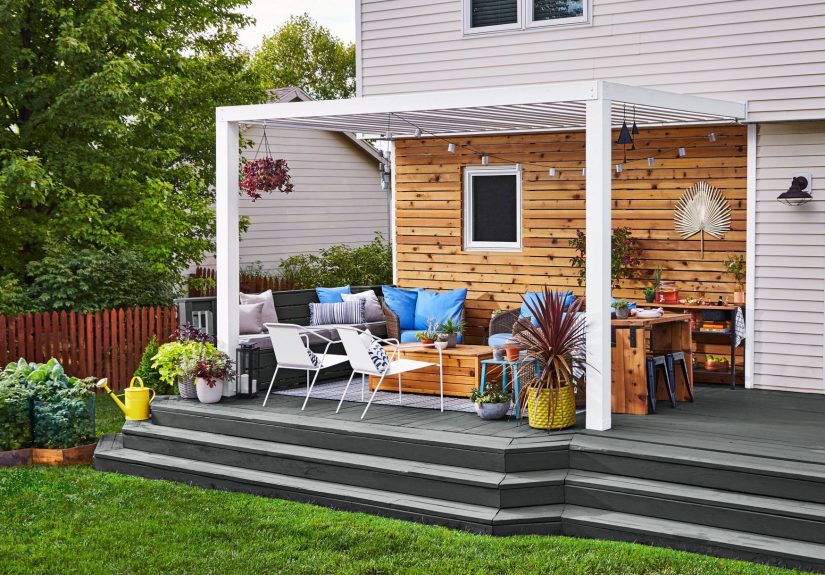
7) The Shade Upgrade: Pergola = Instant Dream Factor
Before: Full sun at 2 p.m. that turns your deck into a skillet.
After: A pergola that defines the space, adds architecture, and creates gentle shade (especially with a canopy or climbing plants).
Steal this idea: Pergolas are the deck equivalent of putting on a tailored blazereverything looks more put-together. Add outdoor curtains or a shade sail for extra coverage and a touch of drama.
8) The Lighting Makeover: From “One Harsh Floodlight” to Ambience
Before: Bright overhead lighting that makes everyone look like they’re being interrogated.
After: Layered deck lighting: post caps, stair lights, rail lights, and soft accents that feel warm and welcoming.
Steal this idea: Prioritize safety lighting on stairs and transitions, then add ambiance lighting around seating zones. The goal is “glow,” not “stadium.” Bonus: good lighting makes even budget furniture look expensive.
9) The Built-In Seating Upgrade: Clean Lines, Extra Storage
Before: Too many chairs cluttering a small deck.
After: A built-in bench that anchors the layout and often includes storage underneath.
Steal this idea: Built-ins save space and create a custom look. Add outdoor cushions and you’ve got seating that’s always ready. Tuck away covers, games, and citronella candles you bought in a moment of optimism.
10) The Privacy Screen Glow-Up: Cozy Without Feeling Boxed In
Before: A deck with a direct view into your neighbor’s kitchen… and they wave. A lot.
After: A slatted wood screen, lattice panel, or modern privacy wall that blocks sightlines while still letting light through.
Steal this idea: Think of privacy as comfort, not isolation. Add tall planters, climbing vines, or an overhead pergola to make the screen feel integrated rather than slapped on.
11) The Staircase Makeover: Wide Steps That Feel Like an Invitation
Before: Narrow stairs that feel like a ladder you politely pretend to enjoy.
After: Wider steps, a landing, and railings that guide the flow and feel substantial.
Steal this idea: Stairs are a design feature. Upgrading them can transform how your deck “connects” to the yard. Add step lighting and a planter at the base for a welcoming entrance.
12) The Skirting Upgrade: Hide the Under-Deck Chaos
Before: The under-deck view is… storage. And not the cute kind.
After: Clean skirtinghorizontal slats, lattice, or panelsthat makes the whole deck feel finished.
Steal this idea: A skirt creates visual weight and polish. If you need access, build in a hidden door panel. Your deck can look tidy and still hold the things you swear you’ll organize “someday.”
13) The “Small Deck, Big Personality” Makeover with Color + Decor
Before: A tiny deck that feels like an afterthought.
After: A compact, styled retreat with bold planters, a bistro set, and a strong color story.
Steal this idea: Small decks thrive on intentional choices: one statement rug, two great chairs, a petite table, and plants that add height and softness. Keep the palette tight so the space feels designed, not busy.
14) The “Entertainer’s Deck” Upgrade: Zones for Cooking, Dining, Lounging
Before: Everyone crowds around the grill because there’s nowhere else to stand.
After: A deck with clear zones: a cooking station, a dining area, and a lounge cornerso the party flows naturally.
Steal this idea: Use layout tricks: an outdoor rug to define seating, a console table behind a sofa for serving, and lighting to highlight each area. Add a small bar cart and suddenly you’re the person who “hosts effortlessly.” (Your secret: the deck does the work.)
Deck Makeover Game Plan: How to Get a Great Before-and-After
Step 1: Decide if you’re refreshing, resurfacing, or rebuilding
A refresh is cleaning, sanding, staining, and small repairs. Resurfacing replaces surface boards and often railings while keeping the frame. Rebuilding is structural work. Choosing the right lane saves money, time, and emotional stability.
Step 2: Pick your “hero upgrade”
Choose one transformation that makes the deck feel new: new railings, a pergola, new decking, or lighting. Then support it with smaller wins like decor, planters, and furniture.
Step 3: Plan for weather, dry time, and your patience level
Finishes need proper drying and curing conditions. Build in buffer days, especially if you’re cleaning or staining. The forecast is not a suggestion; it’s the boss.
Step 4: Make maintenance part of the design
Low-maintenance materials, smarter drainage, and durable hardware reduce future work. The dream isn’t just the “after” photo it’s an outdoor space that still looks good next season.
Conclusion
The most jaw-dropping before-and-after deck makeovers all share one secret: they combine smart fundamentals (safe structure, solid prep, durable finishes) with a few high-impact upgrades (railings, lighting, shade, and layout). Whether you repaint a tired surface, resurface with fresh boards, or redesign the whole footprint, your deck can absolutely become the kind of outdoor space that makes you cancel plans… just so you can hang out at home.
Experience-Based Deck Makeover Lessons (Extra )
If you scroll through enough deck transformations, it starts to look like everyone’s makeover went perfectly: sparkling “after” photos, effortless smiles, and not a single mention of the sanding dust that somehow traveled inside the house and into a closed drawer. Real-life deck makeovers are still totally worth itbut they come with lessons you’ll appreciate before you open the first paint can.
First, homeowners often discover that prep work takes longer than the “fun” part. Cleaning and drying time, scraping old finish, replacing a few questionable boards, and sanding edges can stretch a weekend project into a multi-weekend saga. The good news? Prep is exactly what makes the after-photo look professional. The bad news? Prep is also what makes you question every life choice that led you to buy a “helpful” palm sander with a personality.
Second, color choice is emotional. Stain colors look different in full sun vs. shade, and wet stain looks different than dry stain. Many DIYers learn to test stain on a hidden board, then view it in morning light and late-afternoon light before committing. The deck doesn’t need to match your neighbor’s deck. It needs to match your house and how you want the space to feel: modern and crisp, warm and rustic, coastal and bright, or moody and dramatic.
Third, the most satisfying makeovers are the ones that fix the “annoying stuff” first. Wobbly railings, squeaky steps, popped fasteners, and a gate that never latches correctly aren’t glamorousbut correcting them changes how the deck feels every day. People consistently report that adding lighting to stairs and transitions improves the deck more than they expected. It’s not just safety; it’s confidence. Suddenly you’re moving through the space without that tiny internal panic voice whispering, “Don’t trip in front of everyone.”
Fourth, furniture scale is a sneaky dealbreaker. A too-large sectional can swallow a small deck and kill circulation. A too-small bistro set can make a big deck feel empty. Homeowners often have the best results when they measure the deck, tape out “zones,” and leave comfortable walkways. One smart trick: define a lounge area with an outdoor rug sized properly for front legs of seating, then anchor the dining zone with a table that leaves room to pull out chairs without bumping railings.
Fifth, maintenance habits matter as much as materials. Even “low maintenance” surfaces benefit from regular sweeping, quick spill cleanup, and seasonal checks. Many people end up loving a simple routine: a light wash, a quick hardware check, and an annual “tighten and inspect” pass before heavy outdoor entertaining season. The dream isn’t perfectionit’s a deck that stays welcoming. When you treat the makeover like a lifestyle upgrade (not just a one-time project), the before-and-after feeling lasts longer than the photo.


