
Table of Contents >> Show >> Hide
- Universal design vs. “accessible” vs. “ADA”: what homeowners should know
- Before you pick tile: plan your “future-proof” layout
- 19 universal bathroom design ideas
- 1. Choose a zero-threshold (curbless) shower when possible
- 2. Add a stable shower seat (built-in or fold-down)
- 3. Install a handheld showerheadand make it easy to reach
- 4. Plan for grab bars that look intentional (and stylish)
- 5. Reinforce (block) the walls now, even if you don’t add bars yet
- 6. Pick slip-resistant flooring that still looks good
- 7. Use a comfort-height toilet (and consider a bidet seat)
- 8. Make the doorway wideror at least easier to navigate
- 9. Consider a pocket door or barn-style door (with privacy in mind)
- 10. Improve lighting in layers (not just one sad ceiling bulb)
- 11. Add motion-sensor or toe-kick night lighting
- 12. Use lever handles and easy-turn hardware
- 13. Choose a single-lever faucet or touchless option
- 14. Add anti-scald protection
- 15. Create a vanity setup that works for different heights and needs
- 16. Make storage reachable and predictable
- 17. Use strong visual contrast for edges, controls, and key zones
- 18. Don’t forget ventilation and comfort details
- 19. Add helpful tech that stays simple
- Budget, permits, and pro tips to avoid expensive do-overs
- Common mistakes (and how to dodge them)
- Real-world experiences: what people love (and what they regret) after a universal bathroom remodel
- Conclusion
Bathrooms are where we do three important things: get ready, get clean, and (if we’re honest) contemplate life while staring at a shower niche like it’s a museum exhibit.
They’re also where slips, trips, awkward reaches, and “who put the towel up there?” moments love to happen.
Universal design is the remodel approach that says: “Let’s make this bathroom work for everyonetoday, tomorrow, and on that random day you twist your ankle stepping off a curb.”
It’s not about turning your home into a hospital. It’s about comfort, safety, and convenience that looks good enough to post on the internet without anyone guessing it’s secretly genius.
Universal design vs. “accessible” vs. “ADA”: what homeowners should know
Universal design aims to make spaces usable by the widest range of peoplekids, adults, older adults, tall people, short people, people with temporary injuries, and anyone who just wants a bathroom that’s easier to use.
It’s guided by principles like flexibility, simple operation, and reducing hazards.
Accessibility usually means meeting specific needs for mobility, reach, or sensory differences. ADA standards are legal requirements mainly for public accommodations and commercial spaces.
Most homes aren’t required to follow ADA, but ADA-style measurements and best practices can be very helpful as a design “north star” when you want a bathroom that’s safer and easier to navigate.
Always confirm what your local code requires (and what your building department expects) before you demo anything.
Before you pick tile: plan your “future-proof” layout
Universal design works best when it’s baked into the layout, not sprinkled on top like decorative parsley.
A few layout moves can dramatically increase comfort:
- Clear pathways so two people can pass (because bathrooms are never truly “single-user” during busy mornings).
- Door strategy that doesn’t trap someone inside if they fall or need help.
- Space at key fixtures so you’re not doing yoga poses just to open a vanity drawer.
- Reinforcement behind walls so you can add grab bars later without opening up finished tile.
19 universal bathroom design ideas
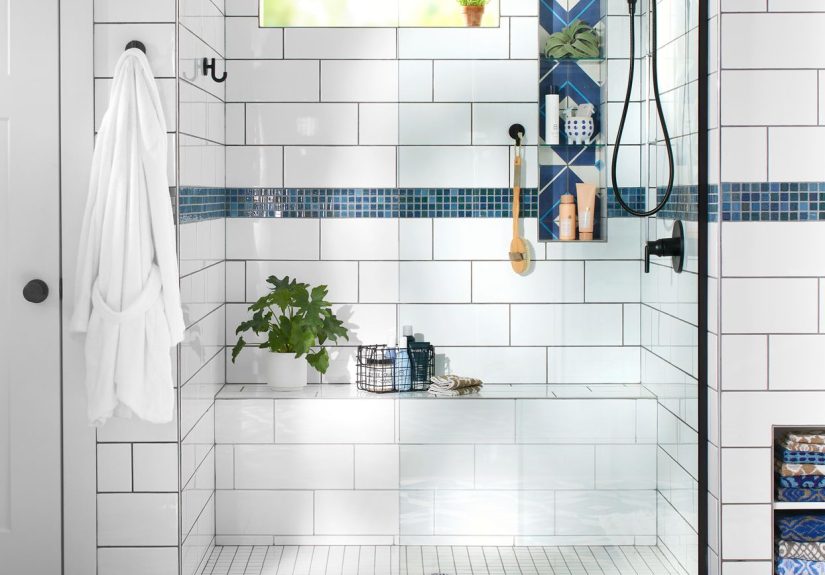
1. Choose a zero-threshold (curbless) shower when possible
A curbless shower is the universal design MVP: it reduces trip hazards, accommodates a wide range of mobility levels, and makes the space feel bigger.
The key is proper waterproofing and slope. Linear drains can help create a clean look while keeping water where it belongs (inside the shower, not starring in a hallway sequel).
2. Add a stable shower seat (built-in or fold-down)
Seats aren’t just for “seniors.” They’re for shaving legs, recovering from a knee injury, bathing kids, or enjoying hot water like it’s a spa membership.
Built-in benches look seamless; fold-down seats save space in smaller showers.
3. Install a handheld showerheadand make it easy to reach
A handheld showerhead improves comfort for everyone, from rinsing shampoo out of thick hair to cleaning the shower walls without acrobatics.
Pair it with a slide bar so different users can adjust height easily.
4. Plan for grab bars that look intentional (and stylish)
Grab bars are one of the most practical universal design features, and modern options look like towel bars, minimalist rails, or sleek architectural accents.
The best time to plan them is before tile goes upbecause secure mounting matters more than vibes.
5. Reinforce (block) the walls now, even if you don’t add bars yet
If you’re opening walls during a remodel, add reinforcement so grab bars can be installed later wherever you wantshower, tub area, and near the toilet.
This is one of those “cheap now, expensive later” decisions.
6. Pick slip-resistant flooring that still looks good
Wet feet + smooth tile = a math problem you don’t want to solve.
Look for flooring with slip resistance appropriate for wet areas (and choose smaller tiles with more grout lines if you want extra traction).
Comfort can matter toosome surfaces feel less icy underfoot.
7. Use a comfort-height toilet (and consider a bidet seat)
Comfort-height toilets can be easier to sit down on and stand up from.
A bidet seat adds hygiene and reduces twisting/reachingplus it’s one of those upgrades people swear they’ll never live without again.
If you go electric, plan an outlet near the toilet.
8. Make the doorway wideror at least easier to navigate
Wider doors help with walkers, wheelchairs, and just general “carrying a laundry basket” life.
If reframing isn’t possible, consider changing door swings or using offset hinges to gain a bit more clear opening.
9. Consider a pocket door or barn-style door (with privacy in mind)
Pocket doors can reduce tight clearances and prevent door-swing conflicts.
For barn doors, pay attention to sound and privacy details (because universal design should not mean universal oversharing).
10. Improve lighting in layers (not just one sad ceiling bulb)
Great bathroom lighting is universal design in disguise. Use layers:
ambient (overall), task (mirror/vanity), and night lighting (low-level).
Bonus points for reducing glare and shadowsyour future self will thank you when applying mascara or shaving.
11. Add motion-sensor or toe-kick night lighting
Night lighting reduces trips during late bathroom runs without blasting your eyeballs with full daylight intensity.
Toe-kick LEDs or motion-sensor nightlights are small changes with huge “why didn’t we do this sooner?” energy.
12. Use lever handles and easy-turn hardware
Lever handles are easier than knobs for kids, anyone with arthritis, and anyone juggling a towel and a toothbrush at the same time.
Choose cabinet pulls that are easy to grip (D-shaped pulls are often a safe bet).
13. Choose a single-lever faucet or touchless option
Single-lever faucets simplify temperature and flow control.
Touchless faucets can reduce germ spread and are helpful when hands are messy (hair dye people, I see you).
14. Add anti-scald protection
Pressure-balancing or thermostatic valves help keep water temperature stableimportant for households with kids, older adults, or anyone who has ever experienced the betrayal of a flushing toilet mid-shower.
This feature is safety-forward without changing the look of your bathroom.
15. Create a vanity setup that works for different heights and needs
A wall-mounted (floating) vanity can be installed at a comfortable height and can provide knee clearance if needed.
Even in a standard vanity, think about drawer organization and the height of frequently used items so you’re not constantly bending and digging.
16. Make storage reachable and predictable
Universal design favors storage that’s easy to see and grab: pull-out drawers, lazy Susans, and shallow shelves.
Place everyday items between shoulder and knee height when possible. Reserve the very high shelves for the backup shampoo bottles you forget you own.
17. Use strong visual contrast for edges, controls, and key zones
Contrast helps many people navigate more confidently, including those with low vision or when you’re half-awake.
Examples: a darker floor against lighter walls, clear contrast between a countertop and sink, and easily visible controls in the shower.
18. Don’t forget ventilation and comfort details
Good ventilation reduces moisture, mold risk, and that lingering “steamy towel” smell.
Consider a quieter fan (so people actually use it), and add comfort touches like radiant floor heat if budget allows.
Universal design isn’t only about safetyit’s also about making the bathroom pleasant.
19. Add helpful tech that stays simple
Technology can support universal design when it reduces effort: voice-activated lighting, smart switches, humidity-sensing fans, and easy-to-read mirrors with integrated lighting.
The rule: if it’s confusing, it’s not universal. Choose controls that are intuitive for guests who didn’t study your bathroom like a final exam.
Budget, permits, and pro tips to avoid expensive do-overs
- Spend money where it’s hardest to change later: waterproofing, layout, plumbing valves, and wall reinforcement.
- Think about the “wet zone” like a system: slope, drain placement, and water containment all need to work together.
- Plan electrical early: outlets for bidet seats, night lighting, and task lighting are easier pre-drywall.
- Ask about clearances: even if you don’t need mobility accommodations now, generous clearances make the bathroom feel calmer and more usable.
Common mistakes (and how to dodge them)
- Skipping wall blocking: then paying later to open tile when you want grab bars.
- Choosing glossy, slippery floors: beautiful until water shows up (which, in a bathroom, is kind of its whole personality).
- One light source: shadows at the mirror and dark corners near the toilet are not a vibe.
- Storage too high: if you need a step stool, the design isn’t universal.
- Hard-to-use hardware: tiny knobs and slick pulls become daily annoyances fast.
Real-world experiences: what people love (and what they regret) after a universal bathroom remodel
Homeowners who incorporate universal bathroom design ideas often report the same “surprise benefit”: it doesn’t feel like a compromise. It feels like the bathroom finally makes sense.
One common story goes like this: someone plans a remodel “for resale,” adds a curbless shower because it looks modern, then realizes it’s also wildly practical. Carrying laundry? No threshold. Helping a kid rinse off after soccer? Easy. Spraining an ankle? You’re not hopping over a curb like you’re auditioning for an action movie.
Lighting is another upgrade people rave aboutespecially layered lighting and toe-kick night lights. The regret usually isn’t “we added it,” but “why didn’t we add more?”
A single overhead light can make a bathroom feel like a haunted hotel hallway. Once people experience a well-lit mirror plus soft ambient light, they stop fighting shadows and start enjoying the space.
Night lighting, in particular, earns glowing reviews (pun fully intended) because it prevents stumbles without waking everyone up.
Grab bars are where the biggest mindset shift happens. Many homeowners start out nervous that grab bars will look “medical.”
Then they discover modern designs that match faucets and hardwareand they realize grab bars help everyone. People mention using them while stepping out of the shower, while cleaning the tub, and yes, sometimes after leg day when sitting down feels like negotiating with gravity.
The most common regret? Not adding wall reinforcement during the remodel, which makes later installation harder and more expensive.
Comfort-height toilets and bidet seats tend to become favorite featuresespecially in households with multiple generations.
People often say bidets make morning routines easier and more hygienic, and they’re especially appreciated after surgery, during pregnancy, or anytime reaching and twisting is uncomfortable.
The practical lesson: plan for an outlet near the toilet from the beginning. Homeowners who forget this either live with an extension cord (not ideal) or pay for electrical work later (also not ideal).
Storage is a sneaky one. During design, it’s easy to focus on tile and fixtures and forget that daily life requires places for towels, toiletries, and all the “just in case” items.
After remodels, people love drawers and pull-outs because they can see everything at once. They regret tall cabinets that force them to reach or climb.
The universal design win is simple: keep frequently used items within easy reach, and give everything a home. A beautiful bathroom that’s constantly cluttered feels less relaxing, no matter how perfect the grout lines are.
Finally, homeowners often learn that universal design is not a strict checklistit’s a mindset. The best remodels combine safety and style so well that guests just say, “Wow, this bathroom is nice,” not “Wow, this bathroom is accessible.”
When that happens, you’ve nailed it: the bathroom works better for everyone, without announcing itself like a public service announcement.
Conclusion
A universal design bathroom remodel is basically future-proofing with better lighting and fewer stubbed toes.
You don’t have to do everything at once, but if you’re remodeling anyway, it’s smart to prioritize layout, safety, and flexibilityespecially the behind-the-scenes work (reinforced walls, better lighting plans, and thoughtful clearances).
The result is a bathroom that feels modern, comfortable, and ready for real lifewhatever that looks like next year or twenty years from now.


