
Table of Contents >> Show >> Hide
- First, Identify What Kind of “Gutter Hole” You’re Actually Dealing With
- Safety and Setup: Because Gravity Doesn’t Negotiate
- Method 1: Metal Patch + Gutter Sealant (The “Do It Once” Fix)
- Method 2: Flashing Tape or Gutter Repair Tape (Fast, Clean, Surprisingly Handy)
- Method 3: Rivet-or-Screw “Plug” + Sealant (Perfect for Old Fastener Holes)
- Which Method Should You Use? A Quick Decision Guide
- After the Patch: Make Sure Water Flows Like It’s Supposed To
- Common Mistakes That Make Gutter-Hole Repairs Fail
- FAQ: Quick Answers to Very Common Gutter-Hole Questions
- Real-World Experiences: What People Usually Run Into (and How to Not Lose Your Weekend)
- Conclusion: A Dry Gutter Is a Happy Gutter (and a Less Dramatic House)
Gutters are like that one friend who never texts backuntil the minute you ignore them, they show up dramatically, dripping water
down your siding like a soap-opera tear. The good news: most gutter holes are fixable without replacing an entire run. The better
news: you can choose a repair method that matches your hole size, your tools, and your patience level (which, let’s be honest,
is often the shortest measurement on the tape).
Below are three simple, proven ways to cover a gutter holeplus how to pick the right one, what makes repairs fail, and how to
keep your “quick fix” from becoming a yearly tradition.
First, Identify What Kind of “Gutter Hole” You’re Actually Dealing With
Not all holes are created equal. Some are tiny “pinholes” from corrosion or wear. Others are suspiciously round and perfectly placed
(translation: someone drilled a hole to “help drainage,” which is like fixing a flat tire by removing the whole wheel). Some holes are
leftovers from moving a downspout or removing an accessory.
Common gutter-hole scenarios
- Pinhole leaks (often from corrosion or thin spots in older gutters)
- Small fastener holes (from old hangers, brackets, or screws)
- Medium holes (punctures from branches, ladders, or sharp tools)
- Old downspout outlet opening (a larger cutout you no longer need)
- Cracks at seams or corners (not a “hole,” but it leaks like one)
When a patch makes sense (and when it’s time to call it)
Covering a hole is smart when the rest of the gutter is in decent shapeno major sagging, no widespread corrosion, no sections pulling
away from the fascia, and no “Swiss cheese” situation where you’re finding a new leak every time it rains. If you have multiple leaks
along several sections, it may be cheaper (and far less annoying) to replace the worst run instead of playing whack-a-drip forever.
Safety and Setup: Because Gravity Doesn’t Negotiate
Before we get into fixes: gutters are usually up high, and working near ladders, sharp metal edges, and sealants requires good judgment.
If you’re under 18 or not comfortable on a ladder, the safest move is to have a parent/guardian or a qualified adult handle the ladder work
(or hire a pro). No leak is worth a fall.
A quick “set yourself up to win” checklist
- Pick a dry day so surfaces can fully dry and sealants can cure properly.
- Wear work gloves (gutter edges can be surprisingly sharp).
- Use eye protection if you’re brushing, sanding, or cutting metal.
- Clean out debris so you can see the problem clearly and your patch bonds well.
The biggest reason gutter repairs fail isn’t the patchit’s the prep. Sealant and tape don’t bond well to dirt, wet surfaces, old crumbling caulk,
or a layer of “mystery roof goo” applied sometime during the previous decade.
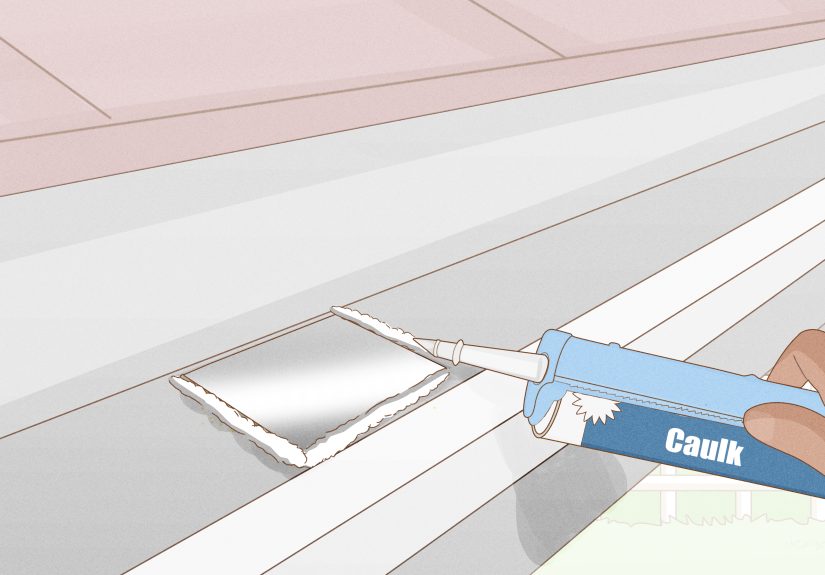
Method 1: Metal Patch + Gutter Sealant (The “Do It Once” Fix)
If you want the most durable DIY approach for anything bigger than a tiny pinhole, a metal patch paired with a quality gutter sealant
is your best bet. Think of it like putting a proper bandage on the problem instead of hoping a dab of caulk will emotionally support your gutter
through the next storm.
Best for
- Medium holes, punctures, and thin spots
- Old downspout openings (when you need real coverage)
- Areas that get a steady flow of water (near outlets and corners)
How it works (simple version)
- Clean and dry the area thoroughly. Remove debris, grime, and any loose old sealant.
- Lightly scuff the metal around the hole so the sealant has better grip (you’re not sanding a classic carjust improving adhesion).
- Cut a patch from matching metal (aluminum patch for aluminum gutter, etc.) big enough to overlap the damaged area.
- Apply sealant generously around the hole and on the patch edge.
- Press the patch in place (often on the inside of the gutter), then seal the edges so water can’t sneak under.
- Let it cure as directed before exposing it to a heavy “test rain” or hose run.
Why this method lasts
The patch provides structure, while the sealant provides waterproofing and flexibility. Gutters expand and contract with temperature changes,
so a repair that stays slightly flexible tends to hold up better than a brittle fix.
Pro-style tips (still simple)
- Match metals whenever possible to reduce corrosion risk over time.
- Patch inside the gutter when you can, because water pressure pushes the patch tighter rather than trying to peel it off.
- Seal the edges thoroughlythat’s where water tries to migrate.
Method 2: Flashing Tape or Gutter Repair Tape (Fast, Clean, Surprisingly Handy)
If you want the quickest route to “no more drip,” repair tape can be a great optionespecially for smaller holes, hairline cracks,
and areas where you don’t want to mess with cutting metal. Many flashing tapes use a butyl-based adhesive that sticks well when surfaces are clean
and dry, and the foil backing helps with weather resistance.
Best for
- Pinhole leaks and small cracks
- Quick reinforcement over a thin spot
- A fast fix when you need results without extra hardware
How it works (simple version)
- Clean and dry the area completely. Tape hates moisture and grime.
- Cut tape large enough to extend beyond the damaged area.
- Press firmly and smooth it down to remove air pockets and improve adhesion.
- Optional but smart: add a thin bead of gutter sealant around tape edges for extra protection.
Reality check: tape is great, but it’s not magic
Tape can last a long time when applied well, but it’s more sensitive to surface prep and long-term weather exposure than a metal patch.
If your gutter is constantly holding standing water (from poor slope or clogs), tape will have a tougher life. Use tape for smaller damage,
and fix drainage issues so the tape isn’t doing the job of an entire gutter redesign.
Method 3: Rivet-or-Screw “Plug” + Sealant (Perfect for Old Fastener Holes)
Sometimes the “hole” is basically a tiny round openinglike an old screw hole or a misplaced fastener. In that case, you can often fix it neatly
with a small mechanical fastener (like a rivet or short screw) plus a washer and sealant. Think: “tiny lid + waterproof gasket.”
Best for
- Single small holes from old hangers or brackets
- Clean, round openings (not ragged corrosion damage)
- Repairs where you want a low-profile fix
How it works (simple version)
- Clean and dry the area.
- Add sealant around the hole and under the washer area (you’re making a waterproof sandwich).
- Fasten the rivet/screw snugly (not “bend the gutter into modern art” tight).
- Seal over the top of the fastener head and edges for extra insurance.
What makes this method reliable
Mechanical fastening holds the “plug” in place, and the sealant keeps water from traveling around it. It’s especially useful where the metal is still sound
and you’re not dealing with a larger corroded area.
Which Method Should You Use? A Quick Decision Guide
If you’re staring at the gutter like it owes you money, use this quick logic:
- Tiny pinhole or hairline crack: Tape is often the fastest fix; sealant alone can work if it’s truly tiny and the metal is sound.
- Small round fastener hole: Rivet/screw plug + sealant is clean and strong.
- Anything larger than a small spotor anything ragged: Metal patch + sealant is the most dependable DIY approach.
- Old downspout opening you no longer need: Treat it like a “bigger hole” and use a patch solution (or consider a pro-grade replacement section if the cutout is large).
After the Patch: Make Sure Water Flows Like It’s Supposed To
Covering the hole solves the symptom. But if water is pooling in the gutter, overflowing, or draining poorly, the gutter will keep stressing the repair.
A few simple checks can extend the life of your fix:
- Clear debris so water doesn’t back up and sit on your patch.
- Check the downspout for clogs so water can exit quickly.
- Watch the next rain (from a safe spot) to see whether water is spilling over or collecting in one area.
If you notice constant standing water, the gutter may be pitched incorrectly or saggingissues that can turn even the best patch into a temporary fix.
Common Mistakes That Make Gutter-Hole Repairs Fail
- Patching on a wet surface: adhesion drops, and sealants may not cure properly.
- Skipping cleaning: dirt and old caulk prevent a strong bond.
- Using the wrong product: interior caulk isn’t built for exterior weather swings.
- Not giving it cure time: a “test hose” too soon can wash away a repair before it’s set.
- Covering the hole but ignoring drainage: standing water will find weaknesses fast.
FAQ: Quick Answers to Very Common Gutter-Hole Questions
Can I just smear sealant over the hole and call it a day?
For a true pinhole, sometimes yesespecially if the surrounding metal is solid. For anything bigger, sealant alone is more likely to crack,
peel, or fail over time. A patch adds strength and spreads stress across a wider area.
Do I need “roofing cement” or “gutter sealant”?
Many people use roofing cement for patching holes with flashing and gutter sealant for seams, corners, and edges. The best choice depends on your
gutter material, weather exposure, and where the leak is located. When in doubt, use products intended specifically for gutters and exterior water management.
What if the hole is from an abandoned downspout outlet?
Treat it like a larger opening: a properly sized metal patch plus a quality sealant is typically the strongest DIY solution. If the outlet is large or the
gutter is weakened around it, replacing that short section may be the cleanest long-term fix.
Real-World Experiences: What People Usually Run Into (and How to Not Lose Your Weekend)
Here’s what tends to happen in real life when someone sets out to “quickly cover a gutter hole.” First: optimism. Then: discovery. Because the moment you
climb up and look closely, you realize your “one little hole” has a whole supporting castold sealant flakes, surprise debris, and at least one screw that
appears to have been installed by someone who feared commitment to straight lines.
One common experience is finding that the leak isn’t exactly where the drip shows up. Water loves to travel. It will run along seams and edges and then
drop dramatically at the most inconvenient pointlike right above your front door, so every guest gets a bonus shower. That’s why people often end up cleaning
a wider area than expected and checking corners, end caps, and seams while they’re up there. It feels like “scope creep,” but it’s actually just smart problem-solving.
Another very typical moment: you go up planning to use tape because it’s fast, but the gutter is dusty, slightly oily, or still damp from shade and morning dew.
Suddenly, the “fast fix” turns into “wait for it to dry” or “grab a rag and clean more than you wanted.” The upside is that once people do the prep correctly,
the repair tends to hold much better. The downside is that prep is boring, and boredom is the sworn enemy of weekend projects.
People also learn quickly that “matching metal” matters more than they expected. It’s tempting to use whatever scrap is in the garagemaybe a random piece of flashing,
maybe a different metal, maybe something that once belonged to a duct. But when repairs last, it’s usually because the patch and gutter play nicely together long-term.
That’s why the most satisfied DIYers tend to use a patch made for the job, plus an exterior-grade gutter sealant, and then actually let it cure. Waiting is hard,
but it’s easier than redoing the patch in the next rainstorm while muttering words your neighbors don’t need to hear.
If the hole is an old downspout opening, the “aha” moment is often realizing the opening is larger than it looks from the groundand that the gutter may flex a bit
around it. In those cases, people who choose the metal patch method usually feel relieved later because the repair feels solid. Meanwhile, the “I’ll just caulk it”
crowd often ends up upgrading to a patch after the first heavy rain proves that water pressure is undefeated.
Finally, there’s the emotional victory of the hose test. People expect it to be dramatic (like a movie scene where water explodes everywhere), but it’s usually subtle:
you run water, you watch, and… nothing drips. It’s oddly satisfyinglike finding the end of a roll of tape without it sticking to itself. The best part is that a good patch
doesn’t just stop the leak; it stops the slow, sneaky damage that gutters can cause when they spill water near the foundation or soak fascia boards over time.
Conclusion: A Dry Gutter Is a Happy Gutter (and a Less Dramatic House)
Covering a gutter hole doesn’t have to be complicated. If you match the method to the size and type of damage, prep the surface properly, and let your materials cure,
you can stop leaks and protect your home’s exterior from water damage.
- Metal patch + sealant is the most durable DIY option for medium-to-large holes.
- Flashing tape is the fastest fix for small leaks when the surface is clean and dry.
- Rivet/screw plug + sealant is a clean solution for small, round fastener holes.
And if you find widespread rust, sagging, or multiple failures, it may be time to replace sectionsor call a professionalso your gutters can go back to being
gloriously unremarkable.


