
Table of Contents >> Show >> Hide
- Before You Start: Set Yourself Up for Button Success
- Way #1: Add a Macro Button to the Quick Access Toolbar (QAT)
- Way #2: Add a Macro Button to a Custom Ribbon Tab
- Way #3: Insert a Button on the Worksheet (Form Control or ActiveX)
- Way #4: Assign a Macro to a Shape, Icon, or Image
- Best Practices for Macro Buttons (So Your Future Self Doesn’t Rage-Quit)
- Conclusion
If you’ve ever run the same Excel steps so many times that your mouse started filing for workers’ comp, congratulations: you’re exactly who macro buttons were made for. A custom macro button in Excel is basically a one-click “do the thing” switchperfect for formatting reports, refreshing pivots, cleaning imports, or generating that weekly dashboard that mysteriously becomes urgent every Friday at 4:57 PM.
Below are four practical, battle-tested ways to create a custom macro button in Excelranging from “fast and simple” to “I want a polished interface that makes my workbook look like a real app.” Along the way, we’ll cover setup, real examples, and the little gotchas that trip people up (usually at 4:58 PM).
Before You Start: Set Yourself Up for Button Success
1) Make sure your macro can actually run
- Use the desktop Excel app. Excel for the web doesn’t run VBA macros the way desktop Excel does.
- Save the file as .XLSM (Macro-Enabled Workbook) or .XLAM (Add-in) if you want portability.
- Enable macros intentionally. In many organizations, macros are disabled by default for security.
2) Turn on the Developer tab (you’ll need it for buttons)
If you don’t see Developer on the ribbon, go to File > Options > Customize Ribbon and check Developer. On Excel for Mac, the path is different, but the goal is the same: make Developer visible.
3) Write (or record) a macro that’s “button-ready”
A macro button should trigger a macro that does something complete and predictablenot a half-finished snippet that depends on you selecting the exact right cell while whispering encouragement to the workbook.
Here’s a simple example macro you can assign to any button in this article:
Pro tip: keep macros you’ll reuse in many workbooks inside your PERSONAL.XLSB (Personal Macro Workbook) or an add-in. That way your button doesn’t “break up” with your macro when you rename or move a file.
Way #1: Add a Macro Button to the Quick Access Toolbar (QAT)
The Quick Access Toolbar is the tiny row of icons near the top of Excel (usually Save/Undo/Redo). Adding a macro there gives you a macro button that’s always availableno matter which worksheet you’re on.
Best for
- Macros you run constantly (refresh, cleanup, export, formatting)
- Personal productivity shortcuts (especially if stored in PERSONAL.XLSB)
- People who love speed and hate hunting through ribbons
Steps to create the button
- Go to File > Options.
- Click Quick Access Toolbar.
- In Choose commands from, select Macros.
- Select your macro (example:
MakeItPresentable), then click Add >>. - Click Modify… to change the display name and choose a more recognizable icon.
- Click OK. Your macro button appears on the QAT.
Power moves (optional, but fun)
- Use Alt key shortcuts: Press Alt, and Excel shows numbers for QAT icons. Your macro button becomes a quick keyboard-triggered command.
- Keep it portable: Store frequently used macros in PERSONAL.XLSB so your QAT button works across workbooks without being tied to one file.
- Name your macros like products, not mysteries:
Export_PDFbeatsMacro1. Your future self will thank you. Your coworkers will also stop side-eyeing your “click this, trust me” buttons.
Way #2: Add a Macro Button to a Custom Ribbon Tab
If the QAT is your pocket knife, a custom ribbon tab is your full tool belt. You can build a dedicated tab (for example, “Reporting Tools”) with grouped macro buttons that guide users through a workflow: Import > Clean > Validate > Refresh > Export.
Best for
- Workbooks used by other people (especially non-technical users)
- Dashboards and templates where your macros are the “app interface”
- Organizing multiple macros into labeled groups
Steps (no code required)
- Right-click anywhere on the ribbon and choose Customize the Ribbon (or go to File > Options).
- On the right, click New Tab. (Excel creates a new tab and a default group.)
- Rename the tab and group to something human, like Automation and Daily Tasks.
- On the left, set Choose commands from to Macros.
- Select your macro and click Add >> into your custom group.
- Click Rename to set a friendly button label and choose an icon.
- Click OK. Your macro button now lives on the ribbon like it pays rent.
The “why does this button open the wrong workbook?” problem
Ribbon customizations can be wonderfully convenientand occasionally confusing. If your macro button is tied to a macro stored inside a specific workbook, Excel may treat that workbook as the “home” for that button. If you duplicate files, rename them daily, or move them across folders, you might click your ribbon macro button and watch Excel attempt to reopen some older file like it’s feeling nostalgic.
The fix is usually strategic placement: put shared macros in PERSONAL.XLSB or (better) package them as an .XLAM add-in so the ribbon button points to a stable macro location.
Advanced option (for teams and polished solutions): Ribbon XML
If you want total controlcustom images, dynamic labels, enabling/disabling buttons based on contextRibbon XML (often called “RibbonX”) is the grown-up route. It’s more complex, but it scales beautifully for add-ins.
You’d pair that with a VBA callback like Sub RunClean(control As IRibbonControl). If that sentence just made your eye twitch, stick to the no-code method aboveyou’ll still get a great result.
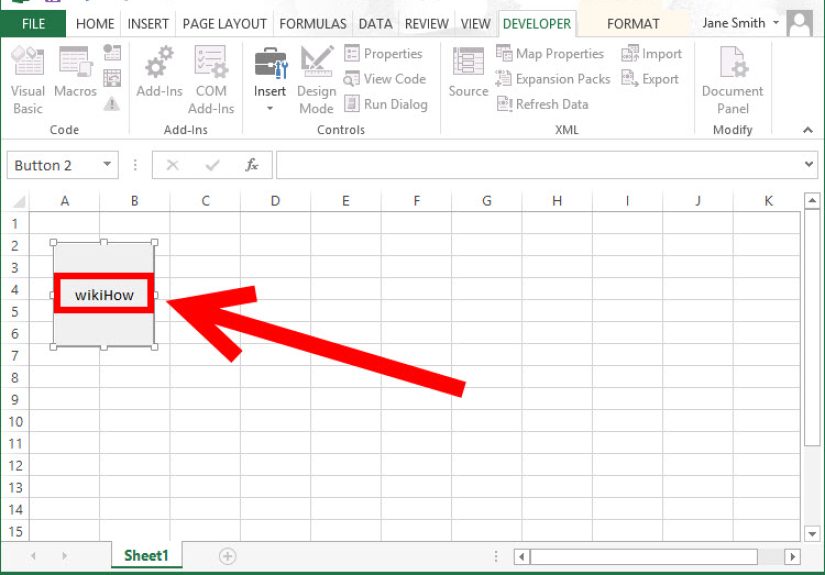
Way #3: Insert a Button on the Worksheet (Form Control or ActiveX)
Worksheet buttons are the most “obvious” type of macro button: users see it right on the sheet and click it. Great for dashboards, data entry forms, and workbook “home screens.”
Option A: Form Control Button (recommended for most people)
Form Controls are simple, dependable, and less finicky across versions. They’re the practical sneakers of Excel buttons.
Steps
- Enable the Developer tab (see setup section above).
- Go to Developer > Insert.
- Under Form Controls, click Button.
- Click and drag on the sheet to draw the button.
- When prompted, select your macro and click OK.
- Right-click the button to edit the text (e.g., “Clean Data” or “Refresh Report”).
- Right-click > Format Control to adjust alignment, size, and other properties.
Option B: ActiveX Command Button (use when you need events)
ActiveX buttons can trigger event-driven behavior (like reacting to clicks, mouse movement, or other control events). They can also be more fragileespecially in locked-down corporate environments or across different Excel installations.
If you choose ActiveX: insert it from Developer > Insert > ActiveX Controls, then use Design Mode to edit properties and double-click the button to write the click event procedure.
Dashboard-friendly formatting tips
- Keep buttons near the action: place them where users naturally look (top-left, header area, or beside key tables).
- Make labels outcome-based: “Generate PDF” is better than “Run Macro.” Nobody wakes up excited to “run macro.”
- Protect your layout: after positioning, consider protecting the sheet and locking objects so buttons don’t get accidentally dragged.
Way #4: Assign a Macro to a Shape, Icon, or Image
Want a macro button that looks like an actual modern UI element? Shapes are your playground. You can turn a rounded rectangle into a slick “Refresh Dashboard” button, add an icon, and style it to match your branding. It’s like giving Excel a little makeoverwithout committing to a whole Ribbon redesign.
Best for
- Dashboards where aesthetics matter
- “Home” sheets that act like an app menu
- Replacing boring default buttons with something friendlier
Steps
- Go to Insert > Shapes (or Insert > Icons if you want a clean modern look).
- Draw the shape on your worksheet.
- Click inside the shape and type a label (e.g., “Refresh,” “Export,” “Fix My Life”).
- Right-click the shape and choose Assign Macro.
- Select your macro and click OK.
Design tricks that instantly level up the experience
- Use consistent sizing: if you have multiple buttons, align them and match dimensions for a clean interface.
- Group an icon + label: insert an icon, place it on the shape, select both, then Group. Assign the macro to the group.
- Create a “pressed” effect: make a second, slightly darker shape underneath to fake a shadow. Subtle, but it sells the illusion.
- Give users feedback: have your macro update a status cell like “Last refreshed: 2/24/2026 3:14 PM” so clicks feel purposeful.
Troubleshooting: when “Assign Macro” is missing
- Macros may be disabled (Trust Center settings, organization policy, or the workbook isn’t trusted).
- You might be in a workbook type that can’t store VBA (like .XLSX).
- The object might not be selected correctlyclick the shape’s border first, then right-click.
Best Practices for Macro Buttons (So Your Future Self Doesn’t Rage-Quit)
Use defensive VBA (buttons get clicked in creative ways)
People will click your macro button with blank data, filtered tables, protected sheets, and the confidence of a toddler with a permanent marker. Add basic validation and friendly messages.
Pick the right “home” for your macro
- Workbook macro: best when the macro is unique to that file and travels with it.
- PERSONAL.XLSB: best for your personal toolkit across many files.
- .XLAM add-in: best for teams, distribution, and stability (especially for ribbon buttons).
Label like a product manager, not a programmer
A macro name like NormalizeData_v2_FINAL_FINAL is a cry for help. For buttons, keep labels short and action-focused: Clean, Refresh, Export PDF, Build Report.
Conclusion
Creating a custom macro button in Excel is one of the highest-return skills you can learn: it saves time, reduces errors, and turns a spreadsheet from a chaotic grid into something that feels like a purpose-built tool.
If you want the fastest win, add your macro button to the Quick Access Toolbar. If you’re building a polished experience for others, use a custom ribbon tab or a worksheet interface with Form Controls or shapes. And if you care about design (or you’ve ever whispered “I wish this looked nicer”), shapes and icons are a surprisingly powerful option.
From the Spreadsheet Trenches: of Real-World Experience
After building more macro buttons than I’d like to admit (and fixing the aftermath of other people’s “creative” buttons), here are the lessons that actually matter once your workbook leaves the safety of your laptop.
First: your button is only as reliable as your macro’s assumptions. The earliest macro buttons I made worked beautifully as long as the user did everything “correctly”which, to be fair, is a strong strategy if you only share files with robots. Humans, however, will click “Refresh Report” before importing data, then email you a screenshot of the error like it’s a rare bird sighting. These days, I treat every macro as if it’s about to be clicked by someone holding coffee in one hand and optimism in the other: I check for required sheets, confirm that tables exist, and fail gracefully with a helpful message.
Second: QAT and Ribbon buttons can become “attached” to the wrong workbook if you’re not careful. I’ve seen teams create a daily version of a file (Report_2026-02-23.xlsm, Report_2026-02-24.xlsm, etc.) and then wonder why their custom ribbon button keeps reopening yesterday’s file. It’s not Excel being pettyit’s Excel remembering where that macro lived when the button was created. The long-term fix is to move shared macros into an add-in or PERSONAL.XLSB, and then point the buttons to the stable macro. The short-term fix is usually: remove the button and re-add it (which feels like “turn it off and on again,” because it basically is).
Third: Form Controls are boring on purposeand that’s a compliment. ActiveX can be powerful, but it can also be the first thing that breaks in a locked-down corporate environment. If you’re building something for wide distribution, Form Control buttons and shape buttons are the dependable options. I’ve used shapes as a UI layer for dashboards (with icons, hover-like styling, and neat alignment), and they’re surprisingly resilient. Plus, people actually click them because they look like buttons from this century.
Fourth: button placement is UX. Put “Export PDF” near the result area; put “Refresh” near the pivot table; place “Reset Filters” where users get stuck. If the user has to hunt for your macro button, they’ll either not use it or (worse) make their own. Nothing humbles you faster than finding a coworker’s workaround that uses three helper columns, a pivot table, and vibes.
Finally: name and style your buttons like you want someone else to succeed without you. The best compliment I ever got was, “I didn’t have to ask you how to use it.” That’s the point of macro buttons: you’re building a tiny interface that makes the right action easy, repeatable, and idiot-proof (with love).


