
Table of Contents >> Show >> Hide
- Why Build a Firewood Shack in the First Place?
- Start With Size: How Much Firewood Do You Need to Store?
- Choose the Best Location for Your Firewood Shack
- Best Design for Most Homes: The Open-Sided Lean-To
- Materials You Will Likely Need
- How To Build a Firewood Shack Step by Step
- How To Stack Firewood Inside the Shack
- Common Mistakes to Avoid
- How Long Should Firewood Season?
- Should You Add Extras?
- Final Thoughts
- Real-World Experiences: What Building a Firewood Shack Taught Me
- SEO Tags
If your firewood is currently living under a sad, flapping tarp that sounds like a haunted kite every time the wind blows, it may be time for an upgrade. A firewood shack is one of those backyard projects that is practical, satisfying, and weirdly life-improving. It keeps your wood drier, your yard neater, your stacking safer, and your future winter self far less grumpy.
The good news is that building a firewood shack does not require master-carpenter credentials, a reality TV crew, or a tool belt with its own zip code. In most cases, a simple open-sided lean-to design is the smartest choice. It protects the top of the stack from rain and snow, keeps the wood up off the ground, and still allows plenty of airflow so logs can season properly. In other words, your firewood gets a roof without being sentenced to a stuffy little sweatbox.
This guide walks you through how to build a firewood shack step by step, from choosing the right location and size to framing, roofing, stacking, and avoiding the classic mistakes that turn “smart storage” into “expensive lumber sculpture.”
Why Build a Firewood Shack in the First Place?
A proper firewood shack does three big jobs. First, it keeps wood dry enough to burn hotter and cleaner. Second, it helps the wood season faster by allowing airflow. Third, it reduces the mess, pests, and moisture problems that come with piling logs directly on the ground or right next to the house.
That last part matters more than many people realize. Firewood loves to attract moisture, bugs, and general backyard chaos. If you stack it directly on soil, it can soak up ground dampness like a sponge at a spill convention. If you stack it tight against your house, you create a nice little bridge for insects and an even nicer headache for yourself.
A firewood shack solves those problems with a few simple design principles: elevate the stack, keep the sides open, add a roof with overhang, and place the structure where sun and wind can do some of the work for free.
Start With Size: How Much Firewood Do You Need to Store?
Before you cut a single board, decide how much wood you want the shack to hold. This is the part where many DIYers get optimistic and build a tiny shelter that looks adorable in June and ridiculous by November.
A standard cord of firewood is traditionally stacked in a space that measures 4 feet high by 4 feet deep by 8 feet long. That does not mean your shack must match those exact dimensions, but it gives you a solid planning reference. If you want room for about one cord, think in terms of an 8-foot-long bay with enough depth for a practical stack and enough roof height to cover it comfortably.
A simple capacity guide
- Small shack: Good for occasional fireplace use or weekend fires.
- Medium shack: Ideal for homeowners who burn regularly through fall and winter.
- Large shack: Better for serious wood stove users who season wood in larger batches.
If you can, build slightly bigger than you think you need. Firewood has a funny way of multiplying. One day it is a “small stack for cozy evenings,” and the next day you are pricing splitting mauls and speaking in cords like you run a frontier outpost.
Choose the Best Location for Your Firewood Shack
Location matters almost as much as construction. A beautifully built shack in a damp, shady corner of your yard can still leave you with smoky, stubborn wood.
Look for a spot with good sun exposure and airflow. A breezy, open area helps moisture leave the wood instead of hanging around like an unwanted houseguest. Avoid low-lying places where water pools after rain. Your firewood shack should stay dry underfoot, not double as a frog resort.
You also want the shack far enough from the house to reduce pest traffic and avoid creating a fire hazard. It should be convenient to reach in bad weather, but not tucked so tightly against the siding that you are basically building an insect on-ramp. Think “easy to access,” not “practically in the living room.”
Finally, check local rules before you build. Permit requirements, setback rules, and homeowner association restrictions vary. That is not the glamorous part of the project, but it is still more glamorous than moving a completed shack because you built it in the wrong place.
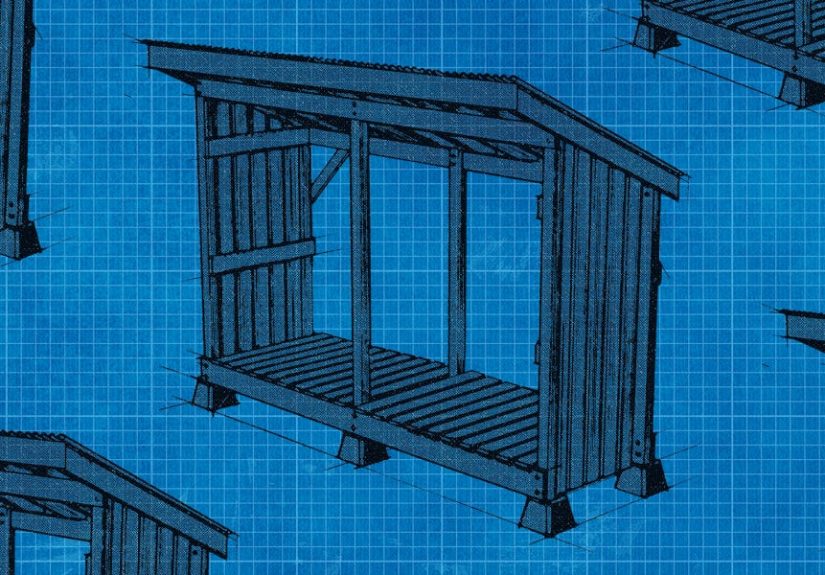
Best Design for Most Homes: The Open-Sided Lean-To
If you want the most useful design with the least fuss, build an open-sided lean-to firewood shack. It is beginner-friendly, cost-effective, and excellent for seasoning wood.
Why this design works so well:
- The roof sheds rain and snow.
- The open front and sides allow ventilation.
- The structure is simple to frame with basic lumber.
- It is easy to scale up or down depending on storage needs.
You can add partial side slats for a more finished look, but avoid enclosing the structure too much. Firewood wants protection from above, not a tiny cabin with poor ventilation.
Materials You Will Likely Need
The exact list depends on the size and style of your build, but a typical wood shack uses straightforward materials:
- Pressure-treated lumber for the base and any parts near the ground
- Posts or framing lumber for the vertical structure
- 2x4s for framing walls and roof supports
- Concrete blocks, gravel, or deck blocks for the base
- Exterior screws or galvanized fasteners
- Plywood or purlins for roof support, depending on roofing choice
- Metal roofing panels or weather-resistant roofing material
- Optional slats for side bracing or visual finish
Basic tools usually include a tape measure, circular saw, drill or driver, level, square, post-hole digger if using set posts, shovel, rake, and ladder. If you can measure twice and cut once, you are already ahead of a surprising number of people.
How To Build a Firewood Shack Step by Step
1. Mark the footprint
Lay out the width and depth of the shack using stakes and string. Double-check for square by measuring diagonally corner to corner. If the diagonal measurements match, your layout is square. If not, now is the time to fix it, not after the roof goes on and your shack starts looking artistically confused.
2. Prepare the base
A strong base is essential because firewood is heavy. Clear vegetation, level the area, and add compacted gravel for drainage if needed. Then install deck blocks, concrete blocks, or another stable support system. The goal is to create a level, durable platform that keeps the wood off the ground.
If you want a simple approach, set pressure-treated skids or runners on top of the supports. These create a raised base for stacking and improve airflow underneath the pile.
3. Set the posts or frame the corners
Install the upright posts at the corners. For a lean-to design, the front posts should be taller than the rear posts so the roof slopes backward or to one side. That slope helps rain and snow run off instead of collecting overhead like a future problem.
Use a level to keep posts plumb and temporary braces to hold them in position while you fasten everything together. A firewood shack should be sturdy before it is pretty.
4. Build the base frame
Attach horizontal framing at the bottom and top of the structure. This ties the posts together and gives the shack its shape. Add cross-bracing where needed, especially if your area gets strong wind. Firewood is heavy, but wind is sneaky.
If you plan to stack a lot of wood, do not skimp here. The structure needs to stay square under load and through changing seasons.
5. Add floor runners or slats
Even if your shack does not have a solid floor, it should still have supports beneath the firewood. Install pressure-treated runners, spaced boards, or slats so the logs rest above ground level. Small gaps are helpful because they allow drainage and airflow.
This is one of the most important details in the whole project. If the wood cannot breathe underneath, you are sabotaging the point of the shack before the first log arrives.
6. Frame the roof
Install rafters or crosspieces between the top front and rear framing. Keep the roof slope simple and practical. You are not building a cathedral. You are building a hardworking backyard shelter that needs to survive weather and do one job well.
Add enough overhang to protect the wood from rain and snow. A stingy roof invites water in from the edges, which is a rude move from a structure whose entire purpose is dryness.
7. Install roofing material
Metal roofing is a favorite for firewood shacks because it is durable, light, and sheds water efficiently. Fasten it securely according to the manufacturer’s instructions and make sure the overhang directs runoff away from the stack.
You can also use other weather-resistant roofing materials, but whatever you choose, the roof should be the strongest visual promise your shack makes: “Rain, not today.”
8. Add side slats or leave it mostly open
At this point, you can leave the sides open or add slatted side panels for stability and style. Slats can help prevent logs from spilling sideways and make the structure look more finished, but keep plenty of space for airflow. Solid walls are not your friend here.
9. Check for level, strength, and drainage
Before loading the shack, inspect everything. Tighten fasteners, confirm the frame feels solid, and make sure water will drain away from the structure. A quick inspection now can prevent a dramatic midwinter collapse later, which is the kind of drama nobody wants.
How To Stack Firewood Inside the Shack
Once the structure is built, do not undo your good work with sloppy stacking. Firewood should be stacked neatly enough to stay stable, but loosely enough to allow air circulation between pieces.
Here are the basics:
- Split wood before stacking if possible.
- Put larger, more stable pieces on the bottom.
- Keep rows reasonably even.
- Leave small gaps so air can move through the stack.
- Do not jam wood tightly against walls or solid surfaces.
If you are storing multiple loads, rotate your wood. Use the oldest, driest wood first. Freshly split wood should get time to season before becoming your fireplace’s star performer.
Common Mistakes to Avoid
Building directly on dirt
This is probably the fastest way to make a brand-new firewood shack less useful. Ground contact invites moisture, rot, and pests.
Covering the sides too much
Firewood needs airflow. A roof is helpful. A sealed-up mini garage is not.
Making the roof too small
If the overhang barely extends past the wood, wind-driven rain will still hit the stack.
Placing the shack in deep shade
Without sun and airflow, the wood dries more slowly and stays damp longer.
Building too little storage
Almost everyone thinks they will need less wood than they actually do. Your future self will appreciate extra capacity.
Ignoring access in winter
A shack hidden behind mud, snow drift, or a maze of garden tools becomes much less charming when you need wood in bad weather.
How Long Should Firewood Season?
That depends on the species, the local climate, and how the wood is processed and stored. In general, split wood dries faster than unsplit logs, and dense hardwoods often take longer than softwoods. A properly designed firewood shack helps because it improves airflow, reduces ground moisture, and protects the top of the stack from soaking rain.
If you burn wood regularly, the smartest habit is to stay ahead by at least one season. Better yet, stay ahead by a year. The people who seem suspiciously calm in late fall usually are not lucky. They just built better storage and planned like adults with slightly obsessive log habits.
Should You Add Extras?
Absolutely, if they improve function. Smart extras include:
- A second bay for separating seasoned and green wood
- A small tool hook area for gloves or a splitting maul
- A wider roof overhang on the weather-facing side
- Decorative trim if you want it to match your home or shed
What you do not need is overdesign. A firewood shack is not supposed to become the Taj Mahal of stacked oak. Make it strong, dry, and easy to use. Beauty can come along for the ride.
Final Thoughts
Learning how to build a firewood shack is one of those rare DIY projects that pays you back immediately and over time. Right away, your yard looks more organized. Later, your wood burns better, your logs stay cleaner, and your winter routine gets easier. It is practical, satisfying, and surprisingly fun once you stop pretending a tarp and two bricks counts as a storage system.
If you keep the design simple, prioritize airflow, raise the wood off the ground, and give the roof enough overhang, you will end up with a firewood shack that does exactly what it should: protect your firewood without trapping moisture. That is the whole game.
And when the first cold evening rolls in and you grab a dry log from your neatly stacked stash instead of wrestling with a wet, muddy pile, you will feel the deep and ancient joy of having built something genuinely useful. Possibly while wearing flannel. Legally, that is optional, but emotionally, it feels correct.
Real-World Experiences: What Building a Firewood Shack Taught Me
The first time I built a firewood shack, I thought the hard part would be the construction. It was not. The hard part was realizing how many tiny decisions affect whether the finished structure is actually useful. On paper, a firewood shack seems simple: four posts, a roof, stack the wood, done. In real life, the difference between “works beautifully” and “why is everything still damp?” usually comes down to placement, airflow, and a few inches here and there.
My first mistake was choosing a spot that looked convenient but stayed shaded for most of the day. It was close to the back door, which felt smart at the time, but the area held moisture after rain and did not get much sun. The shack looked great. The wood inside looked like it had joined a support group for mildew. I learned quickly that convenience matters, but not more than airflow and dryness. Moving the next shack to a sunnier, breezier part of the yard made a huge difference.
The second lesson was that roof overhang is not a decorative bonus. It is a working feature. On my first build, I kept the roof almost flush with the frame because I wanted a cleaner look and thought it would save material. What it saved in lumber, it lost in performance. Wind-driven rain reached the outer edges of the stack too easily, especially during storms. On the next version, I extended the roof farther past the front and sides, and the improvement was obvious after the first serious weather event.
I also learned not to underestimate the value of a raised base. When firewood sits even a little too close to damp ground, the bottom layer starts the season at a disadvantage. Logs get dirtier, airflow suffers, and the whole stack feels less stable. Once I started using a sturdier elevated base with better spacing underneath, the wood stayed cleaner and noticeably drier. It also made the stack easier to load and unload without feeling like I was crouching into a swampy lumber cave.
Another thing experience taught me is that a firewood shack should be slightly bigger than your “reasonable estimate.” Every time I planned for exactly enough storage, I ran out of room. A few extra feet of width or the addition of a second bay made the entire system more flexible. I could separate older wood from newer wood, keep kindling dry, and avoid creating a chaotic overflow pile beside the shack, which defeats the point of building one in the first place.
Most of all, I came away appreciating that a good firewood shack changes your relationship with the whole burning season. Instead of scrambling after storms, covering piles with tarps, and bringing in damp logs that hiss more than they burn, you start working from a system. Dry wood is where it should be. New wood has a place to season. The yard looks better. The process feels calmer. For a fairly modest backyard project, that is a pretty great return. It is not just a structure. It is a small piece of domestic peace made out of lumber, screws, and the firm decision to stop arguing with tarps.


