
Table of Contents >> Show >> Hide
- Tip 1: Choose the “right kind of busy” flowers (and skip the fussy divas)
- Tip 2: Size matterspick a container that won’t turn into a noon-time desert
- Tip 3: Plan for continuous bloom (because pollinators don’t live on “seasonal specials”)
- Tip 4: Build a “pollinator platter”: nectar, pollen, and host plants (yes, caterpillars count)
- Tip 5: Add water and shelterbecause pollinators need more than lunch
- Tip 6: Keep it bee-safe with smart pest control (your garden should not be an ecological trap)
- A quick maintenance checklist (so your pots keep blooming)
- Conclusion: Your “tiny habitat” can punch way above its weight
- Experience Notes : What container pollinator gardens teach you fast
You don’t need a meadow the size of a national park to help pollinatorsyou need a pot, a plan, and the willingness to water something more often than your houseplants’ emotional-support cactus.
A pollinator container garden is basically a tiny, buzzing diner: bees and butterflies stop in for fuel (nectar and pollen), then head back out to do the important work of pollination. Your goal is to make that diner easy to find, open for as long as possible, and free of anything that would make customers… you know… not come back.
Below are six must-know tips for building a pollinator-friendly container garden that performs beautifully on patios, balconies, stoops, and any sunny patch of “I guess this counts as outdoors.”
Tip 1: Choose the “right kind of busy” flowers (and skip the fussy divas)
Pollinators are efficient. They don’t want to solve a floral escape room just to reach nectar. Start by selecting flowers that are easy to use and worth the trip.
What pollinators generally prefer
- Single flowers over double blooms. Heavily ruffled “double” varieties can be harder for insects to access.
- Clusters, not loners. Grouping the same plant together helps pollinators forage more efficiently.
- A mix of flower shapes. Tubular blooms can favor hummingbirds; flat, daisy-like blooms offer easy landing pads for many bees and butterflies.
- Fragrance and color that reads like a neon sign. You’re basically running roadside advertisingmake it obvious.
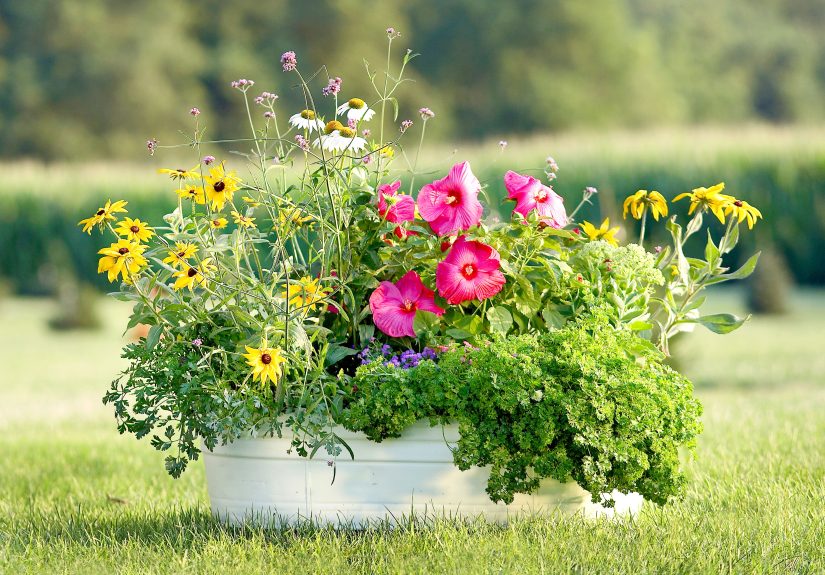
Container-friendly examples (pick what fits your region)
If you’re shopping at a local garden center, look for pollinator magnets that also behave in pots: coneflower (Echinacea), bee balm (Monarda), salvias, asters, coreopsis, blanket flower (Gaillardia), milkweed (Asclepias), and many herb blooms (thyme, basil, oregano). Regional native options are especially valuable.
Quick reality check: “Pollinator-friendly” isn’t a single plantit’s a menu. One gorgeous bloom is like putting out one chip and calling it a party.
Tip 2: Size matterspick a container that won’t turn into a noon-time desert
Containers are dramatic: they heat up faster, dry out faster, and forgive you less than in-ground beds. The simplest upgrade you can give pollinators is a container that keeps plants healthy and blooming longer.
Container basics that actually move the needle
- Go bigger than you think. Large pots hold more soil, which buffers roots from temperature swings and slows drying.
- Demand drainage. Holes are non-negotiable. “I’ll just be careful watering” is the gardening equivalent of “I’ll just have one cookie.”
- Choose materials with intention. Terracotta breathes (and dries faster). Resin stays lighter. Glazed ceramic can be heavy but stable. Match your climate and your back muscles.
- Use a quality potting mixnever straight garden soil. Potting mixes are designed to drain while still holding moisture.
A simple, pollinator-smart potting formula
Start with a high-quality potting mix, then blend in compost for slow, steady fertility. Top with a thin mulch layer (like shredded leaves) to reduce evaporationbut keep mulch from smothering stems at the base of plants.
Watering truth: In hot spells, containers may need daily watering (sometimes more). Pollinators don’t benefit from blooms that crisp up by Tuesday. Build your setup to make watering easier, not heroic.
Tip 3: Plan for continuous bloom (because pollinators don’t live on “seasonal specials”)
One of the most cited pollinator-garden principles is also the most overlooked: keep flowers blooming from early spring through fall. Containers make this easier than you think, because you can swap plants, add a second pot, or rotate blooms like you’re curating a tiny outdoor gallery.
Use a “bloom calendar” approach
Aim for at least three waves of bloomearly, mid, lateso something is always offering nectar and pollen.
- Early season: penstemon, native columbine, early salvias, spring-blooming herbs.
- Mid-season: coneflower, bee balm, blanket flower, coreopsis, basil and oregano blooms.
- Late season: asters, goldenrods (some are container-friendly in larger pots), late salvias, fall-blooming natives.
Make it local (and simpler)
Regionally native plants are adapted to local weather patterns and native pollinators. If you’re not sure what’s native where you live, use a reputable regional planting guide (many are organized by ecoregion/ZIP code) or lean on university extension recommendations.
Bonus for small spaces: Planting in “clumps” still works in containers. Instead of one coneflower, try three in a large pot, or repeat the same species in two pots placed side by side.
Tip 4: Build a “pollinator platter”: nectar, pollen, and host plants (yes, caterpillars count)
Nectar and pollen feed adult pollinators, but butterflies and moths also need host plants for their young. Translation: a truly supportive pollinator container garden isn’t just a buffetit’s a nursery.
What to include for a balanced container ecosystem
- Nectar plants: the “energy drinks” (salvia, bee balm, lantana in warm climates, native wildflowers).
- Pollen-rich flowers: daisy-shaped blooms are often reliable (coneflower, coreopsis, sunflower varieties sized for pots).
- Host plants: milkweed for monarchs is the famous example, but many regions have specific host plants for local species.
- Flowering herbs: thyme, oregano, basil, dill, and chives can be pollinator powerhouses when allowed to bloom.
Two container “recipes” you can copy
1) Sunny patio pollinator pot (18–24 inch container)
- Thriller: Salvia (upright blooms, long season)
- Fillers: Coneflower + coreopsis (pollen/nectar, sturdy)
- Edible edge: Thyme (let some flower)
2) Butterfly-support mini cluster (two matching pots)
- Pot A: Milkweed (choose a species appropriate for your area)
- Pot B: Aster or another late bloomer to fuel adult butterflies into fall
Important perspective shift: A few chewed leaves on a host plant can be a sign of success. You planted for wildlifewildlife showed up.
Tip 5: Add water and shelterbecause pollinators need more than lunch
In the wild, pollinators don’t just find flowers. They find places to drink, rest, nest, and overwinter. You can mimic a surprising amount of that in a container setup, even on a balcony.
Easy water options that won’t become a mosquito condo
- Shallow dish + pebbles: Fill a saucer with stones, add water so the tops stay exposed, and refresh often.
- Drip-friendly watering day: After you water, leave a few damp spots where insects can sip without drowning.
Shelter hacks for small spaces
- Leave some stems standing in fall. Many beneficial insects use hollow or pithy stems for shelter.
- Don’t “deep clean” every leaf. A little leaf litter (even tucked behind pots) can provide overwintering protection.
- Respect ground nesters. Many native bees nest in soil. If you have a larger planter box, consider leaving a small patch of bare soil near the base of plants as mulch breaks down.
Think of shelter as the difference between “nice restaurant” and “nice restaurant with a parking lot.” Pollinators may love your flowers, but they’ll stick around longer if the neighborhood works for them.
Tip 6: Keep it bee-safe with smart pest control (your garden should not be an ecological trap)
The fastest way to turn a pollinator garden into a pollinator hazard is careless pesticide use. Even “just one quick spray” can hit visiting insects directly, leave harmful residues on blooms, or contaminate nectar and pollenespecially with certain systemic products.
Start with IPM: the “least drama” approach
- Identify the pest. Many “garden villains” are temporary or tolerable.
- Use physical control first. Pinch aphids, blast with water, remove infested leaves.
- Encourage beneficial insects. A diverse flower mix can support predators and parasitoids that keep pests in check.
- Only escalate if the plant is truly suffering. And even then, choose the least risky option.
If you must use a pesticide, follow pollinator-protective rules
- Avoid treating plants that are in bloom. Pollinators visit flowersdon’t poison the dining room.
- Prevent drift. Don’t spray on windy days and keep applications targeted.
- Time it when bees are less active. Evening applications can reduce exposure, but always follow label directions and local guidance.
- Be cautious with systemic insecticides. Products taken up into plant tissue can persist and show up in pollen/nectar.
The pollinator-friendly goal is simple: treat problems, not the entire universe. Your containers are smalluse that advantage. A single targeted action is usually better than blanket anything.
A quick maintenance checklist (so your pots keep blooming)
Weekly
- Water consistently. Keep soil evenly moist (not soggy). In heat, check daily.
- Deadhead selectively. Removing spent blooms can encourage rebloom on many species.
- Scout for pests. Early detection prevents “why is everything sticky?” moments.
Monthly (or as needed)
- Feed lightly. Over-fertilizing can push leaves instead of flowers. Follow label rates and avoid “more is better” logic.
- Refresh mulch. A thin layer helps retain moisture and moderate temperature.
End of season
- Overwinter wisely. In cold climates, protect pots from repeated freeze-thaw cycles by moving them to a sheltered location, insulating, or using frost-proof containers.
- Leave some habitat. Stems and leaf litter can be valuable shelterdon’t erase the whole set.
Conclusion: Your “tiny habitat” can punch way above its weight
A pollinator container garden works when it does three things well: (1) offers accessible flowers, (2) stays in bloom across the season, and (3) avoids turning helpful habitat into harm. With the right pot size, a smart bloom plan, and bee-safe care, you can turn a patio corner into a lively stopover for bees, butterflies, and other beneficial visitors.
Start small. Add one more container next season. Repeat what works. And when you see a bee do a clumsy little pollen dance across your flowers, take a second to enjoy ityou just built a tiny piece of functioning ecology with a watering can and mild optimism.
Experience Notes : What container pollinator gardens teach you fast
Practical experience with pollinator containers tends to deliver the same lesson in different costumes: containers are not the ground. They’re more like a rooftop than a backyard bedhotter, windier, and less forgiving. The good news is that once you plan for that, success becomes repeatable (and a lot more fun).
1) The “too-small pot” trap
Many first attempts begin with a cute, affordable containeroften around 10–12 inches widebecause it looks tidy and doesn’t require a gym membership to move. Then summer arrives, and the pot turns into a heat-and-drought simulator. Plants stop blooming, leaves droop, and the gardener starts apologizing to a salvia like it’s a disappointed coworker.
The fix is boring but magical: bigger pots. When you upgrade to a 16–24 inch container (or use multiple larger pots), roots have more stable conditions, watering becomes less frantic, and bloom production improves. Pollinators respond to that stability because the flowers last longer and appear more consistently.
2) “Full sun” on a balcony is a different animal
A plant tag that says “full sun” usually means 6+ hours of sun in a normal yard. On a south- or west-facing balcony, sunlight can be amplified by reflective glass, concrete, and railings. That creates a mini heat island where soil dries quickly and some plants “cook” even when they’d thrive in-ground.
What helps: adding a thin mulch layer, using larger containers, and choosing tougher natives or heat-tolerant bloomers for the hottest spots. Some gardeners also place pots where they get morning sun and a bit of late-afternoon shadestill bright, but less brutal.
3) Bloom timing becomes your secret superpower
The biggest “wow” moment for many people is realizing how quickly pollinators learn a reliable food source. When containers offer continuous bloomearly flowers followed by mid-season workhorses and a late-season finalevisits often increase. You may notice that a pot with late-blooming asters becomes the busiest spot in early fall, when other flowers fade.
A practical strategy is to keep one “utility pot” specifically for filling bloom gaps. If spring flowers are done and summer plants aren’t fully blooming, that utility pot can be swapped in with something seasonal. The containers become modular, and pollinators get a steadier food supply.
4) Pests show upbut containers let you respond precisely
Aphids, spider mites, and whiteflies can appear in tight spaces, especially during hot, dry weather. The container advantage is that you can intervene without collateral damage. Instead of spraying everything, you can isolate one pot, rinse foliage, remove affected stems, or use a targeted approach. This is where pollinator-safe thinking pays off: if flowers are open and insects are visiting, physical control methods usually solve the problem without harming the very creatures your garden is meant to support.
5) You’ll redefine what “tidy” means
In purely decorative container gardening, the instinct is often to clean up every leaf and trim everything down at season’s end. A pollinator-friendly approach nudges you toward “intentional messiness”: leaving some stems, letting a few leaves linger in protected corners, and allowing the garden to be a habitatnot just a display. It can feel odd at first. Then you notice more life returning each season, and the trade-off starts to feel worth it.
The most enjoyable “experience outcome” is the simplest: pollinators make small spaces feel alive. A balcony with containers can go from quiet to bustling, and you begin to recognize regularsthe chunky bumblebee who loves the salvia, the tiny native bee that checks every bloom like a meticulous inspector, the butterfly that hovers, chooses, and settles. It’s not just gardening. It’s front-row seating to nature doing its thing.


