
Table of Contents >> Show >> Hide
- What Is an Alpine Butterfly Knot?
- Why This Knot Is So Popular
- Method 1: The Hand-Wrap Method
- Method 2: The Twist-and-Fold Method
- How to Check if Your Alpine Butterfly Knot Is Correct
- Best Situations to Use an Alpine Butterfly Knot
- When Not to Use It
- Common Mistakes Beginners Make
- Alpine Butterfly Knot vs. Other Common Knots
- How to Practice Until It Becomes Easy
- Final Thoughts
- Real-World Experiences With the Alpine Butterfly Knot
- SEO Tags
If rope knots had a “most reliable coworker” award, the Alpine Butterfly Knot would show up early, bring snacks, and quietly save the day. This knot creates a secure loop in the middle of a rope, which makes it incredibly handy for climbing, rescue work, camping, hauling, and general outdoor problem-solving. It is one of those rare knots that is both practical and oddly satisfying. Tie it right, and it looks neat, balanced, and ready for business. Tie it wrong, and it looks like your rope lost an argument with a blender.
In this guide, you will learn how to tie an Alpine Butterfly Knot using 2 quick and easy methods, when to use it, what mistakes to avoid, and how to tell whether you have tied a clean, trustworthy version. We will also cover real-world situations where this knot shines, plus a few lessons from actual rope users who learned the hard way that “close enough” is not a knot-tying strategy.
Before we begin, one important note: the Alpine Butterfly Knot is widely respected for outdoor and technical rope work, but no article should replace hands-on instruction for life-safety applications. If you plan to use this knot for climbing, rescue, or load-bearing systems, practice with a qualified instructor. Ropes are forgiving. Gravity is much less polite.
What Is an Alpine Butterfly Knot?
The Alpine Butterfly Knot is a midline loop knot, meaning it forms a fixed loop in the middle of a rope without requiring access to either end. That alone makes it a favorite in situations where the rope is already in use or the ends are nowhere near your hands.
It is especially valued because the finished loop is stable, easy to inspect once you know what to look for, and useful in several loading directions. In plain English, that means it works well when you need a dependable loop on a working rope and do not want the whole setup to turn into modern art halfway through the job.
Common uses for the Alpine Butterfly Knot
The knot is often used to create a clip-in point in the middle of a rope, attach a person in the center of a rope team, isolate a damaged section of rope, form a hauling loop, or build organized systems where a mid-rope loop is more useful than an end loop. It also has a reputation for being easier to untie after heavy loading than some bulkier alternatives, which is great news for anyone who has ever stared at a jammed knot like it personally betrayed them.
Why This Knot Is So Popular
1. It can be tied in the bight
You do not need to feed the entire rope through the knot. That is a big advantage when the rope is long, weighted, anchored, or stretched across terrain.
2. It creates a secure mid-rope loop
The loop stays fixed and does not easily collapse under normal use, which makes it useful for clipping gear, attaching to a harness in appropriate systems, or creating a handle or pickup point.
3. It works well for isolating damaged rope
If one section of rope is worn or questionable, the damaged part can be positioned in the loop so it stays out of the loaded strands. That feature alone has made the Alpine Butterfly Knot a favorite among climbers and rescue professionals.
4. It is compact and fairly easy to inspect
A properly dressed Alpine Butterfly has a tidy, symmetrical look. Once you know the visual pattern, it becomes easier to spot whether the knot is correctly tied or whether something has gone gloriously off the rails.
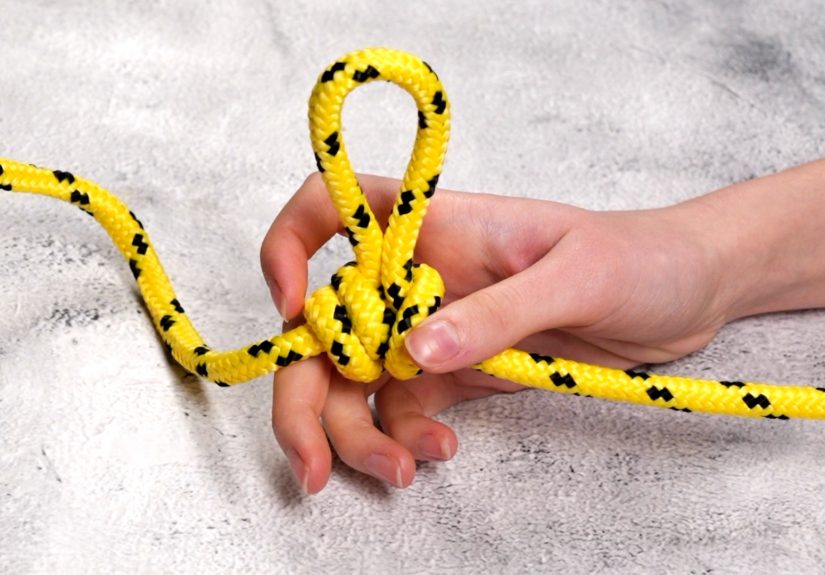
Method 1: The Hand-Wrap Method
This is probably the most famous way to tie the Alpine Butterfly Knot. It is quick, memorable, and perfect for people who like knots with a little choreography.
Step 1: Wrap the rope around your hand
Take a bight of rope and wrap it around your open hand three times. Keep the wraps flat and parallel. Do not let them twist over each other unless you enjoy preventable confusion.
Step 2: Identify the middle wrap
You should now see three strands across your hand. The strand in the middle is the star of the show. Lift that middle wrap carefully.
Step 3: Pull the middle wrap over the front wrap
Bring the middle wrap up and over the wrap closest to your fingertips. Then continue pulling it behind the wrap nearest your wrist.
Step 4: Feed it through the back
Tuck that same middle wrap under and through the last wrap. As you pull it through, it starts forming the loop of the knot.
Step 5: Remove the knot from your hand
Slide the knot off your hand carefully while keeping the structure intact. At this stage, it may look slightly messy. That is normal. Many great knots look awkward before they are dressed and tightened. Frankly, so do some people before coffee.
Step 6: Dress and tighten the knot
Pull the two standing parts of the rope and the loop evenly. Adjust the strands so the knot sits neatly and the loop is the size you want. A well-dressed Alpine Butterfly should look balanced, compact, and clean.
Why people love this method
The hand-wrap method is fast once you learn it. It is especially useful when you need to tie the knot from memory without staring at a diagram like it is a final exam.
Method 2: The Twist-and-Fold Method
If the hand-wrap method feels too much like a magic trick, try this version. The twist-and-fold method is easier for some beginners because it lets you see the knot form more clearly.
Step 1: Make a loop in the rope
Take a section of rope and form a loop.
Step 2: Make a second loop
Create a second loop right next to the first one so you have two adjacent loops. Think of them as twin parentheses made of rope.
Step 3: Twist one loop over the other
Twist one loop over the other so the loops overlap and create the characteristic crossing structure that the butterfly knot needs.
Step 4: Fold the rear loop behind
Take the back loop and fold it behind the front part of the knot.
Step 5: Pull a bight through the center
Now pull a bight through the center opening. This becomes the finished loop of the Alpine Butterfly Knot.
Step 6: Set the knot
Pull on the standing parts and the loop to tighten everything evenly. Adjust until the structure looks tidy and symmetrical.
Why this method works well
This technique can be easier to teach visually because you can watch the knot take shape. It is a solid choice for beginners who prefer understanding the rope path instead of memorizing hand positions.
How to Check if Your Alpine Butterfly Knot Is Correct
A correct knot is not just tied. It is also dressed and set. That means the strands lie neatly, the knot is tightened properly, and the loop emerges from the center in the right orientation.
Look for these signs
- The knot appears compact and symmetrical.
- The loop exits cleanly from the center of the knot.
- The strands are snug and not crossed randomly.
- The standing parts run smoothly out of either side.
Warning signs of a bad tie
- The knot looks lopsided or collapsed.
- The loop is twisted strangely or pinched.
- The rope strands cross in confusing ways.
- You cannot explain how the knot was formed, which is never a great confidence booster.
If the knot looks suspicious, untie it and start over. Rope does not award points for improvisation.
Best Situations to Use an Alpine Butterfly Knot
Mid-rope attachment point
This is the classic use. Need a fixed loop in the middle of a rope for clipping in, attaching gear, or building an organized system? The Alpine Butterfly is a strong candidate.
Rope team travel
In mountaineering and glacier travel, the knot is commonly used for the person traveling in the middle of a rope team or for adding loops and stopper points in certain systems.
Isolating a damaged section
If a rope has a worn or questionable spot, the damaged area can often be isolated in the loop so the tension stays on the stronger rope sections. This can be valuable in emergency problem-solving, though technical rope systems always demand trained judgment.
Hauling and gear management
Need a midline handle or clip-in loop? This knot works beautifully for hanging gear, redirecting force, or keeping the rope organized during work or camp setups.
When Not to Use It
The Alpine Butterfly Knot is versatile, but it is not a universal answer to every rope question ever asked by humanity.
Do not use it blindly in life-safety systems
Even trusted knots require correct application, compatible rope, proper dressing, and system knowledge. The right knot in the wrong situation is still the wrong knot.
Do not confuse it with other butterfly-style knots
There are related knots and bends that look similar or share part of the name. Make sure you are learning the actual Alpine Butterfly Knot and not a different knot entirely.
Do not rely on a sloppy version
Some technical references warn that a poorly formed or incorrectly dressed knot can create dangerous problems. In other words, “basically right” is not good enough when the rope matters.
Common Mistakes Beginners Make
Making the wraps too loose
Loose wraps make the knot harder to recognize and dress correctly. Keep the rope organized from the start.
Crossing strands accidentally
One small twist can turn a beautiful knot into a suspicious noodle sculpture. Watch the rope path carefully.
Skipping the dressing step
This is the big one. Many beginners technically tie the knot but never finish it properly. A knot should be tightened and cleaned up before use.
Learning only one body motion
If you only memorize hand movements, you may freeze when the rope orientation changes. Learn what the finished knot should look like, not just the dance routine that produces it.
Alpine Butterfly Knot vs. Other Common Knots
Vs. Figure Eight on a Bight
The Figure Eight on a Bight is a fantastic loop knot, but it is typically used when you have access to a rope section and want a very obvious, secure end-style loop. The Alpine Butterfly is often more convenient when you need a loop in the middle of the rope and want a compact knot that may be easier to untie after loading.
Vs. Bowline on a Bight
The Bowline on a Bight creates two loops and has its own place in rope work, but the Alpine Butterfly is usually the cleaner choice for a single midline loop that stays organized under varied loading.
Vs. Overhand Loop
An overhand loop is simple, but it is not as versatile for midline use and may jam more stubbornly after heavy load. The Alpine Butterfly is the more refined option when performance matters.
How to Practice Until It Becomes Easy
If you want this knot to become second nature, practice it in short sessions instead of one heroic cram session that ends with rope all over the floor.
A simple practice routine
- Use a short piece of rope or cord and tie the knot ten times with the hand-wrap method.
- Untie it after each attempt and inspect the shape.
- Repeat ten times with the twist-and-fold method.
- Practice making small loops and large loops.
- Try tying it without looking at instructions, then compare your result.
After a few rounds, your fingers will start remembering what your brain keeps forgetting. That is when knot-tying becomes fun instead of mildly insulting.
Final Thoughts
The Alpine Butterfly Knot earns its reputation because it solves a very specific problem extremely well: it creates a strong, stable loop in the middle of a rope without needing the ends. That makes it practical, efficient, and worth learning whether you are a climber, camper, rescuer, or simply the type of person who likes being mysteriously competent around rope.
If you are just starting out, begin with the hand-wrap method and the twist-and-fold method. Practice both. Learn what the finished knot should look like. Dress it carefully. Tighten it properly. And above all, remember that ropes have long memories. They remember every rushed move, every lazy twist, and every moment you thought, “Eh, that is probably fine.”
It is rarely fine.
Real-World Experiences With the Alpine Butterfly Knot
The funny thing about the Alpine Butterfly Knot is that most people do not fall in love with it the first time they hear about it. On paper, it sounds useful but oddly specific. A loop in the middle of the rope? Great. Very nice. Fascinating. But then you actually use it in the real world, and suddenly it becomes the knot you keep returning to because it solves annoying problems with surprising elegance.
One common experience beginners report is that the knot feels awkward during the first few tries and then becomes weirdly addictive. The hand-wrap method, in particular, can feel like you are trying to teach your fingers a card trick from 1892. The first attempt is clumsy. The second looks like a tangled cinnamon roll. By the fifth or sixth try, however, the pattern starts clicking into place. That moment is satisfying because the knot stops being random rope gymnastics and starts making structural sense.
Climbers and mountaineers often appreciate the Alpine Butterfly because it behaves like a practical tool rather than a decorative puzzle. In rope-team settings, a midline loop can be extremely helpful, especially when adding a secure attachment point without reworking the entire rope. The knot is also memorable because it looks tidy when dressed correctly. There is a certain comfort in glancing down at your rope and seeing a knot that appears balanced and intentional instead of vaguely haunted.
Another real-world lesson comes from people who have used the knot to isolate a damaged section of rope. This is one of those situations where the Alpine Butterfly stops being “a useful skill” and starts feeling like a very smart design. Placing the bad section into the loop and keeping the load on the stronger strands is elegant, efficient, and reassuring. That said, experienced users also stress that this is not a substitute for judgment. A knot can help manage a problem, but it does not magically turn a compromised rope into a brand-new one. The best experience here is not “I saved the day with a rope trick.” It is “I knew enough to stay calm and use the right tool correctly.”
Campers and general outdoor users tend to discover the knot in less dramatic ways. Maybe they need a midline attachment point for hanging gear, tensioning a setup, or creating a handy loop where no end is available. In those moments, the Alpine Butterfly feels almost luxurious. It solves the problem neatly, and it often unties without a full emotional breakdown afterward. Anyone who has fought a badly jammed knot in cold weather knows this is not a minor benefit. Easy untying is not glamorous, but neither is spending fifteen minutes muttering at a rope like it insulted your family.
Probably the biggest experience-based takeaway is this: people trust the Alpine Butterfly more once they learn to inspect it visually. That is the turning point. At first, users rely on memorized motions. Later, they recognize the finished shape and can tell whether the knot is clean, balanced, and properly set. That shift matters. It turns the knot from a party trick into an actual skill. And in any rope-related activity, skill beats luck every single time.


