
Table of Contents >> Show >> Hide
- Why Alphabetical Sorting in Excel Matters
- Before You Sort: Three Smart Checks
- How to Sort Microsoft Excel Columns Alphabetically: 11 Steps
- Step 1: Open your Excel worksheet
- Step 2: Locate the column you want to alphabetize
- Step 3: Click any cell inside that column
- Step 4: Select the full dataset if your rows are connected
- Step 5: Go to the Data tab
- Step 6: Choose your sorting method
- Step 7: Confirm that your data has headers
- Step 8: Pick the correct column in “Sort by”
- Step 9: Set “Sort On” to Cell Values
- Step 10: Choose A to Z for alphabetical order
- Step 11: Click OK and review the results
- Quick Sort vs. Custom Sort in Excel
- Common Mistakes to Avoid When Sorting Alphabetically
- Helpful Example of Alphabetical Sorting in Excel
- Extra Tips for Better Excel Sorting
- Real-World Experiences and Lessons From Sorting Excel Columns Alphabetically
- Conclusion
- SEO Tags
Alphabetizing data in Microsoft Excel sounds like one of those tiny tasks that should take three seconds and zero emotional damage. Then somehow you click one button, a single column moves without the rest of the table, names no longer match email addresses, and suddenly your spreadsheet looks like it survived a tornado. The good news is that Excel really does make alphabetical sorting easy once you know the safe way to do it.
Whether you are organizing a client list, cleaning up inventory, sorting school records, or trying to make a chaotic contact sheet look like it belongs in this century, learning how to sort Microsoft Excel columns alphabetically is a foundational skill. It helps you find information faster, keep datasets readable, and avoid the classic spreadsheet horror movie plot: “I sorted the names, but now nothing matches.”
In this guide, you will learn the exact process for sorting Excel columns alphabetically in 11 simple steps. You will also learn when to use quick sorting, when to use Custom Sort, how to avoid common mistakes, and what real users typically experience when sorting data in the wild. Spoiler: the “my data has headers” checkbox is more powerful than it looks.
Why Alphabetical Sorting in Excel Matters
Alphabetical sorting is one of the fastest ways to turn a messy spreadsheet into something useful. When names, products, departments, cities, or categories are listed from A to Z, it becomes easier to scan for duplicates, compare records, review entries, and share the file with other people who do not enjoy decoding spreadsheet chaos for sport.
It also improves workflow. If your worksheet includes customer names, sorted data lets you jump to a record quickly. If you are working with product descriptions, categories, or tags, alphabetical order helps you spot inconsistencies. If you are collaborating with teammates, sorted columns make the document more intuitive. In other words, alphabetical sorting is not just about neatness. It is about making the data easier to use, verify, and trust.
Before You Sort: Three Smart Checks
1. Make sure your data has headers
A proper header row tells Excel what each column represents. Examples include Name, Email, Department, or Product. Without headers, Excel may treat the first row as ordinary data, which can throw your sort off immediately.
2. Select the full data range, not just one random column
If your worksheet contains related information across multiple columns, the safest move is to sort the entire table or dataset together. Otherwise, Excel may reorder one column and leave the rest behind. That is how “John Smith” ends up with “Pumpkin Spice Forklift Parts” in the wrong row.
3. Remove blank rows or merged cells if possible
Blank rows and merged cells can interrupt sorting. Excel prefers clean, continuous ranges. If your sheet is full of decorative formatting choices made during a stressful Tuesday, this is a good time to simplify it.
How to Sort Microsoft Excel Columns Alphabetically: 11 Steps
-
Step 1: Open your Excel worksheet
Start by opening the workbook that contains the data you want to sort. This may seem obvious, but it is worth saying because many sorting disasters begin when someone edits the wrong copy of the file. If the spreadsheet is important, save a backup version first. That way, if anything goes sideways, you can recover faster than your blood pressure rises.
-
Step 2: Locate the column you want to alphabetize
Find the column containing text values you want to sort, such as names, states, brands, or categories. If the data lives inside a larger table, do not focus only on that one column. Think of the whole dataset as one unit. The goal is to sort by one column while keeping each row intact.
-
Step 3: Click any cell inside that column
For a quick alphabetical sort, Excel often allows you to click a single cell in the target column. This tells Excel where your sorting priority lives. If your data is already in a clean range or an official Excel table, this simple click is often enough to get started.
-
Step 4: Select the full dataset if your rows are connected
If your worksheet includes related columns, such as Name, Email, Phone, and Company, select the entire dataset before sorting. You can click and drag across the range, or click inside the data and use Excel’s table or sort dialog tools to confirm the full range. This is the golden rule of sorting: keep related rows together.
-
Step 5: Go to the Data tab
At the top of Excel, click the Data tab. This is the main headquarters for sorting and filtering. Yes, Excel also gives you sorting shortcuts in other places, including the Home tab. But the Data tab is where serious sorting lives, complete with more control and fewer surprises.
-
Step 6: Choose your sorting method
Now you have two main options. For a fast alphabetical sort, click A to Z to sort in ascending order. If you want reverse alphabetical order, click Z to A. If you want more control, click Sort to open the Custom Sort dialog box. For most people working with real tables, the Sort dialog is the safer option because it lets you confirm exactly what Excel is about to do.
-
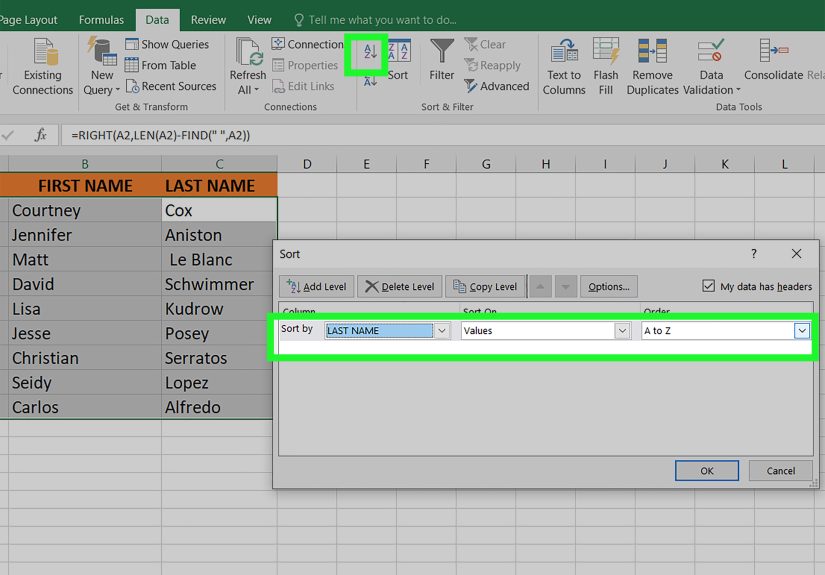
Step 7: Confirm that your data has headers
If the Sort dialog opens, look for the checkbox that says My data has headers. If your first row contains labels like Name, Department, or City, make sure that box is checked. When it is enabled, Excel treats those labels as headers instead of mixing them into the data sort. This tiny checkbox prevents a lot of spreadsheet nonsense.
-
Step 8: Pick the correct column in “Sort by”
In the Sort by dropdown menu, choose the column you want Excel to use as the sorting key. For example, if you want your employee list sorted by last name, choose the Last Name column. If you want products organized by category, choose Category. Excel will reorder the rows based on the values in that selected column.
-
Step 9: Set “Sort On” to Cell Values
Most of the time, you will leave Sort On set to Cell Values. This tells Excel to sort based on the actual content in the cells, not cell color, font color, or icons. Unless your spreadsheet has a very specific visual formatting system, cell values are the right choice.
-
Step 10: Choose A to Z for alphabetical order
Under Order, choose A to Z if you want an ascending alphabetical sort. Excel will place entries beginning with A near the top and entries starting with Z near the bottom. If you want the opposite, choose Z to A. For text columns, this is the main setting that determines the final order.
-
Step 11: Click OK and review the results
Once your settings look correct, click OK. Excel will sort the data instantly. Now do one very important thing: review the results. Scan a few rows to make sure names, emails, numbers, and related fields stayed together. If the order looks strange, undo the action and try again using the full data range or the Sort dialog. Excel is powerful, but it still assumes you know what you meant. Bold assumption, honestly.
Quick Sort vs. Custom Sort in Excel
If you are sorting a simple one-column list, the A to Z button is usually enough. It is fast, clean, and gets the job done. But if you are sorting a larger worksheet with multiple columns, Custom Sort is usually the better choice. It gives you more visibility into the rules Excel will apply.
Custom Sort is especially useful when:
- You need to sort a full table by one column
- You want to add a second or third sorting rule
- You need to confirm that headers are recognized
- You want to sort by values, colors, or icons
For example, imagine you have a contact sheet with columns for Department, Last Name, and First Name. You could first sort by Department, then add a second level to sort last names alphabetically within each department. That is where Excel starts looking less like a spreadsheet and more like a very efficient office assistant.
Common Mistakes to Avoid When Sorting Alphabetically
Sorting only one column in a multi-column table
This is the most famous Excel mistake for a reason. If your data lives across several columns, always sort the entire dataset together. Otherwise, you break the relationship between the cells in each row.
Forgetting the header row
If Excel includes your headers in the sort, your labels may end up in the middle of your data. That is never a good look. Always verify whether your data has headers before clicking OK.
Ignoring hidden spaces or inconsistent formatting
Sometimes data does not sort the way you expect because some cells contain extra spaces, unusual punctuation, or text stored in inconsistent formats. If the order seems off, clean the data first.
Working in a messy range
Blank rows, merged cells, and disconnected chunks of data can confuse Excel. If you want reliable results, give the program a clean structure to work with.
Helpful Example of Alphabetical Sorting in Excel
Let’s say you manage a small customer list with the following columns: Last Name, First Name, Email, and City. You want the list sorted alphabetically by last name so your team can find customers faster.
You would select the full dataset, open the Data tab, click Sort, check My data has headers, choose Last Name under Sort by, keep Cell Values, choose A to Z, and click OK. Excel will then reorder each entire row so every person’s email and city stay matched with the correct last name. Clean, fast, civilized.
Extra Tips for Better Excel Sorting
- Convert your range into an Excel table if you sort often. Tables make data easier to manage and recognize.
- Use filters along with sorting when you need to narrow down records first.
- Undo immediately if the result looks wrong. Excel usually makes it easy to reverse a bad sort.
- Use multi-level sorting when one alphabetical rule is not enough.
- Keep column labels clear and consistent so sorting menus remain easy to understand.
Real-World Experiences and Lessons From Sorting Excel Columns Alphabetically
One of the most common experiences people have with Excel sorting is realizing that the task feels ridiculously easy right up until it is not. A student might be organizing a list of research sources, a manager might be cleaning up employee data, and a small business owner might be sorting product names for an inventory sheet. In all three cases, the goal is simple: make the information easier to scan. But what users often remember most is not the successful sort. It is the first time they accidentally sorted only one column and watched the rest of the spreadsheet stay put like confused bystanders.
That moment teaches a lesson quickly. Excel is not “wrong” when it does that. It is being literal. If you select only one column, Excel assumes that is exactly what you wanted. Many users start out thinking of a spreadsheet as a page, but Excel thinks in ranges, fields, and rows. Once that clicks, people become more careful and much more effective. They begin selecting the full table, checking for headers, and previewing their setup before they commit to the sort. Suddenly, Excel goes from “mysterious chaos machine” to “very obedient data organizer.”
Another common experience happens when people inherit spreadsheets created by someone else. Maybe the file has dramatic formatting, random blank rows, merged title cells, inconsistent capitalization, and mysterious abbreviations that look like they were invented during a coffee shortage. Sorting that kind of sheet alphabetically can feel less like office work and more like archaeology. Still, users often discover that sorting exposes problems they did not notice before. Duplicate customer names become obvious. Misspelled categories stand out. Entries with extra spaces drift to odd positions. In that sense, sorting is not just organizational. It is diagnostic.
People who work with Excel regularly also learn that alphabetical sorting is often the first step in a larger workflow. A recruiter might sort applicants by last name before reviewing departments. A teacher might alphabetize a class roster before adding grades. A sales coordinator might sort account names before filtering by region. The sort itself takes seconds, but the clarity it creates makes every task after it easier. That is why this skill stays useful even as spreadsheets grow more advanced. Fancy formulas are great, but a well-sorted worksheet still saves the day more often than many people admit.
There is also a confidence factor. Beginners often feel nervous about changing spreadsheet structure because they are afraid of ruining the file. After successfully sorting a few datasets the right way, that fear tends to fade. Users begin to trust the process. They learn to save backup copies, use Undo when needed, and rely on Custom Sort when a quick button is too risky. Over time, sorting becomes less of a dramatic event and more of a normal cleanup step, like straightening a desk before starting work.
In practical terms, the best experience people report is simple: finding things faster. When a list is alphabetical, your brain relaxes a little. You know where to look. You do not have to scan every line like you are hunting for a typo in a ransom note. That is why sorting feels so satisfying when done correctly. It creates order with one tool, a few clicks, and a tiny bit of caution. Not glamorous, perhaps, but absolutely effective.
Conclusion
Learning how to sort Microsoft Excel columns alphabetically is one of those small skills that pays off every time you open a spreadsheet. With the right method, you can organize names, categories, products, locations, and other text-based data in seconds while keeping related rows intact. The secret is not just clicking A to Z. It is understanding when to select the full dataset, when to use Custom Sort, and when to double-check your headers before Excel gets creative.
If you remember the 11 steps in this guide, you will be able to sort data with more confidence and fewer spreadsheet disasters. And if you ever forget one rule, remember the big one: sort the whole table, not just the lonely column you happen to be staring at. Your future self will thank you.


