
Table of Contents >> Show >> Hide
- Why Recessed Lighting Creates Such a Dramatic Effect
- Before You Install: Plan the Lighting Like a Designer
- Choosing the Right Recessed Lighting Fixtures
- Trim Styles That Create Drama
- Tools and Materials You May Need
- Step-by-Step: Installing Recessed Lighting for Dramatic Effect
- Step 1: Turn Off Power and Test the Circuit
- Step 2: Mark the Fixture Locations
- Step 3: Check for Joists and Obstructions
- Step 4: Cut the Ceiling Openings
- Step 5: Run the Cable
- Step 6: Make the Wiring Connections
- Step 7: Install the Fixtures
- Step 8: Install a Compatible Dimmer
- Step 9: Restore Power and Test
- Design Tips for a More Dramatic Result
- Common DIY Mistakes to Avoid
- Room-by-Room Recessed Lighting Ideas
- Real-World DIY Experience: What You Learn After the First Hole
- Conclusion
Recessed lighting is the quiet magician of home design. It does not swing from the ceiling, demand attention, or wear a crystal chandelier hat. Instead, it disappears into the ceiling and lets the room look better. Done well, recessed lighting can make a living room feel like a boutique hotel, turn a kitchen into a clean and functional workspace, and give artwork, stone walls, bookshelves, or a fireplace the kind of dramatic glow usually reserved for movie trailers.
The best part? Installing recessed lighting for dramatic effect can be a realistic DIY project for homeowners who are comfortable with basic electrical work, careful planning, and local code requirements. The not-so-best part? Electricity is not impressed by confidence. If a circuit is overloaded, wiring is outdated, or your ceiling hides surprises like plumbing, ductwork, or mysterious “what even is that?” framing, it is time to call a licensed electrician.
This guide walks through how to plan, choose, and install recessed lighting in a way that feels intentional, polished, and safe. We will cover layout, fixture types, trim styles, spacing, wiring basics, dramatic lighting tricks, and practical lessons learned from real DIY-style projects.
Note: Always follow local building codes, permit rules, and manufacturer instructions. Turn off power at the breaker, verify the circuit is dead with a tester, and hire a licensed electrician when the work is beyond your skill level.
Why Recessed Lighting Creates Such a Dramatic Effect
Recessed lighting, also called can lights, downlights, or pot lights, is installed inside the ceiling so the fixture is mostly hidden. That clean look is one reason homeowners love it. But the real drama comes from control. Instead of relying on one lonely ceiling fixture in the center of the room, recessed lights let you place light exactly where it matters.
You can brighten a countertop, wash a wall with soft illumination, highlight a painting, add depth to a hallway, or create a cozy glow around a seating area. In other words, recessed lighting does not just make a room brighter. It shapes the way the room feels.
The Three Lighting Layers That Matter
For a dramatic result, think in layers:
- Ambient lighting: General light that makes the room usable and comfortable.
- Task lighting: Focused light for specific activities such as cooking, reading, shaving, or folding laundry while wondering how socks keep disappearing.
- Accent lighting: Directional light used to highlight features, textures, artwork, shelving, or architectural details.
The magic happens when you combine these layers instead of blasting the whole room with one brightness level. Dramatic recessed lighting is not about turning your ceiling into an airport runway. It is about contrast, shadow, focus, and warmth.
Before You Install: Plan the Lighting Like a Designer
The biggest mistake in DIY recessed lighting is cutting holes first and planning later. Ceiling drywall is forgiving only in theory. In real life, patching extra holes is dusty, annoying, and emotionally personal. Start with a plan.
1. Decide What You Want the Light to Do
Walk into the room and identify the purpose of each area. In a kitchen, you may need strong task lighting over counters and softer lighting over walkways. In a living room, you may want a row of adjustable lights aimed at built-ins, plus dimmable ambient lights for movie night. In a hallway, you may want even pools of light that guide the eye forward without making the space feel harsh.
Ask yourself:
- Do I want even brightness or mood lighting?
- Am I highlighting a wall, fireplace, artwork, or bookshelf?
- Do I need task lighting for a counter, desk, or reading chair?
- Will these lights be dimmed often?
- Is the ceiling insulated, sloped, low, or full of obstacles?
2. Sketch the Room
Draw a simple layout with walls, doors, windows, furniture, cabinets, ceiling joists, and existing fixtures. You do not need architectural software. A pencil, paper, and a tape measure are enough. Mark where you want light to land, not just where the fixtures look symmetrical.
For general lighting, a common starting point is to space recessed lights about half the ceiling height apart. For example, with an 8-foot ceiling, lights spaced around 4 feet apart often create even coverage. For accent lighting, fixtures may be closer to the wall or positioned to aim at specific features. For wall washing, the distance from the wall and spacing between fixtures should be consistent so the light looks smooth rather than blotchy.
3. Avoid the “Swiss Cheese Ceiling” Look
More lights do not always mean better lighting. Too many recessed fixtures can make a ceiling look busy and flatten the room. A dramatic lighting design needs darker zones as much as brighter ones. Leave breathing room. Use dimmers. Highlight focal points. Let shadows do some of the decorating.
Choosing the Right Recessed Lighting Fixtures
Recessed lighting has evolved a lot. Older can lights used bulky housings and incandescent or halogen bulbs. Modern LED recessed lights are more efficient, run cooler, and often come in slim canless designs that fit where traditional cans cannot.
Can Lights vs. Canless LED Recessed Lights
Traditional recessed can lights use a metal housing installed above the ceiling. They are common in older homes and still useful in certain installations. The housing supports the trim and bulb or LED module.
Canless recessed LED lights are ultra-thin fixtures with a separate junction box. They are popular for remodel projects because they require less clearance above the ceiling. Many canless lights include selectable color temperature settings, which allow you to choose warmer or cooler light during installation.
For many DIY remodels, canless LED lights are convenient because they reduce the need to wrestle with bulky housings between joists. Still, the fixture must be rated for the location and installed according to the manufacturer’s instructions.
IC-Rated and Air-Tight Fixtures
If recessed lighting will be installed in a ceiling with insulation above it, look for fixtures labeled IC-rated, meaning they are rated for insulation contact. Non-IC fixtures require clearance from insulation and are not appropriate for every ceiling cavity. When in doubt, choose IC-rated fixtures or consult an electrician.
Air-tight fixtures are also worth considering because they help reduce air leakage between living space and attic space. That matters for comfort, energy efficiency, and keeping your heating and cooling system from quietly judging your choices.
Wet-Rated and Damp-Rated Fixtures
Bathrooms, showers, covered porches, and other moisture-prone areas need fixtures rated for the location. A bathroom ceiling outside the shower may require damp-rated lighting, while a fixture inside a shower area typically needs a wet-location rating. Check the product label carefully.
Trim Styles That Create Drama
The trim is the visible part of the recessed light, and it affects both appearance and performance. Choosing trim is not just a decorative decision. It changes how the light spreads, where it points, and how much glare you see.
Baffle Trim
Baffle trim has a ribbed interior that helps reduce glare. It is a popular choice for living rooms, bedrooms, and general lighting because it softens the light and keeps the ceiling from feeling too bright.
Reflector Trim
Reflector trim has a shiny interior that increases brightness. It can be useful in kitchens, high ceilings, or task areas where you need more punch. Use it carefully in cozy rooms because too much reflectivity can feel harsh.
Gimbal or Adjustable Trim
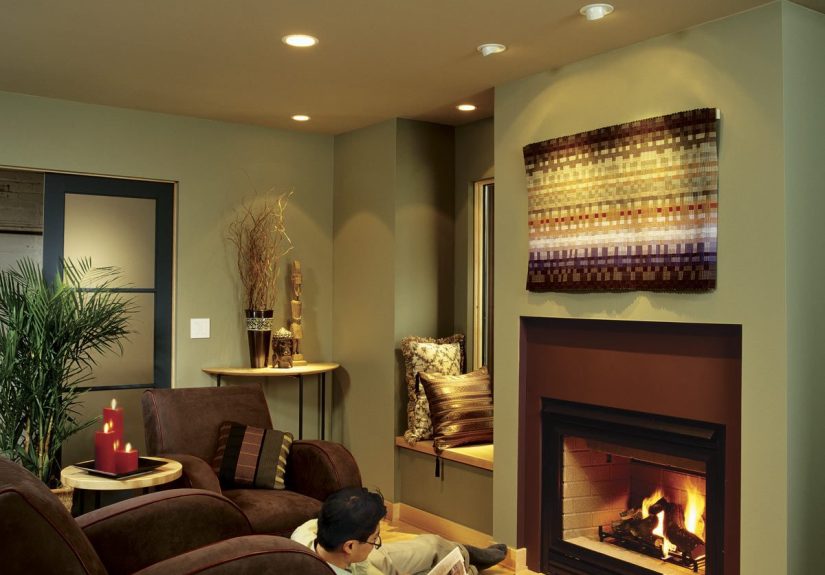
Gimbal trims allow the light to pivot. These are excellent for highlighting artwork, fireplaces, stone walls, plants, built-ins, or architectural details. If your goal is dramatic effect, adjustable trims are your best friend. They aim light like a tiny stage spotlight, minus the applause.
Wall-Wash Trim
Wall-wash trims spread light evenly across a vertical surface. They are ideal for gallery walls, textured finishes, accent walls, and long hallways. Instead of creating a small bright circle, they create a softer glow that makes the room feel larger and more finished.
Tools and Materials You May Need
Your exact materials depend on your home, fixture type, and wiring situation, but most recessed lighting DIY projects require:
- Recessed LED fixtures or remodel housings
- Compatible dimmer switch
- Electrical cable approved for your circuit
- Wire connectors
- Voltage tester
- Stud finder or joist scanner
- Drywall saw or hole saw
- Fish tape or glow rods
- Drill and bits
- Tape measure and pencil
- Safety glasses and dust mask
- Ladder
Before buying anything, confirm your ceiling depth, insulation conditions, circuit capacity, fixture rating, dimmer compatibility, and local permit requirements.
Step-by-Step: Installing Recessed Lighting for Dramatic Effect
Step 1: Turn Off Power and Test the Circuit
Turn off power at the breaker panel. Do not rely on the wall switch. Use a non-contact voltage tester and, ideally, a circuit tester to verify the power is off. Electrical safety is not the place for optimism.
Step 2: Mark the Fixture Locations
Transfer your lighting plan to the ceiling with painter’s tape or pencil marks. Stand back and look at the pattern from multiple angles. Check alignment with cabinets, walls, windows, beams, and furniture. A light that is technically centered but visually awkward will bother you forever, usually at 11:47 p.m.
Step 3: Check for Joists and Obstructions
Use a stud finder or small inspection hole to locate joists. Be alert for ductwork, plumbing, existing wiring, blocking, and other obstacles. If you have attic access, inspect from above. If not, cut carefully and use inspection techniques before committing to large holes.
Step 4: Cut the Ceiling Openings
Use the template provided with your fixtures. Cut slowly with a drywall saw or hole saw. Keep the cut clean and avoid oversizing the hole. Most recessed lights rely on clips or flanges to grip the drywall, so sloppy holes can lead to loose fixtures and creative language.
Step 5: Run the Cable
Run approved cable from the power source to the switch and from the switch to each fixture, depending on your wiring plan. Secure and protect cable as required by code. If drilling through joists, drill in safe locations and avoid weakening structural members. If you are unsure about cable routing, box fill, grounding, or circuit load, bring in a licensed electrician.
Step 6: Make the Wiring Connections
For canless LED lights, wiring is typically made inside the fixture’s junction box. Match hot to hot, neutral to neutral, and ground to ground according to the manufacturer’s instructions. Use approved connectors and close the junction box properly. Never bury illegal splices in the ceiling. Every connection must be made inside an approved accessible box or fixture enclosure.
Step 7: Install the Fixtures
Push the junction box into the ceiling opening, then compress the spring clips and seat the light into place. For remodel can housings, insert the housing through the cutout and lock the clips against the drywall. The trim or LED module is then installed according to the product instructions.
Step 8: Install a Compatible Dimmer
Dimming is essential for dramatic recessed lighting. Without a dimmer, your carefully designed mood lighting may feel like a dental exam. Choose a dimmer compatible with LED fixtures and confirm whether your lights require forward-phase, reverse-phase, or another dimming type. If the lights flicker, buzz, or do not dim smoothly, dimmer incompatibility is often the culprit.
Step 9: Restore Power and Test
Turn the breaker back on and test every fixture. Check the dimmer range, flicker, warmth, beam spread, and direction. Adjustable trims should be aimed after dark, when you can clearly see where the light lands.
Design Tips for a More Dramatic Result
Use Warm Light for Cozy Spaces
Color temperature matters. Warm white light, often around 2700K to 3000K, usually feels best in living rooms, bedrooms, and dining areas. Neutral white, often around 3500K to 4000K, can work well in kitchens, laundry rooms, and task-heavy spaces. Very cool light can feel crisp, but in the wrong room it may look more “hospital hallway” than “high-end renovation.”
Aim Accent Lights at the Feature, Not the Floor
If you are highlighting a painting, fireplace, or built-in shelves, use adjustable lights and aim them at the vertical surface. The goal is to guide the eye. A pool of light on the carpet below the artwork is not drama; it is a missed appointment.
Keep Lights Away From Ceiling Fans
Recessed lights placed too close to ceiling fan blades can create a strobe effect when the fan runs. Unless you want your living room to feel like a low-budget dance club, keep lights clear of rotating blades.
Use Multiple Switch Zones
If possible, separate lighting zones. Put ambient lights on one dimmer and accent lights on another. In a kitchen, separate counter task lights from walkway lights. In a living room, separate wall-wash lights from general downlights. Zones give you control, and control is what makes lighting feel custom.
Common DIY Mistakes to Avoid
- Installing too many lights: More holes do not equal more style.
- Ignoring insulation ratings: Use IC-rated fixtures where insulation contact is possible.
- Skipping dimmers: Dramatic lighting needs adjustable brightness.
- Choosing the wrong color temperature: Match the light warmth to the room’s purpose.
- Cutting before checking joists: Measure, scan, inspect, then cut.
- Using incompatible dimmers: LED fixtures and dimmers must play nicely together.
- Aiming lights straight down only: Accent lighting often works better when aimed at vertical features.
Room-by-Room Recessed Lighting Ideas
Living Room
Use dimmable ambient downlights around the seating area and adjustable accent lights aimed at bookshelves, artwork, or a fireplace. Avoid placing lights directly over every seat unless you want guests to feel interrogated.
Kitchen
Place task lighting over counters, sinks, and islands. Avoid casting shadows by placing lights slightly in front of where you stand, not directly behind you. Add dimming so the kitchen can shift from “chop onions efficiently” to “late-night snack theater.”
Bedroom
Use fewer lights, warmer color temperature, and dimmers. Recessed lighting in bedrooms should feel soft and relaxing, not like someone is searching for a lost contact lens.
Bathroom
Use damp- or wet-rated fixtures where required. Recessed lights can work well over showers, tubs, and vanity areas, but mirror lighting should also include side or front illumination to reduce face shadows.
Hallway
Evenly spaced recessed lights can make a hallway feel longer, cleaner, and more modern. Wall-wash lighting can highlight art or textured walls and prevent the tunnel effect.
Real-World DIY Experience: What You Learn After the First Hole
Every recessed lighting project starts with confidence and a tape measure. Then the ceiling gets involved. The first practical lesson is that ceilings are full of secrets. One planned light location may land directly under a joist. Another may run into a duct. A third may reveal old wiring from a renovation performed by someone who apparently believed electrical work was a form of abstract art. This is why a flexible layout is so important. Mark your ideal locations, but have backup positions ready.
The second lesson is that lighting looks different at night than it does during installation. During the day, you may think your layout is perfect. After sunset, one light may create a harsh scallop on the wall, another may glare into your eyes from the sofa, and the fireplace may still look underwhelming. Adjustable trims help tremendously because they let you fine-tune the result. If drama is the goal, wait until evening to aim accent lights. Turn off other lamps, dim the new lights, and adjust slowly until the room feels balanced.
The third lesson is that dimmers are not optional if you want atmosphere. Full brightness is useful when cleaning, packing, cooking, or finding a Lego before your foot does. But real comfort comes from lower light levels. A dimmer turns recessed lighting from basic illumination into a design tool. It lets the same room feel bright in the morning, relaxed in the evening, and cozy during a movie.
The fourth lesson is to buy one extra fixture and keep your packaging until the project is finished. Even careful DIYers occasionally damage a spring clip, misplace a connector, or decide one more light is needed after seeing the room illuminated. Having an extra matching fixture saves a return trip and prevents the dreaded “same model, slightly different trim color” problem.
The fifth lesson is that dust travels with ambition. Cutting ceiling holes creates fine drywall dust that lands everywhere: floors, shelves, hair, pets, and probably your emotional support coffee mug. Cover furniture, use a drop cloth, wear eye protection, and keep a vacuum nearby. If you can use a hole saw with a dust catcher, your future self will send a thank-you card.
The sixth lesson is to respect the difference between “I can do this” and “I should call someone.” Installing a simple canless LED light on an accessible circuit may be well within reach for a skilled DIY homeowner. Extending circuits, replacing old wiring, adding switches, working in crowded panels, or dealing with aluminum wiring, knob-and-tube wiring, or repeated breaker trips is different. Professional help is not defeat. It is how you protect the house, the project, and everyone who enjoys the finished room.
Finally, the most satisfying experience comes when the lights are installed, the dimmer is adjusted, and the room suddenly looks intentional. The wall texture pops. The shelves glow. The kitchen feels sharper. The living room feels warmer. Nothing bulky was added, yet everything looks more expensive. That is the charm of recessed lighting: when it is done right, people may not notice the lights first. They simply notice that the room feels better.
Conclusion
Installing recessed lighting for dramatic effect is one of the most rewarding DIY upgrades because it changes how a room looks, works, and feels. The key is planning before cutting, choosing the right IC-rated or location-rated fixtures, using dimmers, and thinking in lighting layers rather than simple brightness. For drama, focus on contrast: soft ambient light, targeted accent light, and practical task light where it is needed most.
Whether you are highlighting a fireplace, modernizing a kitchen, creating a gallery-style hallway, or giving your living room a polished glow, recessed lighting can make the space feel custom without adding visual clutter. Work safely, follow local codes, and know when to call an electrician. A beautiful ceiling is great. A safe beautiful ceiling is better.


