
Table of Contents >> Show >> Hide
- What You’re Building (And Why It Works)
- Materials and Tools
- Choose Your Size (A Quick, Practical Example)
- How to Build a Wooden Planter Box: 13 Steps
- Step 1: Decide what your plants need (depth, width, and location)
- Step 2: Pick the right wood and fasteners for outdoor life
- Step 3: Sketch a simple cut list (don’t “eyeball” this part)
- Step 4: Cut your boards cleanly and label them
- Step 5: Sand now, not after assembly
- Step 6: Build the side panels first (square matters)
- Step 7: Pre-drill pilot holes to prevent splitting
- Step 8: Install the bottom support ledge (so the base won’t sag)
- Step 9: Add the bottom boards (leave tiny gaps if using slats)
- Step 10: Drill drainage holes (this is non-negotiable for plant happiness)
- Step 11: Line the planter (protect wood, keep soil in, let water out)
- Step 12: Seal or paint the wood (especially end grain)
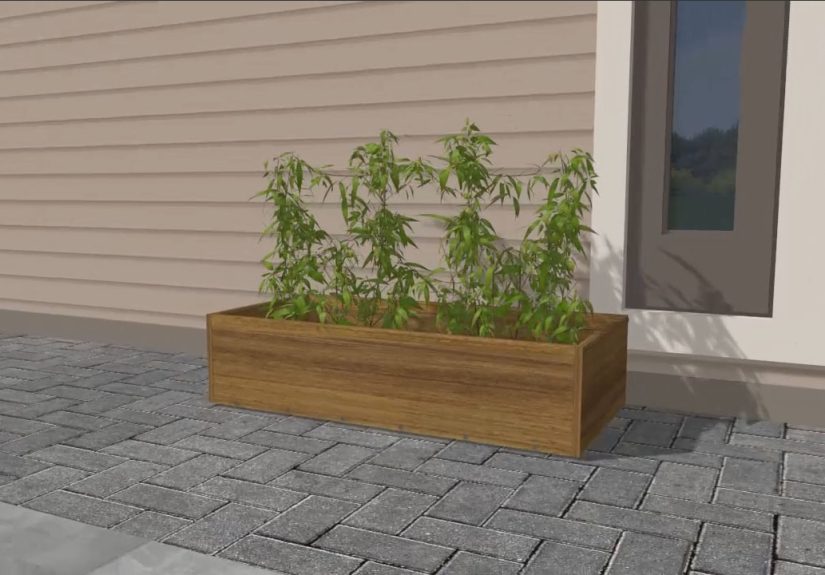
- Step 13: Add feet (or lift it slightly) and place it smartly
- Filling and Planting: Don’t Use Heavy Garden Dirt
- Maintenance Tips That Actually Matter
- Common Mistakes (So You Don’t Have to Learn the Hard Way)
- Conclusion
- Real-World Experiences: What DIYers Notice After the First Season (About )
A wooden planter box is basically a tiny house for plantsexcept the tenants never pay rent, demand “more sun,” and
will absolutely wilt in protest if drainage is bad. The good news: building a planter box is a friendly woodworking
project that rewards you immediately with curb appeal, fresh herbs, and the smug satisfaction of saying,
“Yeah, I built that.”
This guide walks you through a durable, beginner-friendly build that works for patios, decks, porches, and yards.
You’ll learn what wood lasts outdoors, how to prevent rot, how to get drainage right (so your plants don’t live in a swamp),
and how to finish the box so it looks intentionalnot like a middle school shop-class flashback.
What You’re Building (And Why It Works)
We’re building a rectangular wooden planter box with a bottom and drainage holesideal for container
gardening where you want control over soil quality and placement. This design is strong because:
- Corner structure keeps the box square and sturdy.
- Exterior-grade fasteners handle moisture and seasonal movement.
- Drainage + liner prevents root rot while reducing wood-to-soil contact (a major rot trigger).
- Finish + airflow slows weathering and helps the planter last longer.
Materials and Tools
Best wood choices
- Cedar: Lightweight, rot-resistant, smells amazing, and makes your planter feel like it has a skincare routine.
- Redwood: Very durable and stable outdoors, often pricier depending on region.
- Untreated pine: Budget-friendly, but shorter lifespan unless sealed well and kept off wet ground.
-
Pressure-treated lumber: Common for outdoor builds; if you’re growing edibles and prefer extra caution,
use a liner that separates soil from wood and avoid older, obsolete treatments. (More on this in the steps.)
Recommended hardware and supplies
- Exterior-grade screws (deck screws) or stainless screws (best for wet environments)
- Wood glue (optional, for extra stiffnessuse exterior-rated if you do)
- Landscape fabric (breathable) or a heavy plastic liner (more protective; must allow drainage)
- Staple gun + staples (for fabric/liner attachment)
- Sandpaper (80/120/180 grit) or a sander
- Exterior stain/sealer or outdoor paint
- Optional: small mesh screen for drainage holes, rubber feet, and corner brackets
Tools
- Measuring tape + pencil
- Speed square (helpful for straight lines and 90° checks)
- Saw (circular saw, miter saw, or even a handsaw if you’re patient)
- Drill/driver + bits (including a drill bit for pilot holes)
- Clamps (nice-to-have, not mandatory)
- Safety glasses + hearing protection
Choose Your Size (A Quick, Practical Example)
You can build any size you want, but a “sweet spot” for most patios is around 36 inches long,
16 inches wide, and 14–18 inches tall. That gives roots room, keeps the box movable
(with help), and doesn’t require a forklift when the soil is wet.
Example build: 36″ L × 16″ W × 16″ H. That’s roomy enough for herbs, flowers, or a few compact veggies.
If you want a deeper planter for tomatoes or bigger root systems, aim for 18–24 inches deep.
How to Build a Wooden Planter Box: 13 Steps
Step 1: Decide what your plants need (depth, width, and location)
Start with the end in mind: herbs and flowers are usually happy with 8–12 inches of soil depth, while many vegetables
do better with 12–18 inches (or more for larger plants). Also consider sunlight and weightwet soil is heavy, and a
full planter can become a “permanent installation” even if you didn’t mean it that way.
Step 2: Pick the right wood and fasteners for outdoor life
For a long-lasting planter box, rot-resistant wood (cedar/redwood) plus corrosion-resistant screws is a strong combo.
If you’re using pressure-treated lumber for durability, plan to separate the soil from the wood with a liner,
especially for edible plants. Whatever you choose, avoid indoor screwsoutdoors they’ll rust faster than a forgotten bike in the rain.
Step 3: Sketch a simple cut list (don’t “eyeball” this part)
A quick sketch saves you from the classic DIY moment: holding two boards together and whispering, “Why are you… different lengths?”
List each panel and its dimensions. Typical pieces include:
- Two long sides
- Two short sides
- Bottom slats or a bottom panel
- Corner supports (posts or interior braces)
- Optional: top rim/cap boards for a thicker, more finished look
Step 4: Cut your boards cleanly and label them
Cut all boards to size. Then label them lightly in pencil (L-side, S-side, bottom, brace). This sounds overly organized,
but it prevents you from accidentally turning “bottom slat #3” into “mystery board that doesn’t fit anywhere.”
Step 5: Sand now, not after assembly
Sanding flat boards is easier than sanding inside corners later. Start with 80 grit to remove splinters and mill marks,
then 120. If you want a smoother feel on the rim where hands might grab, finish that edge with 180 grit.
Step 6: Build the side panels first (square matters)
Assemble the four sides into a rectangle. You can do this two ways:
- With corner posts: Screw side boards into 2×2 or 2×4 corner posts from the inside. Strong and beginner-friendly.
- Butt joints + interior braces: Screw sides together at the corners, then reinforce inside corners with braces or brackets.
Use a square (or measure corner-to-corner diagonals) to confirm the frame is square before you commit with screws.
Step 7: Pre-drill pilot holes to prevent splitting
Outdoor woods like cedar can split if you drive screws too close to the end grain without a pilot hole. Pre-drill especially
near edges and corners. Your future self (and your boards) will thank you.
Step 8: Install the bottom support ledge (so the base won’t sag)
A planter box bottom holds soilmeaning it holds weightmeaning gravity will try to turn it into a sad hammock.
Add interior ledges or supports:
- Screw 1x2s or ripped strips along the inside bottom perimeter to create a “shelf” for bottom boards.
- For longer boxes, add a center brace across the middle to reduce sag.
Step 9: Add the bottom boards (leave tiny gaps if using slats)
You can use a solid plywood base (exterior-grade) or slats. Slats are great because small gaps help drainage and airflow.
If you do slats, leave 1/8″–1/4″ gaps. If using a panel, you’ll rely on drilled holes for drainage.
Step 10: Drill drainage holes (this is non-negotiable for plant happiness)
Drainage is the difference between “thriving basil” and “sad soup pot.” Drill several holes in the bottom:
- Small planters: 6–10 holes, about 1/4″–3/8″ diameter
- Larger planters: more holes, evenly spaced
If you’re worried about soil washing out, staple a piece of mesh screen over the holes or rely on landscape fabric (next step).
Step 11: Line the planter (protect wood, keep soil in, let water out)
There are two common liner approaches:
-
Landscape fabric: Breathable, helps keep soil from escaping through gaps while allowing drainage.
Great for slatted bottoms. -
Heavy plastic liner: More protective for wood, especially if you used pressure-treated lumber or you want extra rot resistance.
If you use plastic, poke/drill holes aligned with the drainage holes so water can escape.
Attach the liner with staples along the inside walls. Keep it tidywrinkles are fine, but don’t block drainage.
Step 12: Seal or paint the wood (especially end grain)
End grain is like a bundle of straws; it drinks water first. Apply an exterior stain/sealer or outdoor paint and give extra attention to:
- Bottom edges
- Inside lower corners
- Cut ends
If you’re painting, a primer rated for exterior wood helps. If staining, follow the product’s cure time before adding soil.
Step 13: Add feet (or lift it slightly) and place it smartly
The easiest way to extend a planter’s life is to keep it from sitting in constant moisture. Add rubber feet, small blocks,
or a thin strip base so air can circulate underneath. Then place the planter where:
- It gets the right sun (6+ hours for many veggies; partial shade works for many flowers and leafy greens)
- Water can drain without staining your deck
- You can actually reach it (because “I’ll move it later” is famous last words)
Filling and Planting: Don’t Use Heavy Garden Dirt
For containers, use a quality potting mix (lighter, better drainage) rather than dense garden soil.
A simple, effective blend is:
- High-quality potting mix as a base
- Compost for nutrients
- Optional: perlite/pumice for extra aeration
Fill to within 1–2 inches of the top so watering doesn’t overflow like a tiny muddy waterfall.
Then plant based on spacing guidelines. Example combos:
- Herb box: basil, thyme, chives, parsley (give mint its own container unless you enjoy chaos)
- Pollinator box: marigolds, zinnias, salvia, trailing nasturtium
- Salad box: leaf lettuce + arugula + green onions (succession plant every couple weeks)
Maintenance Tips That Actually Matter
- Check drainage after the first watering. If water pools, add holes or adjust the liner.
- Re-seal annually (or as needed) to slow weathering.
- Top-dress with compost mid-season for a nutrient boost.
- Watch watering: containers dry out faster than in-ground beds, especially in summer heat.
Common Mistakes (So You Don’t Have to Learn the Hard Way)
1) “Drainage is optional”
It’s not. Roots need oxygen. Standing water turns soil anaerobic and plants decline fast.
2) Using indoor screws
They rust, stain the wood, weaken joints, and eventually snap when you least expect it (usually while you’re proudly showing someone your planter).
3) No internal support on long boxes
A long base without bracing can sag under wet soil. Add a center brace and you’ll avoid the “smiling planter” look.
4) Filling with heavy soil
Garden dirt compacts in containers and drains poorly. Potting mix keeps roots healthier and the planter easier to manage.
Conclusion
Building a wooden planter box is one of those rare DIY wins where the results are both practical and pretty.
Pick rot-resistant materials, build it square, brace the bottom, and take drainage seriously. Do that, and you’ll end up with a planter
that looks good on day oneand still looks good after the weather tries its best to disagree.
Next step: fill it, plant it, water it, and enjoy that moment when you realize your porch now has “main character energy.”
Real-World Experiences: What DIYers Notice After the First Season (About )
Once a wooden planter box survives its first season outdoors, it starts teaching you thingsmostly about water, sun, and how nature
does not care about your weekend schedule. A common “aha” moment is realizing how much weight a planter holds.
Dry soil is manageable. Wet soil after a good rain? That’s a gym membership you didn’t ask for. This is why builders often say their
“movable planter” becomes “the planter that lives here now.” If you truly need mobility, many DIYers add locking casters on a beefy base,
but even then, they learn quickly that rolling a heavy planter over deck seams is its own sport.
Another frequent observation: sun exposure changes everything. Planters in full sun dry out dramatically faster than you expect,
especially during hot spells. DIYers often adjust by mulching the top with bark or straw, grouping planters to reduce wind exposure,
or switching to a drip line so watering isn’t a twice-a-day ritual. On the flip side, planters tucked into shade can stay damp longer,
which sounds great until you realize damp plus poor airflow can invite fungus gnats or mildew. People who line their boxes neatly and
keep drainage holes clear usually have fewer issues.
The third “seasonal surprise” is how wood behaves. Even rot-resistant woods weather: the color fades, and boards can expand and contract.
DIYers who skipped pilot holes sometimes notice hairline splits near screws after temperature swings. Those who sealed the end grain well
tend to see less checking and fewer rough spots. A lot of folks end up loving the weathered looksilver cedar has a classic charmwhile others
re-stain annually to keep that “fresh build” vibe. Either way, they learn that a quick spring touch-up (light sand + new coat) takes far less time
than letting damage accumulate.
Planter-box veterans also talk about soil settling. The first few waterings compress the mix, sometimes dropping the soil level by an inch or two.
That’s normal. Many DIYers top off with compost or fresh potting mix, then mulch to slow future settling and reduce evaporation.
They also figure out plant spacing the fun way: that adorable “tiny basil start” can become a leafy monster by mid-summer.
After one season, people often plan a little more breathing roomor they intentionally plant crowded for a lush look, knowing they’ll harvest frequently.
Finally, there’s the “placement regret” lesson: putting a planter against a railing or wall can trap moisture and stain surfaces,
and placing it where runoff splashes dirt onto siding creates extra cleanup. Experienced DIYers leave a small gap for airflow and position
the planter where water can drain harmlessly. In the end, the most consistent feedback is simple: the build is the easy part.
The real magic is watching something grow in a box you made with your own handsespecially when guests compliment it and you get to casually say,
“Oh this? Just a little project.”


