
Table of Contents >> Show >> Hide
- What Is “Burning Skull = 3D Paper Art”?
- Why Paper Is Perfect for Dramatic 3D Art
- The Symbolism Behind Skull Paper Art
- Main Styles of Burning Skull 3D Paper Art
- How Artists Create the Burning Effect Without Real Fire
- Materials That Work Well for 3D Skull Paper Art
- Design Principles That Make the Artwork Look Professional
- Where Burning Skull Paper Art Fits in Home Décor
- Beginner-Friendly Project Concept: A Layered Burning Skull Wall Piece
- Advanced Project Concept: Low-Poly Burning Skull Sculpture
- Common Mistakes to Avoid
- Why This Trend Works So Well Online
- Experience Notes: What Making Burning Skull 3D Paper Art Feels Like
- Conclusion
A burning skull made from paper sounds like a contradiction. Paper is fragile. Fire is dramatic. A skull is gothic, symbolic, and just a tiny bit “please don’t place this next to grandma’s floral centerpiece.” But put those ideas together carefullywithout actual flames, unless your hobby is explaining things to the fire departmentand you get one of the most eye-catching forms of modern craft: 3D paper art with a fiery skull theme.
The phrase “Burning Skull = 3D Paper Art” captures a creative sweet spot where paper sculpture, low-poly papercraft, shadow-box layering, fantasy décor, and handmade Halloween-style design all collide. The result can look fierce enough for a rock album cover, refined enough for a gallery wall, and handmade enough to make people say, “Wait, that’s paper?” which is the official trophy sentence of every paper artist.
This article explores what makes burning skull paper art so compelling, how 3D paper sculpture works, why skull imagery remains popular in craft and décor, and how artists can create the illusion of flames, shadows, bone structure, and depth using nothing more intimidating than cardstock, scoring lines, folds, layers, glue, and patience. Lots of patience. The kind of patience that makes a person calmly whisper, “I am stronger than this tab,” while assembling jawbone number 47.
What Is “Burning Skull = 3D Paper Art”?
At its core, Burning Skull 3D paper art is a sculptural paper project that combines a skull form with visual elements inspired by fire. The “burning” effect does not need to involve real heat. In fact, it absolutely should not. Instead, artists use color gradients, layered flame shapes, angular folds, lighting effects, and shadow placement to create the impression of flames rising from or around a paper skull.
The skull may be realistic, low-poly, cartoonish, anatomical, biker-style, fantasy-inspired, or decorative. The flames might be cut as separate layers behind the skull, shaped as curling paper strips, printed as painted gradients, or built into the sculpture through orange, red, yellow, and black cardstock. Some makers even place the finished piece inside a deep frame or shadow box, using battery-powered LED lighting to create a dramatic glow. The effect is bold, theatrical, and surprisingly elegant when done well.
Why Paper Is Perfect for Dramatic 3D Art
Paper is often treated as ordinary because we see it everywhere: receipts, notebooks, mail, packaging, school worksheets, and that one instruction manual nobody reads until the furniture has already won. But in art, paper is incredibly versatile. It can be folded, curled, cut, layered, embossed, scored, painted, glued, crumpled, woven, and stacked. It can look soft or sharp, flat or architectural, delicate or surprisingly strong.
That versatility is why paper-based sculpture appears in museums, galleries, classrooms, craft studios, design projects, and online maker communities. Some artists create realistic animals from paper. Others build abstract installations from tissue paper, sculptural forms from layered sheets, or mathematical origami that turns a flat surface into an object with volume and movement. A burning skull design fits naturally into this tradition because it relies on paper’s best visual tricks: shadow, edge, contrast, repetition, and transformation.
The Symbolism Behind Skull Paper Art
Skulls have appeared in art for centuries because they carry instant meaning. They can represent mortality, danger, rebellion, memory, transformation, mystery, or the simple fact that humans love spooky things even when we pretend we are mature adults who do not buy skeleton decorations in September.
In 3D paper art, a skull becomes especially interesting because it is both anatomical and graphic. The eye sockets create natural shadow. The cheekbones provide structure. The teeth add rhythm and detail. The overall shape is instantly recognizable, even when simplified into low-poly surfaces. This makes the skull an excellent subject for paper sculpture: it can be stylized without becoming confusing.
Why Add Fire?
Fire imagery adds motion and emotion. Flames suggest energy, speed, transformation, intensity, danger, and renewal. When combined with a skull, the result feels cinematic. It can look like a fantasy emblem, a motorcycle-club poster, a heavy-metal stage prop, a Halloween centerpiece, or a dramatic piece of wall art.
For paper artists, flames are also practical design elements. They are easy to stylize with curved shapes, jagged edges, stacked layers, and bright colors. A skull gives the artwork structure; flames give it movement. Together, they create contrast: hard bone versus flowing fire, pale neutral tones versus hot color, stillness versus motion.
Main Styles of Burning Skull 3D Paper Art
1. Low-Poly Papercraft Skull
The low-poly style is one of the most popular approaches for 3D paper skulls. It breaks the skull into geometric planes, usually triangles or polygons, creating a faceted sculpture that looks digital and handmade at the same time. The effect is clean, modern, and slightly futuristic.
Low-poly paper models are often designed digitally, unfolded into printable templates, then cut, scored, folded, and glued into shape. This style is ideal for skull art because the angular planes naturally emphasize cheekbones, brow ridges, and jaw structure. Add layered paper flames behind it, and the skull looks like it has stepped out of a video game loading screen with excellent cheekbone lighting.
2. Layered Shadow Box Skull
A layered shadow box uses multiple flat paper cutouts arranged at different depths inside a frame. This method can create a strong 3D illusion without requiring a fully freestanding sculpture. For a burning skull theme, the artist might place flame layers at the back, smoke-like gray layers in the middle, and the skull silhouette or skull face in front.
This approach works beautifully for wall décor because it is easier to display and protect behind glass or acrylic. It also allows strong control over color and lighting. A small LED strip or battery light behind the flame layers can create a glowing ember effect. Again, no actual flame is needed. Your art should look hot, not file an insurance claim.
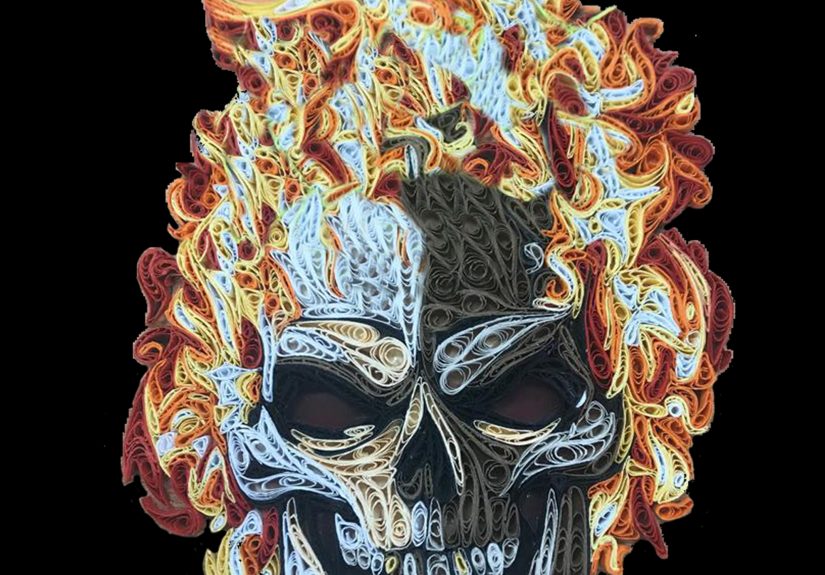
3. Quilled Flame Details
Quilling uses narrow strips of paper rolled, pinched, curled, and arranged into decorative shapes. While quilling is often associated with florals or ornamental patterns, it can also create excellent flame effects. Tight coils can resemble sparks. Long curved strips can become tongues of fire. Layered reds, oranges, yellows, and deep shadows can produce a rich burning effect around the skull.
A quilled burning skull is more decorative than realistic, but that can be its strength. It turns a bold, gothic subject into something intricate and handcrafted, like a tattoo design that decided to attend art school.
4. Sculptural Paper Relief
Paper relief sits between flat art and full sculpture. The skull and flames are built outward from a backing board using raised layers, folded shapes, spacers, curved surfaces, and carefully placed shadows. Relief is excellent for artists who want depth but do not want to assemble an entire hollow skull model.
This method also gives the artist freedom to exaggerate. Flames can curl around the skull. Smoke can rise in layered gray strips. The eye sockets can be deepened with black paper. Teeth can be individually cut and lifted slightly for extra dimension. The result feels handcrafted, dramatic, and easier to hang than a full 3D object.
How Artists Create the Burning Effect Without Real Fire
The most important rule of burning skull paper art is simple: use the idea of fire, not actual fire. Paper and open flames are not creative partners. They are enemies with paperwork.
Artists create the illusion of fire through visual design. One method is color layering: yellow at the center, orange around it, red at the edges, and dark gray or black behind the flames for contrast. Another method is shape language. Flame forms tend to be sharp, curved, irregular, and upward-moving. By cutting flame layers in different sizes and placing them at different depths, the artwork appears active and dimensional.
Lighting can also help. Battery-powered LED lights placed safely behind or around the paper can produce a warm glow. Transparent vellum or thin colored paper can diffuse light, making the flames appear softer. Matte black cardstock behind the skull can deepen shadows, while metallic or pearlescent paper can add a smoky shine.
Materials That Work Well for 3D Skull Paper Art
For a sturdy 3D paper skull, cardstock is usually better than thin copy paper. It holds folds more cleanly, supports structure, and resists warping from glue. Heavy cardstock can be excellent for large pieces, while medium-weight cardstock is easier to fold for detailed templates. The best choice depends on the size of the sculpture, the complexity of the folds, and whether the final piece will be framed, mounted, or freestanding.
Common materials include white or ivory cardstock for the skull, black cardstock for sockets and shadows, red-orange-yellow cardstock for flames, gray paper for smoke effects, foam spacers for shadow-box depth, craft glue or double-sided adhesive, a scoring tool, a cutting mat, a craft knife, and a ruler. Digital cutting machines can speed up repeated flame layers or complex silhouettes, but careful hand-cutting can produce excellent results too.
Design Principles That Make the Artwork Look Professional
Contrast Is Everything
A burning skull design needs strong contrast. The skull should not disappear into the flames, and the flames should not look like random decorative noodles. Use light skull tones against dark shadows, then place bright flame colors where the eye should travel. Black, charcoal, and deep red can make the hot colors look more intense.
Depth Creates Drama
Even a simple design becomes more impressive when layers are separated. A skull lifted a quarter inch from the background can cast shadows. Flames placed behind the skull feel like they are rising from another plane. Teeth, brow ridges, and cheekbones can be slightly raised to add sculptural depth.
Edges Matter
Paper art is all about edges. Clean cuts make the design look intentional. Rough cuts can work too, but only when they match the style. For a polished low-poly skull, crisp edges are essential. For smoky flames, slightly irregular edges can feel more organic.
Balance the Chaos
Flames are naturally chaotic, but the composition still needs order. If every part of the design screams for attention, viewers will not know where to look. The skull should usually remain the focal point. Flames should support it, frame it, or appear to burst from itnot swallow it like an overenthusiastic craft-store dragon.
Where Burning Skull Paper Art Fits in Home Décor
This kind of paper art is not only for Halloween, although it does shine during spooky season. A well-designed burning skull piece can work in modern gaming rooms, music studios, tattoo-inspired interiors, comic-book displays, motorcycle-themed spaces, creative offices, and dramatic gallery walls. It can also be adapted for Day of the Dead-inspired décor when handled respectfully with vibrant colors, floral elements, and cultural awareness.
The style can be dark and moody or bright and playful. A black-and-white skull with red flames feels intense. A colorful skull with layered flowers and stylized flames feels more celebratory. A low-poly skull in metallic paper feels futuristic. A shadow-box skull with warm lighting feels cinematic. The theme is flexible, which is why it keeps showing up in papercraft communities and DIY décor ideas.
Beginner-Friendly Project Concept: A Layered Burning Skull Wall Piece
For beginners, a full 3D skull model can be challenging. A layered wall piece is a better starting point. Imagine a black background, three flame layers in red, orange, and yellow, and a white skull silhouette raised above them. Add darker paper behind the eyes and nose. Use small spacers between layers. Finish it inside a deep frame.
This project teaches the basics of composition, layering, shadow, and paper depth without requiring hundreds of tiny tabs. It also gives beginners a finished result that looks impressive quickly. The design can be cut by hand or with a digital cutting machine. The key is to keep the skull shape clean and the flame layers varied.
Advanced Project Concept: Low-Poly Burning Skull Sculpture
Advanced makers can take the idea further with a low-poly skull sculpture. This type of project begins with a 3D model that is converted into flat printable panels. Each panel includes fold lines and glue tabs. After cutting and scoring, the maker folds the panels and joins them to form a hollow skull.
The burning effect can be added with paper flames attached behind the skull, colored internal lighting, or a base that looks like rising fire. This type of sculpture requires accuracy. A tiny fold error early in the process can become a major alignment problem later. But when it works, the final result is spectacular: a handmade paper skull that looks architectural, dramatic, and surprisingly durable.
Common Mistakes to Avoid
The first mistake is using paper that is too thin. Thin paper may wrinkle, collapse, or show glue marks. The second mistake is rushing the scoring stage. Scoring creates clean folds, especially on cardstock. Without it, edges can look messy. The third mistake is using too much glue. Paper needs enough adhesive to hold, not enough to recreate a swamp.
Another common mistake is forgetting the viewing angle. A 3D paper skull might look great from the front but awkward from the side if the flame layers are too flat or the skull is poorly mounted. Before final assembly, artists should test the layout from multiple angles and under different lighting. Shadows change everything.
Why This Trend Works So Well Online
Burning skull 3D paper art is extremely shareable because it photographs well. The subject is instantly recognizable, the colors are strong, and the transformation from flat paper to sculptural object is satisfying to watch. Social media loves a good “before and after,” and papercraft delivers that beautifully. A pile of flat sheets becomes a skull. A few flame shapes become motion. A blank frame becomes a dramatic finished artwork.
It also appeals to multiple audiences: crafters, Halloween fans, gothic décor lovers, gamers, tattoo-art fans, paper engineers, teachers, and DIY gift makers. That broad appeal makes it a strong topic for blogs, tutorials, craft shops, printable templates, and creative portfolios.
Experience Notes: What Making Burning Skull 3D Paper Art Feels Like
The first experience many makers have with a burning skull paper project is a mix of excitement and mild suspicion. The template looks simple on screen. Then it prints, and suddenly there are many small shapes with fold lines, tabs, numbers, and angles that appear to have been designed by a very organized wizard. This is the moment when the project stops being “just paper” and becomes a real craft challenge.
One of the most satisfying parts is watching the skull structure emerge. At first, the paper pieces look meaningless. A cheek panel does not look like a cheek. A jaw tab does not look like a jaw. The eye socket may look like a mistake that learned geometry. But after enough pieces are folded and connected, the form suddenly appears. That reveal is addictive. It is the reason people finish one paper sculpture and immediately begin looking for another, even though they promised themselves they would clean the glue off the table first.
The flame layers bring a different kind of pleasure. Unlike the skull, which often requires precision, flames allow more artistic freedom. You can exaggerate the curves, stretch the points, stack warm colors, and play with asymmetry. The flames do not need to be perfect. In fact, they look better when they are slightly irregular. Real fire is not symmetrical, and paper fire should not look like it was approved by a corporate spreadsheet.
Lighting is another memorable part of the process. A burning skull design can look good in daylight, but it often becomes much more dramatic under warm lighting. Even a simple desk lamp placed at an angle can make the eye sockets deeper and the flame layers more dimensional. If the piece is in a shadow box, soft battery-powered LEDs can create a glow that makes the paper appear alive. The trick is restraint. Too much light can flatten the shadows; just enough light makes the skull feel mysterious.
Mounting the finished artwork is where many makers learn humility. Paper is light, but 3D paper art still needs support. A skull that sits slightly crooked can look unintentionally goofy, like it is confused by its own flames. Taking time to align the sculpture, reinforce hidden areas, and test the hanging position can make the difference between “handmade masterpiece” and “haunted craft accident.”
The best experience, though, is the reaction from viewers. People often lean closer because they cannot immediately tell how the piece was made. They notice the folds, then the layers, then the shadows, then the fact that the whole dramatic object came from sheets of paper. That surprise is the magic of 3D paper art. It turns an everyday material into something theatrical.
Burning skull paper art also teaches a useful creative lesson: dramatic work does not always require expensive materials. Strong design, clean technique, and thoughtful lighting can make paper feel powerful. The project rewards patience more than perfection. A tiny uneven fold will not ruin the piece. A slightly wild flame shape might improve it. The final artwork carries evidence of the maker’s hands, and that is exactly why it feels special.
For anyone trying this theme, the best advice is to start with a manageable version. Make a layered skull first. Learn how shadows behave. Experiment with flame colors. Try a small low-poly model before building a life-size version. Most importantly, remember that paper art is supposed to be enjoyable. If a tab refuses to cooperate, step away, breathe, and return when you no longer feel personally betrayed by cardstock.
Conclusion
Burning Skull = 3D Paper Art is more than a cool title. It is a perfect example of how paper can become bold, dimensional, symbolic, and visually powerful. By combining skull imagery with flame-inspired color, layered construction, low-poly geometry, shadow-box depth, and safe lighting effects, artists can create a piece that feels intense without being dangerous, handmade without looking amateur, and dramatic without requiring anything more exotic than paper, glue, and patience.
The beauty of this theme is its flexibility. Beginners can create a layered wall piece. Advanced makers can build a full low-poly sculpture. Designers can push it toward gothic décor, fantasy art, Halloween displays, music-room accents, or modern paper sculpture. In every version, the same creative principle applies: flat paper becomes dimensional storytelling.
And that is the real spark behind burning skull paper art. It is not about burning paper. It is about making paper burn with personality.


