
Table of Contents >> Show >> Hide
- Why This Cherry Pie Works (A Little Pie Science, But Make It Fun)
- Ingredients
- Equipment You’ll Be Glad You Have
- Step-by-Step: Cherry Pie with a Lattice Crust
- Lattice Crust Tips (So It Looks Like You Meant It)
- Picking Your Cherries: Sour, Sweet, Fresh, Frozen
- Thickener Talk: Tapioca Starch vs. Cornstarch (The Friendly Rivalry)
- How to Avoid a Soggy Bottom (Nobody Wants That)
- Make-Ahead, Storage, and Reheating
- Variations That Still Feel Like “Cherry Pie”
- Troubleshooting (Because Pie Is Delicious Even When It’s Messy)
- Conclusion
Cherry pie is the dessert equivalent of showing up to a party in a perfectly tailored outfit while also bringing snacks. It’s classic, it’s charming, and it somehow tastes like summer even when you bake it in February and the outside world is doing its best impression of a freezer aisle.
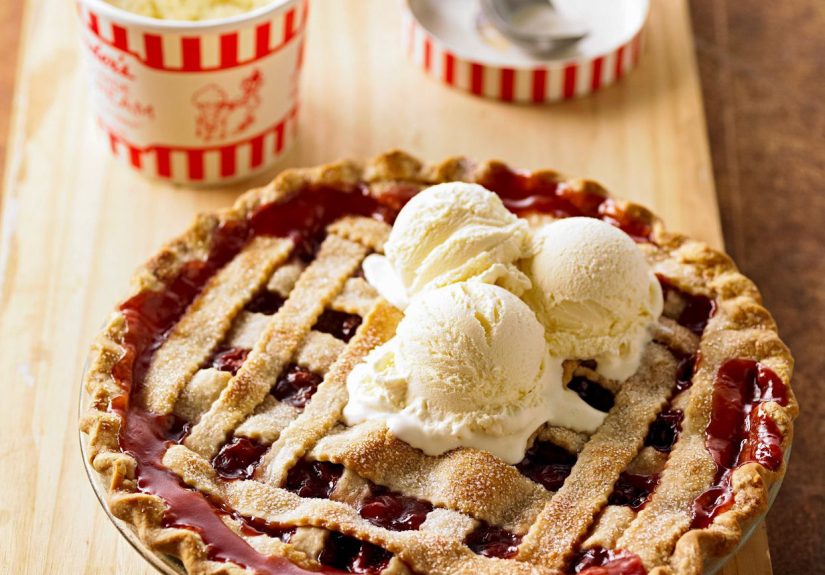
And the lattice crust? That’s not just decorationit’s pie’s way of saying, “Yes, I’m fancy,” while still letting all that ruby filling bubble up and perfume your kitchen like a fruit-scented victory lap. This guide gives you a sliceable, juicy (not soupy) cherry pie with a crisp bottom crust, a flaky top, and step-by-step lattice weaving that won’t make you question your life choices.
Why This Cherry Pie Works (A Little Pie Science, But Make It Fun)
Cherries are basically adorable water balloons with ambition, which is why so many cherry pies turn into “cherry soup with a crust hat.” The secret is balancing fruit + sugar + thickener so the filling sets while the crust bakes through.
In this recipe, we lean on a reliable thickener (hello, tapioca starch) and bake until the filling is genuinely bubbling in the centerbecause a pie that’s only bubbling at the edges is still negotiating its final form.
Ingredients
For the Homemade Pie Crust (Double Crust)
- 2 1/2 cups all-purpose flour
- 1 tablespoon granulated sugar
- 1 teaspoon fine salt
- 1 cup (2 sticks) cold unsalted butter, cut into small cubes
- 6–10 tablespoons ice water (as needed)
For the Cherry Pie Filling
- 5 heaping cups pitted cherries (about 2 pounds whole cherries before pitting; fresh or frozen)
- 2 tablespoons fresh lemon juice
- 1 cup granulated sugar (adjust slightly for very sweet cherries)
- 3/4 teaspoon kosher salt (use less if using table salt)
- 1/3 cup + 1 teaspoon tapioca starch (powdered tapioca starch, not pearls)
Substitution option: cornstarch works too, but see the thickener notes below. - 1 teaspoon vanilla extract (optional, but lovely)
- 1/4 teaspoon almond extract (optional; “bakery flavor” in a bottleuse with a light hand)
For Finishing
- 1 egg (for egg wash)
- 1 egg yolk (for extra shine, optional)
- 1 tablespoon heavy cream or milk
- Coarse sugar for sprinkling (optional, but it sparkles like pie jewelry)
Equipment You’ll Be Glad You Have
- 9-inch pie dish (metal for crispness, or sturdy glass)
- Cherry pitter (optional, but your fingertips will write you thank-you notes)
- Rolling pin
- Pizza cutter or sharp knife (for lattice strips)
- Rimmed baking sheet (for catching drips and boosting bottom browning)
- Foil (for tenting if the crust gets too tan too fast)
Step-by-Step: Cherry Pie with a Lattice Crust
1) Make the Pie Dough
- Mix dry ingredients: In a large bowl, whisk flour, sugar, and salt.
- Cut in the butter: Add cold butter cubes. Use a pastry cutter or your fingers to work butter into the flour until you have a mix of pea-size pieces and some flatter shards (those flakes are future magic).
- Add ice water: Drizzle in 6 tablespoons ice water and toss with a fork. Add more water, 1 tablespoon at a time, until the dough holds together when you pinch it. It should look a little shaggylike it needs coffee, not more flour.
- Divide and chill: Split dough into two discs (one for bottom, one for lattice). Wrap and chill at least 2 hours (or overnight).
2) Prep the Cherries (Fresh or Frozen)
Fresh cherries: Pit them. Taste one. If it’s mouth-puckering tart, you’re in “sour cherry” territory (great for pie). If it’s candy-sweet (like Bing cherries), you may want a tiny bit less sugar and a little extra lemon for balance.
Frozen cherries: Thaw until softened, then drain off excess liquid (save a tablespoon or two if you want to loosen the filling slightly later). Frozen cherries bake beautifully, but they can bring extra moisture to the party.
3) Make the Filling
- In a large bowl, combine pitted cherries, lemon juice, sugar, salt, tapioca starch, vanilla, and (if using) almond extract.
- Toss gently until everything looks evenly coated and glossy. Let it sit for 10 minutes while you roll the doughthis helps the starch hydrate.
4) Roll Out the Bottom Crust
- Lightly flour your counter. Roll one dough disc into a 12-inch circle (about 1/8-inch thick).
- Transfer to your pie dish and ease it into the corners without stretching (stretched dough shrinkslike a waistband after Thanksgiving).
- Chill the lined pie dish while you make the lattice strips. Cold dough = flaky dough.
5) Build the Lattice Top
- Roll the second dough disc into a 12-inch circle. Trim ragged edges, then cut 10–12 strips, about 1/2 to 1 inch wide. (Wider strips are easier; thin strips look fancy but can get dramatic.)
- Pour filling into the chilled bottom crust and spread evenly.
- Lay the first set: Place 5–6 strips across the top of the pie, evenly spaced.
- Weave: Fold back every other strip halfway. Lay one new strip perpendicular across the pie. Unfold the folded strips back over it. Now fold back the opposite set of strips and repeat with another perpendicular strip. Keep going until you have a full woven lattice.
- Seal: Trim excess strip ends. Fold the bottom crust edge up over the strip ends and crimp.
- Chill the whole pie for 20–30 minutes before baking. This helps the lattice hold its shape and stay flaky.
6) Egg Wash + Sugar (Optional, Highly Encouraged)
Whisk egg (and yolk, if using) with cream or milk. Brush lightly over the lattice and crust edge. Sprinkle coarse sugar on top if you want that bakery-case sparkle.
7) Bake Until Bubbling (The Real Finish Line)
- Place a rimmed baking sheet in the oven and preheat to 425°F.
- Put the chilled pie on the hot baking sheet. Bake 20 minutes.
- Reduce oven temperature to 375°F and bake 45–70 minutes, until the crust is golden and the filling is bubbling in the center. If the crust browns too quickly, tent loosely with foil.
- Cool on a rack for at least 4 hours before slicing. This is the difference between clean slices and cherry lava.
Lattice Crust Tips (So It Looks Like You Meant It)
Choose your strip width like you choose your mood
If you want a quick, rustic lattice: cut wider strips (about 1 inch). If you want a delicate, “I have my life together” look: go narrower (about 1/2 inch). Either way, try to keep strips consistent for even baking.
Chill early, chill often
Warm dough is sticky and stressful. Cold dough is cooperative and flaky. If your strips start getting soft, slide them onto a tray and refrigerate for 10 minutes. The pie will wait. It’s not going anywhere. (It’s a pie. It has nowhere to be.)
Picking Your Cherries: Sour, Sweet, Fresh, Frozen
Sour cherries bring bright flavor and that classic pie tang, but they’re seasonal and sometimes hard to find. Sweet cherries (like Bing) make a fantastic pie toojust balance them with lemon juice and don’t go overboard on sugar.
Frozen cherries are a year-round lifesaver. They’re already pitted, which is basically a love letter from your grocery store. Just remember: more liquid may drain out, so plan to thaw and drain to keep the filling thick and sliceable.
Thickener Talk: Tapioca Starch vs. Cornstarch (The Friendly Rivalry)
If you’ve ever sliced into a pie and watched it immediately turn into a sauce situation, you’ve met the “not enough thickener / not baked long enough” problem. Tapioca starch is famous for creating a clear, silky filling that sets well without turning cloudy or gummy.
If using cornstarch: It can work, but it doesn’t always love long baking times. If it’s your only option, use it confidentlybut bake until the center is bubbling, and consider cooling overnight for the cleanest slices.
How to Avoid a Soggy Bottom (Nobody Wants That)
Use the right pan and the right heat
A metal pie pan can help the bottom crust bake more evenly and crisp up faster. Baking on a preheated sheet pan (or stone/steel) also boosts bottom browning, because the pie starts with a blast of heat where it needs it most.
Don’t pull the pie too early
The filling needs to bubble in the center to fully activate the thickener and drive off excess moisture. If the center isn’t bubbling, the pie isn’t doneno matter how charming the crust looks.
Optional “insurance policy” layer
If your cherries are extra juicy, you can sprinkle a thin layer of fine cookie crumbs (like graham crackers) or ground nuts on the bottom crust before adding filling. It’s a subtle moisture buffer, not a weird surprise.
Make-Ahead, Storage, and Reheating
- Make-ahead dough: Keep wrapped dough in the fridge up to 2–3 days, or freeze up to 3 months.
- Make-ahead pie: You can assemble the whole pie and refrigerate it for a few hours before baking (great for holidays).
- Storage: Keep pie at room temperature for a day, or refrigerate for up to 4–5 days for best texture.
- Reheating: Warm slices in a 300°F oven so the crust stays crisp (microwave works, but the crust will get… emotionally soft).
Variations That Still Feel Like “Cherry Pie”
Cherry-almond (the bakery classic)
Add 1/4 teaspoon almond extract to the filling. That’s enough to bring out cherry’s natural almondy notes without tasting like you dumped perfume in dessert.
Cherry-lemon “brighter than my future”
Add extra lemon zest for a more citrusy popespecially good with sweet cherries.
Cherry + warm spices
A pinch of cinnamon or cardamom is cozy without turning the pie into “holiday-only.”
Troubleshooting (Because Pie Is Delicious Even When It’s Messy)
My filling is runny
Most likely: the pie didn’t bake long enough, or it was sliced while still warm. Next time, bake until the center bubbles and cool completely.
My lattice slid or melted
Dough was too warm. Chill the strips and the whole assembled pie before baking. Cold dough holds shape better and bakes flakier.
My crust is too dark but the filling isn’t bubbling yet
Tent with foil and keep baking. The filling sets when it bubbles; the crust can be protected.
Conclusion
A great cherry pie with a lattice crust is equal parts comfort food and edible confidence. Keep the dough cold, use a thickener that plays nice with fruit, bake until the center bubbles, and let it cool like it’s doing a spa day. Do that, and your slices will stand tallno spoon required (unless you want ice cream, which is always a valid life choice).
My Cherry Pie Field Notes (500-ish Words of Real-Life Experience)
The first time I made a lattice crust, I approached it with the same energy as assembling IKEA furniture without the instructions: optimism, denial, and a faint sense that I might end up crying into a pile of parts. My strips were uneven, my “weave” looked like it had been designed by a distracted squirrel, and I still proudly carried the pie to the table like it was the Mona Lisa.
Here’s what I learned: lattice is not about perfectionit’s about rhythm. Cut the strips, line them up, and start weaving like you’re braiding hair (or, if you can’t braid hair, like you’re pretending you can braid hair). The trick that changed everything was chilling. If your kitchen is warm or you’ve been handling dough for a while, the strips start getting floppy. Floppy dough is the gateway drug to frustration. Now, if anything feels soft, I pop the whole setup into the fridge for 10 minutes. It’s amazing how quickly a pie can go from “unruly craft project” to “cooperative pastry.”
Pitting cherries is its own adventure. If you don’t have a cherry pitter, you can use a straw or chopstick, but be prepared: cherry juice has a personality. It will decorate your cutting board, your hands, and possibly your shirtspecifically the shirt you like. I now pit cherries wearing something dark, like I’m preparing for a culinary heist.
I’ve also learned that the most important moment is not when you pull the pie out of the oven. It’s the four hours after that. Cooling feels like a scam because the pie smells incredible and the crust is crackly and the filling is audibly plotting deliciousness. But slicing too early turns your careful thickener choices into a cherry slip ’n slide. The first time I waited the full cool-down, I got clean slices with that jewel-toned filling holding its shape, and I swear I heard angels… or maybe it was just my family saying, “Wow, you finally did it.”
One more thing: bubbling in the center is non-negotiable. I used to pull pies when the edges bubbled, because the crust looked “done.” Then I wondered why the middle was runny. Now I bake until the center is actively bubbling and the pie looks like it’s gently simmering with pride. If the crust browns too quickly, foil is your friend. Think of it as sunglasses for pastry.
Finally, the best part of lattice pie is that it forgives you. A slightly crooked weave? Rustic. A few broken strips? Artistic flair. A little leaked filling caramelized on the pan? Chef’s treat. And when you serve a warm slice with vanilla ice cream, nobody is grading your geometry anywaythey’re busy being happy.


