
Table of Contents >> Show >> Hide
- Why a Scrapbook Paper USA Map Is Such a Good DIY Project
- What You Need
- Choosing the Right Paper and Base
- Planning Your Design Before You Glue Anything
- How to Make a DIY USA Map Out of Scrapbook Paper
- Creative Upgrades That Make the Map Feel Special
- Common Mistakes to Avoid
- Where to Use a Scrapbook Paper USA Map
- The Experience of Making a DIY USA Map Out of Scrapbook Paper
- Final Thoughts
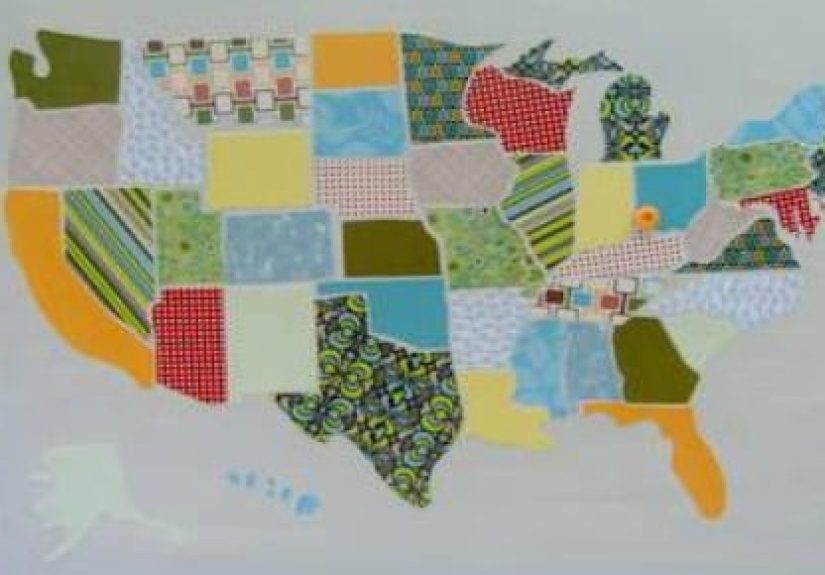
If you have ever looked at a blank wall and thought, “You know what this room needs? A giant patriotic geography craft with excellent color coordination,” then congratulations: this project is your moment. A DIY USA map out of scrapbook paper is equal parts wall art, conversation starter, and crafty excuse to buy paper you absolutely did not need but absolutely deserved.
This project turns ordinary scrapbook paper into something personal and surprisingly polished. You can make it bright and playful for a kid’s room, classic and vintage for an office, or modern and minimalist for a hallway that has been begging for a personality transplant. Better yet, it is customizable. You choose the color palette, the backing, the finish, and whether your map looks like a charming handmade keepsake or something that casually whispers, “Yes, I am creative, thanks for noticing.”
Why a Scrapbook Paper USA Map Is Such a Good DIY Project
A scrapbook paper USA map checks a lot of boxes at once. It is affordable, beginner-friendly, visually striking, and flexible enough for almost any decor style. Scrapbook paper comes in endless patterns, from florals and gingham to vintage postcards, stars, stripes, and subtle neutrals. That means you can give each state its own look or create a more cohesive design by sticking to one palette.
It is also a project with built-in meaning. Some people use different papers to represent places they have lived, traveled, or hope to visit. Others color-code regions, add labels, or pin family roots onto the finished piece. In a classroom or playroom, the map becomes educational decor. In a home office, it can feel both personal and polished. In a living room, it tells guests you have excellent taste and possibly a healthy obsession with paper trimmers.
What You Need
Basic Supplies
- A USA map template or printable outline
- Scrapbook paper or cardstock in assorted colors and patterns
- Scissors and/or a craft knife
- A ruler and pencil
- A cutting mat or protected work surface
- Glue stick, craft glue, or decoupage medium
- A backing surface such as foam board, canvas, plywood, poster board, or framed mat board
- Optional sealer or topcoat for durability
- Optional frame, labels, pins, or embellishments
If you want cleaner cuts, a paper trimmer is a smart addition, especially when trimming background sheets or creating borders. If you own a cutting machine, you can also cut state shapes digitally. That is especially helpful if you want crisp edges without hand-cutting fifty states and having a mild emotional event around Michigan.
Choosing the Right Paper and Base
Scrapbook paper is the star of the show, but not all paper behaves the same way. Lightweight paper is easy to cut and layer, but it can wrinkle more easily if you use too much glue. Heavier cardstock gives a sturdier finish and often feels more substantial on a wall piece. If your design includes lots of tiny state pieces, choose papers with patterns that still look good when cut small. A huge cabbage rose print might be gorgeous on a full sheet and then turn into one mysterious leaf inside Rhode Island.
Your base matters too. If you want the project to feel like wall art, mount it on a rigid surface such as wood, canvas board, or foam board. If you want something quick and lightweight, poster board works fine. If you plan to frame it, mat board or a flat backing cut to fit your frame can save time later. For a rustic style, a wood base looks great. For a cleaner, gallery-style finish, white or black backing creates strong contrast.
Planning Your Design Before You Glue Anything
The secret to a beautiful DIY USA map is simple: plan first, stick later. Start by deciding on your look. Do you want every state to be a different pattern? Do you want one color family, like blues and greens, for a coastal vibe? Do you want red, white, and blue without making it look like fireworks exploded in a craft store? All valid questions.
Here are a few popular design directions:
- Classic Americana: gingham, stripes, stars, faded reds, dusty blues
- Modern Minimalist: black, white, gray, kraft paper, and muted solids
- Vintage Travel: map prints, ticket motifs, old book pages, sepia florals
- Kids’ Room Brights: rainbow colors, polka dots, playful prints
- Seasonal or Holiday: autumn tones, winter metallics, summer florals
Print or trace a map template and do a dry layout before attaching anything. This is the moment to rearrange colors, balance patterns, and make sure neighboring states do not blend together. If Alabama and Georgia look like twins who borrowed each other’s outfits, swap one paper out before glue enters the chat.
How to Make a DIY USA Map Out of Scrapbook Paper
Step 1: Print or Transfer the Template
Choose a USA map template in the size you want. You can print a full map, print individual states, trace from a projection, or use a cutting machine file. If you are mounting on wood or canvas, lightly sketch placement lines on the backing so you do not end up with a map that slowly drifts west by three inches.
Step 2: Trace the States onto the Paper
Turn each scrapbook sheet face down and trace the state outline onto the back. Label each piece as you go. This sounds obvious until you are holding a tiny paper shape and asking yourself whether it is Vermont or a particularly dramatic crumb.
Step 3: Cut Carefully
Use sharp scissors for larger shapes and a craft knife for intricate edges. Work slowly around narrow sections and corners. If a state is too tiny or detailed to cut perfectly, simplify the edge just a bit. No one is going to inspect Delaware with a magnifying glass unless you have invited a very specific kind of guest.
Step 4: Arrange the Full Map
Lay every state out on your backing before gluing. Use a reference map to check spacing and region placement. This is where the project starts to feel real, and also where you discover that Alaska and Hawaii are the roommates of map decor: never in the main arrangement, but still very important.
Step 5: Adhere the Pieces
Attach each state one at a time. If you are using a decoupage medium or wet glue, apply a thin, even layer rather than a thick blob. Smooth from the center outward to reduce air bubbles and wrinkles. If you are using a glue stick or double-sided adhesive for paper-on-paper mounting, press firmly and evenly.
Step 6: Seal or Finish
If your map will be handled a lot or hung in a busy area, add a topcoat or sealer. A matte finish keeps the look soft and paper-like, while gloss adds more color intensity. Let everything dry completely before framing or hanging. Rushing this part is how you end up leaving fingerprints in North Dakota forever.
Creative Upgrades That Make the Map Feel Special
Add Labels or Dates
You can label states by hand, add a small legend, or note memorable trips and moves. A few tasteful details go a long way. The key word here is tasteful. You want “meaningful keepsake,” not “conspiracy evidence board.”
Use Push Pins or String
Turn your map into interactive decor by adding pins for trips, relatives, national parks, or future vacations. This works especially well on a cork-backed version.
Frame It
A frame instantly elevates the finished piece. Even a simple thrifted frame can make the project look intentional and expensive. Large maps also look great mounted on canvas or wood with painted edges if you prefer a frameless style.
Create a Theme
Try one paper collection for the whole map, or assign patterns by region. You can also use scrapbook paper that reflects destinations: beach prints for coastal states, forest patterns for the Pacific Northwest, desert tones for the Southwest, and so on.
Common Mistakes to Avoid
- Using too much glue: This is the fastest route to wrinkles, warping, and craft regret.
- Skipping the dry layout: If you glue first and arrange later, chaos will gladly assist.
- Choosing overly busy prints for tiny states: Small shapes need patterns that still read clearly.
- Ignoring contrast: Neighboring states should not disappear into each other.
- Forgetting the finish: Sealing, framing, or cleanly mounting the piece is what takes it from homemade to home decor.
Where to Use a Scrapbook Paper USA Map
This project works in more rooms than you might expect. In a nursery, it feels sweet and educational. In a kid’s room, it can grow into a travel tracker. In a classroom, it becomes decor with a side of learning. In an entryway or hallway, it turns dead wall space into a real focal point. In a home office, it brings personality without feeling cluttered. It also makes a thoughtful handmade gift for teachers, newlyweds, military families, road-trippers, and anyone who enjoys geography or sentimental decor.
The Experience of Making a DIY USA Map Out of Scrapbook Paper
One of the best parts of this project is that it does not feel like a race. It feels like an afternoon with a purpose. You start with a stack of scrapbook paper, a blank backing board, and the smug confidence of someone who thinks cutting out all fifty states will be “pretty quick.” Then five minutes later, you are deeply invested in whether Tennessee deserves stripes or florals. That is when you know the craft has officially taken over, in the best possible way.
There is something oddly satisfying about matching papers to places. You might pick ocean blues for the coasts, earthy prints for the mountain states, warm oranges for the Southwest, and classic gingham for the Midwest. Or maybe you go full chaos goblin and choose whatever paper makes your heart happy. Either way, the project starts to feel personal fast. A DIY USA map out of scrapbook paper is not just about making decor. It is about building a small visual story, one state at a time.
It is also a project that invites memory. Maybe you choose a paper because it reminds you of a family trip. Maybe one pattern looks like your grandmother’s kitchen curtains, so it absolutely has to become Kansas. Maybe you mark the states where you have lived, studied, or visited, and suddenly the map becomes more than wall art. It becomes a timeline in disguise. Guests do not just say, “That looks nice.” They say, “Wait, why is Colorado covered in tiny lemons?” and then you get to tell the story. That is decor working overtime.
There is a peaceful rhythm to the process too. Trace, cut, arrange, adjust, glue, smooth. Repeat. It is one of those crafts that is just structured enough to feel productive and just creative enough to be relaxing. You can make it while listening to music, a podcast, or a show you have already seen three times. Some projects demand total concentration. This one lets you settle in and enjoy yourself, with only the occasional side quest into “how small can a piece of patterned paper get before I lose it forever?”
The finished map also has a different kind of charm than store-bought art. It is not perfect in the sterile, machine-made sense, and that is exactly why it works. The tiny variations in cutting, the hand-picked paper combinations, the choice of background, the little label in the corner, all of those things make it feel alive. It looks curated, but it also looks human. In a world full of mass-produced decor, that matters.
And then there is the moment when you hang it up. Suddenly the pile of paper scraps, pencil marks, and scattered state pieces has turned into something bold and cohesive. It fills the wall. It changes the room. It looks like a project you planned, not just one you tried. That is a very satisfying reveal. A scrapbook paper USA map has a way of making a space feel more personal, more layered, and more yours. It says you care about home, stories, and maybe color palettes a little more than the average person, which frankly sounds like excellent character development.
If you are looking for a craft that is affordable, customizable, and genuinely fun to make, this one delivers. It gives you creative freedom without requiring elite art skills, and the result feels special enough to keep for years. Not bad for paper, glue, and a willingness to negotiate with the shape of Maryland.
Final Thoughts
A DIY USA map out of scrapbook paper is the kind of project that punches above its weight. It is simple enough for beginners, customizable enough for experienced crafters, and stylish enough to earn real wall space. You can make it educational, sentimental, modern, rustic, colorful, or clean. You can use it to celebrate travel, family roots, favorite places, or just your excellent eye for pattern mixing.
Most importantly, it is fun. Not fake-fun, “team-building exercise” fun. Real fun. The kind where you start with paper and end up with art that means something. And in the grand kingdom of DIY, that is a very solid win.


