
Table of Contents >> Show >> Hide
- Why Build Your Own Step Stool?
- Quick Safety Notes (Read Before You Build)
- Project Overview: A Sturdy One-Step Wooden Step Stool
- Materials and Hardware
- Tools You’ll Need
- Cut List (Use This Like a Shopping Recipe)
- Step-by-Step: How to Build a Step Stool
- Step 1: Plan for Stability (Don’t Skip This)
- Step 2: Prep and Label Your Pieces
- Step 3: Build the Apron Frame
- Step 4: Attach the Legs
- Step 5: Add Corner Blocks (Optional, But “Feels Like a Tank”)
- Step 6: Attach the Top
- Step 7: Make It Foot-Friendly (Round Edges + Sand)
- Step 8: Add Anti-Slip and Floor Protection
- Step 9: Finish (Paint, Stain, or Clear Coat)
- Upgrades and Variations (Choose Your Adventure)
- Quality Checks: How to Know Your Stool Is Actually Safe
- Common Mistakes (And How to Avoid Them)
- FAQ
- Real-World Build Notes: of “I Wish Someone Told Me This”
- 1) The stool isn’t “wobbly,” your floor is… and also your stool might be wobbly
- 2) Straight lumber is a superpower
- 3) Glue is not optional (when it’s a “standing-on-it” project)
- 4) “I’ll sand later” is the origin story of splinters
- 5) Non-slip traction is what makes the stool feel confident
- 6) Paint is easy; paint that lasts is a system
- Conclusion
If your kitchen cabinets have a “top shelf” that doubles as a long-term storage facility for mystery appliances (hello, waffle iron you used twice), a step stool is the peace treaty between you and gravity. The good news: building a sturdy wooden step stool is a beginner-friendly woodworking project that can look great, feel rock-solid, and cost less than a store-bought version that wobbles like a baby deer.
This guide walks you through a simple, strong DIY step stool you can build in an afternoonplus upgrades like non-slip traction, a carry handle, and a two-step option. And because safety beats bravado: if you’re under 18, have a parent/guardian or experienced adult handle the cutting and drilling (or ask the lumber desk to cut pieces for you). You’ll still get the “I built this” bragging rightswithout the “I also built a bandage collection” subplot.
Why Build Your Own Step Stool?
- Custom height and footprint: Make it fit your space (bathroom, pantry, closet, kid’s room).
- Better stability: Wider base, stronger joints, and grippy feet = less wobble.
- Looks like furniture, not a utility prop: Paint it, stain it, or make it match your cabinets.
- Skill-builder project: Measuring, squaring, fastening, sanding, finishingthe greatest hits of beginner woodworking.
Quick Safety Notes (Read Before You Build)
- Adult supervision for power tools: Cutting wood and drilling can be dangerous. If you’re a teen, have an adult do those steps.
- Wear eye protection when drilling, sanding, or cutting.
- Don’t “test” it dramatically: Step stools aren’t trampolines. Load-test slowly on a flat surface.
- Not a ladder substitute: A DIY wooden stool is not certified like commercial step ladders. Build conservatively and inspect often.
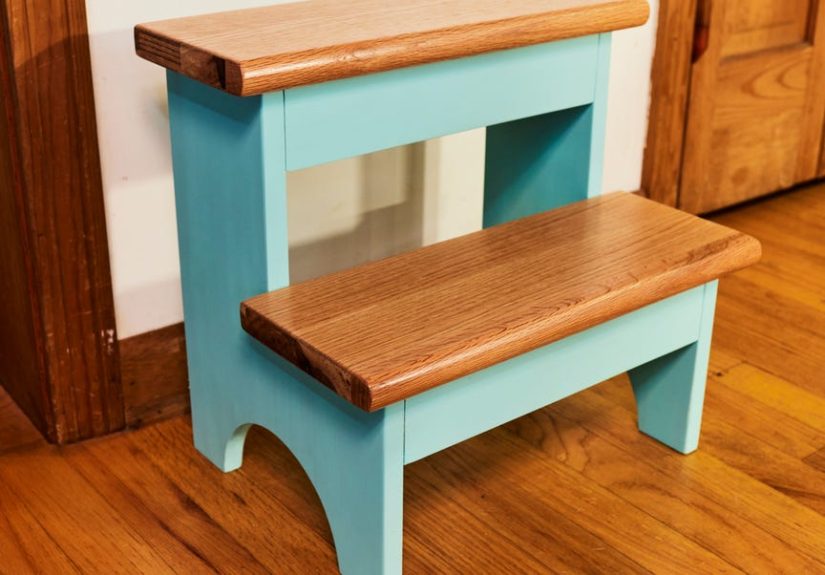
Project Overview: A Sturdy One-Step Wooden Step Stool
This plan makes a compact, stable stool that’s great for everyday indoor use. The design is a classic “apron-and-legs” build (like a tiny table), which is naturally sturdy when glued and fastened correctly.
Recommended Finished Size
- Height: ~8 3/4 inches (comfortable “boost” without feeling tall)
- Top platform: 16 inches x 12 inches (roomy for adult feet)
- Base footprint: about 14 inches x 10 inches (helps stability)
Materials and Hardware
You can use pine for budget builds, poplar for smoother paint results, or hardwood (oak/maple) for a “forever” stool. A 3/4-inch top is the sweet spot for stiffness.
Lumber
- Top: 3/4″ plywood or a glued-up hardwood panel, 16″ x 12″
- Legs: 2×2 stock (or rip a straight 2×4), four pieces at 8″
- Aprons (side rails): 1×4 boards (actual ~3/4″ x 3 1/2″)
- Corner blocks (optional but recommended): scrap 3/4″ wood
Fasteners + Finishing Supplies
- Wood glue
- Wood screws: 1 1/4″ (for top) and 1 5/8″–2″ (for aprons/legs)
- Wood filler (paint-grade) or stainable putty (stain-grade)
- Sandpaper: 120, 180, 220 grit
- Non-slip tape or traction pads
- Rubber feet, felt pads, or nail-on furniture glides (choose based on flooring)
- Paint + primer or stain + clear coat (polyurethane or water-based topcoat)
Tools You’ll Need
If you want the simplest path, have the store cut lumber to length and focus at home on assembly and finishing.
Basic Tools
- Tape measure and pencil
- Combination square (for crisp, accurate marks)
- Drill/driver + drill bits
- Clamps (helpful, not mandatorybut very nice)
- Sander (or sanding block)
Optional Tools (Nice Upgrades)
- Pocket-hole jig (fast, strong joinery)
- Jigsaw (for handle cutout or rounded corners)
- Router or sandpaper for rounding edges
Cut List (Use This Like a Shopping Recipe)
Tip: Pick straight boards. A twisted 2×4 can turn your step stool into a tiny rocking chaircute, but not the goal.
| Part | Material | Qty | Dimensions (Thickness x Width x Length) |
|---|---|---|---|
| Top | 3/4″ plywood or hardwood panel | 1 | 3/4″ x 12″ x 16″ |
| Legs | 2×2 stock | 4 | 1 1/2″ x 1 1/2″ x 8″ |
| Long aprons | 1×4 | 2 | 3/4″ x 3 1/2″ x 11″ |
| Short aprons | 1×4 | 2 | 3/4″ x 3 1/2″ x 7″ |
| Corner blocks (optional) | Scrap 3/4″ wood | 4 | Triangles ~3″ legs |
Step-by-Step: How to Build a Step Stool
Step 1: Plan for Stability (Don’t Skip This)
A safe step stool needs a wide stance and square assembly. Keep these rules in mind:
- Wider base = less tipping. Our 14″ x 10″ footprint is stable for most indoor uses.
- Legs must sit flat. If one leg floats, your stool will wobble foreverlike a curse.
- Glue + fasteners beat fasteners alone. Wood glue adds real strength when joints fit well.
Step 2: Prep and Label Your Pieces
Lay everything out and label parts with pencil: “Long apron,” “Short apron,” etc. It sounds extra… until you put a short apron where a long apron goes and invent new vocabulary.
Step 3: Build the Apron Frame
You’re making a rectangle that the legs attach tothink “mini table skirt.” Choose one joinery method:
Option A: Pocket-Hole Joinery (Fast + Strong)
- Drill pocket holes in the ends of each apron (two holes per end).
- Dry-fit the frame: long aprons on the outside, short aprons between them.
- Add glue to the joints, clamp if possible, then drive pocket-hole screws.
Option B: Screws Through the Aprons (No Jig Needed)
- Pre-drill and countersink two holes at each joint to prevent splitting.
- Glue the joint, clamp, then drive screws through the long aprons into the ends of the short aprons.
Pro tip: Measure corner-to-corner diagonally. If both diagonals match, your frame is square.
Step 4: Attach the Legs
- Stand a leg inside each corner of the frame.
- Make sure each leg is flush with the top edge of the apron frame.
- Glue the contact surfaces.
- Fasten:
- If you used pocket holes, drive screws from inside the aprons into the legs.
- If not, pre-drill and screw through the aprons into each leg (two screws per apron-to-leg connection).
Step 5: Add Corner Blocks (Optional, But “Feels Like a Tank”)
Corner blocks dramatically stiffen the stool and reduce racking (that side-to-side wiggle). Glue and screw a triangle block into each inside corner, tucked under the top edge.
Step 6: Attach the Top
- Center the top so it overhangs evenly (about 1″ on all sides is a nice look).
- Pre-drill 6–8 pilot holes through the top into the aprons (avoid drilling into leg corners).
- Add a thin bead of glue along the top edge of the aprons.
- Drive 1 1/4″ screws to secure the top.
Step 7: Make It Foot-Friendly (Round Edges + Sand)
Sharp corners on a step stool are basically tiny grudges waiting to happen. Lightly round the top edges (sandpaper works fine), then sand everything smooth:
- 120 grit to remove roughness
- 180 grit to refine
- 220 grit for a finish-ready surface
Step 8: Add Anti-Slip and Floor Protection
- Top traction: Apply non-slip tape strips or pads where feet land. A checkerboard pattern looks fun and adds grip.
- Bottom feet: Rubber feet help prevent sliding; felt pads protect hardwood floors but can slide more on tile. Choose what matches your home.
Step 9: Finish (Paint, Stain, or Clear Coat)
Finishing isn’t just for looksit helps with cleaning and moisture resistance.
- Paint: Prime first (especially on pine), then apply 2 light coats. Seal with a durable topcoat if it’s a high-use stool.
- Stain: Use a pre-stain conditioner on softwoods, then stain, then seal.
- Clear coat: Water-based poly dries fast and stays clear; oil-based poly adds warmth but takes longer.
Upgrades and Variations (Choose Your Adventure)
Add a Carry Handle
Mark a centered handle slot on the top (about 4″–5″ long), drill starter holes, then cut with a jigsaw (adult-supervised). Sand the inside edges smooth so it’s comfy to carry.
Make a Two-Step Stool (For Taller Tasks)
If you routinely reach high shelves, a two-step stool is more comfortable than balancing on a single step like a cautious flamingo. A popular two-step approach uses two rectangular frames connected with angled legs/supports for stability, then capped with step boards for wide treads.
Use Hardwood for a “Lifetime” Stool
Oak or maple is tougher than pine and resists dents, but it’s harder to cut and drill. If you want a premium look, hardwood is worth itjust take your time on sanding and finishing.
Make It Kid-Friendly
- Increase the top traction area (kids step fast, like they’re late for a meeting).
- Round all edges more aggressively.
- Consider slightly wider footprint for extra stability.
Quality Checks: How to Know Your Stool Is Actually Safe
- Flat test: Set it on a hard, flat floor. If it rocks, identify the high leg and sand that foot lightly (small adjustments only).
- Joint check: Grab the top and try to twist gently. There should be minimal racking.
- Progressive load test: Press down with your hands, then one foot, then full weight slowly. No drama. No jumping.
- Traction check: Step with socks. If it feels slippery, add more anti-slip pads.
Common Mistakes (And How to Avoid Them)
1) Skipping pilot holes
Pre-drilling prevents splitsespecially near ends of boards. Splits reduce strength and look sad.
2) Using warped lumber
If boards are bowed or twisted, your assembly fights you the entire way. Choose straight pieces at the store.
3) Forgetting the “comfort” details
Rounded edges, smooth sanding, and grippy top surfaces are what separates “DIY project” from “actual furniture.”
4) Over-tightening screws
Driving screws like you’re trying to win a contest can strip the wood. Snug is good. Crushed fibers are not.
FAQ
What’s the best wood for a DIY step stool?
Pine is budget-friendly and easy to work with. Poplar paints beautifully. Oak/maple are durable hardwood choices for heavy daily use.
How tall should a step stool be?
For most homes, 8–10 inches works well for reaching kitchen cabinets and bathroom storage. Taller projects are often better served by a purpose-built, rated step ladder.
Can I build a step stool without power tools?
Yesespecially if the store cuts lumber for you. Assembly can be done with a drill/driver, clamps, and sanding tools.
How much weight can a wooden step stool hold?
It depends on design, materials, and joinery quality. Commercial step ladders and stools are often rated by duty class (commonly 200–300+ lbs depending on type), but a DIY wooden stool isn’t certifiedso build conservatively, use strong joints, and test carefully on a flat surface.
Real-World Build Notes: of “I Wish Someone Told Me This”
Below are the kinds of lessons people learn the fun waymeaning the way that includes re-doing something, buying a second can of paint, and briefly questioning whether cabinets were invented purely to humble us. These are common experiences DIYers report when building a step stool, collected from the usual patterns that show up in beginner woodworking projects.
1) The stool isn’t “wobbly,” your floor is… and also your stool might be wobbly
Sometimes the first test happens on a slightly uneven tile line or a textured floor. Try it on a flat surface (like a garage slab) before you panic. If it still rocks, the fix is usually small: lightly sand one foot, or add better feet. The mistake DIYers make is “correcting” too aggressivelysanding down a leg by a lot. Tiny changes. Re-test often. Think “sneaking up on perfect,” not “chainsaw sculpting.”
2) Straight lumber is a superpower
People often learn this after assembling a frame that looks square-ish… until the top goes on and suddenly everything reveals its true personality. Picking straight boards at the store saves you from fighting twist, bow, and warp later. The usual experience: you’ll clamp harder, tighten screws more, and still feel like wood is gaslighting you. It’s not you. It’s the board.
3) Glue is not optional (when it’s a “standing-on-it” project)
A step stool takes repeated stressespecially side-to-side racking when you step up or step down. DIYers who skip glue often report that the stool feels fine on day one, then loosens over time. Glue plus screws (or pocket holes) creates a much stronger joint than screws alone. The best habit: dry-fit first, then glue, clamp, and fasten.
4) “I’ll sand later” is the origin story of splinters
Lots of people get excited after assembly and rush to paint or stain. Then they realize their top edge is basically a cheese grater. If you sand before finishingand round the edges a littlethe stool feels more professional. The most common “wish I did this earlier” moment is after the first use, when someone says, “Ouch… the corner.”
5) Non-slip traction is what makes the stool feel confident
DIYers are often surprised how much difference traction tape or pads make, especially in socks or in a bathroom. Even a beautifully built stool can feel sketchy if the top is slick. One of the most repeated experiences is: after adding traction, the stool suddenly feels “done,” not “temporary.”
6) Paint is easy; paint that lasts is a system
When people complain that paint scuffs, it’s usually because primer was skipped, coats were too thick, or the stool wasn’t fully cured before use. The real-life move: thin coats, adequate dry time, and a protective topcoat if it’s high traffic. It’s less dramatic than rushing, but it avoids the “why is it peeling already?” moment.
If you build this stool and it ends up living in your kitchen forever, congratsyou’ve joined the proud tradition of DIY projects that get used daily and silently make life easier. That’s the best kind of woodworking: practical, sturdy, and slightly smug (in a healthy way).
Conclusion
Learning how to build a step stool is one of the most satisfying beginner woodworking wins: it’s fast, useful, and easy to customize. Focus on stable proportions, strong joinery (glue plus screws), smooth edges, and a non-slip top. Do those things and you’ll end up with a DIY wooden step stool that looks good, feels secure, and saves you from the dangerous sport of “tiptoe cabinet surfing.”


