
Table of Contents >> Show >> Hide
- Why Cover a Subwoofer Box?
- Best Materials for Covering a Subwoofer Box
- Tools and Supplies You Will Need
- Step 1: Remove the Subwoofer and Hardware
- Step 2: Prepare the Box Surface
- Step 3: Plan Your Seam Placement
- Step 4: Measure and Cut the Covering Material
- Step 5: Apply Adhesive the Right Way
- Step 6: Start Wrapping the Main Panel
- Step 7: Handle Corners Like a Pro
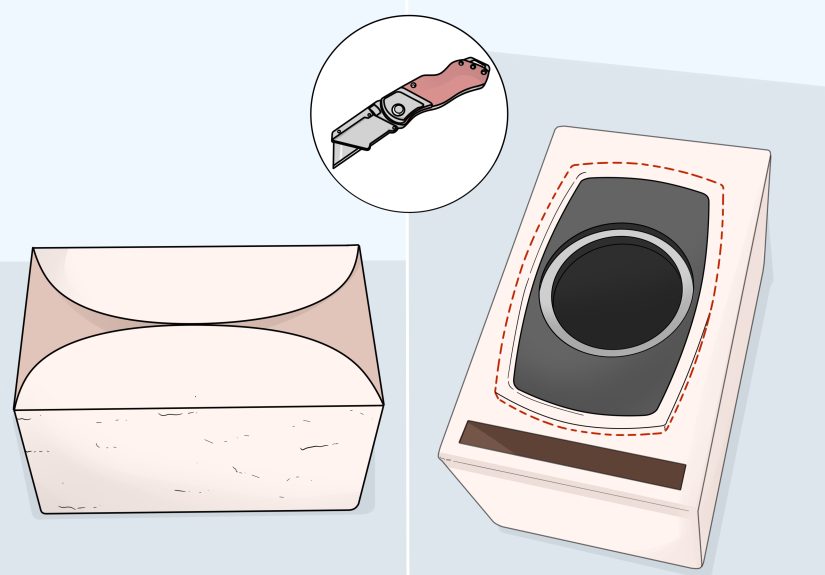
- Step 8: Trim Speaker Holes and Terminal Openings
- Step 9: Add Side Pieces or Finish the Hidden Seam
- Step 10: Reinstall the Subwoofer and Hardware
- Common Mistakes to Avoid
- Carpet vs. Vinyl vs. Coating: Which Is Best?
- Maintenance Tips After Covering a Subwoofer Box
- Real-World Experience: Lessons From Covering Subwoofer Boxes
- Conclusion
- SEO Tags
Covering a subwoofer box is one of those DIY car audio jobs that looks simple until the carpet sticks to your elbow, the corner wrinkles like a confused potato chip, and your garage suddenly smells like “industrial enthusiasm.” The good news? With the right material, adhesive, prep work, and a little patience, you can turn a raw MDF enclosure into a clean, durable, professional-looking sub box that blends into your trunk, cabin, shop, or custom build.
Whether you are restoring an old enclosure, finishing a brand-new custom subwoofer box, or trying to make a plywood cube look less like it escaped from a high school woodshop, this guide walks you through the full process. We will cover carpet, vinyl, paint-style coatings, adhesive choices, measuring, cutting, wrapping, seams, corners, mistakes, and real-world tips that save time, money, and possibly your vocabulary from several dramatic new words.
Why Cover a Subwoofer Box?
A subwoofer box is more than a wooden container for bass. It protects the speaker, supports proper sound performance, and becomes part of the vehicle or room visually. Covering the enclosure helps protect raw MDF or plywood from scuffs, moisture, dust, and everyday abuse. In a vehicle, the box may slide against cargo, get bumped by tools, or collect every crumb known to civilization. A proper covering gives the box a finished look and helps it survive life outside the showroom.
The most common finish is speaker box carpet because it is affordable, flexible, easy to cut, and forgiving around corners. Vinyl offers a more premium custom upholstery look, while textured coating can create a rugged, modern finish. The best choice depends on your budget, skill level, style, and how much punishment the enclosure will take.
Best Materials for Covering a Subwoofer Box
Speaker Box Carpet
Speaker box carpet is the classic option for car audio enclosures. It is usually thin, stretchable, and designed to wrap around box shapes without fighting back too much. Many products are latex-backed or made from durable automotive-style fabric. Black, charcoal, gray, and trunk-matching colors are common. Carpet hides small imperfections well, which makes it ideal for first-time DIY installers.
If your box has uneven screw holes, small sanding marks, or slightly imperfect edges, carpet is your friend. It is the sweatpants of subwoofer finishes: practical, forgiving, and surprisingly respectable when done right.
Vinyl Upholstery
Vinyl gives a cleaner, more custom look. It works well for show builds, beauty panels, false floors, and enclosures that are visible inside the cabin. The downside is that vinyl reveals mistakes more easily than carpet. Every bump, hard corner, glue ridge, or trapped air bubble can show through. For vinyl, surface prep matters a lot. Round sharp edges, fill screw holes, sand carefully, and use a high-temperature upholstery adhesive when the box will live in a hot vehicle.
Textured Coating or Paint
Textured speaker enclosure coating, bed-liner-style coating, or durable paint can be great for utility builds. This option works especially well for boxes in trucks, garages, workshops, and vehicles where cargo abuse is expected. Paint-style finishes require sealing and sanding the MDF first because raw MDF edges soak up finish like a sponge at a water park.
Self-Adhesive Trunk Liner
Some trunk liner and speaker box carpet products come with adhesive backing. These can be convenient for smaller projects, quick repairs, and simple flat panels. However, for high-heat environments or long-term durability, many installers still prefer using dedicated spray adhesive or contact adhesive, especially around edges and seams.
Tools and Supplies You Will Need
- Speaker box carpet, vinyl, trunk liner, or coating
- Spray adhesive, upholstery adhesive, or contact cement
- Utility knife with fresh blades
- Sharp scissors
- Measuring tape
- Straight edge or ruler
- Marker, chalk, or painter’s tape
- Sandpaper or sanding block
- Shop vacuum or clean cloth
- Roller, plastic squeegee, or clean towel
- Staple gun for hidden reinforcement, optional
- Respirator or dust mask, gloves, and eye protection
Do not underestimate the value of fresh blades. A dull utility knife turns clean carpet trimming into a tug-of-war with fabric. Fresh blades cut cleaner seams, reduce fraying, and make you look much more skilled than you may feel during your first attempt.
Step 1: Remove the Subwoofer and Hardware
Before covering the box, remove the subwoofer, speaker terminals, grilles, feet, handles, brackets, and anything else attached to the enclosure. Do not try to wrap around installed hardware unless you enjoy awkward cutting and future regret. Keep all screws in a small container or magnetic tray so they do not vanish into the mysterious alternate dimension where 10mm sockets also live.
If the enclosure is already wired, take a quick photo before disconnecting anything. That makes reassembly easier later. If the box is installed in a vehicle, disconnect power to the audio system before removing components. Safety first, bass second.
Step 2: Prepare the Box Surface
Good covering starts with good prep. Clean the enclosure thoroughly. Remove dust, loose carpet, old glue, staples, dirt, and oily residue. If the box is made from MDF, lightly sand rough edges, high spots, glue drips, and sharp corners. Rounded edges are easier to cover than razor-sharp corners, especially with vinyl.
For carpet, the surface does not have to look furniture-grade, but it should be smooth enough that bumps will not show through. For vinyl or paint, spend more time filling screw holes, sealing edges, and sanding. MDF dust can irritate your lungs, so sand in a well-ventilated area and wear appropriate respiratory protection. Your future self will appreciate breathing more than inhaling beige powder.
Step 3: Plan Your Seam Placement
Seam placement separates a clean job from a “well, at least it has carpet” job. The best strategy is to place seams where they are least visible: on the bottom, back, or a flat side facing away from normal view. Avoid putting seams directly on outside corners if possible because corners take abuse and make raw edges more obvious.
For a simple rectangular subwoofer box, many DIY installers wrap one large piece around the top, front, bottom, and back, then use separate side pieces. Another method is to wrap the entire box with one oversized piece and hide the seam on the bottom. The best approach depends on the box shape and how stretchy your material is.
Step 4: Measure and Cut the Covering Material
Measure the box carefully. Add extra material on each side so you have room to pull, wrap, overlap, and trim. For carpet, adding one to two extra inches around edges usually gives enough working space. For vinyl, add even more if you need to stretch around curves or wrap edges to the back side.
Lay the material face down on a clean surface. Mark your cuts on the backing, not the visible face. Use a straight edge for long cuts and a sharp utility knife for clean edges. If using carpet, pay attention to the direction of the fibers. When side pieces run in different directions, the color can appear slightly different even if it is the same material. This is not magic; it is nap direction.
Step 5: Apply Adhesive the Right Way
Most spray adhesives and contact adhesives work best when applied evenly and allowed to become tacky before bonding. Read the specific product label because open time, dry time, and temperature requirements vary. In general, apply adhesive to both the box surface and the back of the covering material for a stronger bond. Hold the can at the recommended distance, move steadily, and avoid puddles.
Do not spray adhesive next to open flames, heaters, pilot lights, or anything that makes sparks. Work with good ventilation. Adhesive fumes are not a personality enhancer. They are a reason to open the garage door, use protection, and take your time.
Step 6: Start Wrapping the Main Panel
Place the covering material carefully onto the first large panel. Start from the center and smooth outward with your hand, a roller, or a clean towel. This pushes out air bubbles and helps the adhesive grab evenly. Once the material is down, press firmly across the entire surface.
If you are wrapping carpet, you can usually reposition slightly during the first moments, depending on the adhesive. Vinyl is less forgiving. With vinyl, use gentle tension and smooth continuously. Pull too hard and the pattern may distort; pull too little and wrinkles appear. The goal is firm, even tension, not a wrestling match.
Step 7: Handle Corners Like a Pro
Corners are where subwoofer box covering projects earn their drama. For carpet, fold the material around the edge, press it into the adhesive, and trim excess carefully. At corners, use relief cuts so the material can overlap without bunching. Think of wrapping a gift, but the gift is heavy, square, and wants to play bass at 35 Hz.
For outside corners, cut slowly and sneak up on the final fit. It is better to trim three small times than one large time and discover daylight where carpet should be. For vinyl, warming the material slightly with a heat gun can help it stretch, but use caution. Too much heat can damage vinyl, soften adhesive unevenly, or create shiny spots.
Step 8: Trim Speaker Holes and Terminal Openings
After the main material is attached, flip the box so you can access the speaker cutout from inside the enclosure. Use a sharp utility knife to cut an X across the opening, then trim the material back toward the edge. Leave enough material to wrap slightly into the opening if desired, but do not create thick bunches that interfere with the subwoofer gasket or mounting surface.
Terminal cup openings, port openings, and handle cutouts should be trimmed neatly. Press the material firmly around these edges. If carpet begins lifting, add a small amount of adhesive under the edge and press again. Make sure no loose fibers or material block the port or interfere with airtight sealing.
Step 9: Add Side Pieces or Finish the Hidden Seam
If your plan uses separate side panels, cut each side piece slightly oversized, apply adhesive to both surfaces, let it tack, and press it in place. Trim the edges with the knife held flat against the box. A clean side panel can make a basic wrap look factory-made.
If your seam is on the bottom or back, overlap slightly and trim through both layers with a sharp blade for a tight butt seam. Remove the waste strips, press the edges down, and roll the seam firmly. This double-cut technique creates a cleaner joint when done carefully.
Step 10: Reinstall the Subwoofer and Hardware
Give the adhesive time to cure according to the product instructions before reinstalling heavy hardware. Once ready, reinstall the terminal cup, subwoofer, grille, and other parts. Check that the subwoofer sits flat and the gasket seals properly. If carpet or vinyl is too thick under the mounting flange, trim it back so the subwoofer can seal against the enclosure.
Reconnect wiring correctly, tighten screws evenly, and avoid overdriving screws into MDF. If old holes are stripped, repair them before reinstalling the subwoofer. A loose driver can rattle, leak air, and make your clean new box sound like a toolbox falling down stairs.
Common Mistakes to Avoid
Using Household Carpet
Thick household carpet is usually too bulky for subwoofer boxes. It can be hard to wrap, difficult to trim, and ugly around corners. Use automotive trunk liner, speaker box carpet, or upholstery material designed for this type of project.
Skipping Surface Prep
Adhesive sticks best to clean, dry, dust-free surfaces. Sawdust, old glue, and loose fibers weaken the bond. If the carpet peels after a week, the problem is often prep, not bad luck.
Spraying Too Much Adhesive
More adhesive is not always better. Heavy puddles can soak through fabric, create lumps, or extend drying time. Use even coats and follow the adhesive instructions.
Cutting Too Much Too Soon
Once material is cut away, it cannot be politely asked to return. Leave extra material, wrap first, then trim gradually. This is especially important around corners and speaker openings.
Ignoring Heat
Cars get hot. A trunk in summer can punish weak adhesive. If the box will live in a vehicle, choose a quality adhesive suitable for automotive or high-temperature use. A beautiful wrap that peels in July is just sadness with texture.
Carpet vs. Vinyl vs. Coating: Which Is Best?
Choose carpet if you want the easiest, most forgiving, and most traditional finish. It is ideal for everyday car audio builds and blends well with trunk interiors. Choose vinyl if the enclosure is visible and you want a custom upholstery look. Choose textured coating if durability matters more than softness or if the box will be used in rough cargo areas.
For beginners, speaker box carpet is usually the best starting point. It hides small mistakes, costs less, and does not require advanced upholstery skills. For experienced builders, combining carpet with vinyl panels can create a high-end custom appearance without covering the entire enclosure in one difficult material.
Maintenance Tips After Covering a Subwoofer Box
Vacuum carpeted boxes regularly to remove dust and debris. Use a lint roller for pet hair or stubborn fibers. For vinyl, wipe with a damp microfiber cloth and avoid harsh solvents unless the manufacturer approves them. For textured coating, clean with mild soap and water when needed.
Inspect seams occasionally, especially after hot weather. If an edge begins to lift, fix it early with adhesive before dirt gets underneath. Small repairs are easy; large peeling sections are an emotional support project.
Real-World Experience: Lessons From Covering Subwoofer Boxes
The biggest lesson from covering subwoofer boxes is that patience beats speed every time. The first box many people cover looks decent from ten feet away and questionable from ten inches away. That is normal. The skill comes from learning how material behaves, how quickly adhesive tacks, and how much extra fabric you need before trimming.
One practical experience is to test your adhesive on a scrap piece of MDF and material before committing to the actual enclosure. Different carpet backings absorb glue differently. Some grab almost instantly, while others need more open time. A small test tells you whether the adhesive will bleed through, whether the bond feels strong, and how long you can reposition the material. It is much better to learn on a scrap than on the front face of a box you spent all weekend building.
Another experience-based tip is to work from the most visible area toward the least visible area. If the front of the enclosure will face outward, start there. Get that panel smooth and straight, then wrap toward the back or bottom where minor imperfections are less noticeable. Many beginners start randomly, then realize their final seam is right on the display side. That is the DIY equivalent of wearing a tuxedo with one sneaker.
When wrapping carpet, do not panic if the first corner looks bulky. Lift the material carefully if the adhesive still allows it, make a small relief cut, and press again. Small cuts are the secret. Large cuts create gaps. A good rule is to cut only where the material physically needs room to fold. If the carpet can stretch and lay down without a cut, leave it alone.
Vinyl teaches a different lesson: surface defects matter. A screw head that disappears under carpet may show clearly under vinyl. Before using vinyl, run your hand over the box with your eyes closed. If you can feel a bump, you may see it later. Fill holes, sand edges, and consider adding thin foam underlayment for a softer upholstered look. However, do not add padding where the subwoofer needs to mount flat.
Temperature also changes the experience. Adhesive behaves differently in a cold garage than it does on a warm afternoon. In cold conditions, spray patterns can be uneven and tack time may increase. In extreme heat, some materials become floppy, and adhesive can flash quickly. The sweet spot is a clean, dry, moderate workspace with good ventilation. Basically, the opposite of a dusty driveway during a windy day.
For older boxes, removing old carpet can be surprisingly time-consuming. Pull slowly, scrape adhesive residue, and sand lightly before applying new material. If the old glue is gummy, clogged, or uneven, the new covering may not bond properly. Sometimes rebuilding or resurfacing a badly damaged enclosure is faster than fighting old adhesive for hours.
A final real-world tip: dry-fit everything. Wrap the carpet around the box without glue. Practice the folds. Mark the seam location. Check whether the material reaches every edge. This rehearsal feels unnecessary until it saves the project. Once adhesive is sprayed, the clock starts ticking, and decisions become stickier in every sense of the word.
The best finished boxes are not always made by the most experienced builders. They are made by people who measure twice, cut slowly, keep the blade sharp, follow adhesive instructions, and hide seams intelligently. Do that, and your subwoofer box can look clean, durable, and custom instead of like a wooden lunchbox wearing a bad sweater.
Conclusion
Learning how to cover a subwoofer box is one of the most useful finishing skills in car audio. It protects the enclosure, improves the appearance, and makes a DIY build feel complete. Speaker box carpet is the easiest and most forgiving option, vinyl creates a custom upholstered look, and textured coatings offer rugged durability. The process is straightforward: remove hardware, clean and sand the box, plan your seams, cut the material oversized, apply adhesive properly, wrap carefully, trim cleanly, and reinstall everything once the bond is ready.
The secret is not rushing. Good prep, smart seam placement, fresh blades, and the right adhesive make all the difference. Take your time, respect the corners, and remember: bass should rattle the mirrors, not the carpet seams.


