
Table of Contents >> Show >> Hide
- Why an Old Cutting Board Makes a Great DIY Clipboard
- Choose the Right Cutting Board Before You Start
- Tools and Materials You’ll Need
- Step-by-Step: How to Make a DIY Clipboard From an Old Cutting Board
- Creative Ways to Use Your DIY Clipboard
- Mistakes to Avoid
- Design Ideas to Make It Look Custom
- Is This DIY Project Beginner-Friendly?
- Frequently Asked Questions
- Experiences People Commonly Have With This Project
- Conclusion
Some DIY projects scream, “I spent all weekend building this.” This one politely whispers, “I’m clever, useful, and I rescued something from the back of a cabinet.” Turning an old cutting board into a DIY clipboard is one of those rare crafts that checks every box: it’s affordable, beginner-friendly, genuinely practical, and surprisingly stylish when it’s done right.
If you have a worn wooden cutting board with good bones, you’re already halfway there. Add a sturdy clip, a little sanding, and a finish that suits your style, and suddenly that old kitchen workhorse becomes a farmhouse memo board, recipe holder, home office organizer, kids’ art display, or wall-mounted command center. Not bad for something that used to spend its days meeting onions.
In this guide, you’ll learn how to create a DIY clipboard using an old cutting board, what materials work best, which mistakes to avoid, and how to make the finished piece look intentional instead of “I glued office supplies to kitchen leftovers.” We’ll also cover fun design options, practical uses, and real-world experiences people often have while making this project.
Why an Old Cutting Board Makes a Great DIY Clipboard
A wooden cutting board is basically a head start on a craft project. It’s already shaped, sturdy, and designed to handle regular wear. Many older boards also have character that brand-new craft wood just can’t fake: knife marks, mellow patina, softened corners, and that warm grain that says, “Yes, I am rustic, but in a curated way.”
Using an old cutting board for a DIY clipboard is also a smart upcycling move. Instead of buying a plain board and trying to make it interesting, you’re reworking something you already own. That saves money, cuts waste, and gives the project a built-in story. It’s not just décor. It’s décor with a former life.
Best of all, the size is usually perfect. A medium cutting board works well for letter-size paper, shopping lists, recipes, chore charts, meal plans, school notices, and printable calendars. Larger boards can become statement pieces for kitchen walls or family command centers.
Choose the Right Cutting Board Before You Start
Not every old board deserves a glamorous second act. Before you break out the sandpaper, inspect the board carefully.
Good candidates for this project
- Solid wood cutting boards
- Bamboo boards in decent condition
- Boards with minor staining or light surface scratches
- Boards with handles or rounded edges for extra charm
Boards to avoid
- Boards with deep cracks or splits
- Boards that are badly warped
- Boards with mold, soft spots, or lingering foul odors
- Boards that feel structurally weak near the top edge where the clip will attach
If the board only looks tired, that’s fixable. If it looks like it survived three generations of garlic, raw chicken, and questionable storage decisions, let it retire gracefully.
Tools and Materials You’ll Need
- 1 old wooden cutting board
- Clipboard clip or hardware clip
- Screws that fit your clip
- Drill and small drill bit for pilot holes
- Screwdriver
- Sandpaper in coarse, medium, and fine grits
- Wood cleaner or dish soap and warm water
- Clean cloths
- Optional wood filler for minor imperfections
- Optional stain, paint, wax, mineral oil, or clear sealer
- Optional hanging hardware for wall display
- Optional embellishments such as stencils, decoupage paper, labels, ribbon, or leather cord
For the clip, you can buy replacement clipboard hardware online or at a craft or office supply store. You can also salvage a clip from an old clipboard if it’s still in good shape. That little bit of reuse makes the project even more satisfying.
Step-by-Step: How to Make a DIY Clipboard From an Old Cutting Board
Step 1: Clean the Board Thoroughly
Start by washing the board with warm water, dish soap, and a scrub brush or sponge. If it has lingering stains or odors, give it extra attention. A salt-and-lemon scrub can help lift surface discoloration and freshen the wood. Let the board dry completely before moving on.
This step matters more than people think. Dirt, grease, or old residue can interfere with sanding, paint, stain, and adhesives. Also, no one wants a beautiful new clipboard that smells faintly like onions from 2019.
Step 2: Sand for a Smooth, Fresh Surface
If your board is rough, start with a lower grit such as 80 or 100 to remove worn finish, scratches, and shallow stains. Follow with 120 or 150 grit, then finish with 220 grit for a smoother surface. If the board is already in pretty good shape, you can often begin with 150 grit and move up from there.
Always sand in the direction of the wood grain. That helps reduce visible scratches and gives the finished clipboard a cleaner look. Wipe away dust between sanding rounds with a dry cloth or tack cloth.
If there are shallow dents or tiny holes you want to hide, apply wood filler, let it dry fully, and sand again until smooth.
Step 3: Decide on the Final Look
This is where your DIY clipboard starts developing a personality.
Option 1: Natural wood finish
If the grain is pretty, don’t cover it up. A natural finish keeps the project warm and classic. You can use mineral oil for a simple refreshed look, or choose a clear protective topcoat if the board will be decorative rather than food-related from now on.
Option 2: Stained wood
A stain can deepen the color and give the board a more polished, intentional look. Dark walnut feels classic and office-friendly. Weathered oak leans farmhouse. A lighter natural stain works well in Scandinavian-style interiors.
Option 3: Painted clipboard
Paint works beautifully if you want a modern command center, kids’ homework station, or bold seasonal décor. Chalk paint gives a soft, matte finish. Acrylic or furniture paint offers more color options. If you paint the board, sealing it afterward is a smart move to reduce scuffs and transfer.
Option 4: Decorative overlay
You can decoupage paper onto the board, transfer a printed image, add stenciled lettering, or use contact paper for a fast makeover. This is a great option if the board’s wood grain is not exactly giving heirloom energy.
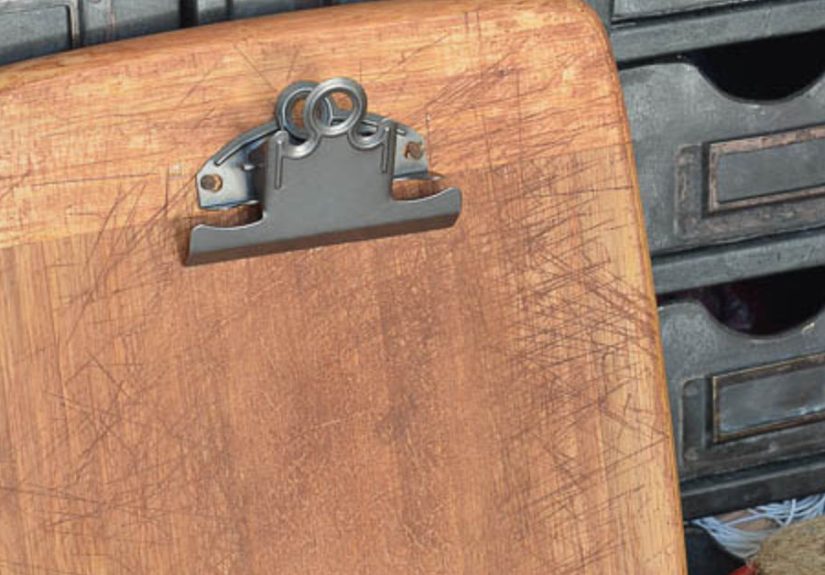
Step 4: Mark and Drill for the Clip
Place the clip at the top center of the board and mark the screw holes with a pencil. Double-check the placement before drilling. A clip that’s even slightly crooked will haunt you every time you look at it.
Drill small pilot holes before inserting screws. This helps guide the screws accurately and reduces the chance of splitting the wood, especially near the top edge. If your screw heads need to sit more neatly, a countersink bit can help create a cleaner recess.
Step 5: Attach the Clip Securely
Screw the clip into place carefully. Do not overtighten, especially if the board is older or the wood feels dry. You want the hardware secure, not aggressively embedded like it owes you money.
Test the clip with several sheets of paper. It should hold firmly without wobbling. If it feels loose, check the screw length and hole size. If it feels overly tight, make sure the clip itself is functioning properly and not bent.
Step 6: Add Optional Extras
Now that the basic DIY clipboard is finished, consider a few upgrades:
- Add a leather loop or ribbon through the handle for hanging
- Attach sawtooth or D-ring hardware to the back for wall mounting
- Stencil a label such as “Menu,” “To Do,” or “Recipes”
- Glue a pencil holder or small metal cup to the side for notes
- Create a matching set for meal planning, schedules, or kids’ artwork
Creative Ways to Use Your DIY Clipboard
This project is more versatile than it first appears. A finished cutting board clipboard can work in almost any room.
In the kitchen
Use it for weekly menus, favorite printed recipes, grocery lists, or a rotating meal plan. A cutting board clipboard looks especially at home in kitchens because, well, it literally started there.
In a home office
Clip up your weekly goals, project notes, inspirational quotes, or a monthly calendar. If you make a set of three, you can create a small wall organizer that looks both practical and Pinterest-approved.
In an entryway
Turn it into a family command station for reminders, school papers, sports schedules, or permission slips that absolutely cannot disappear into the backpack abyss.
In a craft room or studio
Use it to hold supply lists, sketches, measurements, and reference images. It can also serve as a photo prop board for product styling or social media content.
For parties and events
These clipboards make charming displays for drink menus, buffet labels, seating notes, guestbook instructions, or wedding signage. One humble cutting board can suddenly become event décor with a promotion.
Mistakes to Avoid
- Skipping the cleaning step: Old residue can ruin paint, stain, and glue adhesion.
- Not sanding enough: A rough board undercuts the finished look and can snag paper.
- Forgetting pilot holes: Driving screws directly into dry hardwood can split the board.
- Using a damaged board: Deep cracks and warping usually get worse, not better.
- Overdecorating: One beautiful finish or embellishment is often enough.
- Choosing weak adhesive instead of screws: A clipboard clip gets frequent pressure, so mechanical fastening is usually more durable.
Design Ideas to Make It Look Custom
If you want your upcycled clipboard to feel high-end, focus on combinations that make sense.
- Farmhouse style: medium brown stain, black metal clip, jute loop
- Modern style: matte white paint, silver clip, minimal label
- Vintage style: distressed paint, brass clip, handwritten tag
- Kids’ room style: colorful paint, fun decals, oversized clip for artwork
- Kitchen style: natural wood, recipe label, hanging loop through handle
You can also create a coordinated set using different board shapes but the same finish and hardware. That looks especially good in offices, mudrooms, and kitchen command centers.
Is This DIY Project Beginner-Friendly?
Yes, absolutely. If you can wash a board, sand wood, line up a clip, and drive a few screws, you can make this project. It’s approachable for beginners because the structure already exists. You’re not building from scratch. You’re refining, attaching, and styling.
It’s also forgiving. A board with a few imperfections can still look fantastic once it’s sanded and finished. In fact, some minor wear adds charm. This is not a precision woodworking competition. This is a useful object getting a stylish encore.
Frequently Asked Questions
Can I use a plastic cutting board?
You can, but wood usually looks better and is easier to refinish attractively. Plastic boards often read more “dorm utility” than “cute DIY décor.”
Do I have to seal the board?
Not always. If you keep a natural wood look with mineral oil, that may be enough for a simple decorative clipboard. If you paint, decoupage, or stain it, a protective sealer can help preserve the finish.
Can I hang it on the wall?
Yes. Add appropriate hanging hardware to the back. For heavier boards, use secure wall mounting rather than relying on wishful thinking and one tiny nail.
What size clip should I buy?
Choose a clip wide enough to hold standard paper securely without looking too small for the board. Many people like clips around 4 to 6 inches wide for medium boards.
Experiences People Commonly Have With This Project
One reason this DIY clipboard project is so satisfying is that it tends to surprise people in the best way. At first, an old cutting board rarely looks promising. It may be dull, scratched, slightly stained, and about as inspiring as a forgotten wooden spoon. But once it’s cleaned and sanded, the transformation can feel oddly dramatic. Many people discover beautiful grain hidden under years of wear, and that moment alone makes the project feel worth doing.
Another common experience is realizing that the project becomes more personal than expected. You might begin with the simple goal of making a clipboard, then suddenly you’re choosing between black or brass hardware, debating whether to add a leather strap, and wondering if your kitchen really needs a matching trio for recipes, grocery lists, and family notes. Spoiler: it might.
People also tend to appreciate how practical the finished piece is. Unlike some crafts that look cute for two days and then get banished to a closet, this one usually earns a permanent role. A cutting board clipboard often ends up near the coffee station holding a weekly menu, in the entryway managing school paperwork, or in a home office displaying the kind of to-do list that insists on being seen.
There’s also a nice balance of creativity and control here. If you keep the finish natural, the project feels warm, timeless, and easy. If you paint or decoupage it, it becomes more expressive and decorative. Either way, the stakes are low enough that beginners feel comfortable experimenting. If the stain looks too dark, you can adjust. If the painted finish feels plain, you can add a stencil. If the hardware feels underwhelming, swapping the clip is usually simple. It’s a forgiving project, and that makes it enjoyable.
A lot of makers say the most memorable part is how “done” the final result looks. Because the cutting board already has a finished shape and thickness, the clipboard tends to look more substantial than a standard craft-store project. It doesn’t feel flimsy. It feels like an object with purpose. That’s especially true if you use quality hardware and take a little extra time on sanding and finishing.
There can be a couple of small frustrations, of course. Drilling near the top edge can feel nerve-racking if the wood is old and dry. Centering the clip can become a tiny obsession. And if you choose decorative paper or lettering, there is always that brief moment where you wonder whether you’re creating elegant charm or aggressively enthusiastic kitchen décor. But those little decisions are part of the fun.
In the end, the experience of making a DIY clipboard from an old cutting board is usually less about perfection and more about clever reuse. It feels good to turn something worn into something useful. It feels even better when someone sees it hanging on the wall and asks where you bought it. That is your cue to casually say, “Oh, that? I made it from an old cutting board,” and enjoy the extremely reasonable amount of admiration that follows.
Conclusion
If you’ve been looking for a simple upcycling project with real everyday value, this is it. Learning how to create a DIY clipboard using an old cutting board gives you a chance to combine organization, creativity, and sustainability in one smart little project. You don’t need advanced woodworking skills, a huge budget, or a dedicated craft room. You just need a board with potential, a sturdy clip, and the good sense to sand before decorating.
Whether you keep the finish natural, paint it for a bold pop of color, or dress it up with decorative paper and labels, the result can be both useful and beautiful. Better yet, it’s the kind of DIY that can grow with your needs. Make one for recipes now, another for school papers later, and a whole wall set when you fully embrace your organized era.
Old cutting boards have already done enough chopping. Let one hold your notes, plans, and bright ideas for a change.


