
Table of Contents >> Show >> Hide
- Why Plexiglass Can Be Tricky (And How To Outsmart It)
- Before You Cut: Set Yourself Up for a Clean, Safe Win
- Pick the Right Cutting Method (Quick Decision Guide)
- Method 1: Score and Snap (Best for Straight Cuts on Thin Plexiglass)
- Method 2: Circular Saw (Best for Long, Straight Cuts)
- Method 3: Table Saw (Fastest for Repeated Straight Cuts)
- Method 4: Jigsaw (Best for Curves, Cutouts, and “Not a Straight Line in Sight”)
- Method 5: Router (For Edges So Clean They Look Manufactured)
- Special Cuts: Circles, Holes, and Notches
- How to Smooth and Finish Plexiglass Edges
- Troubleshooting: Fix the Most Common Plexiglass Cutting Problems
- Real-World Examples: Which Method Should You Use?
- Conclusion: The Clean Cut Formula
- Experience-Based Notes: What People Learn After Cutting Plexiglass a Few Times
- SEO Tags
Plexiglass (aka acrylic sheet) is the DIY world’s version of a fancy smartphone screen: crystal-clear, surprisingly tough, and one bad move away from a crack, chip, or melted edge that looks like it fought a candle and lost.
The good news: cutting plexiglass cleanly is totally doable at home with basic toolsif you treat heat like the villain, support like the hero, and patience like the superpower you didn’t know you had. This guide breaks down the best ways to cut plexiglass for straight lines, curves, and cutouts, plus how to finish the edge so it looks store-bought instead of “garage-made at midnight.”
Why Plexiglass Can Be Tricky (And How To Outsmart It)
Acrylic cuts differently than wood because it’s a plastic that can:
- Chip if the blade is wrong or the sheet vibrates.
- Crack if it’s stressed, unsupported, or forced.
- Melt if the tool speed/feed rate creates too much heat.
Your goal is simple: keep the sheet stable, keep the cut controlled, and keep heat low. Everything else is just choosing the right method for the job.
Before You Cut: Set Yourself Up for a Clean, Safe Win
1) Keep the protective film on (yes, really)
That paper or plastic film isn’t packaging fluffit helps prevent scratches and can reduce minor chipping around the cut. Peel it back only where you need to mark.
2) Measure like you’re building a spaceship (but with fewer meetings)
Use a tape measure and a straightedge. Mark your line with a fine-tip marker or pencil/grease pencil depending on the film. For straight cuts, use multiple reference marks and connect them with a ruler to avoid a “close enough” line that becomes a “why is it short?” piece.
3) Support the sheet fully
Plexiglass hates vibration and flex. Support it on a flat workbench, foam insulation board, or sacrificial plywood/MDF. If part of the sheet hangs off the edge during a cut, it can crack near the endright when you’re feeling confident. (Plexiglass loves dramatic endings.)
4) Clamp it down
Clamps prevent wandering cuts and chatter. For saw cuts, clamp a straightedge guide if you’re not using a fence.
5) Wear the unglamorous stuff
- Safety glasses (chips can fly)
- Hearing protection (power tools + plastic = loud)
- Dust mask (fine acrylic dust is annoying)
- Gloves only for handling/edge cleanupnot near spinning blades
Pick the Right Cutting Method (Quick Decision Guide)
- Thin sheet (typically up to about 3/16"): Score-and-snap is fast and clean for straight lines.
- Up to about 1/4" (straight cuts): Score-and-snap can work, but a saw may be easier for long cuts.
- Thicker sheets and long straight cuts: Circular saw, table saw, or track saw.
- Curves/cutouts: Jigsaw, band saw, or router with a template.
- Perfect edges: Router flush-trim after rough cutting.
Method 1: Score and Snap (Best for Straight Cuts on Thin Plexiglass)
If you only learn one technique, make it this one. It’s the cleanest low-drama way to cut thin plexiglass without power tools.
What you’ll need
- Acrylic scoring tool (best) or a sharp utility knife
- Metal straightedge/ruler (must be rigid)
- Clamps (recommended)
- A table edge or a straight board for snapping
How to score and snap plexiglass
- Mark the cut line on the protective film.
- Clamp the straightedge exactly on your line.
- Score with firm, even pressure along the straightedge. Make multiple passes instead of trying to “one-and-done” it.
- Keep the scorer in the groove on each pass. Consistency beats brute force.
- Snap it cleanly: align the score line with the edge of your table (or place a straight dowel/board under the score line), hold the sheet firmly, and apply quick downward pressure on the offcut side.
Pro tips for a cleaner snap
- More passes = more control. Especially if the sheet is near the “thicker thin” range.
- Score the “good side.” If one side must look perfect, score that side so any minor roughness tends to be on the less-visible side.
- Don’t rush the snap. The snap should be decisive, not hesitant.
Common mistake: scoring too lightly and trying to snap anyway. That’s how you get a jagged break that looks like a coastline.
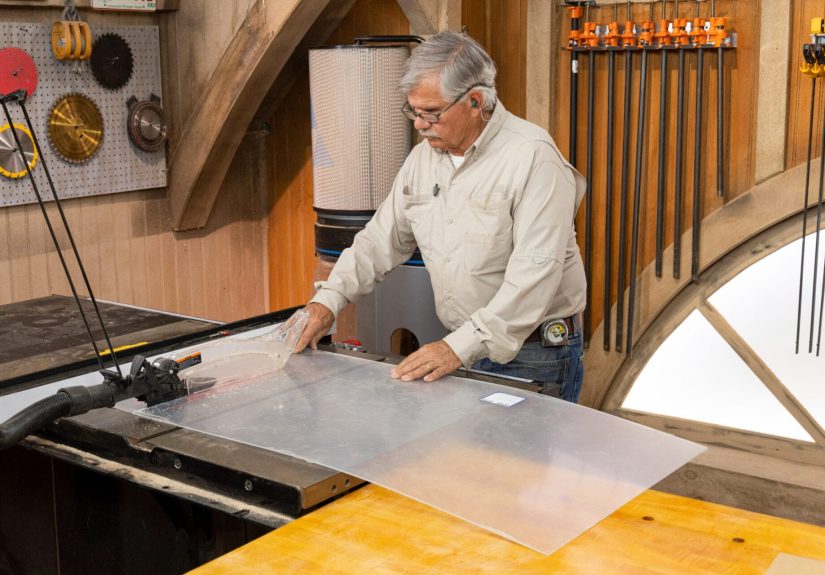
Method 2: Circular Saw (Best for Long, Straight Cuts)
If you need a clean, accurate rip cutlike trimming a sheet for a desk protector, storm window insert, or shop guarda circular saw can do it beautifully.
What you’ll need
- Circular saw (or track saw)
- Fine-tooth carbide blade made for plastics (or a high-tooth-count wood blade in a pinch)
- Straightedge guide/track
- Painter’s tape (optional)
- Clamps + solid support under the sheet
Blade choice: the secret sauce
For acrylic, a fine-tooth blade helps reduce chipping. Many pros use high tooth counts (commonly around 60–80 teeth on a 10-inch blade for acrylic cutting). A blade designed for plastic often has tooth geometry that’s less “grabby,” which helps prevent cracking and chattering.
How to cut plexiglass with a circular saw
- Support the sheet on a sacrificial base (foam board or plywood) so it can’t vibrate.
- Leave the protective film on and tape the cut line if you want extra chip protection.
- Set blade depth just a bit deeper than the sheet thickness. Too deep increases heat and mess.
- Use a guide (straightedge or track) so the saw doesn’t drift.
- Cut steadilydon’t force it. Let the blade do the work. If you smell hot plastic, you’re creating too much heat.
- Pause if needed. For thicker material, short pauses can reduce heat buildup.
How to avoid melting
- Use a sharp blade. Dull blades create friction and heat.
- Maintain a consistent feed rate. Too slow can melt; too fast can chip or crack. Aim for “smooth and confident.”
- Keep the sheet stable. Vibration turns clean cuts into crunchy edges.
Method 3: Table Saw (Fastest for Repeated Straight Cuts)
If you’re cutting multiple pieceslike acrylic shelving dividers or several window insertsa table saw is the time-saving champion.
Setup that prevents chip-out and drama
- Use a fine-tooth carbide blade suitable for plastics.
- Use a zero-clearance insert if possible to reduce edge chipping.
- Support infeed and outfeed so the sheet stays flat the whole time.
- Use a fence that’s perfectly parallel to the blade to reduce binding.
Cutting steps
- Mark your cut and confirm fence measurement (measure twice, cut once, cry never).
- Keep the protective film on.
- Feed the sheet smoothly with steady pressure against the fence.
- Use push sticks/blocks to keep hands safe and control the sheet.
Extra-clean trick: sandwich the plexiglass between thin sacrificial sheets (like hardboard) for ultra-clean edges, especially on thinner acrylic.
Method 4: Jigsaw (Best for Curves, Cutouts, and “Not a Straight Line in Sight”)
Need a rounded corner, a sink cutout, or a weird shape that your project insists on? A jigsaw is a great optionif you go slow and choose the right blade.
What you’ll need
- Jigsaw
- Fine-tooth blade for plastic/acrylic (higher TPI reduces chipping)
- Clamps + scrap board support
- Drill (for starter holes)
- Painter’s tape (optional)
How to cut plexiglass with a jigsaw
- Clamp the sheet to a work surface with a sacrificial board underneath.
- Apply painter’s tape over the cut line to reduce surface chipping (optional but helpful).
- Drill a starter hole for interior cutouts big enough for the blade.
- Set speed lower than you would for wood. High speed = heat = melted mess.
- Keep the jigsaw shoe flat and move steadily along your line.
- Let it cool if it starts to gum up. If melted acrylic sticks to the blade, stop and clean it after it cools.
Jigsaw success tips
- Slow is smooth; smooth is fast. Especially on thicker acrylic.
- Use a gentle curve technique. Don’t twist the blademake relief cuts or take wider turns.
- Support near the cut. Flexing near a curve is a crack invitation.
Method 5: Router (For Edges So Clean They Look Manufactured)
If you want a professional edgeespecially on curvesa router is the finishing weapon. The classic move is: rough cut first, then route to perfection with a pattern/template.
What you’ll need
- Router (handheld or router table)
- Flush-trim or pattern bit (sharp carbide)
- Template/jig
- Clamps
How to route plexiglass cleanly
- Rough cut the shape slightly oversized (jigsaw or band saw).
- Attach a template securely (double-sided tape + clamps works well).
- Take shallow passes. Don’t hog materialrouting too aggressively builds heat and chatter.
- Keep moving steadily to avoid melting.
Router reality check: This is not the tool for “I’m in a hurry.” This is the tool for “I want it perfect.”
Special Cuts: Circles, Holes, and Notches
Drilling holes without cracking
- Support the sheet fully underneath.
- Use a sharp bit and moderate speed.
- Start with a small pilot hole, then step up sizes if needed.
- Don’t press too hardlet the bit cut.
Cutting circles
- Hole saw: Good for clean circular holes, especially if the sheet is well-supported.
- Jigsaw: Best for larger circles and rounded shapes; drill a starter hole and go slow.
- Router circle jig: Best for perfect circles with clean edges.
How to Smooth and Finish Plexiglass Edges
Even a good cut can leave a slightly sharp edge. Finishing is what makes it look clean, safe, and pro.
Simple edge cleanup (fast and effective)
- Deburr with a scraper or a utility knife held lightly (carefully shaving tiny burrs).
- Sand progressively (start around 120–220 for roughness, then 400, 600, and higher if you want a polished look).
- Wet sanding helps keep heat down and reduces clogging.
- Polish with plastic polish or rubbing compound for a clearer edge.
Flame polishing (optional, advanced)
Flame polishing can make edges glassy-clear, but it’s easy to overdo and can cause warping or surface stress. If you try it, practice on scrap first and keep heat movingnever linger in one spot. For many DIY projects, sanding and polishing is the safer, more consistent route.
Troubleshooting: Fix the Most Common Plexiglass Cutting Problems
Problem: Chipping along the cut
- Switch to a sharper, finer-tooth blade.
- Add painter’s tape over the cut line.
- Use a zero-clearance insert (table saw) or better support underneath.
- Reduce vibration with clamps and full support.
Problem: Melted edge or gummy blade
- Lower tool speed and/or adjust feed rate to reduce heat buildup.
- Use a blade designed for plastics and ensure it’s sharp.
- Take short breaks on thick cuts to let heat dissipate.
Problem: Cracks near the end of the cut
- Support the offcut so it doesn’t flex or drop.
- Don’t force the last inchmaintain control to the finish.
- Check that the sheet isn’t already stressed or scratched at the edge.
Problem: The cut wanders off the line
- Use a guide (straightedge/track/fence).
- Clamp the sheet so it can’t shift mid-cut.
- Slow down and keep steady pressurenot jerky corrections.
Real-World Examples: Which Method Should You Use?
- Replacing a broken window pane in a shed door: score-and-snap for thin acrylic; circular saw for thicker.
- Making a clear desk protector: circular saw/track saw for long straight edges; sand lightly to remove sharpness.
- Cutting an access panel with rounded corners: drill corner holes, then jigsaw the lines; finish with sanding.
- Creating a custom acrylic template: rough cut, then flush-trim with a router for precision.
Conclusion: The Clean Cut Formula
Cutting plexiglass isn’t hardit’s just picky. When you combine solid support, the right blade/tool, and a heat-conscious pace, acrylic behaves beautifully. Score-and-snap is the go-to for thin sheets, saws handle long straight cuts on thicker material, and a jigsaw/router combo unlocks curves and pro-level edges. Finish with a quick sanding sequence, and your project will look crisp, safe, and intentionally made (instead of “it survived”).
If you’re unsure, practice on a scrap piece first. Plexiglass rewards confidencebut it loves preparation even more.
Experience-Based Notes: What People Learn After Cutting Plexiglass a Few Times
There’s a special kind of wisdom that only shows up after the first acrylic cutting sessionthe one where everything looked simple on paper, and then the material started acting like it had opinions. The most common “aha” moment is realizing that plexiglass doesn’t fail randomly. It fails for extremely consistent reasons: vibration, stress, and heat. Once those three are under control, the whole experience becomes less chaotic and a lot more predictable.
One lesson DIYers repeat often: support is not optional. A sheet that’s even slightly flexing can turn a decent cut into a cracked corner right at the finish line. People tend to focus on the blade, but the real upgrade is a stable setupflat surface, clamps, and an offcut that won’t drop. That last part matters more than it seems. When the offcut falls, it can “tear” the final fibers of the cut, creating chips or a sudden crack that runs like it’s late for a meeting.
Another common discovery is that the fastest way to ruin a cut is to fight the tool. With acrylic, pushing harder rarely helps. If a blade is sharp and the setup is stable, the cut should feel controlled and steady. When people force it, the blade heats up, the plastic softens, and the edge starts to fuse behind the cut. That’s when the smell shows upthe universal signal that your feed rate and speed settings are negotiating poorly. A small adjustment (slightly faster feed with a slower tool speed, or a pause to cool) often fixes the problem immediately.
Scoring and snapping has its own “experience tax.” Beginners often try to score once, like they’re slicing a pizza, and then wonder why the snap looks like a lightning bolt. The real trick is multiple consistent passes with a rigid straightedge that won’t slide. People also learn that the snap should be decisive, not hesitant. A confident snap along a deep score line is clean. A timid bend along a shallow score line is chaos wearing safety glasses.
Curves teach patience. Many first-time jigsaw users try to turn too tightly and end up with a rough edge or a blade that drifts. The practical approach is to accept that acrylic prefers gentle turns, relief cuts, and steady movement. If the shape must be perfectlike a display panel or a templateexperience pushes people toward the rough-cut-then-router method. It feels like an extra step, but it often saves time because it reduces sanding and rework.
Finally, finishing edges is where pride lives. Plenty of projects function fine with a slightly rough cut, but the moment someone sands progressively and polishes, the piece looks “real.” The experience-based takeaway is simple: cutting gets you the shape; finishing makes it look intentional. If a project is going somewhere visibledesk, door insert, shelving, displayedge cleanup is the difference between “DIY” and “made-to-fit.”


