
Table of Contents >> Show >> Hide
- Safety First (Because Necks Don’t Get a Warranty)
- Know Your Equipment: What a Starting Block Is (and Isn’t)
- The Default Technique: The Track Start (Why Nearly Everyone Uses It)
- How to Dive off a Starting Block: The 7-Phase Start
- Phase 1: Set Your Feet (Fast Starts Are Built From the Ground Up)
- Phase 2: Build a Stable “Ready” Position (Balance Before Violence)
- Phase 3: Hands, Arms, and “Where Do I Look?”
- Phase 4: The “Set” Moment (Stillness Is Speed)
- Phase 5: The Launch (Explode Forward, Not Just “Off”)
- Phase 6: Flight (Be a Dart, Not a Lawn Chair)
- Phase 7: Entry + Underwater (Where Starts Are Actually Won)
- Common Mistakes That Make Your Start Slower (Even If You Feel Fast)
- Adjustments for Stroke and Race Type
- Drills That Actually Improve Your Block Dive
- Race-Day Focus: React Without Guessing (and Avoid False Starts)
- Meet-Day Checklist (So You Don’t Overthink on the Block)
- Experience Notes from the Pool Deck (500+ Words of Real Talk)
- Conclusion
The starting block is a tiny stage with a very loud soundtrack: one beep, one splash, and a whole lot of judgment from the pace clock.
If you’ve ever felt like you “swam great… after the first 10 meters,” this article is for you. A good block start isn’t just about
being brave enough to launch yourself into chlorinated destinyit’s a repeatable sequence of positions and timing that converts leg power
into speed, with as little “belly-flop tax” as possible.
Below is a practical, step-by-step guide to diving off a starting block using the modern, most commonly taught approach (the track start),
plus the safety checks, the mistakes that steal time, and the drills that actually carry over to race day. You’ll finish with a simple
meet-day checklist and a long, real-world “what it feels like” section so you can spot what’s normal, what’s fixable, and what’s just
your brain being dramatic.
Safety First (Because Necks Don’t Get a Warranty)
Competitive starts are designed for pools that are set up for head-first entries from a height. That said: don’t practice block dives in
unknown pools, shallow water, open water, or anywhere you can’t clearly confirm safe depth and a clear landing zone. If you’re new, build
up graduallystart from the deck edge, then a low platform, then the blocksunder the eyes of a qualified coach.
- Only dive where diving is allowed and conditions are known. Depth, lane space, and obstacles matter.
- Never “send it” in warm-up chaos. Crowded lanes and surprise backstrokers are a bad combo.
- If in doubt, go feet-first. Confidence is great; spinal injuries are not.
One more thing: the goal is a controlled head-first entry that stays shallow and streamlinednot a dramatic, deep plunge.
Your start should feel athletic and precise, not like you’re auditioning for a slapstick comedy.
Know Your Equipment: What a Starting Block Is (and Isn’t)
Most modern starting blocks have a non-slip surface, a front edge you can grip, and often an adjustable rear “wedge” (also called a kick
plate or track-start ledge). The wedge lets your back foot push against a stable angled surface, which can improve force production and
balanceespecially for track starts.
Blocks can differ from pool to pool. Some feel grippier, some feel like ice skates on a cafeteria tray. So: always test the surface
during warm-up, and dry your feet if needed. A great start begins with not slipping.
The Default Technique: The Track Start (Why Nearly Everyone Uses It)
The track start looks a bit like a sprinter in the blocks: one foot forward near the front edge, the other back on the wedge (or back of
the block), hips high, weight balanced so you can explode forward without wobbling. Compared to the old “grab start” (feet together),
the track start usually offers better stability and makes it easier to apply force quickly.
Your mission is simple to say and tricky to do: leave fast, fly clean, enter small, and carry speed into underwater.
If any of those steps gets messy, you’re donating free time to your opponents.
How to Dive off a Starting Block: The 7-Phase Start
Phase 1: Set Your Feet (Fast Starts Are Built From the Ground Up)
Step onto the block like you mean it, then set your stance:
- Front foot: near the front edge, toes curled slightly over (enough to grip, not enough to feel like you’ll topple).
- Back foot: on the wedge (if available) or near the rear of the block, heel raised, ready to drive.
- Hip width: generally around shoulder/hip width for balanceavoid the “tightrope walker” stance unless you love wobbling.
Wedge placement matters. Many swimmers adjust it so the back knee is comfortably bent and ready to extend. Too far back can feel strong but
slow to initiate; too close can feel quick but weak. In warm-ups, test a couple settings and keep the one that feels both stable and explosive.
Phase 2: Build a Stable “Ready” Position (Balance Before Violence)
A fast start is not a random jumpit’s a loaded spring. In your “take your mark” position:
- Hips high (think: “hamstrings loaded”).
- Shoulders slightly forward so you can project outward, not upward-only or downward-only.
- Weight balanced so you don’t need a correction step or a pre-rocking motion.
A common speed leak is overdoing the “wind-up”leaning way back or rocking before the signal. It feels powerful, but it costs time and
consistency. Quiet positions tend to produce cleaner, faster reactions.
Phase 3: Hands, Arms, and “Where Do I Look?”
Hands typically grip the front edge of the block (or the grips if your block has them). Keep arms engaged but not rigid. Think “ready to
punch forward,” not “hanging from a cliff.”
Your head and eyes should be neutralgenerally looking down toward the water’s surface just in front of the wall. Avoid cranking your neck
up early. You want your body to travel forward in a long line, not kinked into a “question mark.”
Phase 4: The “Set” Moment (Stillness Is Speed)
When you’re set, you should be able to freeze. If you can’t hold your position for a second without shaking, your stance is too unstable.
Fixing this stability often improves starts immediatelybecause you stop wasting time “finding balance” at the worst possible moment.
Cue to remember: Pressure, not panic. Feel pressure through the front foot and the back foot, hands connected, hips ready,
and the body quiet.
Phase 5: The Launch (Explode Forward, Not Just “Off”)
At the start signal, your body should move as one coordinated action:
- Drive with the legs: front leg is usually the main engine; the back leg adds punch and stability.
- Use the arms: an aggressive arm action helps connect upper body timing to leg drive.
- Project forward: think “long jump into streamline,” not “hop into the pool.”
A helpful mental image: you’re trying to throw the block behind you by pushing it away, while your body launches forward like a sprinter
leaving the blocks. Fast starts come from directional force, not drama.
Phase 6: Flight (Be a Dart, Not a Lawn Chair)
Once you leave the block, your job is to get into a tight streamline quickly:
- Arms locked overhead, hands stacked (one on top of the other), squeezing ears.
- Head neutral between arms (don’t “peek” for the water).
- Legs together, toes pointed behind you.
The cleaner your shape, the less drag you create in the air and at entry. Your body should look like a single connected linebecause water
will punish any loose pieces immediately.
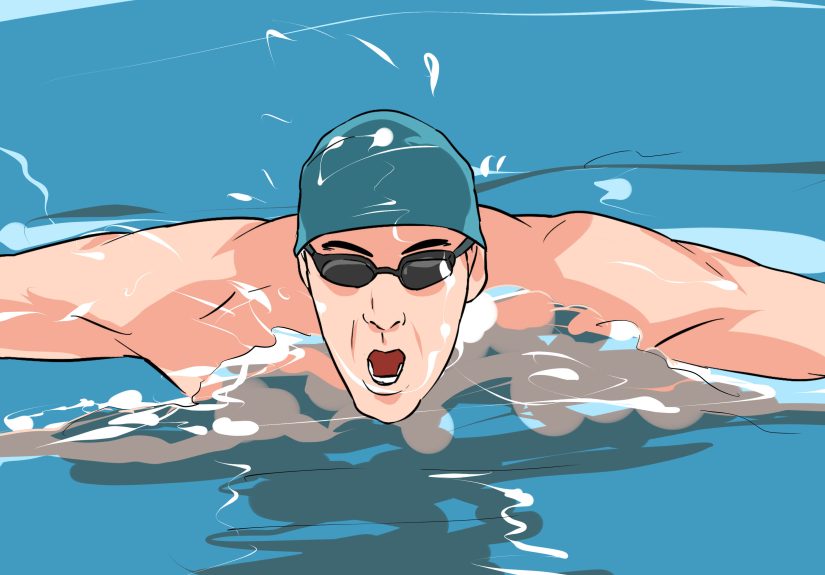
Phase 7: Entry + Underwater (Where Starts Are Actually Won)
Aim for a “small hole” entry: fingertips first, then forearms, then head, then the rest of you following through the same path.
Your entry angle should be shallow enough to keep speed, but deep enough to avoid slapping the surface.
Underwater is the secret continuation of the start. Maintain streamline, then transition into your underwater kick (usually dolphin kick for
freestyle/butterfly, a different sequence for breaststroke, and specific rules depending on your race and league). The breakout should feel like
you’re preserving momentum, not “popping up for air because you got scared.”
Common Mistakes That Make Your Start Slower (Even If You Feel Fast)
1) The Big Wind-Up
Rocking back hard before the signal can delay your actual takeoff and add unnecessary motion. It’s like revving a car in neutralloud, dramatic,
and not moving you forward.
2) Stepping Instead of Jumping
If your front foot “steps” forward rather than driving explosively, you’re losing the most powerful moment of the start. The block is a force
platform. Treat it like one.
3) Late Streamline
Some swimmers launch with arms separated and only streamline right before entry. That creates extra drag and often leads to a messy, splashy entry.
Streamline sooner. Water is not impressed by your interpretive dance.
4) Splayed Legs or a Scissor Kick at Entry
Splitting the legs looks “athletic,” but it usually widens the entry and increases drag. Think: legs together, toes pointed, tight line.
5) Too Deep (or Too Shallow) Entry
Too deep wastes time traveling back up; too shallow can slap the surface and kill speed. The “right” angle depends on your speed, body line,
and underwater strengthsbut in general, you want a controlled, shallow entry that keeps momentum moving forward.
Adjustments for Stroke and Race Type
Sprint (50–100)
In sprints, the start is a bigger percentage of the race. Prioritize a quick reaction, explosive launch, and a breakout that preserves speed.
Practice short, high-quality starts with full rest, like you would practice true sprinting.
Middle/Distance (200+)
You still want a great start, but you may choose a slightly more controlled breakout to settle into rhythm without spiking effort too early.
The key is efficiency: clean entry, clean underwater, no wasted movement.
Breaststroke Note
Breaststroke underwater sequences are rule-sensitive and technique-specific. The big idea remains: maintain streamline off the entry and
transition smoothly into the legal underwater pattern before your breakout.
Backstroke (Different Start Altogether)
Backstroke starts are performed from the water, not from the block. If you’re racing backstroke, you’ll use the wall and a different setup
(hand grips, foot placement on the wall, and a backward/arched launch).
Drills That Actually Improve Your Block Dive
1) Streamline Jumps (Dryland or Poolside)
Stand tall, jump forward into a tight streamline position (arms locked, head neutral), and hold the shape on landing. You’re training fast,
consistent body alignment.
2) Single-Leg Start Drill
Use a track stance and perform starts emphasizing the front-leg drive (or controlled back-leg contribution). This can expose balance problems
and teach you to apply force without wobbling.
3) “No Splash” Entry Practice
From the side or a low platform, practice head-first entries focused on a small hole. Start slow, build confidence, and only progress to blocks
when your entries are consistently controlled.
4) Reaction + Stillness Reps
Do short sets of 4–8 starts where your goal is to hold completely still in “set,” then react cleanly without guessing. Video helps here:
what feels “still” sometimes looks like “tiny earthquake.”
5) Breakout Consistency
Mark a target distance (like the 5m or 10m mark) and repeat starts aiming to surface and break out consistently at your planned point.
Consistency is speed you can trust.
Race-Day Focus: React Without Guessing (and Avoid False Starts)
A fast start is useless if it earns a disqualification. Most competitive rule sets require swimmers to be stationary before the start signal.
If you anticipate and leave earlyeven by a fractionyou risk a false start call depending on the meet rules and officiating procedures.
Practical tip: choose a simple cue like “still… then GO.” You’re not trying to predict the beep; you’re training your nervous system to
respond instantly after it happens. The best starters look calm, then teleport.
Meet-Day Checklist (So You Don’t Overthink on the Block)
- Test the block surface: grip, dryness, wedge stability.
- Pick one wedge setting for the day unless something feels obviously wrong.
- Use one mental cue (example: “hips high, push long”).
- Commit to streamline early and hold it through entry.
- Know your breakout plan: where you’ll surface and how you’ll transition.
Experience Notes from the Pool Deck (500+ Words of Real Talk)
The first time you climb onto a starting block, your brain will do a very funny thing: it will suddenly become an engineer, a poet, and a
risk-management lawyerall at once. The engineer starts calculating angles (“If I lean forward 12 degrees, will I achieve optimal projection?”),
the poet whispers something dramatic (“This is the moment where I become speed”), and the lawyer files an emergency motion titled
“Objection: Gravity.”
Most swimmers remember their early block starts as either (1) surprisingly fine, or (2) a cautionary tale involving a loud slap and a bruised ego.
The difference usually isn’t courageit’s setup. When your feet feel unsure, everything above the ankles tries to compensate. You’ll grip the
front edge like it owes you money, your shoulders will tense, and you’ll either hesitate at the beep or launch with the elegance of a folding chair.
Once you find a stance that feels stable, a weird calm shows up: you stop thinking about “not falling” and start thinking about “going forward.”
The wedge (when your pool has one) can feel like cheating the first time you use itin a good way. Suddenly, your back foot has a clear job:
push. That little plate turns a wobbly back leg into a reliable second engine. But it also exposes a truth: if you over-rely on the back leg,
you might feel powerful while actually being slow. The fastest starts tend to feel like the whole body moves together, with the front leg driving
hard and the back leg snapping through like punctuation. If your start feels like “push… then jump… then maybe arms,” you’ll usually see it in
the water as a big splash and a late streamline.
Entry is where emotion shows up. When you’re nervous, you tend to do one of two things: dive too deep (because you “sent it”) or go too flat
(because you flinched). Deep entries feel bold until you realize you’ve turned your start into a submarine mission and now you’re spending
precious time swimming uphill. Flat entries feel safe until the surface slaps you back like, “Nice try.” The sweet spot feels almost boring:
fingertips cut in, body follows, and the splash is smaller than your anxiety wanted it to be.
Underwater is the part nobody claps for, which is exactly why it matters. In practice, you’ll notice that a “great” start isn’t just the launch
it’s what happens next. If you hold streamline one beat longer, your speed stays cleaner. If you rush the breakout because you’re desperate to
breathe, you often pop up too early and lose the advantage you just created. A good breakout feels like you’re continuing the dive,
not ending it. You’re not switching gears; you’re letting the first gear carry.
The biggest confidence shift comes when you stop trying to create a perfect start and start trying to create a repeatable one. On race day,
your heart rate is louder than logic. So you need a simple routine: step up, set feet, grip, hips high, stillness, react, streamline, small hole,
hold underwater, breakout. When you’ve practiced that sequence enough, the block stops being scary. It becomes familiarlike tying your shoes,
except you’re tying your shoes while people stare and a horn is involved.
And yes, even experienced swimmers sometimes feel like they forgot how to start the moment they hear “take your mark.” That’s normal. The trick
is not to negotiate with that feeling. Keep the routine, trust your setup, and let the beep do its job. Your job is to go forwardclean, tight,
and just a little bit smug when you surface ahead.
Conclusion
Learning how to dive off a starting block is less about fearlessness and more about sequence: stable feet, quiet set position,
explosive forward launch, early streamline, small-hole entry, and an underwater phase that preserves speed. Start with safety and progression,
then build consistency through short, high-quality reps and video feedback. When the pieces line up, your start stops being “the moment before
the race” and becomes your first advantage in it.


