
Table of Contents >> Show >> Hide
- What You’ll Need (Keep It Simple)
- Before You Start: The 3 Big Rules of Realistic Hair
- How to Draw Realistic Hair Step by Step
- Step 1: Pick a clear light source (or your hair will look like a wig)
- Step 2: Lightly build the skull and hairline
- Step 3: Draw the silhouette of the hairstylebig shape only
- Step 4: Map the flow with a few long directional lines
- Step 5: Break the hair into 3–8 clumps (yes, clumps)
- Step 6: Plan the value map (highlights, midtones, shadows)
- Step 7: Lay down an even midtone to “tone the hair”
- Step 8: Establish the darkest shadows (the secret sauce for depth)
- Step 9: Blend transitions without destroying texture
- Step 10: Carve the highlight bands (draw the shine, not the strand)
- Step 11: Add strand texture with tapered strokes (selectively)
- Step 12: Use negative drawing for flyaways and bright strands
- Step 13: Sharpen edges where neededand lose edges elsewhere
- Step 14: Final passcheck value range, clean smudges, add “hero hairs”
- Quick Adjustments for Different Hair Types
- Common Mistakes (And How to Fix Them Fast)
- Practice Drills That Actually Work (No, You Can’t Skip These)
- Real-World Practice Notes: Experiences Artists Commonly Have (500+ Words)
- Conclusion
Drawing realistic hair is basically a magic trick: you’re convincing people they’re seeing thousands of strands,
when you’re really drawing organized chaosshape, value, and a few well-placed “hero hairs.”
The good news? You don’t need to draw every strand. The better news? If you try, your drawing will look like
spaghetti got into a fight with a broom.
In this guide, you’ll learn a reliable, repeatable process to draw believable hair (graphite, colored pencil,
or digital). We’ll focus on volume, flow, and lightingthe stuff your eyes actually readthen sprinkle in
texture only where it matters.
What You’ll Need (Keep It Simple)
- Pencils: HB for light sketching; 2B–6B for richer shadows (or your digital equivalent).
- Erasers: kneaded eraser for lifting highlights; a precision/pen eraser for sharp strands.
- Blending tool (optional): blending stump or soft brush. Use sparinglyno over-smoothing.
- Paper: smoother paper makes clean highlights easier; textured paper adds grainy “sparkle.”
- Reference photo: yes, even if you’re “making it up.” Realism loves receipts.
Before You Start: The 3 Big Rules of Realistic Hair
- Hair is a form first, texture second. Treat it like a 3D shape sitting on a skull.
- Draw in groups (clumps), not strands. Strands are accents, not the foundation.
- Value does the heavy lifting. Great hair is mostly about lights and darks, not line count.
How to Draw Realistic Hair Step by Step
These 14 steps work for straight, wavy, curly, and even “I woke up like this” bedhead.
You’ll adapt the texture marks, but the structure stays the same.
-
Step 1: Pick a clear light source (or your hair will look like a wig)
Decide where the light is coming fromtop left, window light from the side, overhead spotlight, etc.
Then commit. Realistic hair needs consistent highlights and shadows, because hair is shiny and loves to
show off. If the light direction changes mid-drawing, the hair reads flat and “sticker-like.” -
Step 2: Lightly build the skull and hairline
Hair doesn’t float in space (unless you’re drawing a shampoo commercial in zero gravity).
Lightly sketch the head shape first. Then place the hairline and part. Even if the hair covers the forehead,
knowing where the hair starts helps you keep volume believable and prevents the dreaded “helmet hair.” -
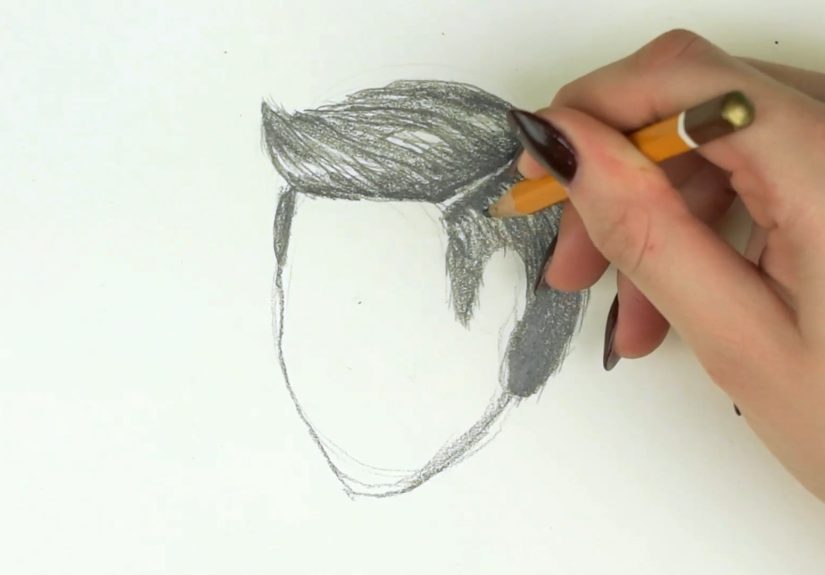
Step 3: Draw the silhouette of the hairstylebig shape only
Block in the outer contour of the hair mass. Think “hairstyle silhouette,” not individual locks.
This is where you decide: long, layered, bob, ponytail, messy bun, curls, etc.
A strong silhouette instantly communicates styleeven before shading. -
Step 4: Map the flow with a few long directional lines
Hair has movement and gravity. Add a handful of long, gentle “flow lines” showing the direction the hair
travels from root to tip. Keep them loose. These lines become your traffic arrowsevery stroke later should
follow the same general flow (or your texture will look chaotic in a bad way). -
Step 5: Break the hair into 3–8 clumps (yes, clumps)
Find the big groupingssections that behave like ribbons. Where does hair overlap? Where does it twist?
Where does it tuck behind the ear or wrap around the neck? Draw these clumps as simple shapes first.
This is the “sculpting” phase: you’re building hair like a hairstylist, not a photocopier. -
Step 6: Plan the value map (highlights, midtones, shadows)
Squint at your reference. Squinting reduces detail and reveals the big value pattern.
Identify: (1) darkest areas (often near roots, under overlaps, behind the neck), (2) midtone body of hair,
(3) highlight zones (the shiny bands where the form faces the light). Lightly mark these regions. -
Step 7: Lay down an even midtone to “tone the hair”
Start with the middle value across the main hair mass (not the highlights). This unifies everything and
prevents a patchy look. In graphite, a light, consistent layer is enough. Digitally, this is your base color.
Leave highlight areas lighter than you thinkyou’ll miss that clean shine once it’s gone. -
Step 8: Establish the darkest shadows (the secret sauce for depth)
Deepen the shadow shapes: under overlapping clumps, near the part, under the hair mass, and where hair meets
the neck or forehead. Use broader strokes at firststill thinking in shapes. Save the darkest darks for
small areas; too much black everywhere can make hair look greasy or cartoonishly shiny. -
Step 9: Blend transitions without destroying texture
If you blend, blend lightly. Real hair has soft transitions, but it also has strand texture.
A quick, gentle pass can smooth midtone-to-shadow areas. Stop before it turns into a plastic helmet.
If you’re digital, use a soft brush at low opacity to merge values while keeping edges intentional. -
Step 10: Carve the highlight bands (draw the shine, not the strand)
Highlights often appear as curved bands following the hair’s formespecially in straight or wavy hair.
Don’t outline highlights with harsh lines. Instead, create contrast: darken around the highlight so the
highlight “pops.” In graphite, lift graphite with a kneaded eraser or precision eraser to brighten those bands. -
Step 11: Add strand texture with tapered strokes (selectively)
Now you can add “strand suggestions.” Use strokes that follow the flow lines and taper at the ends
(light pressure → heavier → light). Vary stroke length and spacing. Concentrate detail near focal areas
(like bangs, the highlighted zone, or the front-most lock). Leave quieter areas simpler so the drawing can breathe. -
Step 12: Use negative drawing for flyaways and bright strands
Some of the most realistic hairs are the ones you “draw” by erasing. Shape a kneaded eraser into a point
and lift a few thin strands across darker regions. A precision eraser can create crisp flyaways.
Keep it restrained: a few believable flyaways look natural; a hundred looks like your character was
electrocuted by a sweater. -
Step 13: Sharpen edges where neededand lose edges elsewhere
Realism comes from contrast and edge control. Make the foreground clumps sharper and higher contrast.
Let background hair dissolve into softer edges and gentler values. This creates depth and avoids the
“everything is equally important” problem. Hair isn’t a spreadsheet; it’s a spotlight. -
Step 14: Final passcheck value range, clean smudges, add “hero hairs”
Step back. Squint again. Do you have a full value range (lights, mids, darks)? Is the highlight placed
consistently with your light source? Darken a few core shadows for punch. Lift a few final highlight strands.
Add 5–10 “hero hairs” (distinct strands crossing forms) only where they enhance realism. Then stop.
Overworking is how good hair becomes sad hair.
Quick Adjustments for Different Hair Types
Straight Hair
Straight hair reads strongly through highlight bands and smooth gradients. Keep strokes longer and cleaner.
Emphasize a few large clumps, then add fine strands near the highlights and edges.
Wavy Hair
Waves are repeating S-curves. Map the rhythm first, then shade like a series of rolling forms.
Highlights hop from peak to peak. Avoid making every wave identicalvariation sells “real.”
Curly Hair
Think “ribbons and springs.” Draw curl groups as looping shapes, then shade the inside turns darker.
Don’t render every coil equallysuggest background curls with softer values and fewer edges.
Coily/Kinky Hair
Focus on overall mass, silhouette, and value patterns. Texture is tighter and more clustered, so
use smaller, broken strokes and subtle highlight clusters rather than long shiny bands.
Strong shadow grouping near roots and overlaps helps the volume read correctly.
Short Hair
Short hair usually shows more scalp form and sharper value transitions. You’ll often see darker roots and
quicker highlight falloff. Use shorter strokes, but still prioritize grouping and light direction.
Common Mistakes (And How to Fix Them Fast)
-
“Spaghetti hair”: too many equal lines.
Fix: erase most strands, redraw as 3–8 clumps, then add selective texture. -
Hair looks flat: not enough shadow structure.
Fix: deepen occlusion shadows under overlaps and near the part; strengthen value range. -
Hair looks greasy/metallic: highlights too white and too sharp everywhere.
Fix: soften highlight edges; keep brightest highlights limited to small areas. -
Random stroke direction: texture fights the hairstyle.
Fix: re-establish flow lines and make every mark follow them. -
Overblending: hair becomes a smooth helmet.
Fix: bring back texture with directional strokes and a few lifted strands.
Practice Drills That Actually Work (No, You Can’t Skip These)
- Single lock study: draw one hair clump with a clear highlight band, midtone, and shadow.
- Three-value hair: limit yourself to highlight, midtone, shadow only. Great for control.
- Edge control test: pick one area to sharpen (front lock) and one to soften (back hair).
- Lighting swap: redraw the same hairstyle with light from the opposite side.
Real-World Practice Notes: Experiences Artists Commonly Have (500+ Words)
When people start learning how to draw realistic hair, the first emotional stage is usually:
“I’ll just draw some strands.” The second stage is:
“Why does this look like a mop?” And the third stageafter you discover grouping and valueis:
“Oh. Hair is basically tiny sculpture.”
One common experience artists report is that hair feels impossible until they stop trying to “draw hair”
and start drawing light on a form. The moment you squint at a reference and notice that hair
is mostly three big value zones (shadow, midtone, highlight), things calm down. You’re no longer chasing
thousands of strands; you’re placing a handful of shapes. That shift alone can make your next study look
30% more realisticeven if your linework is still in its “awkward teenage years.”
Another pattern: beginners often underestimate how dark the darks need to be. They stay in safe, timid midtones,
then wonder why the hair looks flat. The “aha” moment comes when you push the occlusion shadowsunder overlaps,
near the part, where hair meets neck or foreheadand suddenly the hair gains depth. It’s like adding bass to music:
you don’t always notice it until it’s missing, but once it’s there, everything sounds (and looks) more professional.
There’s also the classic overblending phase. A lot of artists discover blending stumps (or smudge brushes)
and go full smoothie mode. The drawing becomes silky… and lifeless. The next breakthrough is learning that
blending is a seasoning, not the meal. A light blend can unify midtones, but realism comes back when you
reintroduce directional texture: tapered strokes, subtle strand suggestions, and a few lifted highlights.
Many people find that the best-looking hair studies happen when they blend less than they feel comfortable with.
(Your brain wants “smooth,” but your eyes want “structured.”)
Artists also notice that realism improves faster when they practice small. Not full portraits
just a 2-inch hair lock with one highlight band and a clear shadow side. These mini-studies teach you the
hardest part: controlling value transitions without losing flow. After a week of tiny lock studies,
a full head of hair feels like assembling LEGO sets you already know, rather than inventing plastic from scratch.
A funny (and very real) experience: once you start drawing hair properly, you can’t stop analyzing hair in public.
You’ll catch yourself staring at someone’s highlights in the grocery store like,
“Interesting… strong specular band, midtone compression near the crown…” and then you realize you’ve been
quietly critiquing a stranger’s bangs for 12 seconds. Welcome to the club. We don’t have jackets, but we do
have kneaded erasers shaped like tiny alien thumbs.
Finally, most artists find that the fastest confidence boost comes from learning “when to stop.”
Realistic hair doesn’t mean maximum detail. It means right detail in the right place.
If you can get the silhouette, flow, and value map working, you can leave huge areas relatively simple and
the viewer’s brain will fill in the rest. That’s not cheatingit’s how perception works.
The goal isn’t to draw every strand; it’s to make the viewer feel like they could run a hand through it
(without getting stabbed by graphite).
Conclusion
Realistic hair isn’t a strand-count contest. It’s a value-and-form game with a little texture garnish.
Start with the skull, simplify into clumps, plan your light, build your value range, and only then add
selective strands and flyaways. Practice with small studies, squint often, and remember:
if your hair starts looking like spaghetti, you’re one regrouping session away from redemption.


