
Table of Contents >> Show >> Hide
- What Is a MAC Address?
- Why You Might Need Your MAC Address on Windows 11
- Quick Answer: The Fastest Way to Find Your MAC Address
- Method 1: Find Your MAC Address in Windows 11 Settings
- Method 2: Find the MAC Address for Your Current Wi-Fi Network
- Method 3: Find the MAC Address with Command Prompt
- Method 4: Find Your MAC Address with PowerShell
- Method 5: Find Your MAC Address from Control Panel
- Wi-Fi vs. Ethernet MAC Address: Which One Should You Use?
- What About Random Hardware Addresses in Windows 11?
- Common Problems When Finding a MAC Address
- Best Method for Different Users
- Security and Privacy Tips
- Real-World Experience: What Finding a MAC Address Is Actually Like
- Conclusion
Finding your MAC address on Windows 11 sounds like one of those tiny tech chores that should take five secondsright until you open Settings and Windows politely hides the answer behind three menus, four labels, and a phrase called “Physical address.” Classic. The good news: your MAC address is easy to find once you know where Windows 11 puts it.
This quick guide walks you through the fastest ways to find your MAC address on Windows 11 using Settings, Command Prompt, PowerShell, and network properties. Whether you need it for router setup, school Wi-Fi registration, office network access, device troubleshooting, or simply proving to yourself that you can still win a fight with a settings menu, you are in the right place.
Before we begin, here is the tiny but important detail: a MAC address is not the same as an IP address. Your IP address can change depending on the network. Your MAC address is tied to a network adapter, such as Wi-Fi, Ethernet, Bluetooth, or a virtual adapter. On Windows 11, the MAC address is usually shown as Physical address (MAC).
What Is a MAC Address?
A MAC address, short for Media Access Control address, is a unique identifier used by network hardware. Think of it as the name tag for your device’s network adapter. Your laptop may have one MAC address for Wi-Fi and another for Ethernet. If you use a USB Ethernet adapter, VPN software, virtualization tools, or a mobile hotspot feature, you may see additional network adapters with their own addresses.
A typical MAC address contains 12 hexadecimal characters, usually displayed in six pairs. It may look like one of these examples:
Both formats mean the same thing. Windows often uses hyphens, while routers, phones, and network dashboards may use colons. Either way, the address identifies a network interface on a local network.
Why You Might Need Your MAC Address on Windows 11
You usually do not need to know your MAC address for everyday browsing, streaming, emailing, or pretending to be productive with seventeen browser tabs open. But there are several common situations where it matters:
- Wi-Fi registration: Schools, universities, hotels, and offices may ask you to register your device by MAC address.
- Router setup: Some routers use MAC filtering to allow or block specific devices.
- Network troubleshooting: IT support may request your MAC address to identify your laptop on the network.
- DHCP reservations: A router can assign the same local IP address to your device based on its MAC address.
- Device inventory: Businesses use MAC addresses to track network equipment and adapters.
- Software licensing: Some older or specialized software tools may bind a license to a network adapter.
In short, the MAC address is useful whenever a network needs to recognize a specific adapter rather than a person, username, or device nickname like “Steven’s Laptop Final FINAL v2.”
Quick Answer: The Fastest Way to Find Your MAC Address
The quickest beginner-friendly method is through Windows 11 Settings:
- Press Windows + I to open Settings.
- Select Network & internet.
- Click Advanced network settings.
- Select Hardware and connection properties.
- Look for Physical address (MAC) under Wi-Fi, Ethernet, or the adapter you are using.
This method is clean, visual, and safe. No command-line wizardry required. If you can open Settings, you can do it.
Method 1: Find Your MAC Address in Windows 11 Settings
For most people, Settings is the best place to start. It shows your current adapters and labels the MAC address clearly.
Step-by-Step Instructions
- Right-click the Start button and choose Settings, or press Windows + I.
- Choose Network & internet from the left menu.
- Scroll down and click Advanced network settings.
- Under More settings, click Hardware and connection properties.
- Find the adapter you care about: Wi-Fi for wireless, Ethernet for wired, or another adapter name if you use a dock, VPN, or virtual machine.
- Copy the value beside Physical address (MAC).
If your laptop is connected over Wi-Fi, use the Wi-Fi adapter’s MAC address. If it is plugged into a network cable, use the Ethernet adapter’s MAC address. This matters because Wi-Fi and Ethernet are different network interfaces. Giving your IT department the Ethernet MAC address when you are trying to register Wi-Fi is like giving a pizza shop your office address when you are sitting at home. Technically an address, but not the one that helps.
Method 2: Find the MAC Address for Your Current Wi-Fi Network
If you only need the MAC address for the wireless network you are currently using, Windows 11 gives you a slightly more direct route.
- Open Settings.
- Go to Network & internet.
- Select Wi-Fi.
- Click the name of the network you are connected to.
- Scroll through the properties until you find Physical address (MAC).
This is especially handy on laptops because most people are looking for their Wi-Fi MAC address, not their Ethernet address. The page may also show IP address, DNS servers, link speed, network band, and other connection details. Do not panic. You only need the line labeled Physical address (MAC).
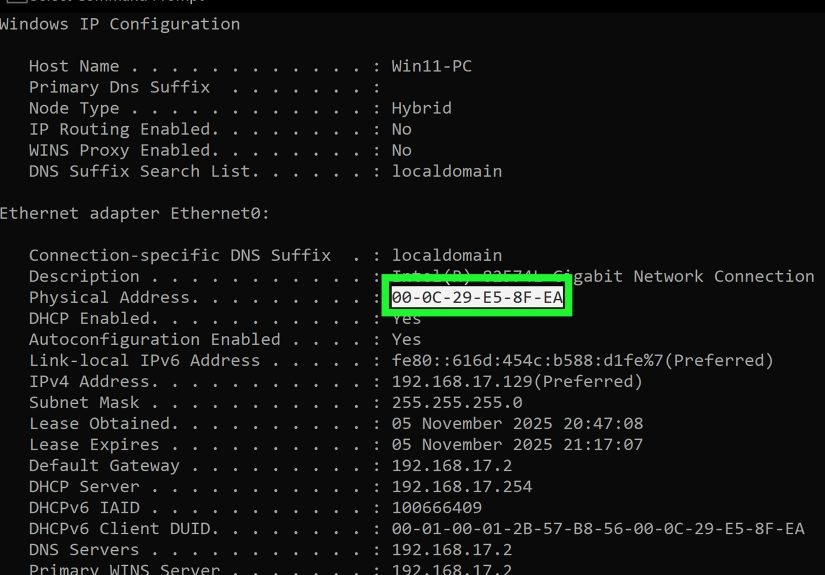
Method 3: Find the MAC Address with Command Prompt
If you like a faster, more technical routeor you are helping someone remotelyCommand Prompt is reliable. It also lists multiple adapters in one place.
Using ipconfig /all
- Press Windows + S and type cmd.
- Open Command Prompt.
- Type the following command and press Enter:
Scroll through the results and look for the adapter you are using. For Wi-Fi, look for a section such as Wireless LAN adapter Wi-Fi. For a cable connection, look for Ethernet adapter Ethernet. The MAC address appears next to Physical Address.
Example:
Using getmac
For an even shorter command, use:
The getmac command returns MAC addresses for network adapters, and the /v option provides more detail. This can be useful when you want a simple list without digging through every IP setting on the machine.
If you see several results, do not automatically copy the first one. Read the connection name or adapter description. Windows may list Bluetooth, virtual adapters, VPN adapters, disabled adapters, and docking station adapters. The correct MAC address is the one that belongs to the network connection you actually need.
Method 4: Find Your MAC Address with PowerShell
PowerShell is another excellent option, especially for power users, admins, or anyone who likes their answers neat and sortable.
Open PowerShell or Windows Terminal and run:
This displays basic network adapter properties, including adapter names and MAC addresses. For a cleaner view, use:
You may see output like this:
The Status column helps you spot the active connection. If Wi-Fi says Up, that is usually the MAC address you need for wireless access. If Ethernet says Up, use the Ethernet MAC address.
Method 5: Find Your MAC Address from Control Panel
Windows 11 prefers Settings, but the old Control Panel still exists, quietly surviving like a stubborn office printer. You can use it to find adapter details too.
- Press Windows + R.
- Type ncpa.cpl and press Enter.
- Right-click your active network adapter and choose Status.
- Click Details.
- Look for Physical Address.
This method is useful if you are familiar with older versions of Windows or if a help desk guide still refers to Network Connections. It works well, but Settings and PowerShell are usually faster on Windows 11.
Wi-Fi vs. Ethernet MAC Address: Which One Should You Use?
One of the most common mistakes is copying the wrong MAC address. Your Windows 11 PC can have several network adapters, and each adapter may have a different MAC address.
Use the Wi-Fi MAC Address When:
- You are registering your laptop for a wireless school or office network.
- You connect without an Ethernet cable.
- The network admin specifically says “wireless MAC address.”
Use the Ethernet MAC Address When:
- You connect through a network cable.
- You use a USB-C dock with Ethernet.
- You are setting up a wired DHCP reservation or wired access rule.
Here is the simple rule: match the MAC address to the way you connect. Wi-Fi for Wi-Fi. Ethernet for Ethernet. Dock Ethernet for dock Ethernet. It is less glamorous than rocket science, but much more useful when the internet refuses to behave.
What About Random Hardware Addresses in Windows 11?
Windows 11 includes a privacy feature called random hardware addresses. When supported by your Wi-Fi hardware, this feature can use a randomized MAC address when scanning for or connecting to wireless networks. The goal is privacy: it makes it harder for public locations to track your device by its real hardware address.
This feature is helpful in public places, but it can cause confusion on networks that rely on MAC registration. For example, if your university Wi-Fi asks you to register your device, but Windows keeps using a randomized address, the network may treat your laptop like a new device later. That is when people start saying things like, “But I registered it yesterday!” and the router responds, emotionally, with absolutely nothing.
How to Check Random Hardware Address Settings
- Open Settings.
- Go to Network & internet.
- Select Wi-Fi.
- Look for Random hardware addresses.
- Turn it on or off depending on your network’s requirements.
You can also manage random hardware addresses for a specific saved network by going to Wi-Fi > Manage known networks, choosing the network, and checking its properties.
If an IT department asks for your “real” Wi-Fi MAC address, you may need to turn random hardware addresses off for that network, reconnect, and then copy the physical address shown for Wi-Fi. Follow the network owner’s instructions, especially on school, workplace, or managed networks.
Common Problems When Finding a MAC Address
You See Too Many MAC Addresses
This is normal. Windows 11 may list Wi-Fi, Ethernet, Bluetooth, VPN adapters, Hyper-V virtual switches, WSL adapters, mobile hotspot adapters, and docking station adapters. Choose the adapter that matches your connection.
Your MAC Address Keeps Changing
Check whether random hardware addresses are enabled for Wi-Fi. If they are on, Windows may use a private or randomized address instead of the adapter’s built-in address.
The Adapter Says “Disconnected”
A disconnected adapter can still have a MAC address. However, if you are registering a device for a network, it is usually safer to use the adapter you plan to connect with.
You Copied the IP Address Instead
Do not worry; it happens. A MAC address looks like six pairs of letters and numbers. An IPv4 address looks like four numbers separated by periods, such as 192.168.1.25. If it has dots, it is probably not your MAC address.
Best Method for Different Users
| User Type | Best Method | Why It Works |
|---|---|---|
| Beginner | Windows 11 Settings | Visual, safe, and easy to follow |
| Student registering Wi-Fi | Wi-Fi network properties | Shows the wireless adapter address directly |
| IT support user | ipconfig /all | Shows detailed adapter and network information |
| Power user | PowerShell Get-NetAdapter | Fast, clean, and useful for multiple adapters |
| Router setup | Settings or Command Prompt | Helps match the correct adapter to the connection type |
Security and Privacy Tips
Your MAC address is not as sensitive as a password, bank number, or private key. Still, you should not post it publicly for no reason. A MAC address can identify a device on a local network, and in some environments it may be used for access rules or tracking. Share it with your school, workplace, internet provider, router admin, or trusted support technician when needed.
For public Wi-Fi, random hardware addresses can improve privacy when your hardware supports the feature. For private managed networks, especially those that require device registration, a stable MAC address may be more practical. The best choice depends on where you are connecting.
Real-World Experience: What Finding a MAC Address Is Actually Like
The first time many Windows 11 users go looking for a MAC address, they expect the process to be obvious. After all, Windows can show weather, widgets, recommended files, cloud backups, and three different places to sign into something. Surely it can show one hardware address without drama. Then they open Settings and discover that the phrase “MAC address” is not always front and center. Instead, Windows often calls it Physical address (MAC), which is accurate but slightly formal, like the address wore a tie to dinner.
In real use, the Settings method is the least stressful. It works well when you are helping a family member, registering a laptop for campus Wi-Fi, or following instructions from an internet provider. The key experience-based tip is to slow down when choosing the adapter. Many laptops show several entries, and the one you need is not always at the top. If you are connected wirelessly, look for Wi-Fi. If you are plugged into a dock, the address may belong to the dock’s Ethernet adapter, not the laptop’s internal hardware. That little detail can save a surprising amount of frustration.
Command Prompt is excellent when Settings feels too slow. The ipconfig /all command gives you a full diagnostic snapshot, which is great for support calls. The downside is that it can feel like Windows just dumped a small novel onto your screen. If you are not used to reading network output, search visually for Wireless LAN adapter Wi-Fi or Ethernet adapter Ethernet, then copy Physical Address. Do not grab the first address you see unless you are sure the adapter is correct.
PowerShell feels cleaner once you know the command. Running Get-NetAdapter gives a tidy list of adapter names, statuses, and MAC addresses. This is especially helpful on computers with virtual adapters from VPN clients, Hyper-V, Docker, WSL, or security software. Seeing the adapter status helps you identify what is currently active. For technical users, this is usually the fastest route.
The biggest real-world trap is random hardware addressing. It is a good privacy feature, especially for public Wi-Fi, but it can confuse networks that expect one stable MAC address. A student might register a laptop on Monday, return Tuesday, and get blocked because the network sees a different randomized address. A home user might create a router rule and wonder why the device no longer matches. If your MAC address seems to change, check Wi-Fi random hardware address settings before blaming the router, the laptop, or Mercury being in retrograde.
Another practical tip: write down which address you used. Label it clearly, such as “Laptop Wi-Fi MAC” or “USB-C Dock Ethernet MAC.” That way, when a router, school portal, or IT person asks for it again, you do not have to repeat the whole treasure hunt. Also, copy carefully. The characters 0 and O can look similar, and one wrong character can turn a simple setup into a very boring mystery.
Overall, finding your MAC address on Windows 11 is easy once you know the vocabulary. Windows says “Physical address,” network admins say “MAC address,” and users say, “Please just make the Wi-Fi work.” Fortunately, all three are talking about the same thing.
Conclusion
Finding your MAC address on Windows 11 is simple once you know where to look. For most users, the best path is Settings > Network & internet > Advanced network settings > Hardware and connection properties. If you prefer commands, ipconfig /all, getmac /v, and Get-NetAdapter are reliable options.
The most important part is choosing the correct adapter. Use the Wi-Fi MAC address for wireless networks, the Ethernet MAC address for wired connections, and the dock adapter’s MAC address if you connect through a docking station. If your address appears to change, check whether random hardware addresses are enabled.
Once you understand that Windows 11 labels the MAC address as Physical address (MAC), the whole process becomes much less mysterious. Not exciting, maybebut extremely useful. And in networking, “useful” beats “exciting” almost every time.


