
Table of Contents >> Show >> Hide
- Why Grease Stains Feel So Stubborn (And Why You Don’t Need to Fight Them)
- The 2-Minute Setup That Saves You 2 Hours Later
- The No-Marathon Grease Removal Method (Works on Most Kitchen Surfaces)
- Make It Even Easier: The “Cling” Method for Stubborn Grease Stains
- Surface-by-Surface: What Works Best Where
- Three Escalation Moves (When Dish Soap Isn’t Enough)
- What Not to Do (Your Kitchenand LungsWill Thank You)
- Keep Grease From Coming Back (Because You Deserve Peace)
- Quick FAQs
- Conclusion: Clean Smarter, Not Harder
- Kitchen Grease: Real-World Experiences (So You Don’t Feel Alone)
Kitchen grease is the glitter of cooking: it travels, it clings, and somehow it ends up in places you swear you’ve never touched.
The good news? You don’t have to spend your entire weekend scrubbing cabinets like you’re training for an arm-wrestling tournament.
The secret is letting chemistry and time do the heavy liftingso your elbows don’t have to.
In this guide, you’ll learn how to remove grease stains and sticky buildup from the most common kitchen surfacescabinets, walls,
range hoods, backsplashes, and appliancesusing smart, low-effort methods. Think: warm surfactants, short soak times, gentle tools,
and a rinse-and-dry finish that keeps surfaces looking clean instead of “clean-ish.”
Why Grease Stains Feel So Stubborn (And Why You Don’t Need to Fight Them)
Grease isn’t like dust that politely sits on a surface waiting to be wiped away. It’s oily, hydrophobic, and loves bonding with
other grimeespecially airborne dust. Over time, it turns into a sticky film that laughs at your dry paper towel.
What actually works is a simple trio:
- Heat (warm water or steam) to soften and loosen oily buildup
- Surfactants (dish soap and gentle cleaners) to break grease into wipeable particles
- Dwell time (letting the cleaner sit briefly) so you don’t have to scrub like it’s a gym membership
The 2-Minute Setup That Saves You 2 Hours Later
Before you start, do these quick steps so grease doesn’t smear, finishes don’t get damaged, and you don’t create a science project
under your sink.
- Ventilate: Open a window or run your hood fan. (Grease cleaning is not the moment for “mystery fumes.”)
- Grab the right cloths: Use microfiber or soft cottonless streaking, more grabbing power.
- Test first: Spot-test any cleaner on a hidden area, especially on painted cabinets and walls.
- Use gloves if you’re sensitive: Even dish soap can be drying after a long wipe-down.
- Keep it simple: Don’t mix cleaning productsever.
The No-Marathon Grease Removal Method (Works on Most Kitchen Surfaces)
This is your default playbook for getting rid of grease stains without scrubbing all day. Start gentle and only “level up” if you
need to.
Step 1: Dry First (Yes, Really)
If the area has dust mixed into grease (hello, cabinet tops and fridge sides), wipe it with a dry microfiber cloth first.
Otherwise, you’ll turn grime into a paste and spread it like you’re frosting a cake no one asked for.
Step 2: Warm Dish-Soap Wipe (Your MVP)
Mix a few drops of grease-cutting dish soap into a bowl of warm water. Dip a cloth, wring it well (damp, not dripping),
and wipe the greasy area in small sections.
For fingerprints and light film, this alone often works. For heavier buildup, don’t scrub harderpause and let it sit.
Step 3: Add Dwell Time (The “Let It Work” Trick)
Re-wipe the area so it’s evenly damp with the soapy solution, then wait 60–120 seconds. This is where the magic happens:
the surfactants loosen the grease, so your next wipe lifts it instead of smearing it.
Step 4: Rinse and Dry (So You Don’t Leave a Sticky “Aftertaste”)
Grease likes leftoversand soap residue can attract more dirt. Follow with a clean cloth dampened with plain water, then dry
immediately with a fresh towel.
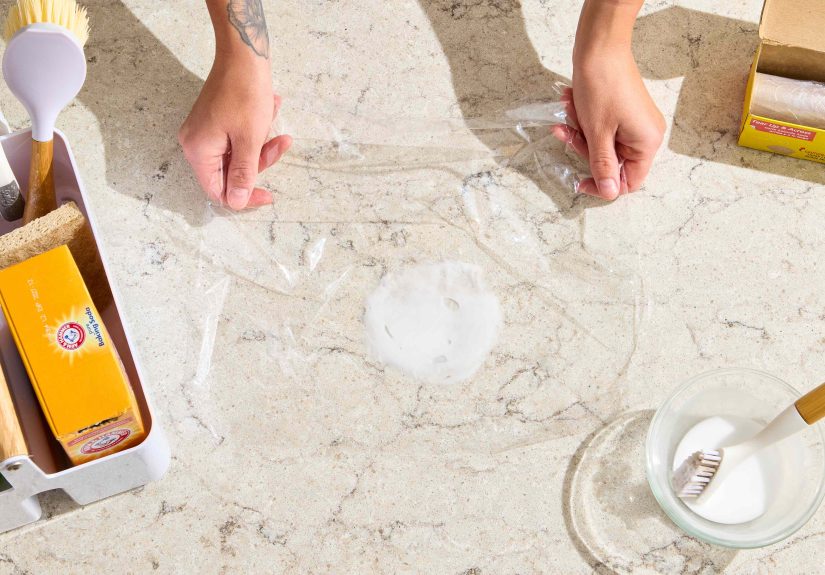
Make It Even Easier: The “Cling” Method for Stubborn Grease Stains
If grease stains are concentrated (near the stove, around handles, under cabinet pulls), use a compress so the cleaner stays put.
This reduces scrubbing because the solution has time to penetrate.
- Wet a paper towel or thin cloth with warm soapy water (not dripping).
- Press it onto the greasy spot like a mini face mask for your cabinet.
- Leave it for 2–5 minutes.
- Wipe away gently, then rinse and dry.
Surface-by-Surface: What Works Best Where
1) Painted Kitchen Walls
Painted walls can be delicate, especially flat or matte finishes. Start with warm water + a small amount of dish soap on a soft cloth.
Wipe gentlyno aggressive rubbing. For spot stains, use the cling method for a couple minutes, then wipe and rinse.
- Tip: Work from the bottom of the stain upward to reduce streak trails.
- Avoid: Abrasive scrubbers (they can burnish paint) and strong solvents unless you’ve spot-tested.
2) Wood Cabinets (Painted or Stained)
Wood finishes don’t love soaking. Use a damp (not wet) cloth with warm soapy water. Let dwell time do the work, then wipe clean and dry.
For sticky buildup around handles, use a soft toothbrush lightlyagain, minimal moisture.
- Pro move: Clean handles/pulls separately if possiblegreasy fingerprints collect there.
- Don’t: Flood seams or edges; moisture can swell wood or weaken adhesives.
3) Laminate and Melamine Cabinets
These surfaces are usually more forgiving. Warm dish soap solution + microfiber works well. For stubborn patches, apply a baking soda paste
(see “Escalation Moves” below) with a soft cloth, then rinse thoroughly.
4) Stainless Steel Appliances
Degrease with warm soapy water on a microfiber cloth, then rinse with a clean damp cloth and dry. For streak-free shine, wipe in the direction
of the grain. If grease is heavy, use the cling method to avoid repeated rubbing.
5) Glass and Tile Backsplashes
These are grease magnets (especially behind a cooktop). Dish soap + warm water works great. If the film is stubborn, a vinegar-and-water wipe can
help on non-porous surfacesjust rinse after and don’t combine vinegar with other products.
6) Grout Lines
Grout holds onto greasy dust. Use a mild paste of baking soda and water, apply with a soft toothbrush, and gently work the grout lines. Rinse and dry.
Keep the paste on the groutnot smeared across everythingso cleanup stays easy.
7) Range Hood Exterior + Filters (Where Grease Goes to Retire)
A greasy hood isn’t just ugly; it can reduce airflow over time. For the exterior, use warm soapy water and a microfiber cloth, then rinse and dry.
For many metal filters, soaking is the “no scrubbing all day” secret:
- Remove the filter (check manufacturer guidance first).
- Soak in very hot water with dish soap and baking soda.
- Let sit 10–60 minutes depending on buildup.
- Rinse thoroughly and air-dry completely before reinstalling.
If you’re not sure what kind of filter you have (mesh, baffle, charcoal), don’t guesscharcoal filters often aren’t washable and may need replacement.
8) Stovetops and Grease Splatter Zones
For daily grease, warm soapy water is usually enough. For cooked-on splatter, soften first: lay a warm, damp cloth over the area for a few minutes.
Then wipe. If needed, use a plastic scraper (like an old gift card) on safe surfaces to lift softened gunk without gouging.
Three Escalation Moves (When Dish Soap Isn’t Enough)
Start gentle. If grease stains are older, stickier, or layered, use one of these upgrade optionsstill without turning your day into a scrub-a-thon.
Escalation #1: Baking Soda Paste (Gentle Abrasive, Big Payoff)
Mix baking soda with a little water until it forms a spreadable paste. Apply with a soft cloth, let it sit for 1–3 minutes, then wipe lightly and rinse.
This is especially helpful on laminate, tile, and some durable finishes.
Escalation #2: A Ready-Made Degreaser (Used Smart, Not Hard)
If grease buildup is heavy (above the stove, cabinet crown molding, hood seams), a commercial degreaser can save time. The key is controlled use:
spray onto a cloth (not directly into hinges or seams), apply, let it sit briefly, then wipe and rinse.
If you’re a teen or you’re unsure about a product, ask an adult to helpespecially with stronger cleaners.
Escalation #3: Steam (The Lazy Genius Option)
Steam loosens grease without harsh chemicals. You can use a handheld steamer on appropriate surfaces, or create gentle steam with a bowl of hot water
placed near the area (never on unstable surfaces). Once grease softens, wipe with soapy water and dry.
What Not to Do (Your Kitchenand LungsWill Thank You)
- Don’t mix cleaners. Especially avoid mixing bleach with ammonia, vinegar, acids, or other products.
- Don’t use abrasive pads on finishes. They can dull paint, scratch stainless, and ruin cabinet sheen.
- Don’t soak wood. Too much water can swell, warp, or weaken edges and joints.
- Don’t assume vinegar is safe everywhere. It can damage some finishes and natural stone.
- Be cautious with rubbing alcohol. It can harm certain painted, varnished, acrylic, or stone surfacesspot-test or skip it.
Keep Grease From Coming Back (Because You Deserve Peace)
Once you’ve banished grease stains, preventing buildup is the real time-saver. Try these low-effort habits:
- Use your range hood every time you cook (and keep filters maintained).
- Cover pans when frying or simmering sauces that splatter.
- Do the 30-second wipe after cooking: warm soapy cloth on backsplash and cooktop edges.
- Weekly quick reset: wipe cabinet fronts near the stove with a damp microfiber cloth.
- Protect cabinet tops: line with paper or washable liners to catch greasy dust.
Quick FAQs
How do I remove grease stains fast without scrubbing?
Use warm dish-soap solution, let it dwell 1–2 minutes, then wipe. For stubborn spots, use the cling method for 2–5 minutes.
What’s the best way to degrease kitchen cabinets?
Warm water + dish soap on a microfiber cloth, minimal moisture, short dwell time, then rinse and dry. Escalate with baking soda paste if needed.
How often should I clean a range hood filter?
Many households do well with monthly cleaning for washable filters, more often if you fry frequently. Follow your manufacturer’s guidance.
Conclusion: Clean Smarter, Not Harder
Getting rid of grease stains in your kitchen without scrubbing all day comes down to a few smart moves: warm water, a grease-cutting surfactant
(hello, dish soap), and a little patience while the cleaner does its job. Add a rinse-and-dry finish and you’ll avoid sticky residue that invites
dirt back for a sequel.
Start with the gentle method, escalate only when needed, and focus on the biggest grease hotspotsnear the stove, on cabinet pulls, and around the range hood.
Your kitchen will look brighter, feel less sticky, and smell less like yesterday’s stir-fry had a permanent lease.
Kitchen Grease: Real-World Experiences (So You Don’t Feel Alone)
In a lot of homes, grease stains don’t announce themselves like a spilled smoothie. They show up quietly, one cooking session at a time.
People often notice it in a very specific moment: the sunlight hits the cabinets at the right angle and suddenly everything looks…
a little “glossy,” and not in a cute, magazine way. That’s when the panic-cleaning urge kicks inusually right before guests arrive.
One common experience is the “cleaning chain reaction.” Someone wipes a greasy cabinet door with plain water, and instead of removing the grime,
it smears into a larger, dull-looking patch. Then they grab more paper towels, scrub harder, and the cabinet starts looking uneven
half clean, half streaky, all frustrating. This is exactly why the rinse-and-dry step matters: it prevents that weird sticky residue that makes the next wipe worse.
Another relatable scenario is the range hood filter situation. Many people forget it exists until airflow feels weak or the hood looks like it’s wearing a shiny coat.
The first instinct is to scrub it like a burnt pan. But once you try a hot soak with dish soap and baking soda, it’s almost comical:
grease loosens on its own, the water turns cloudy, and suddenly you’re not fighting the filteryou’re just rinsing it like a civilized person.
The “aha” moment is realizing that time (soaking) is doing the scrubbing for you.
Kitchens with a lot of frying or high-heat cooking tend to develop grease “zones.” The cabinet closest to the stove gets sticky first.
Drawer pulls collect fingerprints that feel tacky. The backsplash builds a film you don’t see until you try to wipe it and the cloth drags.
People who cook daily often say the fastest fix isn’t a monthly deep cleanit’s the tiny habit of wiping the hotspot areas while the kitchen is still warm.
Not hot, not dangerousjust warm enough that grease hasn’t fully set into a stubborn layer.
Painted walls are their own saga. Someone notices splatter dots near the stove and tries to erase them aggressivelythen the paint looks shiny in that spot,
or the texture gets roughed up. The better experience is the gentle approach: a damp cloth with a tiny bit of dish soap, a short dwell time,
then a soft rinse wipe. It feels almost too easy, which is exactly the point. Scrubbing is usually what makes walls look worse, not better.
And then there’s the “top of the cabinets” discovery. People climb up for a once-a-year deep clean and find a sticky layer that’s basically
grease married to dust. It’s gross, yesbut also predictable. The best experience upgrade here is prevention: lining the tops with paper or a washable liner
so the next clean is just “remove liner, wipe once, replace,” instead of “why does my kitchen have attic grime?”
The overall lesson from these everyday kitchen moments is simple: grease stains are less about strength and more about strategy.
When you let warm water, soap, and a little dwell time do their job, cleaning stops being a workout and becomes a quick reset.
Your kitchen doesn’t need perfectionit just needs a system that doesn’t steal your whole day.


