
Table of Contents >> Show >> Hide
- Why a School Map Project Is Actually Useful
- What You Will Need
- How to Make a School Map (for a Class Project): 14 Steps
- Step 1: Decide what your map needs to show
- Step 2: Choose your boundaries and your audience
- Step 3: Make a rough observation walk
- Step 4: Measure what you can, estimate what you cannot
- Step 5: Pick a scale that fits your paper
- Step 6: Draw the basic outline first
- Step 7: Add the biggest features before the small ones
- Step 8: Draw pathways, doors, and connections
- Step 9: Use symbols instead of drawing every detail literally
- Step 10: Add labels that people can actually read
- Step 11: Create a legend or map key
- Step 12: Add a compass rose and scale bar
- Step 13: Check for accuracy, readability, and privacy
- Step 14: Finalize the design and make it presentation-ready
- Common Mistakes to Avoid
- Final Thoughts
- Extra Experience Notes: What Students Usually Learn From This Project
- SEO Tags
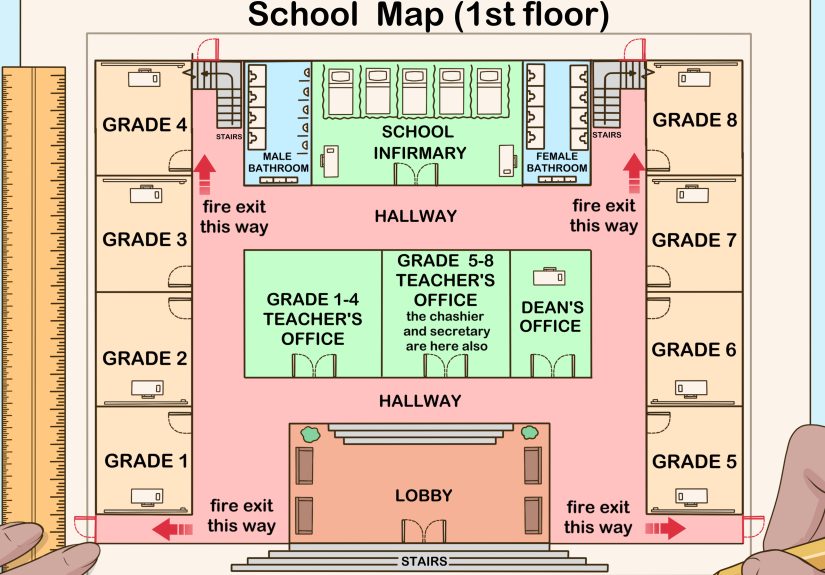
If your teacher has assigned a school map project, congratulations: you have officially entered the world of tiny rulers, suspiciously serious graph paper, and the thrilling debate over whether the cafeteria is “south of the gym” or “kind of diagonally-ish.” The good news is that making a school map is not just an art project pretending to be geography. It is a smart mix of observation, math, design, and communication. A good school map helps a viewer understand a real place quickly. It shows where things are, how they connect, and what matters most.
Whether you are mapping one hallway, one floor, a whole campus, or the area around the school grounds, the basic process is the same. You decide what to show, measure or estimate the space, choose a scale, sketch the layout, and then add the map features that make the whole thing readable. That means labels, a legend, a compass rose, and a scale bar. In other words, you are not just drawing buildings. You are turning a real-world place into a clear visual guide.
This step-by-step guide walks you through the full process in a way that is practical, school-friendly, and much less stressful than staring at a blank page and hoping geometry does all the work for you.
Why a School Map Project Is Actually Useful
A school map project teaches more than most students expect. Yes, it helps with geography and map-reading skills. But it also builds spatial thinking, which is the ability to understand how objects relate to each other in space. That matters in art, architecture, engineering, design, and even everyday life. If you can figure out how to turn a real campus into a flat, understandable drawing, you are practicing how to simplify complex information without losing the truth.
It also teaches planning. You have to make choices about what belongs on the map and what does not. A useful map is selective. It highlights classrooms, the office, library, gym, cafeteria, restrooms, entrances, sidewalks, parking lots, fields, and other important landmarks. It does not need every trash can, every shrub, or the tragic location where your pencil snapped during math class.
Most important, a strong school map is easy for someone else to read. That is the real test. If another student can look at your finished work and immediately understand the layout, your map is doing its job.
What You Will Need
- Graph paper or plain white paper
- Pencil and eraser
- Ruler
- Colored pencils, markers, or pens
- A clipboard or hard surface for note-taking
- A measuring tape, yardstick, or teacher-provided dimensions if available
- Notebook paper for rough observations
- Optional: a phone camera for reference photos if your teacher allows it
How to Make a School Map (for a Class Project): 14 Steps
Step 1: Decide what your map needs to show
Start with the assignment itself. Are you mapping the whole school campus, one floor of the building, a playground area, or the route between important places? The answer shapes everything else. A whole-campus school map will focus on major buildings, fields, parking lots, entrances, and sidewalks. A map of one hallway or floor will need classroom doors, stairwells, restrooms, and office spaces. Define the purpose early so your map does not try to do too much at once. A project that tries to show every possible detail usually turns into a confusing maze of labels and regret.
Step 2: Choose your boundaries and your audience
Now decide exactly where the map begins and ends. Maybe it covers the front office to the gym, or the complete school grounds from the main gate to the athletic field. Think about who is supposed to use the map. Is it for your teacher, classmates, visitors, or new students? That changes what matters. A visitor-friendly map needs obvious landmarks and simple labels. A classroom map may include more detailed room numbers. Keep the project classroom-safe too. Do not include personal student information, home addresses, or sensitive details that do not belong on a school project.
Step 3: Make a rough observation walk
Before drawing anything serious, walk the space and observe it like a cartographer. Look for the largest features first: main building, office, gym, cafeteria, library, playground, parking lot, field, courtyard, and entrances. Then notice how those features connect. Which sidewalk leads where? Which building is next to the office? Where are the stairs? Where do hallways turn? Use quick notes and simple thumbnail sketches. This first walk is not about perfection. It is about building a mental picture of the area so your final map reflects the real layout instead of a vague memory and a heroic amount of guessing.
Step 4: Measure what you can, estimate what you cannot
A map becomes much stronger when it is based on real measurements. If your teacher allows it, measure walls, paths, garden beds, open spaces, or hall lengths with a tape measure or yardstick. If exact measurements are not possible, estimate carefully by using footsteps, floor tiles, or known distances. For example, if one hallway section is made of ten tiles and each tile is one foot wide, that is useful information. Write everything down clearly. Do not trust your memory. Memory is wonderful for birthdays and theme song lyrics, but it is not always loyal when you are trying to place the library 30 feet from the office.
Step 5: Pick a scale that fits your paper
Scale is the rule that shrinks the real world into something that fits on paper. This step is where your math muscles finally get invited to the party. A simple scale might be 1 inch = 10 feet, or 1 square = 5 feet if you are using graph paper. Choose a scale that gives you enough room for detail without forcing the map onto a poster the size of a garage door. If you are drawing a large campus, you may need a smaller scale. If you are mapping one room or hallway, use a larger scale so details stay readable. Test the scale with one major measurement before committing.
Step 6: Draw the basic outline first
Using your chosen scale, lightly sketch the outer boundaries of the area. This is the skeleton of the map. Draw the edge of the campus, the shape of the building, or the hallway outline first. Keep your pencil marks light so you can revise them. Many students make the mistake of drawing doors, trees, desks, and labels before the main shape is correct. That is like decorating a cake before baking it. Get the big structure right first. Once the general outline looks accurate, the smaller details will have a place to live.
Step 7: Add the biggest features before the small ones
Place the large, important landmarks next. Add the main office, library, gym, cafeteria, auditorium, playground, parking area, sports field, or other major sections. If your project focuses on an interior space, place classrooms, restrooms, staircases, and exits. Keep everything proportional to your scale. Bigger spaces should look bigger, smaller spaces should not suddenly become football fields. This is also the moment to check spacing. If the gym is supposed to sit east of the cafeteria with a courtyard in between, make sure the drawing leaves room for all three. A school map should feel organized, not accidentally invented.
Step 8: Draw pathways, doors, and connections
Once the main features are placed, add the routes that help people move through the space. This includes hallways, sidewalks, paths, gates, stairs, ramps, crosswalks, and entrances. These connections often matter as much as the buildings themselves, because maps are not just about where things are. They are also about how to get from one place to another. Use line styles consistently. For example, hallways might be solid lines, sidewalks might be thinner lines, and fences might be dashed. This makes the map easier to decode at a glance, which is exactly what a viewer needs.
Step 9: Use symbols instead of drawing every detail literally
Maps are not realistic paintings. They rely on symbols, and that is a good thing. A restroom can be shown with a small icon. Trees can be simple circles or green shapes. Parking can be marked with a “P.” Entrances can be arrows or highlighted door symbols. If you try to draw every single object exactly as it looks in real life, your map will become crowded and hard to read. Symbols save space and create consistency. Just make sure you use them the same way throughout the map. If a blue square means the library in one corner, it should not randomly mean the nurse’s office somewhere else.
Step 10: Add labels that people can actually read
Now label the important places. Write names clearly and keep the text size consistent. Use room numbers if the assignment calls for them, but do not label every inch of the page until it looks like a dictionary exploded. Focus on the places that matter most to a viewer: office, cafeteria, gym, library, restrooms, classrooms, main entrance, bus area, and outdoor landmarks. If the school is large, you can add a simple letter-number grid so locations are easier to find. That trick is common on real campus maps because it helps viewers search without turning the page into a guessing game.
Step 11: Create a legend or map key
Your legend explains what the symbols and colors mean. This is one of the most important parts of the entire class project, because even a beautiful map becomes confusing if nobody understands its symbols. Set aside a neat box in one corner and list each symbol clearly. Example: green circle = tree, blue rectangle = classroom, red star = main office, dashed line = fence, striped area = parking lot. Keep the legend short but complete. If you used colors for different building types or activity zones, explain those too. Think of the legend as the translation guide for your visual language.
Step 12: Add a compass rose and scale bar
Two classic map features make your school map look polished and useful: direction and scale. Add a compass rose or at least a north arrow so viewers know orientation. North is often at the top, but not always, so do not assume people will guess correctly. Then include a scale bar or a written scale statement such as “1 square = 5 feet.” This tells the viewer how your drawing relates to the real-world space. Together, these features show that your project is a real map, not just a pretty diagram with excellent penmanship.
Step 13: Check for accuracy, readability, and privacy
Before you color anything permanently, review the map carefully. Are the major spaces in the right relative positions? Are labels readable? Does the legend match the symbols on the page? Can someone tell where the entrances and pathways are? Also check whether the map includes anything it should not. For a school project, leave out personal student names, home locations, or sensitive details. If your map is intended for a public display, keep it general and classroom-appropriate. A good map is accurate, but it is also thoughtful about what information belongs in the final version.
Step 14: Finalize the design and make it presentation-ready
Now go over your lines neatly, erase stray pencil marks, and add color with purpose. Use color to separate areas, not to start a rainbow riot. Choose a clean title such as Map of Lincoln Middle School Campus or First Floor School Map. Add your name and date if your teacher wants them. Make sure the legend, compass rose, and scale bar are all easy to spot. Then ask one other person to read the map without your help. If they can understand it quickly, you are done. If they stare at it like it is an ancient code carved into stone, revise before submitting.
Common Mistakes to Avoid
The biggest mistake is skipping the planning stage. Students often rush into drawing before deciding the map’s purpose, scale, or boundaries. That leads to cramped corners, missing features, and a lot of erasing. Another common mistake is ignoring proportion. If the office is tiny in real life and your drawing makes it bigger than the gym, the map may look nice but it stops being trustworthy.
Also avoid over-labeling. A school map should guide the eye, not overwhelm it. Too many labels, arrows, and decorative extras can make even accurate work hard to read. Finally, do not forget the legend, scale, and compass rose. Those features are not optional fluff. They are what make the project feel complete, useful, and convincingly map-like.
Final Thoughts
A strong school map project is part observation, part design, and part problem-solving. It asks you to notice how a familiar place is organized, then communicate that structure clearly to someone else. That is a real skill, and a useful one. When you approach the project step by step, the work becomes much less intimidating. You are not trying to create a masterpiece in one dramatic burst of pencil energy. You are simply building a map piece by piece, from purpose to measurement to layout to final polish.
So grab the ruler, trust the graph paper, and map your school like a calm professional. Or at least like a calm student pretending to be a professional for a grade. That counts too.
Extra Experience Notes: What Students Usually Learn From This Project
One of the most interesting things about making a school map is that students almost always start the project thinking they already know the campus perfectly. After all, they walk through it every day. They know where the office is, where the gym is, and exactly how far the cafeteria feels when they are carrying a backpack that weighs roughly the same as a baby elephant. But the moment they begin mapping, they realize that knowing a place and understanding its layout are not exactly the same thing.
That is usually the first big lesson: familiar spaces are more complex than they seem. A hallway that feels short can turn out to be fairly long when measured. Two buildings that seem close together may actually have a courtyard, sidewalk, and side entrance separating them. Students also notice features they have ignored for months, like ramps, side gates, utility paths, garden beds, bike racks, and the way one entrance lines up with another. In that sense, the project turns a normal school day into an observation exercise. Suddenly, the campus becomes a place to study instead of just a place to survive until dismissal.
The second lesson is about simplification. A real school has hundreds of details, but a useful map cannot show all of them. Students have to decide what matters most. That can be frustrating at first. Many want to include every bench, poster board, or decorative plant because they worked hard to notice them. But mapmaking teaches restraint. The best maps are selective. They tell the truth clearly, not exhaustively. That is a surprisingly mature design principle to learn in a classroom project.
Another common experience is discovering how math becomes practical when there is a real goal attached to it. Scale stops being an abstract classroom idea and starts becoming the reason the map fits on the page. Proportion matters because the drawing has to make sense visually. Even estimation becomes meaningful. Students quickly learn that one sloppy guess can throw off an entire row of rooms. It is a very polite way for the project to say, “Hello, accuracy matters now.”
There is also a confidence boost built into the process. At the start, a blank page can feel intimidating. By the end, students are holding a finished school campus map or floor plan that another person can actually use. That feels good. It proves they can observe a real environment, organize information, and turn it into something useful. For many students, that is the moment the project stops being “just homework” and starts feeling like real design work.
Finally, the project often changes how students see maps in everyday life. After drawing their own, they begin to notice why public maps use legends, symbols, grids, color coding, and directional markers. They understand why a campus map includes points of interest, why building numbers matter, and why accessibility features deserve clear symbols. In other words, they become better readers of visual information. That may not sound dramatic, but it is a powerful skill in a world full of diagrams, interfaces, floor plans, transit maps, and digital navigation tools. Not bad for a class project that began with a ruler and some graph paper.


