
Table of Contents >> Show >> Hide
- What Are Boba Pearls (and Why Do They Get Chewy)?
- Ingredients and Tools You’ll Want
- The Secret: Make a Syrup, Then “Gel” the Starch
- Homemade Brown Sugar Boba Pearls (Step-by-Step)
- How to Make Bubble Tea That Doesn’t Taste “Watery”
- Troubleshooting: Fixes for the Most Common Boba Problems
- Storage and Make-Ahead: The Honest Truth
- Fun Variations (Because You’re Allowed to Be Creative)
- Conclusion: Your Home Boba Era Starts Now
- Real-World Experiences: What It’s Like to Make Boba Pearls at Home (500-ish Words of Reality)
If you’ve ever paid $7 for a bubble tea and thought, “I could’ve bought a whole carton of milk for this”welcome.
The good news: boba pearls (those chewy tapioca balls at the bottom of your cup) are absolutely doable at home.
The even better news: once you learn the core technique, you can make them as classic, brown-sugary, or extra as you want.
This guide walks you through making homemade boba pearls from tapioca starch, cooking them to that springy “QQ” chew,
soaking them in syrup, and then building a bubble tea that tastes like it came from a shopwithout the shop markup.
Expect clear steps, real-world fixes, and a few laughs because your first batch might look like tiny asteroids. Still delicious, though.
What Are Boba Pearls (and Why Do They Get Chewy)?
“Boba” usually means large tapioca pearls made from tapioca starch (which comes from cassava). When cooked properly,
tapioca turns translucent and pleasantly springy. That signature chew happens because the starch hydrates, gels, and firms up as it cools.
The classic “black” look often comes from brown sugar (and sometimes coloring). Clear/white pearls are also common,
and they’ll soak up the flavor of whatever syrup you put them inkind of like tiny edible sponges with better vibes.
Bubble tea itself is typically tea + milk (or a non-dairy option) + sweetener + pearls, usually shaken with ice.
The shaking creates the foamy “bubbles” on topso yes, bubble tea is bubbly for reasons other than the boba.
Ingredients and Tools You’ll Want
Ingredients (for about 4 servings of pearls)
- Tapioca starch (aka tapioca flour): your non-negotiable main character
- Dark brown sugar: flavor + color + that caramel-molasses depth
- Water: for the syrup and for forming the dough
- Extra tapioca starch: for dusting (so your pearls don’t become one mega-pearl)
- Optional: a spoonful of molasses for deeper color, or cocoa powder for a darker look
Tools
- Small saucepan
- Heatproof spatula or wooden spoon
- Mixing bowl (optional, but helpful)
- Rolling pin (optionalyour hands can do the job too)
- Bench scraper or knife
- Large pot for boiling
- Slotted spoon or strainer
- A wide boba straw (for servingand surprisingly useful for cutting uniform pearls)
The Secret: Make a Syrup, Then “Gel” the Starch
Homemade boba dough works best when the tapioca starch meets very hot liquid.
That heat helps the starch hydrate and turn into a pliable, elastic dough instead of sad, dusty crumbs.
Practically speaking: you’ll cook a quick brown sugar syrup, then mix in tapioca starch while it’s hot.
Think of it like this: you’re not just mixing ingredientsyou’re persuading starch to become dough.
And starch, like a cat, needs the right conditions before it cooperates.
Homemade Brown Sugar Boba Pearls (Step-by-Step)
Ingredients
- 2 cups tapioca starch, plus 1/2 to 3/4 cup more for dusting
- 2 cups dark brown sugar, divided (1 cup for dough, 1 cup for syrup bath)
- 2/3 cup water (for dough mixture)
- 1 cup water (for syrup bath)
1) Start the tapioca mixture
-
In a small bowl, whisk 2/3 cup water with 1 cup tapioca starch.
It may look separated. Don’t panic. Tapioca is dramatic at first. -
In a saucepan over high heat, bring 1 cup brown sugar + 2/3 cup water to a boil,
stirring to dissolve the sugar. - Reduce heat to medium-high and whisk in the tapioca slurry. Stir until it begins to tightenthis happens fast (around 30 seconds).
- Remove from heat and stir in the remaining 1 cup tapioca starch until a shaggy dough forms.
2) Knead into a smooth, springy dough
- Dust your counter generously with tapioca starch.
-
Turn out the dough and let it cool for 3–4 minutes (warm is good; lava is not).
Knead until smooth, springy, and no longer stickyabout 6–8 minutes. - If it’s sticky, dust in a little more tapioca starch. If it’s cracking or too dry, dampen your hands and keep kneading.
3) Shape the pearls (yes, this part is a workout for your patience)
- Divide dough into 6 pieces and keep covered with a damp towel so it doesn’t dry out.
- Roll one piece out to about 1/4-inch thickness. Use a wide straw (or knife) to cut small pieces.
-
Roll each piece into a pea-sized ball. Place on a tapioca-dusted baking sheet.
Repeat with the remaining dough.
Pro tip: Uniform pearls cook more evenly. If yours vary wildly in size, you’ll get a mix of “perfectly chewy”
and “surprise gummy marble.” Still ediblejust unpredictable.
4) Cook the boba pearls
-
Bring a large pot of water to a steady boil. Use plenty of water so the pearls have room to move.
A helpful guideline is using much more water than pearlscrowding leads to sticking. -
Add pearls and stir gently right away to keep them from clumping.
Once they float, lower heat to maintain a gentle boil. - Cook until the pearls look mostly translucent, typically 15–20 minutes, stirring occasionally.
-
Turn off heat, cover the pot, and let pearls steam/rest in the hot water for another 15–20 minutes.
Taste one: you want chewy all the way through, not chalky in the center. - Drain well. (Optional: quick rinse to reduce surface starch.)
5) Make a brown sugar syrup bath (don’t skip this)
-
In a saucepan, bring 1 cup water + 1 cup brown sugar to a boil, then simmer until slightly thickened.
You want it syrupy enough to coat a spoon, but still pourable. -
Add drained pearls to the syrup and let them soak for at least 20–30 minutes.
This sweetens them and keeps them from turning into tiny rocks. - Keep the pearls warm in the syrup until serving. Boba is happiest when cozy.
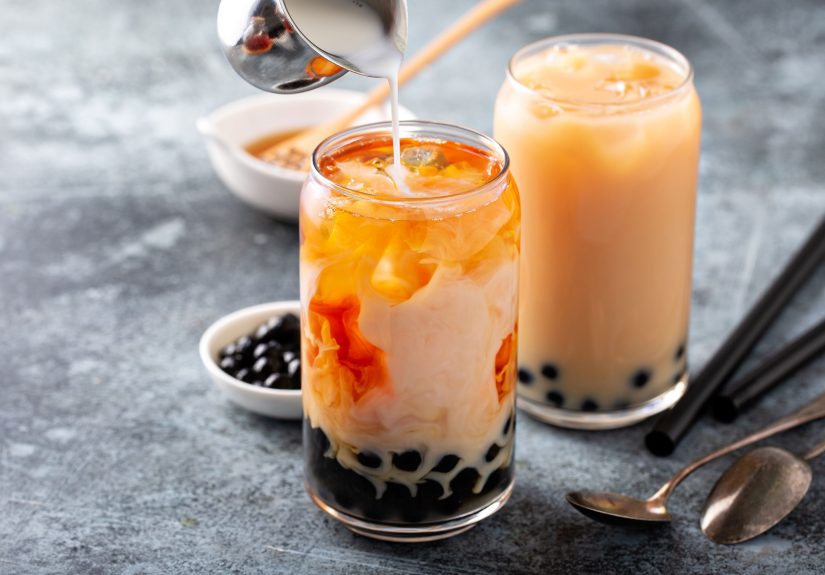
How to Make Bubble Tea That Doesn’t Taste “Watery”
A common home-boba problem is nailing the pearls… then building a drink that tastes like lightly flavored ice.
The fix is simple: make your tea stronger than you think you need, because milk and ice will dilute it.
Bubble tea basics (one 16-ounce drink)
- 1/4 cup cooked boba pearls (plus a spoonful of syrup)
- 1 cup very strong brewed tea (black tea is classic; jasmine/green are great too)
- 1/3 to 1/2 cup milk or non-dairy milk (oat milk is popular for extra creaminess)
- 1–2 tablespoons sweetener (simple syrup, brown sugar syrup, honey, or condensed milk)
- Ice
Assembly method
- Add boba + a bit of syrup to the bottom of a tall glass.
- Add ice.
- Pour in tea and milk, then sweeten to taste.
- Stir or shake (shaking gives you that foamy top).
- Insert a wide straw, take a sip, and enjoy the tiny chewy rewards.
Troubleshooting: Fixes for the Most Common Boba Problems
The dough won’t come together
- Too dry/crumbly: the dough cooled too much or needs moisture. Dampen your hands and knead again.
- Too sticky: dust in a little tapioca starch and keep kneading until springy.
Your pearls stick together in the pot
- Use more water, add pearls only when water is boiling, and stir right after adding (especially the first minute).
- Dust pearls well before cooking to keep them from bonding like best friends.
The center is hard (the dreaded “boba bullet”)
- Cook longer, then give them the covered rest/steam time. Taste-test instead of guessing.
- Very large pearls may need more time than mini pearls.
They turn mushy or fall apart
- Overcooking can break down texture. Aim for “mostly translucent with a tiny dot,” then rest off-heat.
- Don’t leave cooked pearls sitting in plain water for a long timemove them into syrup.
Storage and Make-Ahead: The Honest Truth
Boba pearls are a “best today” food. They’re at their peak within hours of cooking, especially when held warm in syrup.
After too long, the outside softens and the inside firms upbasically the opposite of what we want in life and in boba.
- Best practice: cook, soak in syrup, serve within a few hours.
- Short hold: keep pearls warm in a brown sugar bath. If they sit too long, they lose that bouncy “QQ” chew.
- Make-ahead option: you can freeze uncooked pearls in a single layer, then store in a freezer bag and boil from frozen.
Also: boba pearls can be a choking hazard for small kids. If you’re serving children, supervise and consider smaller pearls.
Fun Variations (Because You’re Allowed to Be Creative)
1) Mini boba vs. jumbo boba
Smaller pearls cook faster and are more forgiving. Jumbo pearls look dramatic (and make you feel like you’re drinking dessert with a mission),
but they require more careful cooking so the centers don’t stay firm.
2) Flavor and color upgrades
- Cocoa boba: knead in 1–2 tablespoons of cocoa powder with a bit of extra starch as needed.
- Matcha boba: add 1–2 teaspoons matcha for earthy color and flavor.
- Purple sweet potato vibe: use purple sweet potato powder (or similar natural coloring) for a fun twist.
3) Syrup swaps
Brown sugar is classic, but you can also sweeten pearls in honey syrup, maple syrup, or deeper “black sugar”-style syrups.
The pearls themselves are mild, so the syrup is where you can really steer the flavor.
Conclusion: Your Home Boba Era Starts Now
Making boba pearls at home is equal parts cooking and craft project: you create a hot brown sugar base, knead tapioca into a springy dough,
roll tiny pearls, cook them until chewy, then soak them in syrup so they stay soft and sweet.
After that, building bubble tea is mostly about using strong tea, the right milk, and the sweetness level you actually like.
The first batch might not be perfectmaybe they’re slightly uneven or you accidentally invent “abstract boba.”
But once you get the dough feel and cooking rhythm down, you’ll be able to make café-style bubble tea whenever the craving hits.
Which is… suspiciously often, once you realize you can.
Real-World Experiences: What It’s Like to Make Boba Pearls at Home (500-ish Words of Reality)
Here’s what nobody tells you before your first homemade boba session: it’s not just cooking. It’s a full-on tiny-ball manufacturing operation.
One minute you’re calmly stirring sugar on the stove; the next you’re dusted in tapioca starch like you lost a fight with a powdered donut.
And somehow, that’s part of the charm. Rolling pearls is repetitive in a weirdly soothing waylike culinary fidget spinninguntil you realize
you’ve been standing in the same spot for 25 minutes and your back is filing a complaint.
The dough teaches you quickly that recipes are guidelines and humidity is the boss. On a dry day, the dough can crack and crumble,
and you’ll learn the “dampen your hands and keep kneading” trick like it’s ancient wisdom. On a humid day, the dough can feel sticky,
and you’ll start dusting tapioca starch the way some people sprinkle saltconfidently and with emotion. The best moment is when the dough turns
smooth and springy and stops trying to cling to your fingers like it pays rent there. That’s your signal: you’re winning.
Shaping pearls also changes your personality for a while. You’ll begin by insisting every pearl must be perfectly round and identical,
like it’s going to be judged in a tiny tapioca beauty pageant. Then, halfway through, you’ll accept that “roughly pea-sized” is a completely valid
lifestyle choice. The good news: bubble tea is very forgiving. Once pearls hit the pot, most of the “imperfect shapes” become “rustic artisanal texture.”
If anyone questions it, you can say “handcrafted” with a straight face.
Cooking is where the magic happens. The first time you see the pearls float, it’s oddly satisfyinglike they’re announcing,
“We have become boba; please proceed.” The real test is texture. You’ll taste one, realize the center is still a little firm,
and learn why the covered resting step matters. That rest is basically spa time for your pearls: warm, steamy, and essential for becoming fully chewy.
Afterward, the syrup bath does its own transformation, turning plain tapioca into something you actually crave.
And then comes the best part: building your drink. Homemade bubble tea feels customizable in a way shops can’t always match.
Want it less sweet? Easy. Want it intensely tea-forward? Brew stronger. Want a “dessert in a cup” moment? Use brown sugar syrup and extra milk.
If you’re making it with friends or family, you’ll notice everyone has a different “perfect ratio,” and suddenly you’ve created a boba tasting bar in your kitchen.
The first sipwhen you get cold tea, creamy milk, caramel syrup, and that chewy pearlfeels like a small victory.
Not the kind where you win a trophy… more like the kind where you quietly think, “Yeah, I could open a bubble tea stand.”
(You probably shouldn’t. But you could.)


