
Table of Contents >> Show >> Hide
- Quick Decision: Microwave vs. Oven
- Main Keyword Targets (Naturally, Not Spammy)
- How to Choose a Good Butternut Squash
- Prep Without Drama: Safe Cutting and Peeling Tips
- Method 1: How to Microwave Butternut Squash (3 Ways)
- Method 2: How to Cook Butternut Squash in the Oven (Halves or Cubes)
- Flavor Playbook: Make It Sweet, Savory, or Spicy
- What to Do With Cooked Butternut Squash
- Storage, Reheating, and Meal Prep
- Troubleshooting (Because Squash Has Opinions)
- Mini Timing Cheat Sheet (Real-Life Ranges)
- of Real-Life Experience: What Actually Works in a Normal Kitchen
- Conclusion
Butternut squash is basically the overachiever of the produce aisle: naturally sweet, ridiculously versatile, and somehow always shows up when you’re trying to “eat healthier” without emotionally committing to kale. The only downside? It’s shaped like a bowling pin made of armor. The good news is you don’t need chef skills (or a gym membership) to cook it beautifully.
This guide covers two reliable routes: microwaving butternut squash for speed and convenience, and oven-roasting for deeper flavor, caramelized edges, and that “I definitely meal-prepped” energy. You’ll also get timing charts (the human-friendly kind), prep tips that keep your fingers attached, and a bunch of ways to make cooked squash taste like it belongs at the center of the plate.
Quick Decision: Microwave vs. Oven
- Microwave butternut squash when you want it fast: weeknights, meal prep, purees, soups, baby food, or “I forgot dinner exists.”
- Oven-roast butternut squash when you want maximum flavor: caramelization, crisp edges, and a richer, nuttier sweetness.
- Best of both worlds: microwave to soften (or partially cook), then finish in the oven to brown and deepen flavor.
Main Keyword Targets (Naturally, Not Spammy)
You’ll see phrases like how to cook butternut squash, microwave butternut squash, butternut squash microwave time, and roast butternut squash in oven show up where they make senselike seasoning, not like glitter.
How to Choose a Good Butternut Squash
Picking the right squash makes cooking easier and flavor better. Look for a squash that feels heavy for its size (more flesh, less air), with matte beige skin (shiny can mean it’s less mature), and no deep cuts or soft spots. Small-to-medium squashes often cook a bit faster and can be slightly sweeter, while larger ones are great for batch cooking.
Prep Without Drama: Safe Cutting and Peeling Tips
Butternut squash is delicious, but it is not here to make your life easy. If your knife is struggling, don’t wrestle itoutsmart it.
Tools that help (a lot)
- Big, sharp chef’s knife (sharp = safer because you don’t have to force it)
- Stable cutting board (put a damp paper towel underneath to keep it from sliding)
- Vegetable peeler (Y-peeler is great)
- Spoon for scooping seeds
- Microwave-safe dish with a lid or microwave-safe cover (or vented wrap)
Optional “cheat code” to make peeling easier
If peeling feels like scraping a bowling ball: microwave the whole squash for a few minutes just to soften the skin slightly, then peel. This doesn’t cook it throughit just reduces the effort and the chance your peeler files a complaint with HR.
Method 1: How to Microwave Butternut Squash (3 Ways)
Microwaving butternut squash is ideal when you need cooked squash quickly for purees, soups, mashed squash, or as a shortcut for roasting. The big rule: vent steam. Squash can trap steam, and nobody wants a microwave horror story.
Microwave Safety Basics (Worth 20 Seconds)
- Pierce whole squash multiple times so steam can escape.
- Cover food for even cooking (use a microwave-safe lid or vented wrap).
- Let it stand after cooking. Microwaves heat unevenly; standing time finishes the job and evens out heat.
Option A: Microwave a Whole Butternut Squash
This is the “no cutting until it’s softer” method. Great if you want to make peeling and slicing easier afterwardor if your squash is shaped like it lifts weights.
- Wash and dry the squash.
- Pierce it all over with a fork or the tip of a knife (think: 10–15 pokes).
- Place on a microwave-safe plate.
- Microwave on HIGH in bursts:
- Small/medium squash: start with 10–12 minutes
- Large squash: start with 14–16 minutes
Rotate halfway if your microwave doesn’t have a turntable.
- Stand 5 minutes (seriouslythis matters), then test with a fork. It should pierce more easily.
- If needed, microwave in 2-minute increments until tender enough for your purpose. (If you’re finishing in the oven, you can stop when it’s just softened.)
Best use: softening for easier peeling/cutting, or cooking through for purees.
Texture note: whole microwaved squash can be very moistperfect for blending, less perfect for “crispy edges.”
Option B: Microwave Butternut Squash Halves (Fast + Controlled)
If you can safely cut it, halves cook faster and more evenly than whole. This is the most reliable microwave method for “fully cooked squash” that you can scoop, mash, or shred with a fork.
- Trim the ends so it sits steady. Cut lengthwise.
- Scoop out the seeds and stringy bits.
- Place halves cut-side down in a microwave-safe dish with a splash of water (2–4 tablespoons) to create steam.
- Cover (lid or vented wrap).
- Microwave on HIGH:
- Medium halves: about 10–12 minutes
- Large halves: 12–15 minutes
- Stand 3–5 minutes covered.
- Check tenderness. If needed, continue in 1–2 minute bursts.
Pro move: score the flesh lightly in a crisscross pattern before cooking. It helps heat penetrate and makes scooping easier.
Option C: Microwave Cubed Butternut Squash (Meal-Prep Friendly)
Cubes are perfect when you want cooked squash quickly for salads, tacos, grain bowls, or to mash into a side dish. The trade-off: you have to peel and cube first (unless you use pre-cut squash).
- Peel, seed, and cut into 1-inch cubes for even cooking.
- Put cubes in a microwave-safe bowl with 2–3 tablespoons water.
- Cover and microwave on HIGH for 6–10 minutes, stirring halfway.
- Stand 2 minutes, then test. Cook longer in 1–2 minute bursts if needed.
Tip: If you want cubes that taste roasted, microwave just until barely tender, then toss with oil/spices and roast for 10–15 minutes at high heat to brown.
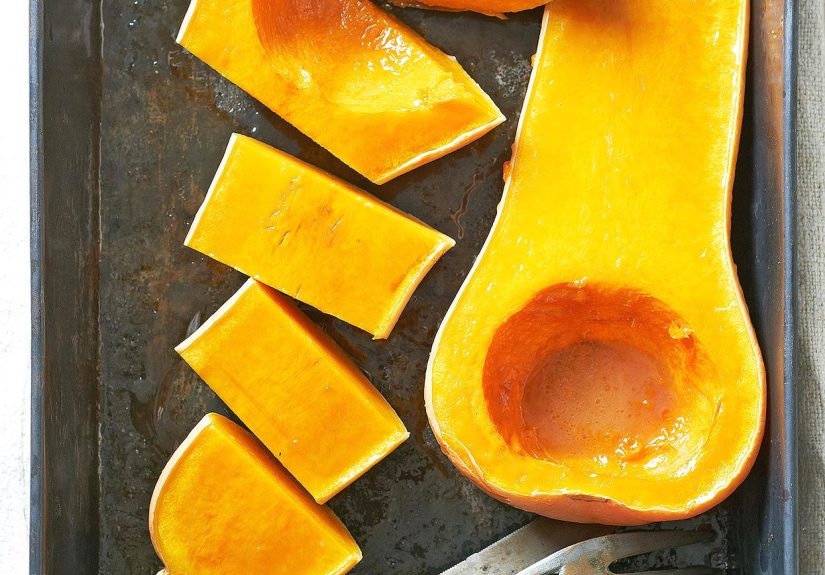
Method 2: How to Cook Butternut Squash in the Oven (Halves or Cubes)
Oven cooking takes longer, but it’s where butternut squash becomes its best self: sweet, nutty, and caramelized. Two main styles: roasting halves (great for scooping and purees) and roasting cubes (great for bowls, sides, and crisp edges).
Option A: Roast Butternut Squash Halves
Roasting halves is simple and forgiving. It’s also the best path to silky mash or puree with deeper flavor than the microwave usually delivers.
- Preheat oven to 400–425°F.
- Cut squash lengthwise and scoop seeds.
- Brush or rub the flesh with olive oil or melted butter, then season with salt and pepper.
- Roast:
- At 425°F: about 35–55 minutes depending on size
- At 400°F: about 45–60 minutes depending on size
- It’s done when the flesh is fork-tender and edges look lightly browned. Let cool a few minutes, then scoop.
Cut-side up or down? Cut-side up gives more browning and flavor. Cut-side down traps steam and can cook a bit faster but may be softer. If your goal is puree, either works. If your goal is flavor, go cut-side up.
Option B: Roast Butternut Squash Cubes (The “Crispy Edge” Method)
This is the go-to for roasted vegetable vibes. You want space on the pan so the squash roasts instead of steams.
- Preheat oven to 400–425°F.
- Peel, seed, and cut into 1-inch cubes.
- Toss with olive oil, salt, and your seasoning of choice.
- Spread in a single layer on a sheet pan (don’t crowd).
- Roast until browned and tender:
- At 400°F: about 25–35 minutes
- At 425°F: about 25–40 minutes (often browns faster, but watch edges)
Flip once halfway through for more even browning.
Pan-crowding reality check: If the cubes are touching like commuters on a packed subway, they’ll steam. Use two pans if needed. More space = more caramelization = more “why is this so good?”
Flavor Playbook: Make It Sweet, Savory, or Spicy
Butternut squash is naturally sweet, which means it works in dessert-adjacent directions and in bold, savory ones. Choose your own adventure:
Classic sweet-leaning seasonings
- Butter + brown sugar or maple syrup + cinnamon
- Honey + pinch of salt + chili flakes (sweet heat)
- Nutmeg + clove (a little goes a long way)
Savory and “put this on everything” combos
- Olive oil + garlic + rosemary or thyme
- Smoked paprika + cumin + black pepper
- Gochujang or chili paste + soy sauce + sesame (spicy-salty-sweet magic)
- Parmesan + black pepper + lemon zest (bright and salty)
What to Do With Cooked Butternut Squash
Once you’ve cooked it, butternut squash is basically edible infrastructure. Here are practical, tasty ways to use it:
Use microwaved squash for
- Soup base: blend with broth, sautéed onions/garlic, and spices
- Mashed side: mash with butter/olive oil, salt, pepper, and a splash of cream or broth
- Quick puree: stir into oatmeal (yes), pancake batter, sauces, or mac and cheese
- Baby food: puree with a little water or breast milk/formula as appropriate
Use oven-roasted squash for
- Grain bowls: quinoa, farro, or rice + greens + roasted squash + protein
- Salads: arugula + roasted squash + goat cheese + pepitas
- Tacos: roasted squash + black beans + salsa verde
- Side dish: roasted cubes with herbs and a squeeze of lemon
Storage, Reheating, and Meal Prep
Refrigerator
Store cooked squash in an airtight container for 3–5 days. If it’s very moist (especially microwaved), cool it fully before sealing, or it can get watery.
Freezer
Squash freezes well, especially as puree. Freeze in portions (muffin tins or freezer bags laid flat). Label it so “mystery orange blob” doesn’t become a recurring character in your freezer.
Reheating
- Microwave: cover and heat in short bursts, stirring if it’s mashed/cubed.
- Oven/toaster oven: best for roasted cubesspread on a pan at 400°F for 8–12 minutes to re-crisp edges.
Troubleshooting (Because Squash Has Opinions)
“My microwaved squash is watery.”
Totally normal. Microwave cooking steams, which keeps moisture in. Fix it by draining excess liquid, mashing with a little butter or olive oil, or finishing it in a hot oven for 10 minutes to dry the surface slightly.
“My roasted squash is soft but not browned.”
Likely pan crowding or oven temp too low for your setup. Spread it out more, use a hotter oven (425°F), and flip halfway. Also, make sure cubes are coated in oil and fully exposed on the pan.
“The outside browned but the inside is still firm.”
Your cubes might be too large or uneven. Cut into consistent 1-inch cubes, or lower the temp slightly and roast longer. If you’re in a rush, microwave for a few minutes first, then roast to finish.
Mini Timing Cheat Sheet (Real-Life Ranges)
- Microwave whole squash: ~10–16 minutes + 5 minutes standing (size and wattage matter)
- Microwave halves: ~10–15 minutes + 3–5 minutes standing
- Microwave cubes: ~6–10 minutes + 2 minutes standing
- Roast halves: ~35–60 minutes at 400–425°F
- Roast cubes: ~25–40 minutes at 400–425°F
of Real-Life Experience: What Actually Works in a Normal Kitchen
The first time I tried to cook butternut squash, I approached it with the confidence of someone who had once successfully made toast. I set it on the cutting board, raised my knife, and immediately realized this vegetable was built like a medieval battering ram. That’s when I learned the most important butternut squash lesson: you don’t win by forceyou win by strategy.
Microwaving became my weeknight secret weapon. If dinner is in danger of turning into “cereal again,” a whole squash gets stabbed with a fork like it owes me money, then goes into the microwave. Ten-ish minutes later, it’s soft enough to cut without feeling like I’m auditioning for a lumberjack competition. That small step alone makes peeling and cubing dramatically easier. It’s not glamorous, but it’s effectivelike sweatpants with good skincare.
For meal prep, I’ll microwave halves in a covered dish with a splash of water, then scoop the flesh into a container. That cooked squash becomes a multi-purpose base all week: I’ll mash it with butter and salt for a fast side, blend it into soup with broth and sautéed onion, or stir it into pasta sauce when I want “creamy” without going full heavy cream. The microwave version is softer and wetter, which is exactly what you want for blending and mixing. It’s not trying to be crispy. It’s trying to be helpful.
But when I want the kind of flavor that makes people ask, “Wait… what did you put on this?” I use the oven. Roasting cubes at high heat is where butternut squash turns into the best version of itself: browned edges, concentrated sweetness, and that slightly nutty depth you don’t get from steaming. The biggest difference-maker, in my experience, is space. I used to cram everything onto one pan to avoid washing a second panclassic mistake. The squash steamed, got pale, and tasted fine-but-sad. Now I’d rather wash an extra sheet pan than eat “steamed roast squash,” which is basically an oxymoron you can chew.
My favorite hybrid move is microwaving cubes just until they’re barely tender, then roasting them for 10–15 minutes. That combo feels like a kitchen cheat code: you get speed and browning. It’s especially useful when you’re trying to get dinner on the table before everyone in the house starts grazing on random snacks and calling it a meal.
If you’re new to cooking butternut squash, here’s the truth: you don’t need perfection. You need a method you’ll actually use. Microwave it when you’re busy. Roast it when you want flavor. And if the first try is slightly too soft or not browned enough, congratulationsyou’re now officially cooking like a real person. Make a small tweak next time, and the squash will eventually stop acting like a gym workout.
Conclusion
If you want fast and flexible, microwave butternut squash. If you want rich flavor and caramelized edges, roast it in the oven. And if you want to feel like a culinary wizard on a Tuesday, microwave to speed things up and finish in the oven for that golden-brown magic. Either way, you end up with a cozy, nutritious ingredient that can anchor everything from soups to saladswithout requiring a culinary degree or a handshake agreement with your cutting board.


