
Table of Contents >> Show >> Hide
- What Is Galvanized Duct Work?
- Can You Paint Galvanized Duct Work?
- Why Galvanized Metal Is Difficult to Paint
- Tools and Materials You’ll Need
- Step-by-Step Guide: How to Paint Galvanized Duct Work
- Step 1: Inspect the Ductwork First
- Step 2: Turn Off the HVAC System
- Step 3: Protect the Area
- Step 4: Clean the Galvanized Surface Thoroughly
- Step 5: Remove Rust, Peeling Paint, and Powdery Residue
- Step 6: Let the Metal Dry Completely
- Step 7: Apply the Right Primer
- Step 8: Paint With Acrylic Latex or DTM Acrylic Enamel
- Step 9: Allow Proper Cure Time
- Best Paint for Galvanized Duct Work
- Should You Spray, Brush, or Roll Ductwork?
- Common Mistakes to Avoid
- Color Ideas for Painted Galvanized Duct Work
- Maintenance Tips After Painting
- My Practical Experience Painting Galvanized Duct Work
- Conclusion
Galvanized duct work has a funny way of making a room look either “cool industrial loft” or “unfinished basement where holiday decorations go to retire.” The good news is that you can paint galvanized duct work and make it look clean, intentional, and surprisingly stylish. The less glamorous news is that galvanized metal is picky. Paint does not simply grab onto it like it does drywall. It needs cleaning, the right primer, the right paint, and a little patience.
If you rush the job, the paint may peel, bubble, wrinkle, or flake off like a bad sunburn. If you prepare the surface correctly, however, painted ductwork can blend into a ceiling, match surrounding walls, highlight an industrial design, or simply make an exposed HVAC system look less like a robot snake crawling through the room.
This guide explains how to paint galvanized duct work step by step, including what products to use, what mistakes to avoid, and how to get a smooth finish that lasts.
What Is Galvanized Duct Work?
Galvanized duct work is usually made from steel coated with zinc. That zinc coating helps protect the steel from corrosion, which is exactly why galvanized metal is so common in HVAC systems, vents, registers, pipes, gutters, and outdoor metal components.
The zinc layer is useful, but it also creates the main painting challenge. New galvanized metal may be slick, shiny, oily, or treated with passivators that prevent white rust during storage and shipping. Older galvanized ducts may have dust, oxidation, grease, fingerprints, or chalky white residue. Paint hates all of these things. Paint is dramatic that way.
To paint galvanized duct work successfully, the goal is simple: remove contaminants, create a paint-friendly surface, prime with a compatible product, and apply thin, even coats of the right topcoat.
Can You Paint Galvanized Duct Work?
Yes, you can paint galvanized duct work, especially when the ducts are exposed in a basement, garage, loft, studio, laundry room, workshop, or commercial-style interior. Painting exposed ductwork can help it disappear into the ceiling, match trim, complement walls, or become a design feature.
However, you should only paint the exterior of the ductwork unless a qualified HVAC professional recommends otherwise. The inside of ductwork affects airflow and indoor air quality, so coating the interior with standard household paint is not a DIY decorating project. Keep your creativity on the outside, where it belongs.
Why Galvanized Metal Is Difficult to Paint
Galvanized ductwork is not difficult because it is metal. It is difficult because of the zinc coating and surface treatments. Paint can fail on galvanized steel for several reasons:
- Oil or passivators: New galvanized metal may have a protective film that blocks adhesion.
- Slick surface: Smooth galvanized steel gives paint very little texture to grip.
- White oxidation: Weathered galvanized metal can develop powdery residue that must be removed.
- Wrong paint chemistry: Oil-based or alkyd coatings can react poorly with zinc and peel.
- Poor cleaning: Dust, grease, and construction grime are paint’s sworn enemies.
The best paint job is won before the first coat goes on. Surface preparation is the hero. Paint is just the glamorous sidekick.
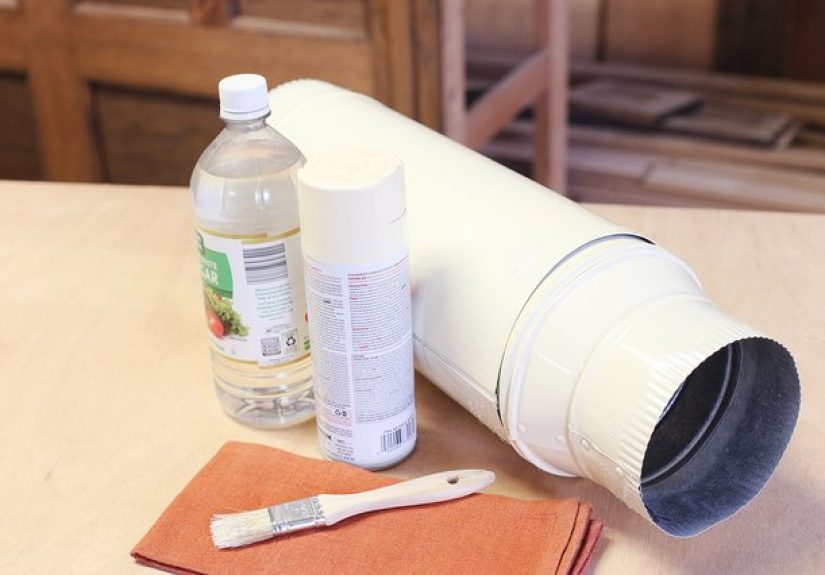
Tools and Materials You’ll Need
Before starting, gather everything so you are not standing on a ladder holding a roller and realizing your degreaser is in another room. For most galvanized duct painting projects, you will need:
- Drop cloths or plastic sheeting
- Painter’s tape
- Microfiber cloths or lint-free rags
- Mild detergent or water-based degreaser
- Clean water for rinsing
- White vinegar for very new galvanized metal
- Nylon scrub pad or soft brush
- Fine sanding sponge or scuff pad, if recommended by the primer label
- Galvanized metal primer, acrylic bonding primer, or metal-specific DTM primer
- Acrylic latex paint or compatible direct-to-metal acrylic enamel
- High-quality synthetic brush
- Small foam roller or 1/4-inch to 3/8-inch nap roller
- Respirator or dust mask suitable for the task
- Safety glasses and gloves
If the ducts are high, use a stable ladder. If the ductwork runs through a finished room, cover nearby walls, floors, furniture, and vents. Paint mist and splatter are talented travelers.
Step-by-Step Guide: How to Paint Galvanized Duct Work
Step 1: Inspect the Ductwork First
Start by inspecting the ductwork. Look for loose seams, rust spots, peeling old paint, damaged insulation, condensation, mold, gaps, or air leaks. Paint should not be used as a duct repair product. If the duct has holes, loose joints, or heavy rust, fix those issues before painting.
For HVAC ducts, also check whether the surface gets unusually hot. Most residential ductwork does not reach extreme temperatures, but you should still choose coatings appropriate for the temperature range listed on the product label. If the ductwork is near a furnace, boiler, flue, or other heat-producing equipment, ask an HVAC professional before painting.
Step 2: Turn Off the HVAC System
Turn off the HVAC system before cleaning or painting near ducts and vents. This keeps dust, fumes, and particles from moving through the system while you work. It also prevents air movement from blowing dust onto wet paint. Wet paint plus airborne lint equals a textured finish nobody asked for.
Step 3: Protect the Area
Use painter’s tape around walls, ceilings, trim, registers, and any surfaces you do not want painted. Lay drop cloths under the work area. If you are spraying, masking becomes even more important. Spray paint can drift farther than expected, especially around round ductwork and elbows.
For most interior ductwork projects, brushing and rolling are easier to control than spraying. Spraying can produce a beautiful finish, but it also requires stronger masking, ventilation, and overspray control.
Step 4: Clean the Galvanized Surface Thoroughly
This is the most important step. Clean galvanized ductwork with a mild detergent or a water-based degreaser. Wipe every surface you plan to paint, including seams, elbows, hangers, and underside areas where dust loves to hide.
If the ductwork is greasy, clean it twice. Kitchens, workshops, garages, and basements can leave a film on metal that is not always visible. Rinse with clean water after degreasing, then let the surface dry completely.
For newly installed, shiny galvanized ductwork, wipe the surface with white vinegar before degreasing. Vinegar can help dull the slick surface and remove some residue. Do not treat vinegar like magic potion, though. It is helpful, but it does not replace proper cleaning or primer.
Step 5: Remove Rust, Peeling Paint, and Powdery Residue
If the ductwork has old peeling paint, scrape away loose material. If you see rust, remove loose rust with a wire brush or abrasive pad. If there is white powdery oxidation on the galvanized surface, clean it away before priming.
Be careful with aggressive sanding. Heavy sanding can damage the zinc coating that protects the steel underneath. A light scuff may be acceptable if the primer instructions call for it, but the goal is not to grind the ductwork into submission. You want clean and slightly receptive, not wounded.
If your home was built before 1978 and the ductwork or surrounding surfaces have old paint, be cautious. Disturbing old lead-based paint can create dangerous dust. In that situation, testing and lead-safe work practices are important, and hiring a certified professional may be the smartest move.
Step 6: Let the Metal Dry Completely
After cleaning and rinsing, allow the ductwork to dry fully. Moisture trapped under primer can cause adhesion problems. Pay special attention to seams, folded edges, screws, brackets, and low spots. These areas can hold water longer than flat surfaces.
A good rule is this: if you would not want to tape a postcard to it, do not paint it yet.
Step 7: Apply the Right Primer
Use a primer specifically labeled for galvanized metal, non-ferrous metal, or difficult-to-coat surfaces. Good choices may include acrylic metal primer, bonding primer, galvanized metal primer, or a compatible direct-to-metal primer system.
Avoid standard oil-based primers unless the manufacturer clearly states they are suitable for galvanized metal. Alkyd and oil-based coatings can react with zinc and cause peeling. This is one of the classic reasons painted galvanized metal fails.
Apply primer in a thin, even coat. Use a brush for seams, joints, screws, hangers, and tight corners. Use a small roller for flat duct surfaces. On round ductwork, work in manageable sections and keep a wet edge to avoid lap marks.
Let the primer dry according to the label. Dry time and recoat time are not decorative suggestions. They are the difference between “nice finish” and “why is my duct wearing cornflakes?”
Step 8: Paint With Acrylic Latex or DTM Acrylic Enamel
Once the primer has dried, apply the finish coat. For interior galvanized ductwork, a high-quality acrylic latex paint or direct-to-metal acrylic enamel is usually a strong choice. Acrylic coatings are flexible, easy to clean up, and generally compatible with properly prepared galvanized metal when used over the right primer.
Choose the sheen based on the look you want:
- Flat or matte: Hides imperfections and helps ductwork blend into ceilings.
- Eggshell or satin: Easier to clean while still looking soft.
- Semi-gloss: More durable and reflective, good for modern or industrial spaces.
- Gloss: Bold and shiny, but it highlights dents and seams.
Apply two thin coats rather than one heavy coat. Heavy coats are more likely to sag, drip, wrinkle, or cure slowly. Ductwork has curves, seams, and edges, which means thick paint will quickly reveal your overconfidence.
Step 9: Allow Proper Cure Time
Paint may feel dry in a few hours, but curing takes longer. Avoid bumping, wiping, taping, or cleaning the surface until the coating has had time to cure. Follow the paint manufacturer’s instructions for recoat and cure times.
If possible, keep the room ventilated during and after painting. Once the paint is dry enough and odors have decreased, you can return the HVAC system to normal operation. For enclosed spaces, low-VOC coatings are a smart choice.
Best Paint for Galvanized Duct Work
The best paint for galvanized duct work is usually a water-based acrylic system designed for metal. You can use either:
- A galvanized metal primer plus acrylic latex paint
- An acrylic bonding primer plus interior acrylic topcoat
- A direct-to-metal acrylic enamel approved for galvanized surfaces
- A professional metal coating system recommended by a paint supplier
For visible interior ducts, appearance matters too. If the ceiling is white, painting the ductwork the same white can make it fade into the background. If the room has an industrial style, matte black, charcoal, bronze, or deep gray can look intentional and high-end. For playful spaces, ducts can even become an accent color. Yes, your ductwork can have a personality. Just do not let it become the loudest person in the room unless that is the plan.
Should You Spray, Brush, or Roll Ductwork?
Each method has advantages. Spraying gives the smoothest finish on round ducts and complicated shapes, but it requires careful masking and ventilation. Brushing works well for seams, edges, straps, corners, and touch-ups. Rolling is efficient on rectangular ducts and broad flat sections.
For most homeowners, the best method is a combination: brush the details first, then roll the larger surfaces. This gives good coverage without turning the room into an overspray crime scene.
Common Mistakes to Avoid
Painting Without Cleaning
Dust and oil are invisible troublemakers. Even new ductwork can have manufacturing oils, fingerprints, or storage residue. Always clean first.
Using the Wrong Primer
Standard primers may not bond well to galvanized metal. Use a galvanized-metal-compatible primer or bonding primer recommended for non-ferrous metal.
Using Oil-Based Paint Without Checking Compatibility
Oil-based and alkyd coatings can fail on galvanized steel. Unless the product label specifically approves use on galvanized metal, choose an acrylic system.
Applying Paint Too Thick
Thick paint looks efficient for about five minutes. Then it sags, wrinkles, and takes forever to cure. Thin coats win.
Ignoring Duct Problems
Paint will not fix leaks, loose joints, condensation, or damaged insulation. Repair first, decorate second.
Color Ideas for Painted Galvanized Duct Work
If your goal is to hide the ductwork, match the ceiling or wall color. This works especially well in basements and open ceilings. A flat black ceiling with black ductwork can make pipes, wires, and ducts visually recede.
If your goal is to feature the ductwork, choose a clean contrast. Satin black, graphite gray, soft white, deep navy, or warm metallic tones can make ductwork feel like part of the design instead of a leftover mechanical necessity.
For restaurants, studios, offices, and creative spaces, painted ductwork can support branding. A bold accent color on ducts can look energetic, but test a small area first. Bright red ductwork sounds fun until it starts giving “emergency submarine.”
Maintenance Tips After Painting
Once painted, ductwork is easy to maintain. Dust it with a microfiber cloth or vacuum brush attachment. Avoid harsh cleaners, abrasive pads, or strong solvents. If the surface gets scratched, lightly clean the area, spot-prime bare metal if needed, and touch up with leftover paint.
Watch for peeling around seams, screws, and elbows. These are high-contact areas and may need occasional touch-ups. If paint peels widely, the original surface preparation was probably not thorough enough, or the primer was not compatible with galvanized metal.
My Practical Experience Painting Galvanized Duct Work
Painting galvanized duct work is one of those projects that looks simple from the floor and becomes very educational once you are on a ladder with a brush in your hand. The first lesson is that ductwork has more sides than your brain wants to admit. A rectangular duct has a top, bottom, front, back, seams, corners, straps, screws, and awkward little shadow areas where the roller cannot reach. Round ducts are even trickier because gravity becomes personally involved.
In real projects, the biggest difference between a professional-looking result and a flaky mess is cleaning. Not the fun kind of cleaning where you wipe once and declare victory. Galvanized ducts collect dust, oily residue, fingerprints, construction debris, and sometimes a mysterious basement film that seems to be made from ancient air. When I have seen paint fail on metal ductwork, the surface was almost always under-cleaned or painted with the wrong primer.
A helpful habit is to clean the ductwork in sections and keep changing rags. If the rag keeps coming away gray or greasy, the metal is not ready. On new shiny ductwork, a vinegar wipe followed by degreasing can make the surface feel less slick. On older ductwork, degreaser and patient wiping matter more. You do not need to attack the metal like you are sanding a canoe. You need it clean, dry, and ready to bond.
Another experience-based tip: do not start with the most visible section. Start on a side or back area where you can learn how the primer behaves. Some primers level beautifully. Others dry quickly and show brush marks if you overwork them. Ductwork has seams and ridges that catch extra paint, so it is better to apply less product and build coverage with a second coat.
For exposed basement ceilings, matching the ducts to the ceiling color is usually the safest design choice. White ductwork on a white ceiling feels clean and bright. Black ductwork on a black open ceiling can look modern and hide a lot of visual clutter. If the room already has many pipes, joists, and wires, painting everything one color can calm the space dramatically.
For living areas, satin or eggshell finishes often look better than high gloss. Glossy ductwork can be attractive in the right industrial room, but it also highlights dents, seams, roller marks, and every small imperfection. Satin gives a cleaner finish without shouting, “Please inspect my elbows.”
Timing matters too. Painting overhead ductwork is tiring, so break the job into sections. Prime one run, then another. Paint in good light. Keep a small artist brush nearby for screw heads and tight seams. Remove painter’s tape before the final coat becomes rock-hard, so the edges stay clean.
The final result can be surprisingly satisfying. A duct that once looked like a utility leftover can suddenly look like part of the architecture. The key is respecting the metal. Galvanized ductwork does not forgive shortcuts, but it rewards patience with a finish that looks intentional, durable, and far more polished than bare gray metal.
Conclusion
Learning how to paint galvanized duct work is mostly about preparation. Clean the surface thoroughly, remove residue, choose a galvanized-metal-compatible primer, avoid incompatible oil-based products, and apply thin coats of acrylic paint or direct-to-metal enamel. Whether you want your ductwork to disappear into the ceiling or become a bold industrial feature, the right method will help the finish last.
The secret is not complicated: clean well, prime smart, paint patiently. Your ductwork may never become the star of your home, but with the right finish, it can finally stop looking like it wandered in from a hardware aisle.


