
Table of Contents >> Show >> Hide
- Before You Start: Set Yourself Up for Success
- How to Put in Contact Lenses: Easy Step-by-Step Instructions
- Step 1: Wash and dry your hands thoroughly
- Step 2: Always start with the same eye
- Step 3: Remove the lens and place it on your fingertip
- Step 4: Check that the lens is clean, undamaged, and not inside out
- Step 5: Hold your eyelids open
- Step 6: Bring the lens toward your eye slowly
- Step 7: Release your eyelids and blink a few times
- Step 8: Repeat with the other eye
- What to Do Right After You Put Your Contacts In
- Beginner Tips That Make Contact Lenses Easier
- Common Mistakes to Avoid
- How Reusable Contact Lens Care Fits Into the Routine
- When You Should Remove Your Contacts Immediately
- Contact Lens FAQs for First-Time Wearers
- Conclusion
- Common Experiences People Have When Learning to Put in Contact Lenses
- SEO Tags
If you are new to contact lenses, the first insertion can feel less like a vision upgrade and more like a tiny, transparent trust exercise. Your eye blinks. Your hand freezes. The lens folds like a moody taco. Totally normal. The good news is that putting in contact lenses gets much easier once you know the routine and stop trying to negotiate with your eyelids.
This guide walks you through exactly how to put in contact lenses step by step, with beginner-friendly tips, common mistakes to avoid, and safety habits that matter just as much as the insertion itself. Think of this as your practical, no-drama contact lens roadmap: clean hands, calm moves, clear vision.
Before You Start: Set Yourself Up for Success
Before you even touch a lens, get your setup right. A few small details can save you a lot of frustration.
What you need
- A clean, well-lit bathroom or vanity area
- A mirror at eye level
- Your contact lens case or blister pack
- The correct contact lens solution, if you wear reusable lenses
- A clean, lint-free towel
- Backup glasses nearby, just in case
It also helps to start at a time when you are not rushing out the door, late for work, and trying to balance a granola bar in one hand. First-time contact lens insertion goes best when you can slow down.
Important safety reminder
Contact lenses are medical devices, not tiny fashion stickers. Always follow the exact instructions from your eye doctor for wear time, cleaning, and replacement. If your doctor’s instructions differ from a general online guide, your doctor wins. Every time.
How to Put in Contact Lenses: Easy Step-by-Step Instructions
Step 1: Wash and dry your hands thoroughly
This is the golden rule. Wash your hands with soap and water, then dry them completely with a clean, lint-free towel. Avoid oily, heavily scented, or lotion-based soaps if possible, because residue can transfer to the lens and irritate your eye.
Do not handle your lenses with wet fingertips. Water and contact lenses are not friends. Tap water may look harmless, but it can contain microorganisms that can cause serious eye infections.
Step 2: Always start with the same eye
Choose one eye and stick with it every time. Most people start with the right eye first, but left-eye loyalists are welcome here too. This simple habit helps you avoid mixing up lenses, especially if each eye has a different prescription.
Example: if your right lens is -2.00 and your left lens is -2.75, swapping them will not destroy civilization, but it can make your vision annoyingly off.
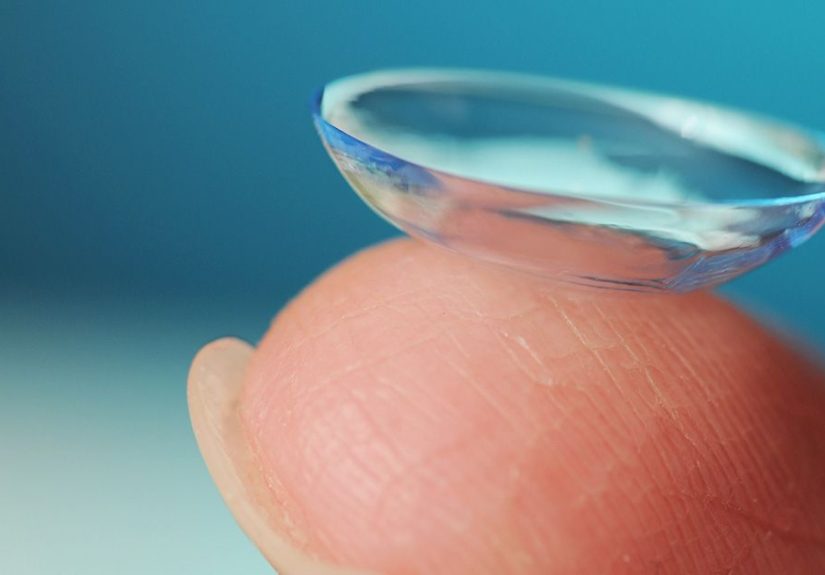
Step 3: Remove the lens and place it on your fingertip
If you are using daily disposables, gently slide the lens out of the blister pack. If you are using reusable lenses, remove one lens from its case using clean fingers and, if instructed, rinse it with the recommended contact lens solution.
Place the lens on the tip of your index finger on your dominant hand. The lens should sit there like a tiny bowl, not like a floppy pancake draped over your finger.
Step 4: Check that the lens is clean, undamaged, and not inside out
Look closely at the lens before it goes anywhere near your eye. If it has a tear, a rip, a lot of debris, or anything that looks suspicious, do not use it.
Then check the shape. A properly oriented soft contact lens should look like a smooth bowl with edges that rise mostly straight up. If the edges flare outward, it is probably inside out. Some lenses also have tiny numbers or markings that help you confirm orientation.
If the lens is inside out, simply place it in your clean palm, add a few drops of solution, and flip it gently.
Step 5: Hold your eyelids open
This step is where many beginners discover their eyelids have strong opinions. Use the middle finger of the hand holding the lens to pull down your lower eyelid. Then use the fingers of your other hand to lift and hold your upper eyelid so it does not blink shut mid-mission.
Try to hold the upper lid from near the lash line rather than grabbing skin farther up the brow. That usually gives you better control.
Step 6: Bring the lens toward your eye slowly
Look straight ahead into the mirror or slightly upward if that feels easier for you. Move the lens slowly toward your eye while keeping both lids steady. Many people find it helpful to think about placing the lens on the eye rather than poking into the eye. That tiny mental shift can reduce the flinch factor.
Gently place the lens on the center of your eye, over the cornea. Do not slam it in, jab it in, or perform a dramatic attack run. Contact lenses reward calm energy.
Step 7: Release your eyelids and blink a few times
Once the lens is on your eye, release your lower eyelid first and then your upper eyelid. Blink slowly several times. The lens should settle into place and begin to feel more natural after a few seconds.
If your vision clears and the lens feels comfortable, congratulations. You did it.
If the lens feels scratchy, burns, or seems to drift around too much, take it out, inspect it, rinse it with the correct solution if appropriate, and try again. A lens that is inside out, dirty, damaged, or dry often feels uncomfortable right away.
Step 8: Repeat with the other eye
Repeat the same process with the second lens. Keep the routine identical every day. Repetition is what turns contact lens insertion from a 10-minute emotional event into a 30-second habit.
What to Do Right After You Put Your Contacts In
Putting in contact lenses is only part of the story. Once both lenses are in, pause for a quick check.
- Your vision should feel clear or close to clear within a short time
- The lenses should feel comfortable, not painful
- Your eyes should not look unusually red
- You should not have major tearing, burning, or light sensitivity
If anything feels wrong, remove the lens and reassess. Never try to “push through” eye pain. Your eyes are not impressed by your determination.
Beginner Tips That Make Contact Lenses Easier
Keep your fingernails short
Shorter nails reduce the risk of scratching your eye or tearing the lens. Long nails are not impossible, but they do raise the difficulty setting.
Use the same routine every time
Same eye first. Same hand. Same mirror. Same sequence. Familiarity builds confidence fast.
Do not rush
Speed comes later. At the beginning, smooth and steady beats fast and frantic.
Apply contacts before makeup
Put your contact lenses in before applying eye makeup or face lotion around the eyes. At the end of the day, remove your contacts before taking makeup off. This helps keep cosmetic residue off the lenses.
Keep backup glasses with your current prescription
If a lens tears, gets lost, or your eyes become irritated, you need a comfortable fallback. Backup glasses are not optional. They are your Plan B with frames.
Common Mistakes to Avoid
- Using water on lenses: Never rinse, clean, or store lenses in water.
- Using saliva: Your mouth is not a sterile contact lens care system.
- Sleeping in contacts without approval: This raises the risk of eye infection.
- Topping off old solution: Always use fresh solution in the case for reusable lenses.
- Ignoring replacement schedules: Daily, biweekly, and monthly lenses are not interchangeable just because optimism says so.
- Wearing a damaged lens: If it is torn, chipped, or contaminated, toss it.
- Skipping follow-up appointments: Regular eye care visits help protect both comfort and eye health.
How Reusable Contact Lens Care Fits Into the Routine
If you wear daily disposable lenses, life is simple: wear them once and throw them away at the end of the day. No cleaning, no storing, no late-night case archaeology.
If you wear reusable lenses, proper care matters every single time. After removal, clean and disinfect them exactly as directed by your eye doctor and lens care product instructions. Use fresh solution each time. Do not reuse old solution. Clean the case as directed and replace the case regularly, typically every few months or according to professional guidance.
Plain saline is not the same as disinfecting solution. And if you use a hydrogen peroxide lens care system, follow the instructions with extreme care. That type of solution must be neutralized properly before lenses go back into your eyes.
When You Should Remove Your Contacts Immediately
Take your lenses out and contact an eye care professional promptly if you notice any of the following:
- Eye pain or significant discomfort
- Redness that does not quickly improve
- Blurred or suddenly reduced vision
- Light sensitivity
- Excess tearing or discharge
- A gritty feeling that does not go away
- Swelling or trouble opening the eye
These symptoms can point to irritation, a scratched cornea, or an infection such as keratitis. Fast treatment matters. Do not wait it out for two days while hoping your eye “sorts itself out.”
Contact Lens FAQs for First-Time Wearers
Does it hurt to put in contact lenses?
It should not hurt. It may feel strange at first, but pain is not normal. Mild awareness is common. Sharp discomfort is not.
Can a contact lens get lost behind my eye?
No. It may move around under your eyelid, but it cannot disappear behind your eyeball. Your anatomy does not allow that dramatic plot twist.
What if I blink every time the lens gets close?
This is very common. Practice holding the upper and lower lids more firmly, breathe normally, and approach slowly. Many beginners improve a lot within a few days.
Should I put contacts in before or after makeup?
Before. Put contacts in first, then apply makeup. Remove contacts before taking makeup off.
Can I shower in contact lenses?
It is safer to remove them first. Water exposure increases the risk of contamination.
What if I accidentally nap in them?
Remove them as soon as you safely can, let your eyes recover, and watch for redness, pain, or blurry vision. If symptoms show up, call your eye doctor.
Conclusion
Learning how to put in contact lenses is mostly about building a repeatable routine. Wash and dry your hands, start with the same eye, check that the lens is clean and right-side out, hold your eyelids steady, place the lens gently, and blink it into comfort. That is the basic playbook.
The real secret, though, is consistency. Good contact lens habits protect your vision and make the entire process faster, easier, and far less annoying. Give yourself a little grace during the learning curve. Most beginners do not become contact lens ninjas on day one. But with practice, you will likely go from “Why is my eyelid fighting me?” to “Done already?” sooner than you think.
Common Experiences People Have When Learning to Put in Contact Lenses
One of the most reassuring things for beginners to hear is this: struggling at first is incredibly common. The early days of contact lens wear usually include a mix of curiosity, awkward hand movements, blinking battles, and a surprising amount of self-coaching in the mirror. Many people assume they are doing something wrong because insertion feels clumsy at first. In reality, the skill simply takes repetition.
A very common experience is the “lens bounce.” You move the lens toward your eye, your eyelid panics, and the lens lands on your cheek, your finger, or some mysterious place in the sink area that instantly becomes a search-and-rescue zone. This happens because your blink reflex is trying to protect your eye. Over time, your brain realizes the lens is supposed to be there, and the reflex becomes less dramatic.
Another common first-week experience is watering. Your eyes may tear up when you insert the lens, even when you do everything correctly. A little tearing does not automatically mean the lens is wrong. It often means your eye is reacting to something new. Usually, after a few blinks and a minute or two of settling, the sensation improves. If it does not improve, that is when it makes sense to remove the lens and inspect it.
Many beginners also report that one eye learns faster than the other. For example, the right eye may accept the lens like a seasoned professional while the left eye acts personally offended for three straight mornings. This uneven learning curve is normal. Eyes do not always cooperate equally, and your hands may feel more coordinated on one side.
It is also common to put a lens in backwards at least once. The lens may feel scratchy, shift more than usual, or make your vision feel slightly off. That does not mean you are bad at contacts. It means you are now part of a very large club of people who have learned the difference between a proper bowl shape and a sneaky inside-out lens.
Some people notice that the first successful insertion feels oddly emotional. There is relief, pride, and maybe a tiny urge to tell someone, “I touched my eye and survived.” That is valid. Contact lens wear can feel like a small personal victory, especially if you were nervous about it.
With time, the experience usually changes in predictable ways. The mirror session gets shorter. Your hands become steadier. Your eyelids stop acting like overprotective bodyguards. You begin to recognize immediately when a lens is sitting correctly and when it needs to be removed and reset. Eventually, putting in contacts becomes as routine as brushing your teeth, just with fewer minty side effects.
The key takeaway from these shared experiences is simple: awkward does not mean unsuccessful. Most new contact lens wearers go through a short adjustment period before the process starts to feel natural. Patience, proper hygiene, and consistent technique usually make the biggest difference. In other words, if today felt a little messy, that does not mean tomorrow will. It usually gets better fast.


