
Table of Contents >> Show >> Hide
- What a Basket Strainer Does (and How to Tell It’s the Problem)
- Tools and Materials Checklist
- Plumber’s Putty vs. Silicone
- How to Replace a Sink Basket Strainer in 15 Steps
- Step 1: Clear the cabinet and set up your “leak zone”
- Step 2: Cut power to the garbage disposal (if you have one)
- Step 3: Take a quick photo of the plumbing
- Step 4: Remove the basket and any stopper/strainer parts from above
- Step 5: Disconnect the dishwasher tailpiece or branch line (if applicable)
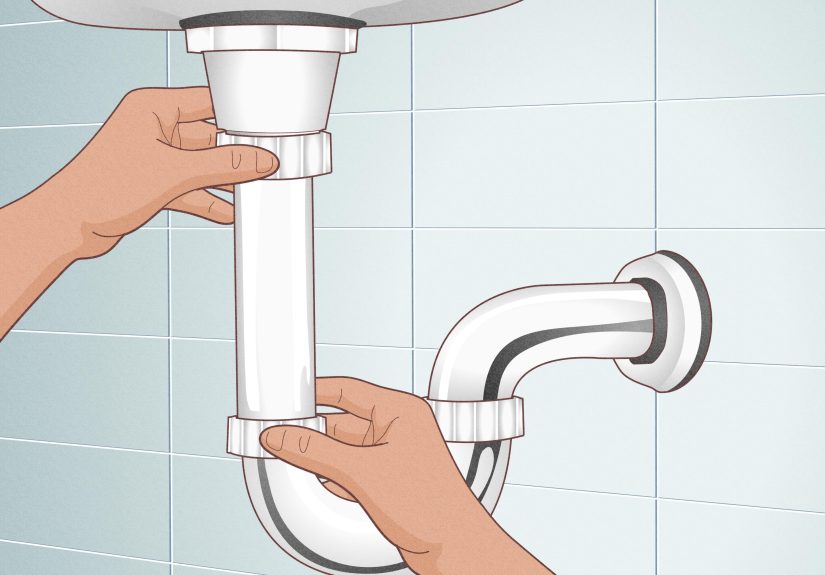
- Step 6: Loosen slip nuts and remove the P-trap
- Step 7: Stabilize the strainer from above
- Step 8: Loosen and remove the locknut (the big nut) under the sink
- Step 9: Remove old washers and the mounting hardware
- Step 10: Push the old strainer up and out
- Step 11: Clean the sink opening thoroughly
- Step 12: Dry-fit the new strainer and confirm compatibility
- Step 13: Apply sealant (putty or silicone) the right way
- Step 14: Seat the strainer from above and assemble the underside stack
- Step 15: Tighten, reconnect plumbing, and test for leaks
- Troubleshooting: When Your Sink Thinks It’s Funny
- Maintenance Tips (So You Don’t Do This Again Next Month)
- When to Call a Plumber
- Real-World DIY Experiences: What People Wish They Knew (About )
- Conclusion
If you’ve discovered a mysterious puddle under your sink, congratulations: your cabinet has started its own
tiny indoor water feature. The usual suspect is the sink basket strainerthat metal ring and
basket combo that sits at the drain, catches food bits, and (when it’s failing) quietly leaks into the darkness
below.
The good news: replacing a kitchen sink basket strainer is a very doable DIY. You don’t need to
re-plumb your whole house, and you don’t need to become best friends with your local hardware store cashier
(although they are usually nice). You just need patience, a few basic tools, and a plan that doesn’t involve
“tighten everything with maximum rage.”
What a Basket Strainer Does (and How to Tell It’s the Problem)
A basket strainer seals the drain opening in your sink and connects the sink to the plumbing belowtypically a
tailpiece and P-trap, and sometimes a branch line for a dishwasher or a connection to a garbage disposal.
When the seal fails, water can seep around the rim (top seal) or through the body and washers below (bottom seal).
Common signs your sink strainer needs replacing
- Water dripping from the large nut/washer area under the sink when you run the faucet
- Rust, pitting, or corrosion around the strainer body
- A loose strainer that spins when you touch the basket
- A persistent musty smell in the cabinet (aka “Eau de Mystery Leak”)
- Repeated leaks even after “just tightening it a little” (famous last words)
Tools and Materials Checklist
Gather everything first. Crawling under a sink mid-project to realize you don’t own pliers is a rite of passage,
but it doesn’t have to be your rite of passage.
Tools
- Channel-lock pliers or slip-joint pliers (for slip nuts and stubborn fittings)
- Adjustable wrench (helpful for certain nuts)
- Basket strainer wrench or large pliers (optional, but handy)
- Flathead screwdriver (for stabilizing the strainer from above)
- Putty knife or plastic scraper (to remove old putty/silicone)
- Utility knife (optional, for cutting old silicone)
- Rags/paper towels + sponge
- Bucket or shallow pan (there will be wateralways)
- Flashlight or headlamp (welcome to the under-sink cave)
Materials
- New sink basket strainer (most kitchen sinks use a standard 3-1/2-inch drain opening)
- Plumber’s putty or 100% silicone sealant (more on choosing below)
- Optional: penetrating oil (for stuck locknuts)
- Optional: replacement slip washers or tailpiece if yours are worn
Plumber’s Putty vs. Silicone
Both can work, but the right choice depends on your sink material and your strainer’s instructions.
Plumber’s putty is classic for metal sink strainers because it stays flexible and seals immediately.
Silicone is preferred for some materials (especially porous stone) and some manufacturer setups.
Quick rule of thumb
- Use plumber’s putty for many stainless-steel or porcelain sinks (unless instructions say otherwise).
- Use silicone if you have a porous stone sink/counter (granite, marble) or if your manufacturer specifies silicone.
- When in doubt: follow the strainer manufacturer’s directions for the sealant they expect.
How to Replace a Sink Basket Strainer in 15 Steps
These steps assume a typical kitchen sink basket strainer (not a bathroom pop-up drain). If you have a double sink
with a garbage disposal, you’ll do the same basic processjust with extra connections and extra opportunities to
say, “Who installed this, and why do they hate me?”
Step 1: Clear the cabinet and set up your “leak zone”
Remove everything under the sink. Place a bucket or shallow pan underneath the trap area. Lay down a towel to
protect the cabinet floor. This is also a great time to discover a missing sponge you thought the dog ate in 2023.
Step 2: Cut power to the garbage disposal (if you have one)
Unplug the disposal under the sink. If it’s hardwired, switch it off at the breaker. You’re going to be working
around the drain and pipesthis is not the time for surprise spinning blades.
Step 3: Take a quick photo of the plumbing
Snap a clear picture of how everything connects. It’s your “before” reference when you’re holding a pipe and
thinking, “This looks… right-ish?”
Step 4: Remove the basket and any stopper/strainer parts from above
Lift out the strainer basket, stopper, and any removable parts. Wipe the sink dry around the drain so you can see
what you’re doing.
Step 5: Disconnect the dishwasher tailpiece or branch line (if applicable)
Some setups have a dishwasher drain hose connected to a tailpiece under the sink. Loosen that connection carefully.
If water dribbles out, you’re doing it right (and your bucket is earning its keep).
Step 6: Loosen slip nuts and remove the P-trap
Use pliers to loosen the slip nuts on the P-trap and tailpiece. Keep the bucket centered beneath the trap because
it holds water by design. Remove the trap and set it aside.
Step 7: Stabilize the strainer from above
If the strainer wants to spin while you loosen the big nut below, wedge a flathead screwdriver across the drain
opening (or into the basket openings) to hold it in place. A helper can also press down from above, which is the
polite version of sink teamwork.
Step 8: Loosen and remove the locknut (the big nut) under the sink
Under the sink, locate the large locknut that clamps the strainer to the sink. Loosen it counterclockwise.
If it’s stubborn, apply penetrating oil and give it a few minutes. A basket strainer wrench can help, but big
pliers and steady pressure often do the job.
Step 9: Remove old washers and the mounting hardware
Once the locknut is off, slide off the washers (often a rubber gasket and a friction washer). Keep an eye on the
order and orientationmany assemblies stack in a specific way.
Step 10: Push the old strainer up and out
From underneath, push the strainer body upward. Then lift it out from the top of the sink. If old putty is gripping
it like it has abandonment issues, gently wiggle and liftdon’t pry hard enough to scratch the sink.
Step 11: Clean the sink opening thoroughly
Scrape away old plumber’s putty or cut away old silicone. Clean the rim with a sponge and mild cleaner, then dry it.
A clean surface is the difference between “perfect seal” and “why is it still leaking?”
Step 12: Dry-fit the new strainer and confirm compatibility
Test the new basket strainer in the opening. Confirm it sits flat and centers well. Most kitchen drains are standard,
but strainers vary: some use putty, some use a gasket, and some specifically call for silicone.
Step 13: Apply sealant (putty or silicone) the right way
If using plumber’s putty: roll it into a rope and place it under the strainer flange. If using silicone: apply a neat
bead under the flange. Don’t overdo ityour goal is a continuous seal, not a modern art installation.
Step 14: Seat the strainer from above and assemble the underside stack
Press the strainer into the drain opening. From below, install the gasket/washer stack (commonly rubber gasket first,
then friction washer), then thread on the locknut. Hand-tighten at first while keeping the strainer centered.
Wipe away squeeze-out putty/silicone from the top as you go.
Step 15: Tighten, reconnect plumbing, and test for leaks
Tighten the locknut graduallyalternate between tightening and checking alignment from above. Reinstall the tailpiece
and P-trap with slip washers correctly oriented (tapered side typically faces the joint). Then test:
- Run water and check all connections
- Fill the sink partially, then drain it quickly for a “stress test”
- Wipe joints with a dry paper towel to detect slow leaks
Troubleshooting: When Your Sink Thinks It’s Funny
Leak around the top rim of the strainer
- Likely cause: not enough sealant, uneven flange, or dirty surface
- Fix: disassemble, clean thoroughly, reapply putty/silicone, reseat evenly
Leak from the locknut/washer area underneath
- Likely cause: gasket stack wrong order, cross-threaded nut, or not tightened enough
- Fix: recheck washer order and orientation; retighten in small increments
Strainer spins when you tighten
- Likely cause: nothing holding it steady from above
- Fix: stabilize with a screwdriver across the drain opening or have a helper hold the strainer
Locknut won’t budge
- Try penetrating oil and time
- Use steady force with a proper wrench/pliers (avoid jerking motions that can damage pipes)
- If everything is heavily corroded, replacing the entire assembly (or calling a pro) can be smarter than wrestling forever
Maintenance Tips (So You Don’t Do This Again Next Month)
- Empty the basket regularlyfood + time = funk
- Avoid harsh chemicals that can accelerate corrosion
- Occasionally check under the sink for dampness, especially after big cooking sessions
- If you remove the basket often, be gentleno need to audition for a strongman competition
When to Call a Plumber
DIY is greatuntil it isn’t. Consider calling a professional if you find cracked drain pipes, rotted cabinet flooring,
a damaged sink opening, or severe corrosion that turns simple removal into a multi-hour grudge match.
Also: if you’re tempted to introduce open flame or extreme cutting tools under a sink, that’s your cue to pause and phone a pro.
Real-World DIY Experiences: What People Wish They Knew (About )
Replacing a sink basket strainer sounds like a small job, and it isright up until the moment you meet the
Ancient Locknut of Doom. In many households, the “experience” of this project comes down to three themes:
preparation, patience, and a healthy respect for how creative plumbing can get in tight spaces.
One of the most common surprises is how much water lives in the pipes even when the faucet is off. The P-trap is
literally designed to hold water, so first-timers often remove it and get an instant reminder that gravity is loyal
and unforgiving. A bucket placed correctly feels like a small victory. A bucket placed two inches to the left feels
like a lesson you will remember forever.
Another frequent “aha” moment is realizing that leaks aren’t always about brute-force tightening. Many DIYers start
by cranking down the locknut, only to end up with a strainer that’s off-center or a gasket that’s pinched and leaking
anyway. The better approach is slow and methodical: tighten a little, check alignment, wipe, test. This is one of
those rare life scenarios where less dramatic is actually more effective.
Sealant choice can also shape the whole experience. People who use plumber’s putty often love how forgiving it is:
it seals immediately, it stays workable, and cleanup is straightforward. But homeowners with porous stone surfaces
(or who have read the warnings on putty labels) tend to choose silicone for peace of mind. Silicone can create an
excellent seal, but it requires cleaner application and usually a bit more care during assembly so you don’t smear
it everywhere like frosting on a cake nobody asked for.
Then there’s the under-sink yoga. Tight spaces force you to work by feel, and that’s where the “take a photo first”
advice becomes gold. People often report that reassembly is the moment they second-guess everything: which way does
the slip washer face? Why does the pipe look slightly too short now? Did that nut always have that weird angle?
The truth is: drain parts can shift as you loosen and tighten. Loosely assembling everything before final tightening
helps you line things up without stressing the joints.
Finally, many DIYers describe the best part of the project as the moment they do the stress testfill the sink,
pull the stopper, and watch the water rush through with no drips underneath. It’s oddly satisfying. You didn’t just
replace a sink strainer; you restored order to the cabinet universe. And the next time someone says, “There’s a leak,”
you can calmly respond, “I know a guy.” (It’s you. You’re the guy.)
Conclusion
Replacing a sink basket strainer is one of those “small job, big payoff” repairs: it stops leaks, reduces odors,
and prevents cabinet damage. Follow the 15 steps, use the right sealant for your sink, tighten with patiencenot
furyand you’ll have a clean, leak-free kitchen sink drain that behaves like a responsible adult.


