
Table of Contents >> Show >> Hide
- Why Audio and Video Fall Out of Sync
- Before You Start: Identify the Type of Sync Problem
- 1. Adjust Audio Delay in a Media Player
- 2. Sync Audio and Video Automatically in Editing Software
- 3. Manually Align Audio and Video with Waveforms
- 4. Fix Sync Permanently During Export or Conversion
- How to Prevent Audio Sync Problems Next Time
- Common Mistakes When Syncing Audio and Video
- Which Method Should You Choose?
- Real-World Experience: What Actually Works When Sync Goes Wrong
- Conclusion
Few things can make a good video feel strangely cursed faster than out-of-sync audio. A speaker’s lips move, the words arrive half a second later, and suddenly your polished interview has the energy of an old dubbed kung fu movie. The good news? Audio and video sync problems are usually fixable, even if you are not a professional editor with three monitors, a color-coded keyboard, and a suspiciously expensive chair.
Whether you recorded a podcast with a separate microphone, captured gameplay in OBS, shot a wedding toast on a phone, or downloaded a video that plays like the sound is running late to its own party, there are several simple ways to get everything lined up again. Some fixes are quick playback adjustments. Others permanently correct the file in an editor or through exporting. The right method depends on one question: do you only need the video to play correctly, or do you need to publish a corrected version?
This guide explains how to sync audio and video using four easy methods: adjusting playback delay, syncing clips automatically in video editing software, manually aligning waveforms, and fixing sync during export or conversion. Along the way, you will learn why audio drift happens, how to avoid common mistakes, and what to check before uploading your finished video to YouTube, TikTok, Instagram, a client portal, or your family group chat where Aunt Linda will absolutely notice if the lips are wrong.
Why Audio and Video Fall Out of Sync
Before fixing the problem, it helps to know what kind of sync issue you have. Not all audio-video problems are the same. Some clips are offset from the beginning, meaning the audio is consistently early or late by the same amount. For example, the sound may arrive 300 milliseconds after the speaker’s mouth moves. That is annoying, but it is usually easy to correct.
The trickier issue is audio drift. This happens when audio starts in sync but slowly becomes worse over time. A video may look fine in the first minute, slightly off by minute five, and completely distracting by minute twenty. Drift often appears when footage is recorded with variable frame rate settings, when audio sample rates do not match, or when screen recordings are pushed through overloaded hardware.
Another common cause is separate recording devices. A camera, phone, external recorder, wireless microphone, and screen recorder may all keep time slightly differently. Each device thinks it is behaving perfectly. Together, they form a tiny orchestra with no conductor. That is why claps, slates, waveform matching, and proper project settings matter so much.
Before You Start: Identify the Type of Sync Problem
Open your video and look for a moment with a sharp visual cue: a clap, a door closing, a hand tapping a desk, a sentence with clear lip movement, or a cut where music hits the beat. Watch it several times. If the delay feels the same at the beginning and the end, you likely have a simple offset. If the delay grows as the video continues, you may have drift.
Quick Sync Test
Play the video from the beginning, middle, and near the end. If the audio is late by roughly the same amount everywhere, use a playback delay adjustment or a simple timeline shift. If the audio gets progressively worse, you may need to convert the footage, use constant frame rate export settings, or stretch the audio slightly in an editor.
Once you understand the problem, choose one of the four methods below.
1. Adjust Audio Delay in a Media Player
This is the fastest fix when you only want to watch a video correctly. It does not permanently change the file, but it can rescue movie night, a downloaded lecture, a client review session, or a recorded webinar that is just slightly off.
Media players such as VLC allow you to shift audio forward or backward during playback. If the person’s lips move before you hear the words, the audio is late and needs to move earlier. If you hear the words before the lips move, the audio is early and needs to be delayed.
Best For
This method is ideal for watching videos, reviewing files, checking sync before editing, or confirming how many milliseconds the audio needs to move. It is not the best choice when you need to upload or deliver a fixed video file.
How to Do It
Open the video in your preferred media player and look for audio delay or synchronization settings. In many players, you can adjust the delay in small increments while the video continues playing. Start with small changes, such as 50 milliseconds at a time. A delay of 100 to 300 milliseconds is often enough to make a clip feel noticeably wrong, so do not jump too far too quickly.
Use lip movements, hand claps, or hard sound effects as your reference. When the visible action and the sound happen together, write down the offset amount. That number is useful if you later want to make a permanent fix in editing software.
Example
Suppose you are watching an interview and the speaker’s mouth moves just before the words arrive. You test a few adjustments and discover that shifting the audio earlier by 200 milliseconds makes the dialogue feel natural. That tells you the audio track is about 200 milliseconds late. For casual viewing, you are done. For publishing, take that number into your editor and apply the same correction there.
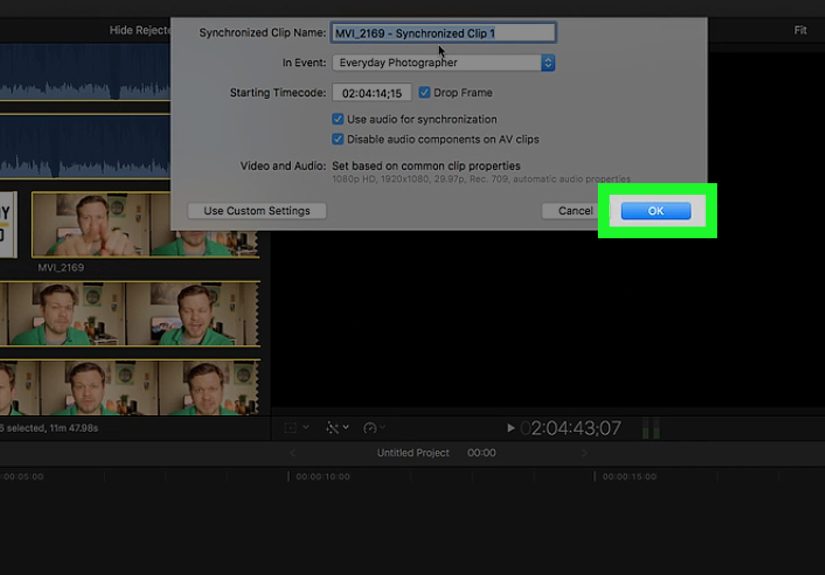
2. Sync Audio and Video Automatically in Editing Software
If you recorded video on one device and audio on another, automatic sync is usually the easiest professional-looking fix. Modern editing tools can analyze matching audio waveforms and line up the external microphone track with the camera audio. In plain English, the software looks at the shapes of the sound waves and says, “Ah, these two messy mountain ranges match right here.” Very polite of it.
Programs such as Adobe Premiere Pro, Final Cut Pro, DaVinci Resolve, and other popular video editors include tools for synchronizing clips. These features work especially well when both the camera and external recorder captured the same sound, even if one track sounds worse. For example, your camera’s built-in microphone may sound tinny, but it still provides a useful reference waveform for syncing your crisp lavalier or shotgun microphone audio.
Best For
Use automatic sync for interviews, YouTube videos, documentaries, podcasts with video, tutorials, weddings, live events, and multicamera projects. It is especially helpful when you have a clean external audio recording and scratch audio from the camera.
How to Do It
Import your video clip and separate audio file into your editor. Select the matching clips, then choose the software’s synchronize, merge, or auto-sync option. When available, choose audio waveform as the sync method. The editor will analyze both tracks and create a synced clip or align them in the timeline.
After syncing, always check the result. Play a section with visible speech or a sharp sound. Zoom in on the timeline and compare the waveform peaks. Automatic tools are impressive, but they are not mind readers. Background noise, music, echo, or weak camera audio can confuse the process.
Practical Tip
Do not delete your original audio immediately. Mute it first. Keeping the camera audio in the timeline gives you a backup reference if something sounds odd later. Once you are confident the sync is correct, you can disable or remove the scratch track.
Example
Imagine you recorded a cooking video with your camera across the kitchen and a small recorder clipped near your shirt. The camera audio includes room echo, refrigerator hum, and the emotional soundtrack of a spoon falling into the sink. The external recorder sounds much better. Select both files, run waveform sync, mute the camera audio, and use the external track for the final edit. Your pasta now sounds as elegant as it looks.
3. Manually Align Audio and Video with Waveforms
Manual syncing is the classic method, and it still works beautifully. It is also the method that makes you feel most like a real editor, mostly because you will spend a few minutes zooming into waveforms with great seriousness. Manual sync is useful when automatic syncing fails, when the audio is too noisy, or when your software does not have a reliable auto-sync feature.
The basic idea is simple: find the same moment in both the video’s scratch audio and the separate audio track, then slide one track until the peaks match. A clap is perfect because it creates a sharp spike in the waveform. This is why film crews use clapperboards. They are not just charming movie props; they are sync tools with attitude.
Best For
Manual alignment works well for short clips, noisy recordings, music videos, social media videos, screen recordings, voiceovers, and projects where you only need to correct a few files. It is also a lifesaver when the software refuses to auto-sync because the reference audio is too quiet or distorted.
How to Do It
Place the video clip and the separate audio file on your editing timeline. Expand the audio waveforms so you can see peaks clearly. Find a distinct sound in both tracks: a clap, cough, tap, laugh, drum hit, or first spoken word. Drag the external audio track left or right until the matching peaks line up.
Zoom in closely and make fine adjustments. Then play the clip at normal speed. Watch the speaker’s lips and listen for consonants such as “p,” “b,” and “t,” because those sounds have clear mouth movements. If the sync feels slightly off, nudge the audio one or two frames at a time.
What If There Is No Scratch Audio?
If your video has no built-in audio at all, syncing becomes more visual. Look for moments where a sound should match an action: a hand clap, a glass touching a table, a guitar strum, a door closing, or a person beginning to speak. Line up the sound with the frame where the action occurs. It may take more patience, but it is still possible.
Example
You recorded a product review with a camera and a separate microphone, but the camera audio is too low for automatic syncing. In the first few seconds, you clap once. In the timeline, that clap appears as a tall spike in the external audio. The camera track has a smaller spike at the same moment. Align those spikes, mute the camera audio, and check the lips. Congratulations: your review no longer looks like it was transmitted from another dimension.
4. Fix Sync Permanently During Export or Conversion
Sometimes the problem is not just the timeline. The video file itself may have timing issues caused by variable frame rate recording, mismatched audio sample rates, damaged metadata, or conversion settings that made the audio and video disagree about when time begins. This is common with phone footage, screen recordings, livestream captures, and files passed through multiple apps.
If audio and video are in sync inside your editor but drift after export, check your export settings. A reliable web-friendly export usually uses an MP4 container, H.264 video, and AAC audio at a 48 kHz sample rate. For many publishing platforms, those settings are safe, widely supported, and less likely to create playback surprises.
Best For
This method is best for creators who need a final corrected file, especially for YouTube uploads, online courses, client delivery, webinars, social posts, or archived recordings. It is also useful when a video plays correctly in one app but not another.
How to Do It
First, correct the sync in your editor using either automatic or manual alignment. Then export with consistent settings. Avoid mixing unusual frame rates unless you have a reason. If your footage came from a phone or screen recorder and keeps drifting, convert it to a constant frame rate before editing. Many editors handle variable frame rate better than they used to, but constant frame rate files are still more predictable for editing and delivery.
If you are comfortable with technical tools, FFmpeg can offset audio or video streams and remux files without a full visual re-edit. However, command-line fixes require care. A small typo can create a new problem, and nobody wants to explain to a client that the video now has perfect sync but no audio because the terminal goblin was hungry.
Export Checklist
- Use a standard frame rate that matches your project.
- Export audio at 48 kHz for video projects.
- Use a common container such as MP4 for web publishing.
- Watch the exported file from beginning to end before uploading.
- Test the file in more than one player if the project is important.
Example
You edit a 25-minute screen recording, and it looks perfect in the editor. After export, the audio slowly drifts out of sync. The likely culprit is inconsistent timing from the original recording. Convert the source recording to a constant frame rate, reimport it, line up the audio again, and export with standard web settings. It takes a little extra time, but it prevents the final video from slowly turning into a badly dubbed weather report.
How to Prevent Audio Sync Problems Next Time
Fixing sync is useful, but preventing the problem is even better. The easiest habit is to create a sync point at the start of every recording. Clap once on camera, use a slate, tap the microphone lightly, or make another sharp sound that appears clearly in both the video and audio tracks.
Second, record scratch audio whenever possible. Even if your camera microphone sounds terrible, it gives your editing software something to match. A bad reference track is often better than no reference track at all.
Third, keep your recording settings consistent. Use the same frame rate across cameras when possible. For audio, 48 kHz is the standard choice for video production. If one recorder uses 44.1 kHz and another uses 48 kHz, sync issues are more likely to appear, especially in longer recordings.
Fourth, avoid overloading your computer during screen recording or streaming. When the system struggles, frames may drop, timing may wobble, and audio can slip away from video like it has other plans. Close unnecessary apps, record a short test, and check the file before capturing a long session.
Common Mistakes When Syncing Audio and Video
Relying Only on Your Eyes
Lip sync is important, but your eyes can be fooled. Always check waveforms when you can. The waveform gives you a visual map of the sound and helps you make frame-level adjustments.
Moving the Wrong Track
If your timeline has multiple video clips, music, sound effects, and voiceover tracks, it is easy to shift the wrong item. Lock tracks you do not want to move before making sync adjustments.
Ignoring Audio Drift
If the beginning is synced but the end is not, sliding the audio track will not fully solve the problem. You may need to convert the video, adjust speed slightly, or use proper constant frame rate settings.
Exporting Without Watching the Final File
Never trust the export button completely. Watch the finished file, especially around the beginning, middle, and end. A video can be perfect in the timeline and still have issues after compression or upload.
Which Method Should You Choose?
If you are only watching a file, adjust the playback delay in your media player. If you are editing separate camera and microphone files, use automatic waveform sync. If automatic sync fails, manually align the waveforms. If the final exported file still has problems, fix the project settings, convert variable frame rate footage, or use a more controlled export workflow.
For most creators, the best workflow is simple: record scratch audio, clap at the beginning, use automatic sync, check manually, then export with standard settings. That process covers most YouTube videos, online classes, interviews, podcasts, and social clips without turning your editing session into a technical treasure hunt.
Real-World Experience: What Actually Works When Sync Goes Wrong
In real editing situations, audio sync problems rarely show up at a convenient time. They appear when the client is waiting, the upload deadline is close, or the best take of the day has perfect emotion and imperfect timing. The first lesson from experience is this: do not panic and start randomly dragging clips around. That usually turns one sync problem into five smaller sync problems wearing fake mustaches.
The smartest first move is to duplicate the sequence or project before making changes. That way, you can experiment without destroying the original timeline. Next, find a clear sync point near the start. A clap is ideal, but a spoken word with a strong consonant can work. Line up that moment first. Then jump to the middle and end of the video to see whether the sync still holds. This simple check tells you whether you have an offset problem or a drift problem.
For interviews, I have found that waveform syncing is usually the fastest path, but manual checking is still necessary. Automatic tools can line up the wrong part of a waveform if there is echo, background music, or overlapping speakers. A good habit is to sync automatically, then zoom in and verify the first loud peak. After that, watch the person say a sentence with visible mouth movement. If the “p” and “b” sounds look right, you are usually in good shape.
For screen recordings, the problem is often different. The recording may begin correctly but slowly drift because the computer dropped frames or recorded at a variable frame rate. In that case, shifting the audio track fixes only one section. The better solution is to convert the footage to a constant frame rate before editing or to record future sessions with more stable settings. It may feel like an extra step, but it saves time compared with chasing sync every few minutes.
For social media videos, the biggest mistake is editing with Bluetooth headphones and assuming everything is wrong. Wireless headphones can introduce monitoring delay. The exported video may be fine, while your headphones are the real prankster. Always check sync using wired headphones or built-in speakers before making permanent changes. This one habit can save you from “fixing” a video that was never broken.
For long videos, create multiple sync checkpoints. Use markers at the beginning, middle, and end. If the audio is consistently late by the same amount, apply one offset. If the delay changes, investigate drift. Sometimes you can slightly stretch or compress the audio track, but do this carefully. Over-adjustment can make voices sound unnatural. If someone starts sounding like a nervous robot or a sleepy giant, undo and try a cleaner conversion workflow.
Finally, always export a short test section before rendering the full project. Choose a section with talking, movement, and sound effects. Watch it in a normal media player, not only inside the editor. If that short export is synced, then render the full version. This small test can prevent the classic tragedy of waiting an hour for an export only to discover that the audio is marching to a completely different calendar.
Conclusion
Learning how to sync audio and video is one of those practical editing skills that pays off constantly. A small delay can make an otherwise excellent video feel amateur, while clean sync makes dialogue, tutorials, performances, and screen recordings feel polished and trustworthy. The good news is that most sync problems do not require advanced wizardry. You can adjust playback delay for quick viewing, use automatic sync in editing software, manually align waveforms when needed, or fix timing permanently during export and conversion.
The best method depends on your goal. Watching a video? Use a player delay. Publishing a video? Correct it in the timeline and export carefully. Recording separate audio? Use waveform sync and keep scratch audio as a reference. Working with long screen recordings? Watch for drift and consider constant frame rate conversion. Once you understand the difference between offset and drift, syncing audio and video becomes much less mysterious.
In short, audio sync is not magic. It is timing, patience, and a few reliable tools. Also, maybe one good clap at the beginning of every recording. Future you will be grateful.


