
Table of Contents >> Show >> Hide
- What Is Okaki, Exactly?
- Ingredients and Pantry Notes
- Step 1: Cut and Dry the Mochi (The Secret to Real Crunch)
- Step 2: Cook the Okaki (Fried or Baked)
- Step 3: Season Like a Pro (Not Like a Plain Rice Cake)
- Crunch Science: Why Drying Matters So Much
- Troubleshooting (Because Mochi Has Opinions)
- Serving Ideas (Beyond “Eat Over the Sink”)
- Storage and Make-Ahead
- Food Safety Notes (Quick but Important)
- Personal Experiences With Okaki (The Crunch Chronicles)
- Conclusion
- SEO Tags
Okaki is what happens when mochi decides it’s done being cute and chewy and wants to become crunchy and
dangerously snackable. Think of it as a Japanese rice cracker glow-up: dried mochi gets fried or baked until it
puffs, crackles, and turns into an airy, crisp bite that begs for a salty-sweet glaze. The best part? Homemade
okaki tastes fresher than most bagged crackers, and you control the seasoningso you can go classic shoyu, furikake
confetti, or full “spicy snack gremlin.”
What Is Okaki, Exactly?
Okaki (often grouped with terms like kakimochi and arare) is a Japanese rice cracker made from mochi
(glutinous rice cake). Traditionally, mochi is cut, dried until firm, then cooked (often deep-fried) so the trapped
moisture rapidly turns to steam and puffs the pieces into a light, crisp cracker. Seasonings usually lean savory:
salt, soy sauce (shoyu), seaweed, sesame, and sometimes sweet-salty glazes that stick to every nook and cranny.
Okaki vs. Senbei (and Why You Should Care)
If you’ve ever called every Japanese rice cracker “senbei,” you’re not aloneEnglish menus do it too. But here’s the
practical difference: senbei are typically made from non-glutinous rice (or rice flour dough) and are
pressed/baked/grilled into flatter, denser crackers. Okaki starts with mochi, so it
puffs and becomes airy when cooked. Translation: okaki is the crunchy cousin with the dramatic personality.
Ingredients and Pantry Notes
This okaki recipe uses store-bought mochi (kirimochi) because it’s accessible, consistent, and doesn’t require you to
pound rice like you’re training for an anime tournament arc.
Core Ingredients
- Kirimochi (plain mochi blocks): 6–8 pieces (about 10–14 oz total)
- Neutral oil (for frying): canola, rice bran, grapeseed, or peanut (enough for 1–1.5 inches in a pot)
- Kosher salt: to finish
Optional Seasonings (Pick Your Adventure)
- Soy sauce (shoyu) or tamari (gluten-free): for brushing or spritzing
- Sugar (or honey): for a glossy sweet-salty glaze
- Furikake: adds salty umami crunch (seaweed + sesame vibes)
- Nori (roasted seaweed): tear into strips, or wrap bigger pieces
- Sesame seeds (white or black): nutty and classic
- Shichimi togarashi (seven-spice): for a warm, citrusy heat
- Aonori (green seaweed flakes) or black pepper: easy flavor boosters
Equipment That Makes Life Easier
- Sharp knife (or kitchen shears for some shapes)
- Wire rack or tray for drying
- Heavy pot or deep skillet (if frying)
- Thermometer (highly recommended for frying)
- Sheet pan + parchment (if baking)
Step 1: Cut and Dry the Mochi (The Secret to Real Crunch)
Drying is the unglamorous step that makes okaki both crisp and safer to cook. Less moisture means better puffing and
less dramatic oil splatter.
How to Cut
- Classic thin slices: Slice mochi into 1/8-inch (about 3 mm) slabs for fast puffing and lots of crunch.
- Bite-size cubes: Cut into 1/2-inch (about 1–1.5 cm) cubes for chunky, snack-mix-friendly pieces.
- Strips: Great for dipping and glazes; they puff like little crunchy logs.
How to Dry (Choose One)
-
Air-dry (best texture): Arrange pieces in a single layer on a rack or tray. Leave uncovered in a cool,
dry spot for 2–7 days until the surfaces look dry and you see small cracks. Flip once daily if you can. -
Quick-dry (when you remember you have guests in 3 hours): Place mochi on a rack in a very low oven
(around 170–200°F) for 60–120 minutes, checking often. This won’t mimic long air-drying
perfectly, but it helps.
You’ll know it’s ready when it feels firm, slightly lighter, and the surface is no longer tacky. If it still feels
“soft like a pillow,” give it more timefuture-you will thank you.
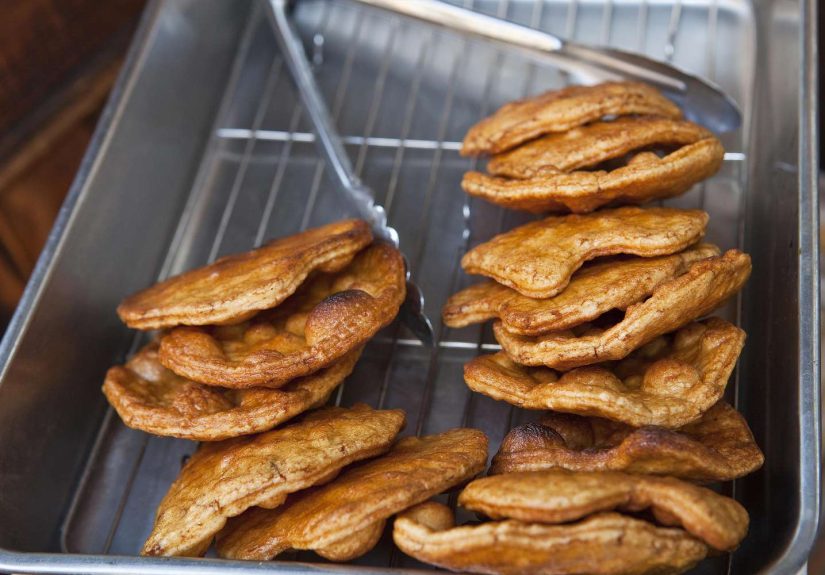
Step 2: Cook the Okaki (Fried or Baked)
Method A: Classic Deep-Fried Okaki (Age Okaki)
This is the traditional, ultra-crispy version. Frying at a lower temperature lets the mochi puff gradually instead of
browning too fast on the outside.
- Heat the oil to 320°F (160°C) in a heavy pot. Use 1–1.5 inches of oil.
-
Add dried mochi in small batches. Don’t crowdeach piece needs room to puff without sticking to its
neighbors like they’re in a group hug. -
Fry slowly, turning with chopsticks or tongs. The mochi will expand and puff; keep it moving so it
browns evenly. - Remove when light golden and fully puffed, about 3–8 minutes depending on size.
- Drain on a rack or paper towels.
- Season immediately with salt, or move to a glaze (below).
Method B: Oven-Baked Okaki (Crispy, Less Oil)
Baking gives you a crunchy result with less mess. The texture is slightly denser than frying, but still excellentand
perfect if hot oil makes you nervous (valid!).
- Heat the oven to 350°F (180°C). Line a sheet pan with parchment.
- Arrange dried mochi with space between pieces.
-
Bake for 12–20 minutes, flipping once, until puffed and lightly browned (timing depends
on thickness). - Season while warm, or glaze and return briefly to set the coating.
Air Fryer Shortcut
If you own an air fryer, you can cook dried mochi at 350°F for about 8–12 minutes,
shaking once or twice. Watch closely near the endmochi goes from “perfect” to “toasty regret” quickly.
Step 3: Season Like a Pro (Not Like a Plain Rice Cake)
Okaki is basically a crispy blank canvas. Seasoning is where it becomes “I’ll just have one more” and suddenly the
bowl is empty.
Option 1: Salted Okaki (Classic)
Toss hot okaki with a pinch of kosher salt. Add toasted sesame seeds if you want a nutty finish without extra effort.
Option 2: Shoyu (Soy Sauce) Finish
For a savory, glossy coating: lightly brush or spritz warm okaki with soy sauce (or tamari), then let it air-dry on a
rack for 5–10 minutes. Keep it lighttoo much liquid can soften the crunch.
Option 3: Sweet-Salty Soy Glaze (A “Mitarashi-ish” Vibe)
This is the flavor that makes people ask, “What is in this?” like you’re hiding secrets. You’re not. It’s just sugar
and soy doing teamwork.
- Glaze: 2 tbsp soy sauce + 2 tbsp water + 1–2 tbsp sugar (adjust to taste)
- Warm glaze ingredients in a small pan just until sugar dissolves (no need to boil aggressively).
- Toss hot okaki in a bowl with a small splash of glazecoat lightly.
-
Spread on a rack to dry. If you baked the okaki, you can return it to a 300°F oven for
3–5 minutes to set the glaze faster (watch carefully to avoid burning).
Option 4: Furikake + Nori “Snack Confetti”
Sprinkle furikake over warm okaki, then add torn nori strips. The seaweed aroma makes the whole kitchen smell like a
Japanese snack aisle (the good kind).
Option 5: Spicy Seven-Spice (Shichimi Togarashi)
Mix a pinch of shichimi togarashi with salt, then dust over warm okaki. It’s warm, a little citrusy, and perfect with
green teaor a cold beer if it’s been that kind of day.
Crunch Science: Why Drying Matters So Much
Okaki puffs because moisture trapped inside the dried mochi flashes into steam when heated. If the mochi is properly
dried, you get a controlled “puff” that creates airy structure and crispness. If it’s still wet, the water can
violently escapeespecially in hot oilleading to splatter and uneven texture. Drying also helps the cracker stay
crunchy after seasoning, since less internal moisture means less sogginess.
Troubleshooting (Because Mochi Has Opinions)
-
It didn’t puff: The mochi may be too thick, too wet, or your oil/oven temperature may be off. Dry
longer and slice thinner next time. -
It’s tough instead of crisp: Often undercooked or not dried enough. Keep cooking until fully puffed
and light. - It’s oily: Oil was too cool or the batch was crowded. Fry smaller batches and keep temperature steady.
- It tastes bitter: Soy sauce glaze likely burned. Use lower heat to set the glaze and watch closely.
-
It went soft after seasoning: Too much liquid seasoning. Brush lightly and dry on a rack. Re-crisp in
a 300°F oven for 3–6 minutes.
Serving Ideas (Beyond “Eat Over the Sink”)
- With tea: Classic pairinggreen tea and salty okaki is pure snack harmony.
- Snack mix: Toss with peanuts, sesame sticks, or pretzels for a crunchy party bowl.
- Salad topper: Crush and sprinkle like croutons, especially on sesame-ginger salads.
- Soup garnish: A few pieces on miso soup add surprise crunch (eat quickly so they don’t soften).
- “Hurricane” style: Mix okaki with buttered popcorn and furikake for an irresistible sweet-salty combo.
Storage and Make-Ahead
Okaki is best the day it’s madepeak crunch, peak aroma, peak “where did the whole batch go?” If you need to store it,
cool completely and keep in an airtight container in a dry place. If it softens, re-toast at 300°F for
a few minutes to bring the snap back.
Food Safety Notes (Quick but Important)
-
Hot oil caution: Fully dry mochi before frying, and fry at moderate heat to reduce splatter. Lower
pieces into oil gentlyno dramatic tosses. -
Choking hazard reminder: Mochi (and mochi-based snacks) can be sticky and risky for young kids and
older adults. Cut into small pieces, chew thoroughly, and supervise anyone who needs extra caution.
Personal Experiences With Okaki (The Crunch Chronicles)
The first time I tried making okaki at home, I did what every confident home cook does: I underestimated the
importance of drying. I sliced the mochi, waited a grand total of “about an hour,” and decided that was basically the
same as a few days. Spoiler: it was not. The oil popped like a tiny, angry jacuzzi, and I spent the rest of the batch
standing at arm’s length like I was negotiating with it. The crackers still puffed, but they were unevensome airy and
perfect, others dense and chewy in a way that felt like the snack was trying to turn back into mochi mid-bite.
Attempt number two was the redemption arc. I air-dried thin slices on a rack for several days until they looked
slightly cracked and felt like little rice tiles. When those hit the oil, the transformation was immediate: the pieces
ballooned slowly, turning pale gold and light as they danced around the pot. The sound was the best partsoft
crackling, like a campfire made entirely of snacks. And the smell? Toasted rice with that warm, cozy “you’re about to
eat something really satisfying” note.
Seasoning was where I learned my biggest okaki lesson: less liquid is more crunch. My first soy sauce attempt was a
heavy-handed drizzle that tasted great for about three minutes… until the crackers started to soften. The next time, I
used a small brush and treated soy sauce like perfume: a little goes a long way. I brushed the warm okaki lightly, set
them on a rack, and let the coating dry. That thin shoyu layer turned glossy and savory without stealing the crunch.
Then I tried a sweet-salty glaze with sugar and soy, and suddenly I understood why people can demolish a bag of rice
crackers without realizing it.
My favorite “I didn’t plan this but it’s genius” moment came when I sprinkled furikake over a warm batch and added torn
nori. The kitchen smelled like the snack aisle of a Japanese grocery storein the best possible wayand the texture was
pure joy: crisp, airy, with little sesame and seaweed hits. I started using okaki as a topping too: crushed over a
simple cucumber salad with sesame oil, tossed onto ramen right before serving, even sprinkled on buttered popcorn for a
chaotic-but-brilliant snack mix. (If you’ve never tried the popcorn route, fair warning: it’s suspiciously addictive.)
The funniest part is how okaki changes the way people “taste-test.” Nobody takes one polite cracker. Remember that
scene in movies where someone samples something and then immediately goes back for more? That’s okaki. It invites
“just one more” behavior because it’s light, crisp, and perfectly seasonedespecially when you play with spicy shichimi
or black pepper. Now I keep a mental note: if I’m making okaki for a group, I should double the batch. Not because
people are greedy. Because okaki is sneaky. It’s basically crunch magic with a soy sauce cape.
Conclusion
Homemade okaki is one of those deceptively simple snacks that feels like you unlocked a secret level in your kitchen.
Dry the mochi well, cook it patiently, season it smartly, and you’ll end up with Japanese rice crackers that are crisp,
flavorful, and dangerously easy to snack on. Start with salted or shoyu, then branch out to furikake, nori, and
shichimi togarashi. Your future self (and your snack bowl) will be very busy.


