
Table of Contents >> Show >> Hide
- Why a paw print makes a perfect memorial
- What string art is (and why it works so well here)
- Supplies you’ll need
- Choosing a paw print design that works for string art
- Step-by-step: How to make paw print string art
- Step 1: Pick your size, layout, and message
- Step 2: Prep the board (the “future you will thank you” step)
- Step 3: Attach your pattern
- Step 4: Hammer nails along the outline
- Step 5: Remove the paper pattern
- Step 6: Plan your string path (outline first, fill second)
- Step 7: Start stringing
- Step 8: Finish cleanly
- Memorial personalization ideas that feel thoughtful (not crowded)
- Display ideas and care
- If you’re making this as a gift: etiquette that matters
- Troubleshooting: common issues (and fixes)
- Why making something can help (even if it doesn’t “fix” the sadness)
- Experience-based reflections and ideas from makers (about )
- Conclusion
There’s something quietly powerful about a paw print. It’s a tiny signature your pet left all over your lifeon the floor after a bath, on your favorite jeans, and somehow on your heart (which, inconveniently, doesn’t come with a lint roller).
A paw print string art memorial turns that signature into a piece of wall art you can touch, see, and keep. It’s part DIY décor, part keepsake, and part “I needed to do something with my hands because my feelings were taking up the whole living room.”
This guide walks you through making a memorial-quality string art paw printstep by stepwith design tips, customization ideas, and a few hard-earned tricks to keep your thread from turning into a stressed-out spaghetti nest.
Whether you’re honoring a dog, cat, or any pet who trotted straight into your life and rearranged the furniture in your heart, this is a meaningful project that can be as simple or as fancy as you want.
Why a paw print makes a perfect memorial
Memorials don’t have to be grand to be real. A paw print is recognizable instantly, even without words. It’s also wonderfully flexible: you can keep it minimal (clean outline and one color) or personalize it with a name, dates, a collar-color palette, or a short phrase like “Forever Loved” or “Best Nap Buddy.”
String art adds something special because it’s tactilethread crossing thread, building shape out of patience. The process itself can feel calming: repetitive wrapping, steady progress, and a final piece that looks far more complicated than it actually is (which is the sweetest kind of achievement).
What string art is (and why it works so well here)
Traditional string art uses a board as a base, nails as anchor points, and string (often embroidery floss) to form a design by wrapping and weaving from nail to nail. The “magic” is in the overlap: lines layer until a shape appears. For a paw print, that layering creates a soft, textured lookalmost like fur, without the sneezing.
For memorial pieces, string art has three big advantages:
- It’s durable: once secured, it holds up well and can be displayed for years.
- It’s customizable: you can change the size, color, text, and layout easily.
- It’s mindful: the making is gentle, structured, and (for many people) comforting.
Supplies you’ll need
You can buy a kit, but you can also build your own supply list. Either way, aim for materials that look clean and feel sturdythis is a memorial, not a “science fair project that survived on vibes.”
Base materials
- Wood board (common sizes: 8×10, 10×10, 12×12, or 12×16). Pine, plywood, or a rustic “barn wood” style board all work.
- Finishing nails or brad nails (typically 3/4″ to 1.25″). Choose nails with heads that can hold floss without slipping.
- Hammer (a small craft hammer is easier to control).
- Embroidery floss (classic choice), or thin craft cord. Floss gives the cleanest, most detailed look.
- Printed pattern of a paw print (more on that below).
Helpful extras
- Painter’s tape (to hold the pattern in place).
- Pliers (for pulling a nail if you place one wrong, or holding tiny nails steady).
- Scissors (sharp onesfloss can fray with dull blades).
- Sandpaper (120 and 220 grit) for smoothing the board.
- Stain or paint and a brush/cloth (optional, but it elevates the look).
- Clear sealer (optional) to protect the finish.
- Glue (a tiny dab to lock knots in place, optional).
- Hanging hardware (sawtooth hanger, D-rings, or a simple wall hook setup).
- Felt or cardstock backing (optional) to cover nail tips if needed.
Safety note (worth reading)
If you’re a teen or making this with a younger crafter, have an adult handle nail hammering. Wear eye protection while hammering, work on a stable surface, and keep fingers clear of the “hammer zone.” If nails aren’t safe or practical, you can make a no-hammer version using thick cardboard and pushpins or thumbtacks.
Choosing a paw print design that works for string art
A paw print is simple in theoryone big pad, four toe beansbut the best string art patterns are designed with anchors in mind. That means smooth curves, enough spacing for nails, and a layout that won’t turn into a tangled knot festival.
Three easy pattern options
-
Use a ready-made paw print outline.
Choose a clean silhouette with rounded shapes and no tiny internal details. -
Trace a paw print from a photo.
If you have a clear photo of your pet’s paw or paw-print keepsake, you can trace it digitally (simple outline) and print it to size. -
Design a “paw + heart” memorial layout.
Add a heart around the paw or include a small heart near the name. It reads instantly as a memorial piece without needing a lot of text.
Design tips (so the final piece looks clean)
- Keep edges smooth: jagged corners are hard to translate into nails.
- Leave breathing room: avoid making the paw too close to the board edge.
- Plan the text early: if adding a name, decide whether it will be painted, stenciled, vinyl, wood letters, or string art lettering.
Step-by-step: How to make paw print string art
Step 1: Pick your size, layout, and message
Decide what you want people to notice first: the paw print, the name, or a phrase. For most memorials, a strong layout is:
paw print centered, with name below, and optional dates in smaller text.
Example layouts:
- Minimal: Paw print only (classic, modern).
- Name focus: Paw print + name (“Luna”) in script below.
- Tribute: Paw print + “Forever Loved” + name.
- Time capsule: Name + years (2011–2025) in small text.
Step 2: Prep the board (the “future you will thank you” step)
Lightly sand the board to remove rough spots and soften edges. Wipe away dust. If staining or painting, do it now and let it dry completely.
A darker stain often makes light-colored floss pop. A white or pale board looks great with black, navy, or rainbow floss.
Step 3: Attach your pattern
Print the paw pattern to your chosen size. Tape it to the board so it doesn’t shift. If your design includes text, position everything now.
Next, mark nail positions along the outline. A simple spacing rule:
place marks evenly, about 1/4″ to 1/2″ apart depending on board size and detail.
Tighter spacing = smoother curves, but more hammering.
Step 4: Hammer nails along the outline
Hammer nails at each marked point. Keep them as vertical as possible. Don’t hammer them flushleave enough height to wrap floss comfortably.
A good target is leaving roughly 1/4″ to 3/8″ of nail exposed above the wood.
If a nail bends, don’t panic. Pull it gently with pliers and replace it. (Memorial crafts are allowed to have feelings. Nails are not.)
Step 5: Remove the paper pattern
Carefully tear away the pattern. Tweezers help for stubborn bits. Go slow around nails so you don’t loosen them.
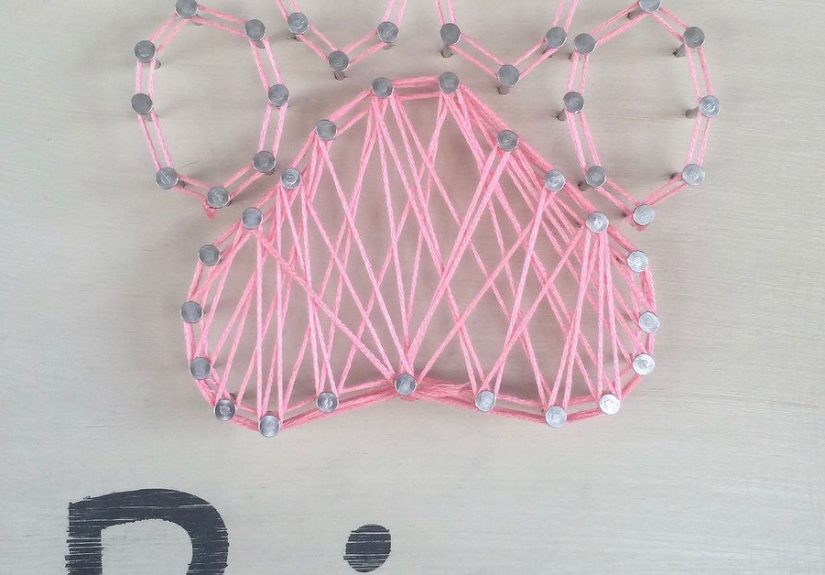
Step 6: Plan your string path (outline first, fill second)
Before you start wrapping, decide whether you want:
- Outline-only: clean, minimalist, quick.
- Filled paw: crisscross weaving inside the paw for a bold, plush look.
- Gradient fill: two or more colors blending (great for “rainbow bridge” tributes).
Step 7: Start stringing
Cut a manageable length of floss (around 3–6 yards). Tie it securely to a nail with a double or triple knot. If you want extra security, add a tiny dab of glue on the knot.
Outline method: wrap around each nail in order, following the paw shape. This gives you a crisp border.
Fill method: after outlining, begin jumping across the shapenail to nailso lines overlap and create a dense interior. Keep tension consistent, but don’t pull so hard you tilt nails.
Step 8: Finish cleanly
When you’re satisfied with coverage, tie off the floss on a nail near the back or a less-visible area. Use a tight knot, trim the tail, and (optional) secure with a tiny dab of glue.
Add hanging hardware. If nails poked through the back of thin wood, cover the back with felt or cardstock and glue it down neatly.
Memorial personalization ideas that feel thoughtful (not crowded)
The best memorial pieces feel intentional. A few clean details usually mean more than five different fonts fighting in a tiny corner.
Color choices with meaning
- Collar color tribute: use the color your pet wore most.
- Fur-inspired neutrals: tan, cream, gray, black, or white floss looks timeless.
- Rainbow bridge palette: subtle gradient from warm to cool.
- Two-tone: dark outline, lighter fill for depth.
Name + dates (simple ways that look polished)
- Painted name: stencil or freehand with acrylic paint after the string art is done.
- Vinyl lettering: clean, modern, and easy if you have access to a cutting machine or pre-made decals.
- Wood letters: glue small letters below the paw for a raised effect.
Small additions that add heart
- A tiny heart near one toe bean
- A short phrase: “Always with me,” “Best friend,” “Forever loved”
- A miniature charm (like a small paw charm) attached discreetly near the name
- A photo on the back with a handwritten note (private, but meaningful)
Display ideas and care
String art is surprisingly sturdy, but it appreciates a good environmentkind of like a cat.
- Keep it dry: avoid high-humidity areas where floss could loosen over time.
- Dust gently: a soft brush or a light burst of cool air works better than aggressive wiping.
- Hang safely: use proper hardware for the board’s weight and check that nails don’t scratch your wall.
If you’re making this as a gift: etiquette that matters
A memorial gift can mean the world, but timing and tone are everything.
- Keep it optional: ask if they’d like a keepsake before surprising them with one.
- Use correct details: confirm spelling of the name and any dates.
- Include a simple note: “Made with love in honor of ____.”
- Don’t force cheer: warm and gentle beats overly upbeat (“Smile! It’s art!” is not the vibe).
Troubleshooting: common issues (and fixes)
Nails keep bending
- Use a softer wood like pine for easier hammering.
- Start each nail with light taps, then hammer normally.
- Hold the nail with pliers for stability and safer fingers.
Thread keeps slipping off nail heads
- Choose nails with larger heads or add an extra wrap around each nail.
- Maintain steady tension (too loose = slipping, too tight = warping).
- Consider embroidery floss (it grips better than slick string).
The paw looks messy instead of crisp
- Outline first, then fill.
- Use fewer “random jumps” and more consistent angles in your weave.
- Step back occasionallyclose-up work can look chaotic until the shape “clicks.”
Why making something can help (even if it doesn’t “fix” the sadness)
A memorial craft won’t erase griefand it’s not supposed to. What it can do is give your love a place to land. You’re turning memory into something visible, which is a gentle way of saying: “This bond mattered, and it still does.”
If your grief feels heavy or lonely, it can help to talk to someone who understandsfriends who love animals, a veterinarian’s office that can point to resources, or pet loss support groups and services run by veterinary schools and organizations.
Experience-based reflections and ideas from makers (about )
People who make paw print memorials often say the first surprise is how “normal” the crafting feels. You set out the board, line up the nails, and for a moment your brain goes, “Okay, we’re doing a project.” That normal feeling can be comfortinglike your day has a shape again, even if your heart still feels a little wobbly.
The second surprise is how emotional the tiny decisions can be. Choosing floss colors seems simple until you realize you’re basically choosing how to remember them. Some people pick the exact shade of their dog’s collar. Others pick a calm neutral because it feels peaceful. And some go full rainbownot because they’re trying to be dramatic, but because the brightness feels like a refusal to shrink the love into something small.
There’s also a pattern many crafters notice: the outlining stage can feel like naming the lossclear edges, defined shape, “this is real.” Then the filling stage feels like memories piling in. Your hands keep moving while your mind wanders: the way your cat used to appear the moment you opened a yogurt, the way your dog stared at you like you were the CEO of Treat Distribution, the way a simple walk around the block turned into a whole adventure because they acted like every leaf was breaking news.
Makers also learn that “perfect” isn’t the goal“true” is. A slightly uneven nail or an imperfect curve doesn’t ruin the piece; it makes it human. A memorial doesn’t need to look factory-made. It needs to feel like love showed up, did its best, and left something behind that says, “You mattered here.”
One practical tip that comes up again and again is to build in a pause. String art is repetitive, which is part of the charm, but it can also sneak up on your emotions. Taking a breakgetting water, stretching your hands, stepping outside for a minutehelps you come back with steady tension (in the string) and gentler tension (in your chest). If you’re making this with family, some people turn it into a small ritual: one person chooses the layout, another does the wrapping, someone writes the name on the back, and everyone shares one favorite story. It’s not about making a “sad moment.” It’s about making a “real moment.”
Finally, a lot of makers end up doing one extra thing they didn’t plan: adding a hidden message. Maybe it’s a tiny heart wrapped into one corner. Maybe it’s the pet’s initials on the back. Maybe it’s a short note like, “Thanks for finding me.” Those details don’t always show to anyone else, but that’s kind of the point. Some love is meant to be displayed. Some love is meant to be tucked safely behind the frame, where it can keep your memories company.
Conclusion
A paw print string art memorial is more than a craft trendit’s a way to honor a pet with your own hands, at your own pace, in your own style. Keep it simple if you want. Add meaningful details if you’re ready. Either way, you’re creating a keepsake that turns “I miss you” into something you can hang on the wall and keep close.


