
Table of Contents >> Show >> Hide
- What PVC “Glue” Actually Does (And Why That Matters)
- Before You Start: Choose the Right Pipe and the Right Cement
- Tools and Materials Checklist
- DIY Step-by-Step: How to Glue PVC Pipe the Right Way
- Step 1: Plan the Run (Dry-Fit Like You Mean It)
- Step 2: Cut Square and Clean Up the End
- Step 3: Check the Fit (It Should Feel “Snug,” Not “Hopeless”)
- Step 4: PrimerWhy It’s Purple and Why It Matters
- Step 5: Apply PVC Cement Quickly and Generously (But Not Like You’re Frosting a Cake)
- Step 6: Push, Twist a Quarter Turn, and Hold
- Step 7: Wipe the Bead and Leave It Alone
- Cure Time: When Can You Turn the Water Back On?
- Code and Standards Basics (So Your DIY Doesn’t Get Red-Tagged)
- Common Mistakes That Cause Leaks (And How to Avoid Them)
- Troubleshooting: “Why Is My Joint Leaking?”
- Safety Notes (Because Solvents Don’t Care That You’re Handy)
- Quick Mini-Examples (Real-World DIY Scenarios)
- DIY Experiences: What People Learn the Hard Way (So You Don’t Have To)
- Conclusion
Let’s clear up the biggest lie on the plumbing aisle: “PVC glue” isn’t really glue.
It’s solvent cementa chemical that briefly softens PVC so the pipe and fitting
fuse into one piece. Think “plastic welding,” not “Elmer’s for grown-ups.”
Do it right and the joint can outlive your DIY confidence. Do it wrong and you’ll discover
a new kind of indoor water feature.
What PVC “Glue” Actually Does (And Why That Matters)
PVC solvent cement works by softening the outer surface of the pipe and the inside of the fitting.
When you push them together, the softened layers mingle and then re-harden as the solvents flash off.
The result is a true solvent-welded jointstrong, permanent, and not impressed by your attempts to “twist it a little more later.”
That’s why most leaks aren’t caused by “not enough glue.” They come from rushed prep, poor fit,
cement that started drying before assembly, or moving the joint while it’s setting.
Before You Start: Choose the Right Pipe and the Right Cement
PVC vs. CPVC vs. ABS (Don’t Mix Like It’s a Smoothie)
- PVC (white/gray): common for cold water supply (where allowed), irrigation, drain/waste/vent (DWV), pool/spa, and conduit.
- CPVC (often tan/cream): typically used for hot and cold potable water supply; uses CPVC-rated cement (often orange) and primer as required.
- ABS (black): common for DWV in some regions; typically uses ABS cement (often black). Primer is generally not used on ABS unless a manufacturer specifies otherwise.
“All-Purpose” vs. PVC-Specific Cement
In a perfect world, you always match cement to the plastic: PVC cement for PVC, CPVC cement for CPVC, ABS cement for ABS.
There are “multi-purpose” cements, but they still have rulesand your local code inspector may have opinions.
For ABS-to-PVC transitions, use a transition cement rated for that job (and remember it’s typically for non-pressure applications).
Pick the Right Body: Regular, Medium, or Heavy
The “body” is basically thickness:
- Regular-bodied: common DIY choice for smaller diameters and tight-fitting joints.
- Medium-bodied: more working time and gap-filling; good for larger sizes.
- Heavy-bodied / extra heavy: for larger diameters and situations where extra build helps fill minor gaps (still not a substitute for correct fit).
Fast-Set, Wet/Dry, and Cold-Weather Formulas
Some cements are designed for quick pressurization, damp conditions, or cold weather. If you’re working outside in winter,
or repairing a line that refuses to be “totally dry,” choosing a cement made for that scenario can save your sanity.
(No cement, however, is certified for “I glued it underwater while sprinting.”)
Tools and Materials Checklist
- PVC pipe and the correct fittings
- PVC primer (often purple) and PVC solvent cement (PVC-rated)
- Pipe cutter, miter saw, or fine-tooth saw
- Deburring tool or utility knife (plus sandcloth for light edge cleanup if needed)
- Marker (Sharpie-style) for alignment marks
- Clean rag or paper towels
- Gloves and safety glasses
- Optional: tape measure, level, and a small brush if your can’s dauber is too small
DIY Step-by-Step: How to Glue PVC Pipe the Right Way
Step 1: Plan the Run (Dry-Fit Like You Mean It)
Assemble everything without primer or cement first. Confirm lengths, angles, and orientation.
This is where you catch mistakes that would otherwise become “modern plumbing sculpture.”
Once the dry-fit looks right, use a marker to draw alignment marks across the pipe and fitting.
These marks help you line everything up fast during final assemblybecause once cement is on, the clock starts.
Step 2: Cut Square and Clean Up the End
Cut the pipe as square as possible. A crooked cut reduces contact area and can compromise the seal.
Then deburr the inside edge and lightly chamfer the outside edge. Deburring removes the ridge that can scrape cement away,
while chamfering helps the pipe slide into the fitting without shoving all the cement forward like a tiny snowplow.
Step 3: Check the Fit (It Should Feel “Snug,” Not “Hopeless”)
PVC joints are designed with an interference fitthe pipe should slide partway in with hand pressure and then tighten.
If it drops in like a hot dog down a hallway, something’s wrong (wrong fitting, damaged part, or questionable bargain-bin geometry).
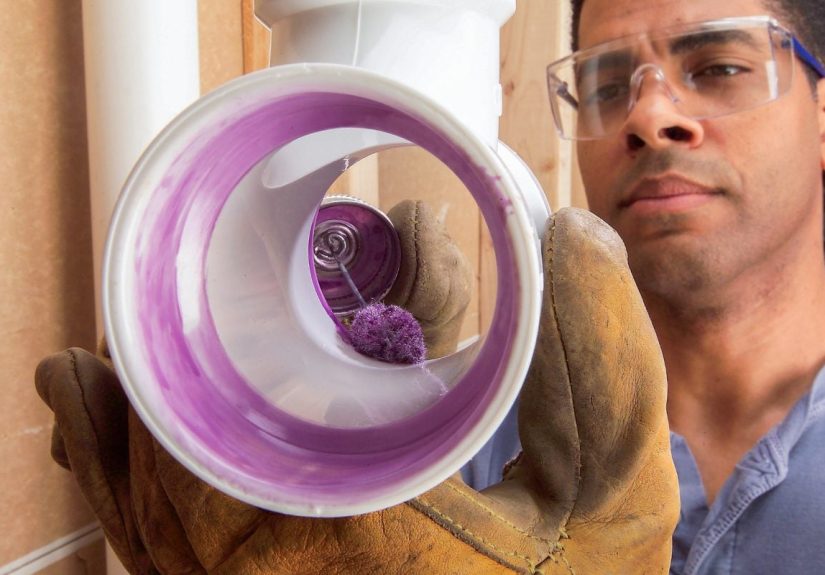
Step 4: PrimerWhy It’s Purple and Why It Matters
Primer cleans and softens the PVC surface. The famous purple color is mostly for inspection visibility: it proves you primed.
Some jurisdictions allow clear primer; others want purple so an inspector can spot it from across the room like a highlighter exploded.
Apply primer to both surfaces: the outside of the pipe end and the inside of the fitting socket.
Coat evenlywet, not dripping puddles.
Step 5: Apply PVC Cement Quickly and Generously (But Not Like You’re Frosting a Cake)
Stir or shake the cement if the label instructs, and keep the lid closed between applications so it doesn’t thicken into sad jelly.
Use an applicator sized appropriately for the pipe diameter so you can coat the surfaces fast and evenly.
A reliable method:
- Brush cement around the outside of the pipe end (full, even coat).
- Brush a thin, even coat inside the fitting socket.
- For larger sizes, apply a second coat to the pipe end to maintain a wet film during assembly.
Don’t paint cement six inches past where it will seat. Cement belongs on the mating surfaces, not on your hands, your shirt,
and the dog who wandered into the garage.
Step 6: Push, Twist a Quarter Turn, and Hold
Immediately push the pipe into the fitting until it bottoms out. As you seat it, rotate the pipe about 1/4 turn
to help distribute cement evenly. Align your marks. Then hold the joint firmlyfresh joints can “push out”
slightly because tapered sockets and trapped air can create back-pressure.
Hold time is typically around 30 seconds (longer for larger pipe or colder temps). This is not the moment to answer a text.
Step 7: Wipe the Bead and Leave It Alone
You should see a small, continuous bead of cement around the joint. Wipe off excess.
Then stop touching it. “Checking it” is how people turn good joints into mystery leaks.
Cure Time: When Can You Turn the Water Back On?
Cure time depends on pipe size, temperature, humidity, cement type, and pressure. A joint can have “handling strength”
pretty quickly, but that’s not the same as “ready for full pressure.”
Practical Rule-of-Thumb (DIY-Friendly)
- Small diameter in warm conditions: often wait at least a couple hours before pressurizing.
- Larger diameters, cold weather, or high pressure: plan for significantly longersometimes up to a full day.
- Humid or damp weather: add extra time. (Yes, the air can slow curing. Nature is petty.)
Always follow the cement manufacturer’s label instructions for your exact product and conditions.
Pressure Testing Safety (Seriously)
Never test PVC/CPVC systems with compressed air or gas. Use water-based testing methods appropriate for your application.
Compressed gas stores a lot of energy, and failures can be dangerous.
Code and Standards Basics (So Your DIY Doesn’t Get Red-Tagged)
Plumbing codes and industry standards exist for a reason: they turn “seems fine” into “actually reliable.”
Many code sections reference ASTM standards for materials and joining methods, including standards for solvent cements
and for the step-by-step joining practice.
- PVC solvent cement commonly aligns with ASTM specifications for PVC cements.
- Two-step joining (primer + cement) is commonly described by an ASTM practice.
- Purple primer may be required in certain installations to make primer use verifiable.
Bottom line: if you’re doing a permitted job, match products to pipe type, follow the joining steps,
and check your local requirementsespecially for supply lines, buried work, and anything tied into a home’s potable system.
Common Mistakes That Cause Leaks (And How to Avoid Them)
Mistake 1: Skipping Deburr/Chamfer
Burrs can scrape cement off during insertion, and a sharp edge can “plow” cement forward, leaving a dry spot.
A 20-second deburr is cheaper than a Saturday redo.
Mistake 2: Letting Cement Dry Before Assembly
Solvent cement needs to be wet when you assemble. If you hesitate, re-prime (if required) and re-cement.
Never try to “reactivate” dried cement with wishful thinking.
Mistake 3: Moving the Joint While It Sets
That little wiggle to “make it straighter” can break the developing weld. Use alignment marks and supports
so the joint can cure undisturbed.
Mistake 4: Wrong Cement for the Plastic
PVC cement on CPVC? ABS cement on PVC? That’s like using pancake batter as groutcreative, but doomed.
For ABS-to-PVC transitions, use a transition cement intended for that connection, typically for non-pressure DWV.
Mistake 5: Trying to Patch a Bad Joint with More Cement
If a solvent-welded joint leaks, the real fix is usually to cut it out and rebuild it.
Smearing more cement around the outside is plumbing’s version of putting a bandage on a flat tire.
Troubleshooting: “Why Is My Joint Leaking?”
- Leak at the socket edge: often incomplete insertion, movement during set, or uneven cement coverage.
- Slow weep under pressure: common with rushed cure time, cold temps, or wrong cement for the application.
- Drip after a few days: sometimes a dry spot from poor prep, burr scraping, or cement that skinned over.
If you can’t confidently blame the leak on a loose threaded adapter (different issue), don’t gamble.
Cut back to clean pipe, use new fittings, and redo the joint with proper prep.
Safety Notes (Because Solvents Don’t Care That You’re Handy)
- Ventilation: primer and cement fumes can be strong and flammablework in a well-ventilated area.
- No flames/sparks: keep away from pilot lights, heaters, cigarettes, and anything that makes your insurance agent cry.
- PPE: wear gloves and eye protection; primer in your eye is a “day-ruiner” with excellent follow-through.
- Storage: close lids tightly; solvents evaporate and cements can gel or thicken.
Quick Mini-Examples (Real-World DIY Scenarios)
Example 1: Replacing a Leaky Irrigation Elbow
You cut out the cracked elbow, dry-fit the new elbow and two couplings, and mark alignment.
After deburring and priming, you cement and assemble each joint with a quarter-turn and a firm hold.
You wait the recommended cure time before pressurizingbecause sprinklers are fun, indoor sprinklers are not.
Example 2: Adding a Cleanout to a DWV Line
You dry-fit the tee and cleanout adapter so the plug faces an accessible direction (future-you will thank you).
Depending on local code and product instructions, you may be allowed to use cement without primer on certain DWV work,
but many DIYers still prime for consistency. The key is full insertion, correct orientation, and leaving it alone to cure.
DIY Experiences: What People Learn the Hard Way (So You Don’t Have To)
DIY PVC work has a predictable storyline: confidence, purple primer, and at least one moment of “Why is this part facing the wrong way?”
Here are the most common real-world lessons DIYers run intoespecially on first-time repairs and weekend projects.
1) The “Purple Primer Tattoo” Phase
Purple primer is basically plumbing’s version of permanent marker with a mischievous streak.
The first time you open a can, you’ll assume you can be careful. Then the dauber flicks once,
and your fingers look like you lost a fight with a grape Popsicle.
The practical takeaway: wear disposable gloves, keep rags nearby, and set the can on cardboard.
Also, don’t prime while leaning over finished flooring unless you enjoy explaining yourself.
2) The “Push-Out Surprise” on Big Fittings
Many people are shocked when a freshly assembled joint slowly backs out by a hair.
It’s subtlejust enough to reduce engagement and create a future leak.
This shows up more on larger diameters and when you’re working fast.
The fix is simple: bottom the pipe fully, twist a quarter-turn, then hold it.
A full 30 seconds can feel dramatic, but it’s cheaper than cutting out a half-cured mess later.
3) The “I Forgot the Alignment Marks” Comedy
If your assembly has multiple elbows, tees, or a trap adapter, orientation matters.
Without alignment marks, you’ll be trying to line things up while the cement is already flashing off.
Many DIYers describe this as “playing plumbing Jenga under time pressure.”
Marking the pipe and fitting during dry-fit turns the final assembly into a quick, confident move instead of a frantic twist-and-pray.
4) Cold Weather = Slow Chemistry
People often underestimate how much temperature changes cure behavior.
In a warm garage, things set up quickly. Outside in cold air, the same joint can take much longer to reach full strength.
That’s why winter repairs are where patience pays rent. Cold-weather cements help, but they aren’t magic:
you still need adequate cure time before pressure or load.
5) “More Cement” Isn’t a SkillIt’s a Symptom
A very common beginner instinct is to compensate for anxiety with extra cement.
The reality: proper coverage matters, but technique matters more.
Sloppy puddles inside a fitting can weaken the joint, create obstructions, or make assembly messy and slow.
Experienced DIYers get calmer after they see that clean prep, fast assembly, and a firm hold produce consistent results.
6) Repairs Teach You the Value of New Fittings
When you’re fixing a leak, it’s tempting to reuse a fitting that “looks fine.”
But once a fitting has been solvent-welded, it’s not designed to be reused.
Many DIYers learn that the hard way after a second leak appears at a reused part.
The reliable repair approach is to cut back to clean, undamaged pipe and use new fittingsthen do the full prep and cement steps again.
If you remember only one thing from all these war stories, let it be this:
prep + speed + stillness.
Prep the surfaces, assemble quickly while the cement is wet, and keep the joint still while it sets.
The rest is just choosing the right can and resisting the urge to “check it one more time.”
Conclusion
Gluing PVC pipe is a fast skill with slow consequences: a good joint becomes invisible for years,
and a bad joint becomes a recurring character in your weekend plans.
Use the right cement for the plastic, prep the pipe ends properly, prime when required, work quickly,
seat fully with a quarter-turn, hold the joint, and give it real cure time before pressure.
Do that, and your PVC project will be the quiet, boring success story every home needs.


