
Table of Contents >> Show >> Hide
- Why Make Refrigerator-Pickled Radishes?
- Quick 24-Hour Refrigerator-Pickled Radishes Recipe
- How the 24-Hour Pickling Process Works
- Tips for the Best Crunchy Pickled Radishes
- Flavor Variations for Refrigerator-Pickled Radishes
- What to Eat with Pickled Radishes
- Storage and Food Safety Tips
- Common Mistakes to Avoid
- Experience Notes: What Making 24-Hour Pickled Radishes Teaches You
- Conclusion
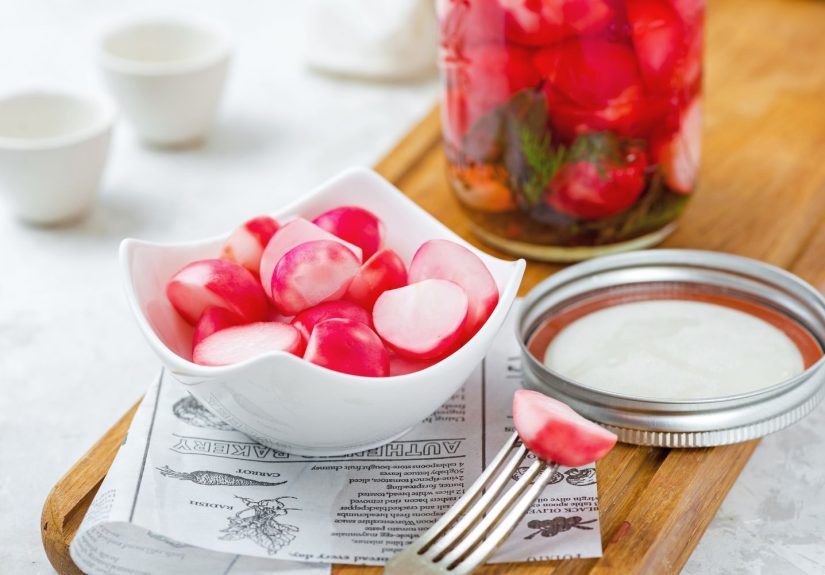
If your radishes are sitting in the crisper drawer looking slightly offended that you ignored them all week, this quick 24-hour recipe for refrigerator-pickled radishes is their glow-up moment. In less than half an hour of hands-on workand one overnight rest in the fridgeyou can turn peppery, crunchy radishes into bright, tangy, slightly sweet pickles that make tacos, salads, sandwiches, rice bowls, burgers, and snack boards taste like they hired a personal stylist.
Unlike traditional canned pickles, refrigerator-pickled radishes do not require water-bath canning, special equipment, or the emotional commitment of sterilizing your kitchen like a science lab. These are quick pickles, also called refrigerator pickles, meaning the vegetables are covered in a vinegar-based brine and stored cold. The fridge does the heavy lifting while you sleep, and by the next day, your radishes are crisp, pink, punchy, and ready to rescue boring meals from blandness.
This guide walks you through the full pickled radishes recipe, including the best vinegar to use, how thin to slice the radishes, how long to chill them, flavor variations, storage tips, serving ideas, and real kitchen experience from making batch after batch. The goal is simple: a reliable, beginner-friendly, no-canning refrigerator pickle recipe that tastes fresh, looks beautiful, and does not require a culinary degree or a dramatic apron.
Why Make Refrigerator-Pickled Radishes?
Radishes are naturally crisp, watery, peppery, and slightly spicy. That makes them excellent candidates for quick pickling because they soak up flavor fast while keeping their snap. When sliced thinly and covered with hot or warm vinegar brine, radishes soften just enough to become pleasant but not mushy. The vinegar tames their sharp bite, the salt seasons them deeply, and a small amount of sugar rounds out the acidity.
Another bonus: quick pickled radishes are stunning. Red-skinned radishes turn the brine a cheerful pink, and the slices become almost jewel-like after a day in the jar. If you have ever wanted a condiment that says, “I am organized and charming,” while requiring only a cutting board and a jar, this is it.
Refrigerator Pickles vs. Canned Pickles
Refrigerator-pickled radishes are not shelf-stable canned pickles. They must be stored in the refrigerator and eaten within a reasonable time. That is not a disadvantage; it is actually what keeps this recipe fast, fresh, and crisp. Traditional canned pickles are processed for long-term pantry storage, while refrigerator pickles are made for everyday eating. Think of them as the low-pressure cousin who brings snacks and never starts arguments at family dinner.
Quick 24-Hour Refrigerator-Pickled Radishes Recipe
This recipe makes one pint-size jar, which is enough for several meals depending on how enthusiastically you pile pickles onto things. If your household contains a taco lover, sandwich builder, or midnight snacker, consider doubling the batch.
Recipe Overview
- Prep time: 15 minutes
- Cook time: 3 minutes
- Chill time: 24 hours for best flavor
- Total time: About 24 hours and 20 minutes
- Yield: 1 pint jar
- Storage: Refrigerate and enjoy within 2 weeks for best texture and flavor
Ingredients
- 1 bunch fresh red radishes, about 10 to 12 ounces
- 1 cup white vinegar, apple cider vinegar, rice vinegar, or white wine vinegar
- 1 cup water
- 1 tablespoon kosher salt or pickling salt
- 1 to 2 tablespoons granulated sugar, honey, or maple syrup
- 1 small garlic clove, lightly smashed
- 1 teaspoon black peppercorns
- 1/2 teaspoon mustard seeds, optional
- 1/4 teaspoon red pepper flakes, optional
- 1 small sprig fresh dill, optional
Best Vinegar for Pickled Radishes
White vinegar gives the cleanest, sharpest pickle flavor and lets the radish color shine. Apple cider vinegar adds a fruity tang and a slightly warmer taste. Rice vinegar is milder and gently sweet, making it a great choice if you want a softer, less aggressive brine. White wine vinegar tastes bright and polished, like it might own linen napkins.
For a balanced quick pickle, use equal parts vinegar and water. This keeps the brine tangy without making the radishes taste like they are auditioning for a cleaning product commercial. Use vinegar labeled 5% acidity when possible, especially if you want consistent pickling strength.
Step-by-Step Instructions
- Wash the radishes well. Trim off the greens and root ends. Save the greens for sautéing if they look fresh, or compost them if they look like they have seen too much.
- Slice thinly. Use a sharp knife or mandoline to cut the radishes into thin rounds, about 1/8 inch thick. Thin slices pickle faster and develop better flavor within 24 hours.
- Pack the jar. Place the sliced radishes into a clean pint-size glass jar. Add garlic, peppercorns, mustard seeds, red pepper flakes, and dill if using.
- Make the brine. In a small saucepan, combine vinegar, water, salt, and sugar. Warm over medium heat, stirring until the salt and sugar dissolve. The brine does not need to boil hard; it only needs to be hot enough to dissolve everything.
- Pour and cover. Carefully pour the hot brine over the radishes, making sure the slices are fully submerged. Tap the jar gently on the counter to release air bubbles.
- Cool briefly. Let the jar sit at room temperature until it is no longer steaming, about 20 to 30 minutes.
- Refrigerate. Seal the jar and place it in the refrigerator for at least 24 hours. The radishes can be tasted after a few hours, but the overnight rest gives the best flavor.
- Serve cold. Use clean utensils to remove radishes from the brine and keep the remaining pickles refrigerated.
How the 24-Hour Pickling Process Works
Quick pickling works through acid, salt, time, and temperature. The vinegar brings acidity, which gives refrigerator pickles their signature tang. Salt draws some moisture from the radishes and seasons them throughout. Sugar balances the vinegar and softens the radishes’ natural peppery edge. Cold storage slows spoilage and helps the pickles stay crisp.
The 24-hour mark is the sweet spot for this recipe. After a few hours, the radishes are lightly pickled and still very peppery. After a full day, the slices taste brighter, more rounded, and more integrated. After two or three days, the flavor becomes even more mellow and the brine turns a deeper shade of pink. In other words, day one is delicious, day two is excellent, and day three may cause you to start putting pickled radishes on breakfast.
Tips for the Best Crunchy Pickled Radishes
Choose Fresh, Firm Radishes
The better the radish, the better the pickle. Look for radishes that feel firm and heavy for their size, with smooth skin and no soft spots. If the greens are still attached, they should look lively rather than wilted. Tired radishes can still be pickled, but they will not have the same clean crunch.
Slice Evenly
Even slices pickle evenly. A mandoline makes quick work of the job, but a sharp knife is perfectly fine. Just try to keep the pieces similar in thickness. Paper-thin slices become tender quickly, while thicker slices keep more bite and may need extra time.
Keep the Radishes Submerged
Radish slices should stay under the brine. If a few float to the top, press them down with a clean spoon before sealing the jar. For larger batches, a small fermentation weight can help, but for a simple pint jar, tightly packing the slices usually does the trick.
Do Not Skip the Salt
Salt is not just there for flavor. It helps draw moisture from the radishes and creates a more seasoned, satisfying pickle. Kosher salt or pickling salt works best because it dissolves cleanly. Table salt can be used in a pinch, but it may contain additives that slightly cloud the brine.
Flavor Variations for Refrigerator-Pickled Radishes
Once you understand the basic brine, you can customize this refrigerator pickles recipe to match your meals. Radishes are surprisingly flexible, and they play well with spicy, sweet, herbal, and citrusy flavors.
Spicy Pickled Radishes
Add 1/2 teaspoon red pepper flakes, 1 sliced jalapeño, or a small dried chile to the jar. This version is excellent on tacos, nachos, grilled chicken, pulled pork, and rice bowls. The heat builds as the radishes sit, so start small unless your taste buds enjoy adventure sports.
Garlic-Dill Pickled Radishes
Add one smashed garlic clove and a sprig of fresh dill. This gives the radishes a deli-pickle personality and makes them especially good on sandwiches, burgers, and potato salad. Use only one small garlic clove for a pint jar; raw garlic can become strong quickly.
Sweet and Mild Pickled Radishes
Use rice vinegar and increase the sugar to 2 tablespoons. This creates a gentler pickle that pairs beautifully with sushi bowls, spring rolls, grain bowls, and grilled fish. It is also a great starter version for people who think vinegar is “too loud.”
Citrus-Pepper Pickled Radishes
Add a strip of lemon or lime zest and extra black peppercorns. This version tastes fresh and lively, especially with avocado toast, roasted vegetables, chicken salads, and seafood tacos.
What to Eat with Pickled Radishes
Pickled radishes are small but mighty. They bring acidity, crunch, color, and contrastthe four horsemen of “why does this homemade lunch suddenly taste restaurant-level?”
- Tacos: Add them to fish tacos, carnitas, chicken tacos, or roasted cauliflower tacos.
- Sandwiches: Layer them into turkey sandwiches, banh mi-style subs, grilled cheese, or veggie wraps.
- Salads: Toss them into green salads, cucumber salads, potato salads, or grain salads.
- Rice bowls: Pair with rice, avocado, edamame, grilled meat, tofu, or a fried egg.
- Charcuterie boards: Serve beside cheese, crackers, olives, nuts, and cured meats.
- Breakfast: Add to avocado toast, egg sandwiches, or savory oatmeal.
- Burgers: Use them anywhere you would use pickles or raw onions.
Storage and Food Safety Tips
Store refrigerator-pickled radishes in a covered glass jar in the refrigerator. For the best crunch and flavor, enjoy them within 2 weeks. Always use a clean fork or spoon to remove pickles from the jar, and keep the radishes submerged in brine between servings.
Discard the pickled radishes if you notice mold, a bad smell, unusual sliminess, bubbling that was not present before, or a dramatically cloudy brine paired with off odors. A little color change is normal; red radishes often fade slightly as the brine turns pink. But if the jar smells suspicious, do not hold a committee meeting with your stomach. Throw it out.
Common Mistakes to Avoid
Using Too Little Vinegar
A weak brine can make the pickles taste flat and shorten their quality window. Equal parts vinegar and water create a reliable tang for refrigerator pickles. If you prefer a sharper flavor, use more vinegar than water.
Cutting the Radishes Too Thick
Thicker slices can be delicious, but they may not taste fully pickled after 24 hours. For a true quick 24-hour recipe, thin slices are best. If you like chunky radish halves, give them at least 48 hours.
Overloading the Jar with Garlic
Garlic is wonderful, but raw garlic in vinegar can become assertive. One small clove is enough for a pint jar. Three cloves may cause your pickled radishes to introduce themselves before you do.
Expecting Shelf-Stable Pickles
This recipe is quick, fresh, and refrigerated. It is not designed for pantry storage. Keep the jar cold from the moment it has cooled and been sealed.
Experience Notes: What Making 24-Hour Pickled Radishes Teaches You
The first thing you learn when making refrigerator-pickled radishes is that the recipe looks almost too easy. You slice vegetables, heat vinegar with salt and sugar, pour everything into a jar, and then stand there wondering if you accidentally skipped the hard part. You did not. The magic is mostly patience, which is annoying because patience is not available for delivery.
After making several batches, one of the biggest lessons is that radish thickness changes everything. Paper-thin slices turn delicate and tangy fast. They are perfect for tacos, sandwiches, and salads because they fold easily into every bite. Slightly thicker slices keep more crunch and peppery attitude. They are better for snack boards or bowls where you want a pickle that announces itself. Neither style is wrong, but the best 24-hour result usually comes from slices thin enough to bend but thick enough to snap.
The second lesson is that vinegar choice matters more than expected. White vinegar makes a clean, classic pickle. Apple cider vinegar adds warmth and a little fruitiness. Rice vinegar creates a softer pickle that tastes friendly and mild. White wine vinegar gives the jar a slightly fancy personality, as if the radishes have suddenly started saying “hors d’oeuvres.” If you are new to pickling, start with white vinegar or apple cider vinegar. Once you know what you like, experiment.
The third lesson is that sugar is not the enemy of savory pickles. A tablespoon or two does not make dessert radishes; it simply rounds out the sharpness of the vinegar. Without sugar, the brine can taste a bit severe. With too much sugar, the radishes can become candy-adjacent, which is a confusing place for a root vegetable to be. The sweet spot is usually one tablespoon for a bold pickle or two tablespoons for a mellow one.
Another useful experience: pickled radishes are meal-prep heroes. A jar in the fridge makes leftovers feel intentional. Plain rice and eggs? Add pickled radishes. Sad sandwich? Add pickled radishes. Salad that tastes like responsibility? Add pickled radishes. Their acidity cuts through rich foods, their color brightens beige plates, and their crunch makes soft foods more interesting. They are the kitchen equivalent of adding a good punchline at the right moment.
You also learn not to overcomplicate the spices. It is tempting to add garlic, dill, coriander, mustard seeds, peppercorns, chile flakes, bay leaf, ginger, and maybe a small handwritten poem. Resist. Radishes have a clean, peppery flavor that can get crowded. A simple brine with one or two seasonings often tastes better than a jar that has been treated like a spice cabinet emergency.
Finally, the best experience-based tip is to make pickled radishes before you think you need them. They are good after 24 hours, better after 48, and extremely convenient when dinner is happening faster than your imagination. Keep one jar in the refrigerator, and you will start finding excuses to use it. That is when you know the recipe has earned a permanent spot in your kitchen rotation.
Conclusion
This quick 24-hour recipe for refrigerator-pickled radishes is simple, colorful, practical, and wildly useful. With fresh radishes, a vinegar brine, a clean jar, and one night in the refrigerator, you get a crisp homemade condiment that adds brightness to everyday meals. It is not a complicated preservation project, and it does not require canning equipment. It is just smart, fast cooking: take a vegetable with natural crunch, give it acid and seasoning, and let time do the rest.
Whether you spoon these quick pickled radishes onto tacos, tuck them into sandwiches, scatter them over salads, or eat them straight from the jar while pretending you are “checking the flavor,” they bring instant energy to the plate. Make one batch, then adjust the vinegar, sweetness, spices, and slice thickness until the recipe tastes like your house pickle. That is the beauty of refrigerator pickles: low effort, high reward, and absolutely no need to apologize for the pink brine taking over your fridge door.


